前言
由于在实际项目中,业务功能的增加导致软件开发规模在逐渐变大,所以我准备找个Silverlight框架来组织当前项目中的文件,以期能够让后续的业务功能增添和维护更加容易一些。无意中,我在这篇文章中看到了当前Silverlight下所有的框架的评测:Discover and compare existing MVVM frameworks !,当我看到MvvmLight toolkit在各方面都比较完备的时候,于是决定选择这个框架:
在Codeplex网站上,下载了MVVM Light Toolkit V4 RTM这个版本,因为我用的是vs2010,所以我下载了支持当前机器IDE的版本。
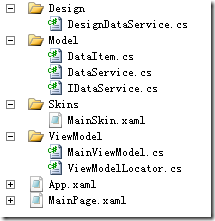
新建项目,选择MvvmLight(SL4),之后我们就可以看到项目结构了:
其中:
Design文件夹中的文件主要提供设计时运行支持
Model文件夹则放置了富实体模型
Skins文件夹则放置了样式文件定义
ViewModel文件夹则放置了ViewModel对象,其实MainViewModel和MainPage是一对一的(ViewMoel-View)关系.二者的映射通过ViewModelLocator进行。
MainPage.xaml就是我们的视图页面
下面我们就以例子来演示MvvmLight Toolkit中是如何实现MVVM模式,如何绑定命令,如何进行事件消息传递的。
首先,在这个框架中,MVVM模式的入口点为ViewModelLocator类,在这个类中,可以定义多个ViewModel属性,并且每个属性都可以通过ServiceLocator.Current.GetInstance方法进行映射,以便于暴露给前台绑定。同时,在新增一个ViewModel类的时候,一定要在其提供的SimpleIoc对象容器中进行注册,以便于能够通过IOC的方式获取其实例。
做完映射后,就是我们的ViewModel对象了。它需要继承自ViewModelBase类,这个类封装了ICommand,INotifypropertyChanged等接口,使用起来很方便。比如可以用RaisePropertyChanged直接来抛出变更通知。
之后就是View了,在View中,我们需要先对DataContext进行绑定:
DataContext="{Binding Main, Source={StaticResource Locator}}"
然后就可以随心所欲的操作了。
然后,我们来讲解下绑定命令。
由于命令绑定是应用程序中必不可少的环节,所以这里我以 绑定无参事件,绑定一个参数事件,绑定多个参数事件来说明。
绑定无参事件:
  #region Command without parameters
        private RelayCommand showText;
        public RelayCommand ShowText
        {
            get
            {
                if (showText == null)
                    showText = new RelayCommand(ShowTextFunc);
                return showText;
            }
        }
        public RelayCommand PassEvent { get; set; }

        private void ShowTextFunc()
        {
            MessageBox.Show("I am RealyCommand!");
        }
        #endregion
上面代码就是绑定无参事件,在View上可以通过如下方式绑定:
 <Button Content="绑定无参事件"
 		 Command="{Binding ShowText}"
		 Height="23"
		 HorizontalAlignment="Left"
		 Margin="32,62,0,0"
		 Name="button1"
		 VerticalAlignment="Top"
		 Width="141" />
绑定一个参数事件:
 #region Command with a parameter
        private RelayCommand<int> showValue;
        public RelayCommand<int> ShowValue
        {
            get
            {
                if (showValue == null)
                    showValue = new RelayCommand<int>(x=>ShowValueFunc(x));
                return showValue;
            }
        }

        private int ShowValueFunc(int a)
        {
            int c = a + 10;
            MessageBox.Show(c.ToString());
            return c;
        }
        #endregion
上面的代码部分就是绑定一个参数的事件定义,我们来驱动view层:
<Button Content="绑定一个参数事件"
        Command="{Binding ShowValue}"
		CommandParameter="{Binding ElementName=textBox1,Path=Text,Converter={StaticResource IntConverter}}"
		Height="23"
		HorizontalAlignment="Left"
		Margin="32,103,0,0"
		Name="button2"
		VerticalAlignment="Top"
		Width="141" />
需要说明的是,上面代码示例中,CommandParameter的值来自于textBox1的Text属性中。这个值加上10以后返回。
如果遇到用户输入不是数字的情况,则通过IntConverter方法将用户输入格式化,然后返回:
public class IntConverter:IValueConverter
    {

        public object Convert(object value, Type targetType, object parameter, System.Globalization.CultureInfo culture)
        {
            int result;
            if(Int32.TryParse(value.ToString(),out result))
            {
                return result;
            }
            return "0";
        }

        public object ConvertBack(object value, Type targetType, object parameter, System.Globalization.CultureInfo culture)
        {
            throw new NotImplementedException();
        }
    }
绑定多个参数事件:
由于RelayCommand默认最多允许一个参数传递,所以这里如果想传递多个数据对象,只能够去构建自己的DTO了。
在Model文件夹新建一个BookItem类:
public class BookItem
    {
        public string BName { get; set; }
        public string BAuthor { get; set; }
    }
然后在ViewModel中进行如下控制:
 #region Command with multiple parameters
        private RelayCommand<BookItem> showBooks;
        public RelayCommand<BookItem> ShowBooks
        {
            get
            {
                if (showBooks == null)
                    showBooks = new RelayCommand<BookItem>(x=>ShowBooksFunc(x));
                return showBooks;
            }
        }

        private void ShowBooksFunc(BookItem bookItem)
        {
            MessageBox.Show(bookItem.BName+"|"+bookItem.BAuthor);
        }
        #endregion
驱动View层:
 <Button Command="{Binding ShowBooks}"
         Content="绑定多个参数事件"
		 Height="23"
		 HorizontalAlignment="Left"
		 Margin="32,141,0,0"
		 Name="button3"
		 VerticalAlignment="Top"
		 Width="141" >
            <Button.CommandParameter>
                <model:BookItem BName="testName" BAuthor="TestAuthor" ></model:BookItem>
            </Button.CommandParameter>
 </Button>
运行起来得时候,我们发现BookItem参数已经被自动赋值了。
ViewModel之间事件传递
最后需要讲解的是如何在ViewModel之间进行事件传递。由于在MVVMLight Toolkit中已经集成了Messenger对象,所以我们可以利用其很方便的进行事件传递,下面新建一个ChildWindow1.xaml子窗体,然后在ViewModelLocator中添加如下代码:
 public ChildViewModel Child
        {
            get
            {
                return ServiceLocator.Current.GetInstance<ChildViewModel>();
            }
        }
SimpleIoc.Default.Register<ChildViewModel>();
然后在ViewModel文件夹中新建一个ChildViewModel类,在其中添加如下代码:
 public class ChildViewModel:ViewModelBase
    {
        public ChildViewModel()
        {
            Messenger.Default.Register<BookItem>(this, message =>
            {
                MyText = message.BName + "|" + message.BAuthor;
            });
        }
        public string MyText { get; set; }
    }
由于我们传递的对象是从 MainViewModel到ChildViewModel,所以我们在MainViewModel中添加如下发送代码:
 #region Messenger communication cross page
        private RelayCommand showChildWindow;
        public RelayCommand ShowChildWindow
        {
            get
            {
                if (showChildWindow == null)
                    showChildWindow = new RelayCommand(ShowChildWindowFunc);
                return showChildWindow;
            }
        }

        private void ShowChildWindowFunc()
        {
            ChildWindow1 child = new ChildWindow1();
            child.Show();
            var bookItem = new BookItem() { BAuthor="TestAuthor",BName="TestName" };
            Messenger.Default.Send<BookItem>(bookItem);
        }
        #endregion
这样当运行起来的时候,我们就能看到效果了:
好了,暂时就到这里,后面我们再深入挖掘。


