在Linux驱动中使用输入子系统
参考:
- https://www.cnblogs.com/lifexy/p/7553861.html
- https://www.cnblogs.com/linux-37ge/articles/10212377.html
介绍
什么是input输入子系统?
Linux系统支持的输入设备繁多,例如键盘、鼠标、触摸屏、手柄或者是一些输入设备像体感输入等等,Linux系统是如何管理如此之多的不同类型、不同原理、不同的输入信息的输入设备的呢?其实就是通过input输入子系统这套软件体系来完成的。
从整体上来说,input输入子系统分为3层:上层(输入事件驱动层)、中层(输入核心层)、下层(输入设备驱动层),如下图所示:
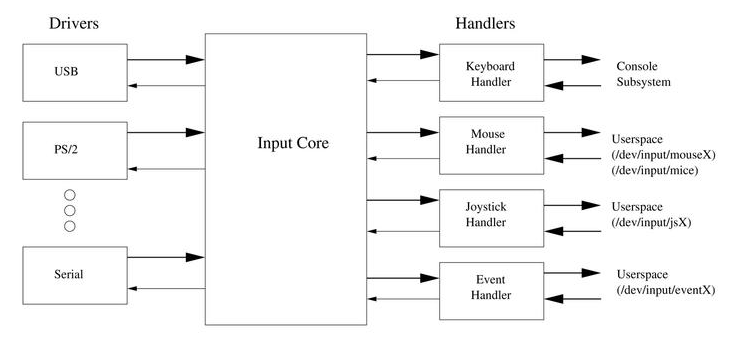
图中Drivers对应的就是下层设备驱动层,对应各种各样不同的输入设备,Input Core对应的就是中层核心层,Handlers对应的就是上层输入事件驱动层,最右边的代表的是用户空间
上层中的各个handler(Keyboard/Mouse/Joystick/Event)是属于平行关系。由于历史原因,一种设备可能连接到多个handler层中,由于event是后出的。所有event实现大一统,所有输入设备都可以连接到event handler中
官方查看文档
- 文档1:kernelDocumentationinputinput.txt
- 文档2:kernelDocumentationinputinput-programming.txt
原型
input_dev驱动设备结构体中常用成员如下:
路径:include/linux/input.h
struct input_dev {

    void *private;          //输入设备私有指针,一般指向用于描述设备驱动层的设备结构
    const char *name;  // 提供给用户的输入设备的名称
    const char *phys;  // 提供给编程者的设备节点的名称  文件路径,比如 input/buttons
    const char *uniq;  // 指定唯一的ID号,就像MAC地址一样
    struct input_id id;//输入设备标识ID,用于和事件处理层进行匹配

    unsigned long evbit[NBITS(EV_MAX)];      //位图,记录设备支持的事件类型(可以多选)
    /*
         *  #define EV_SYN          0x00    //同步事件
         *  #define EV_KEY          0x01    //按键事件
         *  #define EV_REL          0x02    //相对坐标
         *  #define EV_ABS          0x03    //绝对坐标
         *  #define EV_MSC          0x04    //其它
         *  #define EV_SW           0x05    //开关事件
         *  #define EV_LED          0x11    //LED事件
         *  #define EV_SND          0x12
         *  #define EV_REP          0x14<span style="white-space:pre">    </span>//重复上报
         *  #define EV_FF           0x15
         *  #define EV_PWR          0x16
         *  #define EV_FF_STATUS    0x17
         *  #define EV_MAX          0x1f
         */

    unsigned long keybit[NBITS(KEY_MAX)];    //位图,记录设备支持的按键类型
    unsigned long relbit[NBITS(REL_MAX)];    //位图,记录设备支持的相对坐标
    unsigned long absbit[NBITS(ABS_MAX)];    //位图,记录设备支持的绝对坐标
    unsigned long mscbit[NBITS(MSC_MAX)];    //位图,记录设备支持的其他功能
    unsigned long ledbit[NBITS(LED_MAX)];    //位图,记录设备支持的指示灯
    unsigned long sndbit[NBITS(SND_MAX)];    //位图,记录设备支持的声音或警报
    unsigned long ffbit[NBITS(FF_MAX)];      //位图,记录设备支持的作用力功能
    unsigned long swbit[NBITS(SW_MAX)];      //位图,记录设备支持的开关功能

    unsigned int keycodemax;                //设备支持的最大按键值个数
    unsigned int keycodesize;               //每个按键的字节大小
    void *keycode;                          //指向按键池,即指向按键值数组首地址
    int (*setkeycode)(struct input_dev *dev, int scancode, int keycode);        //修改按键值
    int (*getkeycode)(struct input_dev *dev, int scancode, int *keycode);       //获取按键值

    struct ff_device *ff;

    unsigned int repeat_key;                //支持重复按键
    struct timer_list timer;                //设置当有连击时的延时定时器

    int state;

    int sync;       //同步事件完成标识,为1说明事件同步完成

    int abs[ABS_MAX + 1];                //记录坐标的值
    int rep[REP_MAX + 1];                //记录重复按键的参数值

    unsigned long key[NBITS(KEY_MAX)];   //位图,按键的状态
    unsigned long led[NBITS(LED_MAX)];   //位图,led的状态
    unsigned long snd[NBITS(SND_MAX)];   //位图,声音的状态
    unsigned long sw[NBITS(SW_MAX)];     //位图,开关的状态

    int absmax[ABS_MAX + 1];             //位图,记录坐标的最大值
    int absmin[ABS_MAX + 1];             //位图,记录坐标的最小值
    int absfuzz[ABS_MAX + 1];            //位图,记录坐标的分辨率
    int absflat[ABS_MAX + 1];            //位图,记录坐标的基准值

    int (*open)(struct input_dev *dev);                         //输入设备打开函数
    void (*close)(struct input_dev *dev);                       //输入设备关闭函数
    int (*flush)(struct input_dev *dev, struct file *file);     //输入设备断开后刷新函数
    int (*event)(struct input_dev *dev, unsigned int type, unsigned int code, int value);        //事件处理

    struct input_handle *grab;

    struct mutex mutex;                     //用于open、close函数的连续访问互斥
    unsigned int users;

    struct class_device cdev;               //输入设备的类信息
    union {                                 //设备结构体
        struct device *parent;
    } dev;

    struct list_head        h_list;         //handle链表
    struct list_head        node;           //input_dev链表
};
接口函数
申请/释放
struct input_dev *input_allocate_device(void);
void input_free_device(struct input_dev *dev);
描述:向内核中申请/释放一个input_dev设备。
注册/注销
int __must_check input_register_device(struct input_dev *);
void input_unregister_device(struct input_dev *dev); //卸载/sys/class/input目录下的input_dev这个类设备,
描述:input_register_device()函数是输入子系统核心(input core)提供的函数。该函数将input_dev结构体注册到输入子系统核心中,
参数解析:dev结构体必须由前面讲的input_allocate_device()函数来分配。
返回值:input_register_device()函数如果注册失败,必须调用input_free_device()函数释放分配的空间。
如果该函数注册成功,在卸载函数中应该调用input_unregister_device()函数来注销输入设备结构体。
设备特性支持
让设备能够支持某些输入功能。
void input_set_capability(struct input_dev *dev, unsigned int type, unsigned int code);
描述:设置输入设备可以上报哪些输入事件。
注意:input_set_capability函数一次只能设置一个具体事件,如果设备可以上报多个事件,则需要重复调用这个函数来进行设置。
参数解析:
-
dev就是设备的input_dev结构体变量
-
type表示设备可以上报的事件类型
-
code表示上报这类事件中的那个事件
上报事件
void input_event(struct input_dev *dev, unsigned int type, unsigned int code, int value);  //上报事件
 // input_dev *dev :要上报哪个input_dev驱动设备的事件
 // type : 要上报哪类事件, 比如按键事件,则填入: EV_KEY
 // code: 对应的事件里支持的哪个变量,比如按下按键L则填入: KEY_L
 //value:对应的变量里的数值,比如松开按键则填入1,松开按键则填入0
input_sync(struct input_dev *dev); //同步事件通知
为什么使用了input_event()上报事件函数,就要使用这个函数?
因为input_event()函数只是个事件函数,所以需要这个input_sync()同步事件函数来通知系统,然后系统才会知道
input_sync()代码如下:
static inline void input_sync(struct input_dev *dev)
{
    input_event(dev, EV_SYN, SYN_REPORT, 0); //就是上报同步事件,告诉内核:input_event()事件执行完毕
}
重复事件机制
事件默认是不会重复上报的:
如果第一次报告了 input_event(input, type, button->code, 1); 第二次又报告了 input_event(input, type, button->code, 1); 。
那么第二次是报告不上的,也就是说 只有键值变化了报告才有效。
这也是按键驱动为什么都是双边延触发,就是为了产生按键按下 和 按键抬起 ,如果每次只报告一次按键按下,那么 驱动只会报告一次按键。
如何让事件重复上报,工作机制是怎么样的?
如果 设置了 __set_bit(EV_REP, input->evbit); 也就是重复报告,它的工作机制是这样的:
如果按键报告了input_event(input, type, button->code, 1); 之后,
在250ms (可以改)后,依然没有报告 input_event(input, type, button->code, 0);
则 input 会每隔 33ms 继续报告一次 input_event(input, type, button->code, 2);
直到 报告了 input_event(input, type, button->code, 0); 才停止 ,
这就是我们按住一个按键不松开时,会一直打印键值的原因;
这段代码在 drivers/input/input.c 中,这个机制是通过定时器dev->timer实现的。
/**
 * input_allocate_device - allocate memory for new input device
 *
 * Returns prepared struct input_dev or %NULL.
 *
 * NOTE: Use input_free_device() to free devices that have not been
 * registered; input_unregister_device() should be used for already
 * registered devices.
 */
struct input_dev *input_allocate_device(void)
{
    static atomic_t input_no = ATOMIC_INIT(-1);
    struct input_dev *dev;

    dev = kzalloc(sizeof(struct input_dev), GFP_KERNEL);
    if (dev) {
        dev->dev.type = &input_dev_type;
        dev->dev.class = &input_class;
        device_initialize(&dev->dev);
        mutex_init(&dev->mutex);
        spin_lock_init(&dev->event_lock);
        init_timer(&dev->timer);
        INIT_LIST_HEAD(&dev->h_list);
        INIT_LIST_HEAD(&dev->node);

        dev_set_name(&dev->dev, "input%lu",
                     (unsigned long)atomic_inc_return(&input_no));

        __module_get(THIS_MODULE);
    }

    return dev;
}

int input_register_device(struct input_dev *dev)
{
    // ...

    /*
     * If delay and period are pre-set by the driver, then autorepeating
     * is handled by the driver itself and we don't do it in input.c.
     * 如果我们自己的驱动里自己定义了 dev->rep[REP_DELAY] = 值;
     * 那么就不会使用input 的timer ,而要使用自己编写的timer
    */

    if (!dev->rep[REP_DELAY] && !dev->rep[REP_PERIOD])
        input_enable_softrepeat(dev, 250, 33);

    // ...
}

/**
 * input_enable_softrepeat - enable software autorepeat
 * @dev: input device
 * @delay: repeat delay
 * @period: repeat period
 *
 * Enable software autorepeat on the input device.
 */
void input_enable_softrepeat(struct input_dev *dev, int delay, int period)
{
    dev->timer.data = (unsigned long) dev;
    dev->timer.function = input_repeat_key;
    dev->rep[REP_DELAY] = delay;
    dev->rep[REP_PERIOD] = period;
}
例子:按键键盘驱动
实现键盘驱动,让开发板的4个按键代表键盘中的L、S、空格键、回车键。
源码实现
驱动
流程如下:
- 1)向内核申请input_dev结构体
- 2)设置input_dev的成员
- 3)注册input_dev 驱动设备
- 4)初始化定时器和中断
- 5)写中断服务函数
- 6)写定时器超时函数(用于消抖)
- 7)在出口函数中 释放中断函数,删除定时器,卸载释放驱动
#include <linux/module.h>
#include <linux/version.h>
#include <linux/init.h>
#include <linux/fs.h>
#include <linux/interrupt.h>
#include <linux/irq.h>
#include <linux/sched.h>
#include <linux/pm.h>
#include <linux/sysctl.h>
#include <linux/proc_fs.h>
#include <linux/delay.h>
#include <linux/platform_device.h>
#include <linux/input.h>
#include <linux/irq.h>
#include <linux/gpio_keys.h>
#include <asm/gpio.h>


struct input_dev *buttons_dev;            //  定义一个input_dev结构体
static struct ping_desc *buttons_id;          //保存dev_id,在定时器中用
static struct timer_list buttons_timer;    //定时器结构体

struct  ping_desc{

    unsigned  char  *name;          //中断设备名称
    int            pin_irq;          //按键的外部中断标志位
    unsigned  int    pin;                //引脚
    unsigned int  irq_ctl;           //触发中断状态:   IRQ_TYPE_EDGE_BOTH
    unsigned  int    button;         //dev_id,对应键盘的 L ,  S,  空格,  enter
};

// KEY1 -> L
// KEY2 -> S
// KEY3 -> 空格
// KEY4 -> enter
static  struct ping_desc   buttons_desc[5]=
{
    {"s1", IRQ_EINT0,   S3C2410_GPF0,  IRQ_TYPE_EDGE_BOTH,KEY_L},
    {"s2", IRQ_EINT2,   S3C2410_GPF2,  IRQ_TYPE_EDGE_BOTH,KEY_S},
    {"s3", IRQ_EINT11, S3C2410_GPG3 , IRQ_TYPE_EDGE_BOTH,KEY_SPACE},
    {"s4", IRQ_EINT19, S3C2410_GPG11,IRQ_TYPE_EDGE_BOTH,KEY_ENTER},
};

/*5. 写中断服务函数*/
static irqreturn_t  buttons_irq (int irq, void *dev_id)       //中断服务函数
{
    buttons_id=(struct ping_desc *)dev_id;             //保存当前的dev_id
    mod_timer(&buttons_timer, jiffies+HZ/100 );   //更新定时器值 10ms
    return 0;
}

/*6.写定时器超时函数*/
void buttons_timer_function(unsigned long i)
{
    int val;
    val=s3c2410_gpio_getpin(buttons_id->pin);             //获取是什么电平
    if(!!val)         //高电平,松开
    {
        /*上报事件*/
        input_event(buttons_dev,EV_KEY,buttons_id->button, 0);  //上报EV_KEY类型,button按键,0(没按下)
        input_sync(buttons_dev);         // 上传同步事件,告诉系统有事件出现
    }

    else      //低电平,按下
    {
        /*上报事件*/
        input_event(buttons_dev, EV_KEY, buttons_id->button, 1);  //上报EV_KEY类型,button按键,1(按下)
        input_sync(buttons_dev);       // 上传同步事件,告诉系统有事件出现
    }
}

#define _SET_BIT_   __set_bit

static int buttons_init(void)   //入口函数
{
    int i;
    /* 1.向内核 申请input_dev结构体 */
    buttons_dev=input_allocate_device();

    /* 2.设置input_dev ,  */
    _SET_BIT_(EV_REP,buttons_dev->evbit);       //支持键盘重复按事件
#if 0 // 下面俩种写法等价。
    _SET_BIT_(EV_KEY,buttons_dev->evbit);       //支持键盘事件

    _SET_BIT_(KEY_L,buttons_dev->keybit);       //支持按键 L
    _SET_BIT_(KEY_S,buttons_dev->keybit);       //支持按键 S
    _SET_BIT_(KEY_SPACE,buttons_dev->keybit);   //支持按键 空格
    _SET_BIT_(KEY_ENTER,buttons_dev->keybit);   //支持按键 enter
#else
    // 支持键盘事件
    input_set_capability(buttons_dev, EV_KEY, KEY_L);     //支持按键 L
    input_set_capability(buttons_dev, EV_KEY, KEY_S);     //支持按键 S
    input_set_capability(buttons_dev, EV_KEY, KEY_SPACE); //支持按键 空格
    input_set_capability(buttons_dev, EV_KEY, KEY_ENTER); //支持按键 enter
#endif

    /* 3.注册input_dev */
    input_register_device(buttons_dev);


    /* 4. 初始化硬件:初始化定时器和中断*/
    // KEY1 -> L
    // KEY2 -> S
    // KEY3 -> 空格
    // KEY4 -> enter
    init_timer(&buttons_timer);
    buttons_timer.function=buttons_timer_function;
    add_timer(&buttons_timer);

    for(i=0;i<4;i++)
        request_irq(buttons_desc[i].pin_irq, buttons_irq, buttons_desc[i].irq_ctl, buttons_desc[i].name, &buttons_desc[i]);

    return 0;
}

static int buttons_exit(void)  //出口函数
{
    /* 7.释放中断函数,删除定时器,卸载释放驱动 */
    int i;
    for(i=0;i<4;i++)
        free_irq(buttons_desc[i].pin_irq,&buttons_desc[i]);    //释放中断函数

    del_timer(&buttons_timer);   //删除定时器

    input_unregister_device(buttons_dev);     //卸载类下的驱动设备
    input_free_device(buttons_dev);                //释放驱动结构体
    return 0;
}

module_init(buttons_init);
module_exit(buttons_exit);
MODULE_LICENSE("GPL v2");
应用程序
/*******************************************************************
 *                   linux 读取input输入设备demo
 * 说明:
 *     本文主要是解读以前同事写的input设备的一个demo程序。
 *
 *                                2016-3-24 深圳 南山平山村 曾剑锋
 ******************************************************************/
#include <stdio.h>
#include <unistd.h>
#include <sys/types.h>
#include <fcntl.h>
#include <linux/input.h>

int main(int argc, char **argv)
{
    int fd;
    struct input_event ev;

    // 判断参数
    if (argc < 2) {
        printf("Usage: %s <input device>
", argv[0]);
        return 0;
    }

    // 打开设备
    fd = open(argv[1], O_RDWR);
    if (fd < 0) {
        printf("open %s", argv[1]);
        fflush(stdout);
        perror(" ");
        return 0;
    }

    // 循环读取
    while(1) {
        // 读取数据
        read(fd, &ev, sizeof(struct input_event));
        // 打印当前触发类型
        printf("ev ==  %x
",ev.type );
        switch(ev.type) {
        case EV_SYN:
            printf("-------------------------
");
            break;

        // 按键
        case EV_KEY:
            printf("key down / up: %d
",ev.code );
            break;

        // 鼠标
        case EV_REL:
            printf("mouse: ");
            if (ev.code == REL_X) {
                printf(" x -- %d
", ev.value);
            } else if (ev.code == REL_Y) {
                printf(" y -- %d
", ev.value);
            }
            break;

        // 触摸屏
        case EV_ABS:
            printf("ts: ");
            if(ev.code == ABS_X) {
                printf(" x -- %d
", ev.value);
            } else if (ev.code == ABS_Y) {
                printf(" y -- %d
", ev.value);
            } else if (ev.code == ABS_PRESSURE) {
                printf(" pressure: %d
", ev.value);
            }
            break;
        }
    }
    close(fd);

    return 0;
}
测试运行
挂载键盘驱动后, 如下图,可以通过 ls -l /dev/event* 命令查看已挂载的设备节点:

输入子系统的主设备号为13,其中event驱动本身的此设备号是从64开始的,如上图。
测试运行有4种方法:
exec命令详解入口地址: http://www.cnblogs.com/lifexy/p/7553228.html)
- 方法1:
cat /dev/tty1 #tty1:LCD终端,就会通过tty_io.c来访问键盘驱动,然后打印在tty1终端上
- 方法2:
exec 0</dev/tty1 #将/dev/tty1挂载到-sh进程描述符0下,此时的键盘驱动就会直接打印在tty1终端上
- 方法3:
hexdump /dev/event1
hexdump命令调试代码详解地址:http://www.cnblogs.com/lifexy/p/7553550.html)
- 方法4:执行应用程序
参考上面的例程。