版权声明:本文为博主原创文章,转载 请注明出处:https://blog.csdn.net/sc2079/article/details/90454379
- 写在前面
本科毕业设计终于告一段落了。特写博客记录做毕业设计(路面裂纹识别)期间的踩过的坑和收获。希望对你有用。
目前有:
1.Tensorflow&CNN:裂纹分类
2.Tensorflow&CNN:验证集预测与模型评价
3.PyQt5多个GUI界面设计
本篇讲GUI界面的设计。设计目标:实现用户对路面裂纹快速检测与识别,有三个界面:主界面、裂纹快速识别界面、图像处理测试界面。
- 环境配置安装
运行环境:Python3.6、Spyder、Qt Designer
依赖的模块:PyQt5、mysql等
值得注意的是:我安装PyQt5模块时,按照网上方法,如下:
pip install PyQt5
pip install PyQt5-tools
却发现找到Qt Designer的应用程序,(其实是有的,在C盘的某个角落,可以用everything小工具可以找到)。
于是乎,我就直接使用了PyQt5运行环境合集,内含Qt Designer(主要用来设计界面以及UI文件转换成PY)。
下载地址如下:
- 开始工作
1. 界面设计
打开Qt Designer:
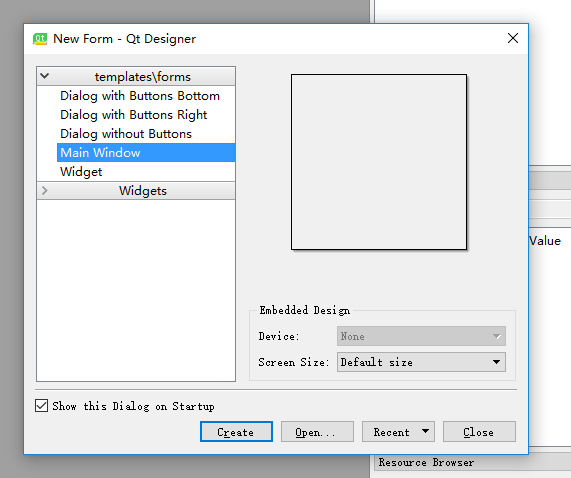
可以参照网上或书籍上关于Qt Designer的资料,简单设计三个界面,如下:
Qt Designer设计的文件后缀为.ui,需要将其转换为.py文件。打开刚才下载的PyQt5合集中的WinPython Command Prompt,输入:
pyuic5 -o D:WinPyQt5.9-32bit-3.5.3.1 estXX.py D:WinPyQt5.9-32bit-3.5.3.1 estXX.ui
即可得到界面的Python文件。
2. 界面功能实现
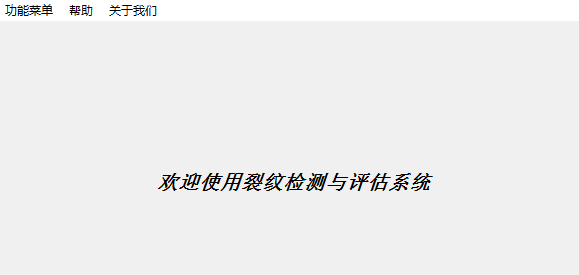
2.1 主界面
主界面功能比较简单,主要是用户对功能的选择以及对该系统的了解。
from PyQt5.QtWidgets import QMainWindow,QMessageBox,QApplication
from main_gui import Ui_MainWindow
import sys
import time
from PyQt5.QtGui import QPixmap

class MainWindow(QMainWindow):
    def __init__(self,parent = None):
        super(MainWindow,self).__init__(parent=parent)#调用父类的init
        global ui
        ui = Ui_MainWindow()
        ui.setupUi(self)

    def about_us(self):
        msgBox = QMessageBox(QMessageBox.NoIcon, '关于','XX的本科毕业设计')
        msgBox.setIconPixmap(QPixmap(".//icon//me3.jpg"))
        msgBox.exec()
    def function_exp(self):
        msgBox = QMessageBox(QMessageBox.NoIcon, '功能说明','')
        msgBox.exec()
    def operate_exp(self):
        msgBox = QMessageBox(QMessageBox.NoIcon, '操作说明','')
        msgBox.exec()

    def jump_to_1(self):
        pass

    def jump_to_2(self):
        pass

    def closeEvent(self, event):
        reply = QMessageBox.question(self, '提醒',
            "确定退出?", QMessageBox.Yes |
            QMessageBox.No, QMessageBox.No)

        if reply == QMessageBox.Yes:
            event.accept()
        else:
            event.ignore()
if __name__ == '__main__':
    app = 0
    app = QApplication(sys.argv)
    myMainWindow = MainWindow()#自定义的类例化
    myMainWindow.show()
    time.sleep(10)
    sys.exit(app.exec_())
而对于转换的主界面的py代码(注意:本文将转换成的.py文件命名为xx_gui.py,而其对应的.py文件命名为xx_win.py),找到如下语句:
        self.retranslateUi(MainWindow)
        QtCore.QMetaObject.connectSlotsByName(MainWindow)
修改为:
        self.retranslateUi(MainWindow)
        self.crack_info.triggered.connect(MainWindow.jump_to_1)
        self.img_processing.triggered.connect(MainWindow.jump_to_2)
        self.function_exp.triggered.connect(MainWindow.function_exp)
        self.operate_exp.triggered.connect(MainWindow.operate_exp)
        self.about_us.triggered.connect(MainWindow.about_us)
        QtCore.QMetaObject.connectSlotsByName(MainWindow)
这样,主界面功能就实现了。
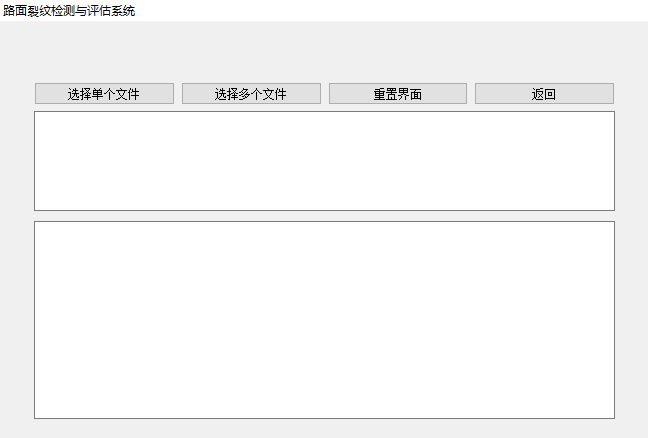
2.2 裂纹快速识别界面
现已经利用CNN以及图像处理技术实现了对裂纹的识别与检测。这里主要是怎么将结果显示在界面上。这里参照了博客使用PyQt5创建带文件对话框和文本对话框的ui窗口程序。
from PyQt5.QtWidgets import (QMainWindow,QApplication,QFileDialog)
from PyQt5 import QtCore
from crack_detect_gui import Ui_MainWindow2
from prediction import prediction
import sys
import threading
import time
from img_processing import img_processing
import numpy as np
from mysql_save import save_mysql

class MainWindow2(QMainWindow):
    _signal=QtCore.pyqtSignal(str)#自定义信号
    def __init__(self,parent = None):
        super(MainWindow2,self).__init__(parent=parent)#调用父类的init
        self.img_opened = False
        self.imgs_opened = False
        global ui
        ui = Ui_MainWindow2()
        ui.setupUi(self)
        self.mainWindow2=ui.MainWindow2
        ui.output_info.clear()
        ui.file_name.clear()
        self._signal.connect(self.print_info)

    def back(self):
        pass

    def reset(self,parent = None):
        pass

    def open_file(self):
        self.img_name = QFileDialog.getOpenFileName(self,"打开","","图片(*.jpg;*.png)")
        ui.file_name.setPlainText(self.img_name[0])
        self.img_opened = True
    def open_files(self):
        self.imgs_name = QFileDialog.getOpenFileNames(self,"打开","","多个图片(*.jpg;*.png)")
        imgs_name=''
        for img_name in self.imgs_name[0]:
            imgs_name=imgs_name+img_name+'
'
        ui.file_name.setPlainText(imgs_name)
        self.imgs_opened = True
    def print_info(self,pri_str):
        ui.output_info.appendPlainText(pri_str)
        ui.output_info.show()


def output_info_thread(myMainWindow):
    t1=time.time()
    Opened = False
    while(True):
        if myMainWindow.img_opened==True:
            imgs_path = myMainWindow.img_name[0].replace("/","//")
            break
        elif myMainWindow.imgs_opened==True:
            imgs_path=[]
            for path in myMainWindow.imgs_name[0]:
                imgs_path.append(path.replace("/","//"))
            break
    Opened = True
    myMainWindow._signal.emit("当前线程:%s" %threading.current_thread().name)
    timeArray = time.localtime(t1)
    now=time.strftime("%Y_%m_%d", timeArray)
    try:
        if(Opened):
            s1 = "正在进行裂纹识别评估"
            myMainWindow._signal.emit(s1)
            kinds=prediction(imgs_path)
            s2='裂纹图片   裂纹类型   裂纹长度    裂纹面积    裂纹最大宽度    裂纹最小宽度   裂纹平均宽度'
            myMainWindow._signal.emit(s2)
            data= np.empty(shape=[0, 8])
            for i in range(len(kinds)):
                if len(kinds)==1:
                    name=imgs_path[::-1].split('//', 1)[0][::-1]
                else:
                    name=imgs_path[i][::-1].split('//', 1)[0][::-1]
                if kinds[i]=='无裂纹':
                    crack_info=[imgs_path[i],kinds[i],'','','','']
                elif len(kinds)==1:
                    crack_info=img_processing(imgs_path,kinds[i])
                else:
                    crack_info=img_processing(imgs_path[i],kinds[i])
                s=name+'   '+crack_info[0]+' '*5+crack_info[1]+' '*7+crack_info[2]+
                ' '*11+crack_info[3]+' '*12+crack_info[4]+' '*12+crack_info[5]
                myMainWindow._signal.emit(s)
                new_crack_info=[name,crack_info[0],crack_info[1],crack_info[2],
                                crack_info[3],crack_info[4],crack_info[5],now]
                data=np.append(data, [new_crack_info], axis = 0)
            t2=time.time()
            database='crack_info'
            try:
                save_mysql(database,data)
                myMainWindow._signal.emit('数据已存入'+database+'数据库中')
            except:
                myMainWindow._signal.emit('数据存储失败,请检查数据库是否打开!')
            time_comsume=round(t2-t1,2)
            myMainWindow._signal.emit('共耗时: '+str(time_comsume)+' s')
            myMainWindow._signal.emit("****************处理完毕****************")
    except BaseException as e1:
        print(e1)
    except EnvironmentError as e2:
        print(e2)
    except (OSError,WindowsError,
            MemoryError,NameError,
            UnboundLocalError,ReferenceError,
            RuntimeError,NotImplementedError,
            UnicodeDecodeError,UnicodeEncodeError,
            UnicodeError,UnicodeTranslateError,
            RuntimeWarning,UserWarning) as e3:
        print(e3)

if __name__ == '__main__':

    app = 0
    if not QApplication.instance():
        app = QApplication(sys.argv)
    else:
        app = QApplication.instance()

    myMainWindow = MainWindow2()#自定义的类例化
    myMainWindow.show()

    t1 = threading.Thread(target = output_info_thread, args = (myMainWindow,))
    t1.start()
    time.sleep(10)
    sys.exit(app.exec_())
同理,将该界面的XX_gui.py修改为:
        self.retranslateUi(MainWindow2)
        self.pushButton.clicked.connect(MainWindow2.open_file)
        self.pushButton_2.clicked.connect(MainWindow2.open_files)
        self.pushButton_3.clicked.connect(MainWindow2.reset)
        self.pushButton_4.clicked.connect(MainWindow2.back)
        QtCore.QMetaObject.connectSlotsByName(MainWindow2)
        self.MainWindow2=MainWindow2
        mainWindow2=self.MainWindow2
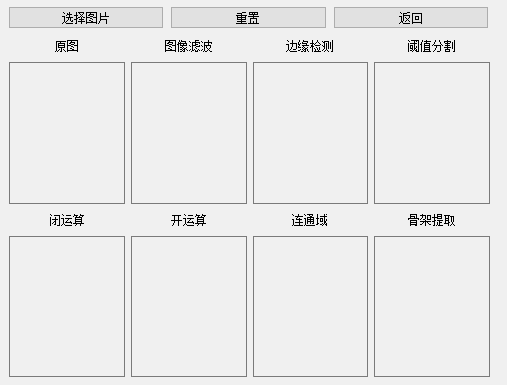
2.3 图像处理测试界面
import sys
from PyQt5 import QtGui
from PyQt5 import QtWidgets
from PyQt5.QtWidgets import QFileDialog,QWidget
#from img_pro_gui_code import Ui_Dialog
from img_pro_gui import Ui_Dialog
from img_processing_plot import img_processing
#from main_win import MainWindow
class Picture(QWidget):
    def __init__(self):
        super(Picture,self).__init__()#调用父类的init
        global ui
        ui = Ui_Dialog()
        ui.setupUi(self)
        self.imgs_data=ui.imgs_data
        self.dialog=ui.dialog
    def reset(self):
        pass
    def back(self):
        pass

    def open_file(self):
        imgName, imgType = QFileDialog.getOpenFileName(self, "打开图片", "", "*.jpg;;*.png;;All Files(*)")
        self.path=imgName
        img_path=self.path.replace("/","//")
        imgs=img_processing(img_path)
        for i in range(len(imgs)):
            jpg = QtGui.QPixmap(imgs[i]).scaled(self.imgs_data[i].width(),
                                self.imgs_data[i].height())
            self.imgs_data[i].setPixmap(jpg)

if __name__ == "__main__":
    app=0
    app = QtWidgets.QApplication(sys.argv)
    my = Picture()
    my.show()
    sys.exit(app.exec_())
值得一提的是,这里的多图片显示功能,我是先将图像处理测试程序中产生的图片保存到本地再使用QPixmap方法导入并显示。
同理,该界面所对应的XX_gui.py文件中改写为:
        self.retranslateUi(Dialog)
        self.choose.clicked.connect(Dialog.open_file)
        self.clear.clicked.connect(Dialog.reset)
        self.back.clicked.connect(Dialog.back)
        QtCore.QMetaObject.connectSlotsByName(Dialog)
        self.imgs_data=[self.img_source,self.img_blur,self.img_canny,self.img_cut,
               self.img_close,self.img_open,self.img_domain,self.img_skeleton]
        imgs_data=self.imgs_data
        self.dialog=Dialog
        dialog=self.dialog
3. 界面跳转与重置
3.1主界面与裂纹快速识别界面
主界面跳转界面1修改为:
    def jump_to_1(self):
        #myMainWindow.hide()   #如果没有这一句,关闭子界面后就会关闭程序
        self.ui_1=MainWindow2()
        self.ui_1.show()
        crack_detect(self.ui_1)
裂纹快速识别界面上返回功能是直接关闭当前界面,重置功能是将界面数据清零并再次启动多线程。
    def back(self):
        self.mainWindow2.close()

    def reset(self,parent = None):
        self.img_opened = False
        self.imgs_opened = False
        ui.output_info.clear()
        ui.file_name.clear()
        t1 = threading.Thread(target = output_info_thread, args = (myMainWindow,))
        t1.start()
3.2主界面与图像处理测试界面
主界面跳转界面2修改为:
    def jump_to_2(self):
        #myMainWindow.hide()   #如果没有这一句,关闭子界面后就会关闭程序
        self.ui_2=Picture()
        self.ui_2.show()
图像处理测试界面上返回功能的实现同上,重置功能是将界面数据清零。
    def reset(self):
        for label in self.imgs_data:
            label.clear()
    def back(self):
        self.dialog.close()
- 结果展示
在命令行运行主界面程序,结果如下(以Gif展示):
- 写在最后
由于时间有限且初次设计GUI界面(经验不足),界面比较丑,请见谅。若有问题,欢迎留言。