文章转载自:https://me.jinchuang.org/archives/114.html ,有修改
步骤总结
1.安装好nginx,假设其html根路径为/usr/share/nginx/html
2.准备工作:关闭防火墙,关闭selinux,安装epel源
3.yum安装依赖包:dh-autoreconf fcgi fcgi-devel
4.源码安装spawn-fcgi和fcgiwrap
(这俩其实也可以直接通过yum方式安装,不过安装后没法通过systemctl的方式启动fcgiwrap,还是得用脚本文件,启动的时候会报错:spawn-fcgi: child exited with: 127,因此还是使用源码安装比较稳妥)
5.配置nginx的location路径
把下载好的linux-shell模板放在nginx的html根路径下,设置用户和用户组为nginx,然后脚本目录文件增加可执行权限,添加location规则
location规则中配置的root是nginx的html根路径,并不是实际程序所在路径,因为执行的时候会在设置root路径也就是nginx的html根路径下查找linux-shell/page/script/(.*)$路径里的文件进行执行。
chown -R nginx:nginx /usr/share/nginx/html/linux-shell
cd /usr/share/nginx/html/linux-shell/page/script/
chmod +x */*
    location ~ ^/linux-shell/page/script/(.*)$ {
        gzip off;
        root /usr/share/nginx/html;
        fastcgi_pass unix:/var/run/fcgiwrap.socket;
        include fastcgi_params;
        fastcgi_param SCRIPT_FILENAME $document_root/$fastcgi_script_name;
    }
路径:/usr/share/nginx/html下有api文件夹,api文件夹下有一个disk的文件
cd `/usr/share/nginx/html/
chown -R nginx:nginx api
chmod a+x api/disk
访问路径是:http://localhost/api/disk,就会在设置的root路径下,也就是/usr/share/nginx/html路径下找api开头的文件夹,进而找到disk文件进行执行
    location ~ ^/api/(.*)$ {
        gzip off;
        default_type  text/plain;
        root /usr/share/nginx/html;
        fastcgi_pass unix:/var/run/fcgiwrap.socket;
        include fastcgi_params;
        fastcgi_param SCRIPT_FILENAME $document_root/$fastcgi_script_name;
    }
如上俩,模板和参数可以合并起来,linux-shell模板可以参考disk里的文件内容写法接收传递过来的参数
使用说明
1,shell命令 | python命令 | 系统支持的都可以
2,不支持交互式显示 | 不支持动态内容显示
3,傻瓜式操作(页面点击链接一次,执行一次脚本内容)|可以设置页面自动刷新,实现重复执行脚本
准备工作
##关闭防火墙
##(centos6)
service iptables stop
chkconfig iptables off
##(centos7)
systemctl stop firewalld
systemctl disable firewalld

#关闭selinux
sed -i 's/SELINUX=enforcing/SELINUX=disabled/' /etc/selinux/config
setenforce 0

#已有epel源的跳过此步骤,直接安装依赖开始
#centos6 添加epel yum源
wget -O /etc/yum.repos.d/epel-6.repo http://mirrors.aliyun.com/repo/epel-6.repo

#centos7 添加epel yum源
wget -O /etc/yum.repos.d/epel-7.repo http://mirrors.aliyun.com/repo/epel-7.repo

#清除缓存 重新生成缓存
yum clean all
yum makecache
安装依赖包
#安装开发包组和相关的依赖包
yum install dh-autoreconf fcgi fcgi-devel -y
安装spawn-fcgi 和 fcgiwrap
#创建存放包的目录(包下载到哪个目录都可以,这里放在/source/目录下)
mkdir /source/ && cd /source/

#安装spawn-fcgi
#github下载最新代码 https://github.com/lighttpd/spawn-fcgi

本地下载:wget https://www.jinchuang.org/novel/lnmp/spawn-fcgi.zip
最新版:wget https://github.com/lighttpd/spawn-fcgi/archive/refs/tags/spawn-fcgi-1.6.4.zip
解压:unzip spawn-fcgi-1.6.4.zip
安装:
cd spawn-fcgi-spawn-fcgi-1.6.4
./autogen.sh
./configure
make && make install

#安装fcgiwrap
#github下载最新代码 https://github.com/gnosek/fcgiwrap

本地下载:wget https://www.jinchuang.org/novel/lnmp/fcgiwrap.zip
最新版: wget https://github.com/gnosek/fcgiwrap/archive/refs/tags/1.1.0.zip
解压: unzip 1.1.0.zip
安装:
cd fcgiwrap-1.1.0
autoreconf -i
./configure
make && make install
创建fcgiwrap启动脚本
【nginx通过转发请求到这里来执行脚本命令】,脚本启动用户要和你nginx启动用户一致,注意下脚本中2个命令的路径是否和你的一致
vim /etc/init.d/fcgiwrap

#! /bin/bash
### BEGIN INIT INFO
# Provides:          fcgiwrap
# Required-Start:    $remote_fs
# Required-Stop:     $remote_fs
# Should-Start:
# Should-Stop:
# Default-Start:     2 3 4 5
# Default-Stop:      0 1 6
# Short-Description: FastCGI wrapper
# Description:       Simple server for running CGI applications over FastCGI
### END INIT INFO

PATH=/usr/local/sbin:/usr/local/bin:/sbin:/bin:/usr/sbin:/usr/bin
SPAWN_FCGI="/usr/local/bin/spawn-fcgi"
DAEMON="/usr/local/sbin/fcgiwrap"
NAME="fcgiwrap"

PIDFILE="/var/run/$NAME.pid"

FCGI_SOCKET="/var/run/$NAME.socket" # 注意:这里跟原文不一样
FCGI_USER="nginx"
FCGI_GROUP="nginx"
FORK_NUM=5
SCRIPTNAME=/etc/init.d/$NAME

case "$1" in
    start)
        echo -n "Starting $NAME... "

        PID=`pidof $NAME`
        if [ ! -z "$PID" ]; then
            echo " $NAME already running"
            exit 1
        fi

        $SPAWN_FCGI -u $FCGI_USER -g $FCGI_GROUP -s $FCGI_SOCKET -P $PIDFILE -F $FORK_NUM -f $DAEMON

        if [ "$?" != 0 ]; then
            echo " failed"
            exit 1
        else
            echo " done"
        fi
    ;;

    stop)
        echo -n "Stoping $NAME... "

        PID=`pidof $NAME`
        if [ ! -z "$PID" ]; then
            kill `pidof $NAME`
            if [ "$?" != 0 ]; then
                echo " failed. re-quit"
                exit 1
            else
                rm -f $pid
                echo " done"
            fi
        else
            echo "$NAME is not running."
            exit 1
        fi
    ;;

    status)
        PID=`pidof $NAME`
        if [ ! -z "$PID" ]; then
            echo "$NAME (pid $PID) is running..."
        else
            echo "$NAME is stopped"
            exit 0
        fi
    ;;

    restart)
        $SCRIPTNAME stop
        sleep 1
        $SCRIPTNAME start
    ;;

    *)
        echo "Usage: $SCRIPTNAME {start|stop|restart|status}"
        exit 1
    ;;
esac
启动fcgiwrap服务
增加可执行权限
chmod +x /etc/init.d/fcgiwrap

#添加到服务里面(centos6系统执行,centos7跳过此步骤)
chkconfig --add fcgiwrap
chkconfig --level 2345 fcgiwrap on

#启动服务
/etc/init.d/fcgiwrap start
Starting fcgiwrap... spawn-fcgi: child spawned successfully: PID: 22416
spawn-fcgi: child spawned successfully: PID: 22417
spawn-fcgi: child spawned successfully: PID: 22418
spawn-fcgi: child spawned successfully: PID: 22419
spawn-fcgi: child spawned successfully: PID: 22420
done
nginx配置转发 (系统安装好nginx)
这一步的含义是下载现成的模板放在一个目录下,然后nginx中配置location路径进行访问
#注意下修改为你的目录路径
#location ~ ^/linux-shell/page/script/.*\.(cgi) {  #这里的cgi后缀匹配根据需要修改,后缀自定义即可

# linux-shell 为模板程序目录,放在nginx网站根目录下面
location ~ ^/linux-shell/page/script/ {  #我这里调用的文件是没有后缀的就用这个配置
        gzip off;
        fastcgi_pass  unix:/var/run/fcgiwrap.socket; # 注意:这里跟原文不一样
       root /usr/share/nginx/html;  # 注意:这里跟原文不一样,nginx的html目录
        include fastcgi_params;
        fastcgi_param  SCRIPT_NAME    $document_root/$fastcgi_script_name; # 注意:这里跟原文不一样
      }

#重启nginx:
nginx -s reload
模板目录结构
# 下载模板,放在网站根目录下
# 目录结构:
linux-shell
├── css
│   ├── iconfont.css
│   ├── iconfont.eot
│   ├── iconfont.svg
│   ├── iconfont.ttf
│   ├── iconfont.woff
│   ├── iconfont.woff2
│   ├── page.css
│   └── style.css
├── favicon.ico
├── images
│   ├── b.jpg
│   ├── body.cur
│   ├── b.png
│   ├── content.jpg
│   ├── hua.gif
│   ├── link.cur
│   ├── logo.png
│   ├── nav.jpg
│   └── page.cur
├── index.html
├── js
│   ├── jquery-2.1.1.min.js
│   └── nav.js
└── page
    ├── content
    │   ├── index.html
    │   ├── script.js
    │   └── TweenMax.min.js
    ├── h5
    │   ├── 161
    │   │   └── 161.html
    │   ├── 188
    │   │   └── 188.html
    │   └── local
    │       └── local.html
    └── script
        ├── 161
        │   ├── disk
        │   ├── info
        │   ├── mem
        │   ├── ps
        │   ├── server
        │   ├── ssh
        │   └── uptime
        ├── 188
        │   ├── disk
        │   ├── info
        │   ├── mem
        │   ├── ps
        │   ├── server
        │   ├── ssh
        │   └── uptime
        └── local
            ├── disk
            ├── info
            ├── mem
            ├── ps
            ├── server
            ├── ssh
            └── uptime
shell代码示例文件(查看磁盘使用情况):
#!/bin/bash
echo "Content-Type:text/html;charset=utf-8"
echo ""

# 自动刷新
#echo "<script>window.setInterval(function(){
#    window.location.reload();
#},1000);</script>"
#echo "<meta http-equiv="refresh" content="60">"

# html页面css样式
echo '<style>
body{color:#cecece;}
.title{color: #FF9800;border-left: 4px solid;padding: 4px;}
pre{font-size:14px;border-left: 4px solid #4CAF50;padding: 5px;}
</style>'

# 定义变量
ip="192.168.x.x"

# 内容代码(命令返回结果放在<pre>标签中)
echo '<div style="padding-left:10px;">'
echo '<h1 class="title">硬盘使用情况</h1>'
echo '<h5 style="color:#848484;">'
dd=`date`
echo "统计时间: $dd 【当前机器ip: $ip】"
echo '</h5>'
echo '<pre>'
# 查看磁盘使用(本机)
df -hT
# 查看磁盘使用(远程机器,可以使用ansible|sshpass等远程工具)
sshpass -p "password" ssh root@$ip -o StrictHostKeyChecking=no  'df -hT'
echo '</pre>'
html模板下载
如果访问弹出下载,先检查fcgiwrap服务是否正常,再检查nginx匹配规则
下载地址:https://files.cnblogs.com/files/sanduzxcvbnm/linux-shell.zip
# 程序html模板使用:(脚本文件要加执行权限,不然会提示403 错误)
cd linux-shell/page/script/
chmod +x */*

# 脚本文件说明:
# disk
查看硬盘使用情况

# info
提示信息内容

# mem
内存使用情况

# ps
系统进程概览

# server
自定义服务进程查看

# ssh
ssh连接用户情况

# uptime
系统负载cpu和内存使用概览
传递参数
nginx配置
    location ~ ^/api/(.*)$ {
        gzip off;
        default_type  text/plain;
        root /usr/share/nginx/html;
        fastcgi_pass unix:/var/run/fcgiwrap.socket;
        include fastcgi_params;
        fastcgi_param SCRIPT_FILENAME $document_root/$fastcgi_script_name;
    }
在/usr/share/nginx/html路径下有api文件夹,api文件夹下有一个disk的文件,其内容如下:
#!/bin/sh
echo "Content-Type:text/html;charset=utf-8"
echo ""

for i in a b c; do
        echo $i
done
echo "$QUERY_STRING" | awk -F '=' '{print $1}'
echo "$QUERY_STRING" | awk -F '=' '{print $2}'
访问测试,用浏览器访问效果是一样的
# curl http://localhost/api/disk
a
b
c
# curl http://10.16.16.101/api/disk?abc=123
a
b
c
abc
123
关于使用nginx用户,不使用root用户的问题
首先,在写fcgiwrap启动脚本文件,也就是/etc/init.d/fcgiwrap的时候里面指定的是nginx用户,这个用户是启动nginx使用的用户是一致的。
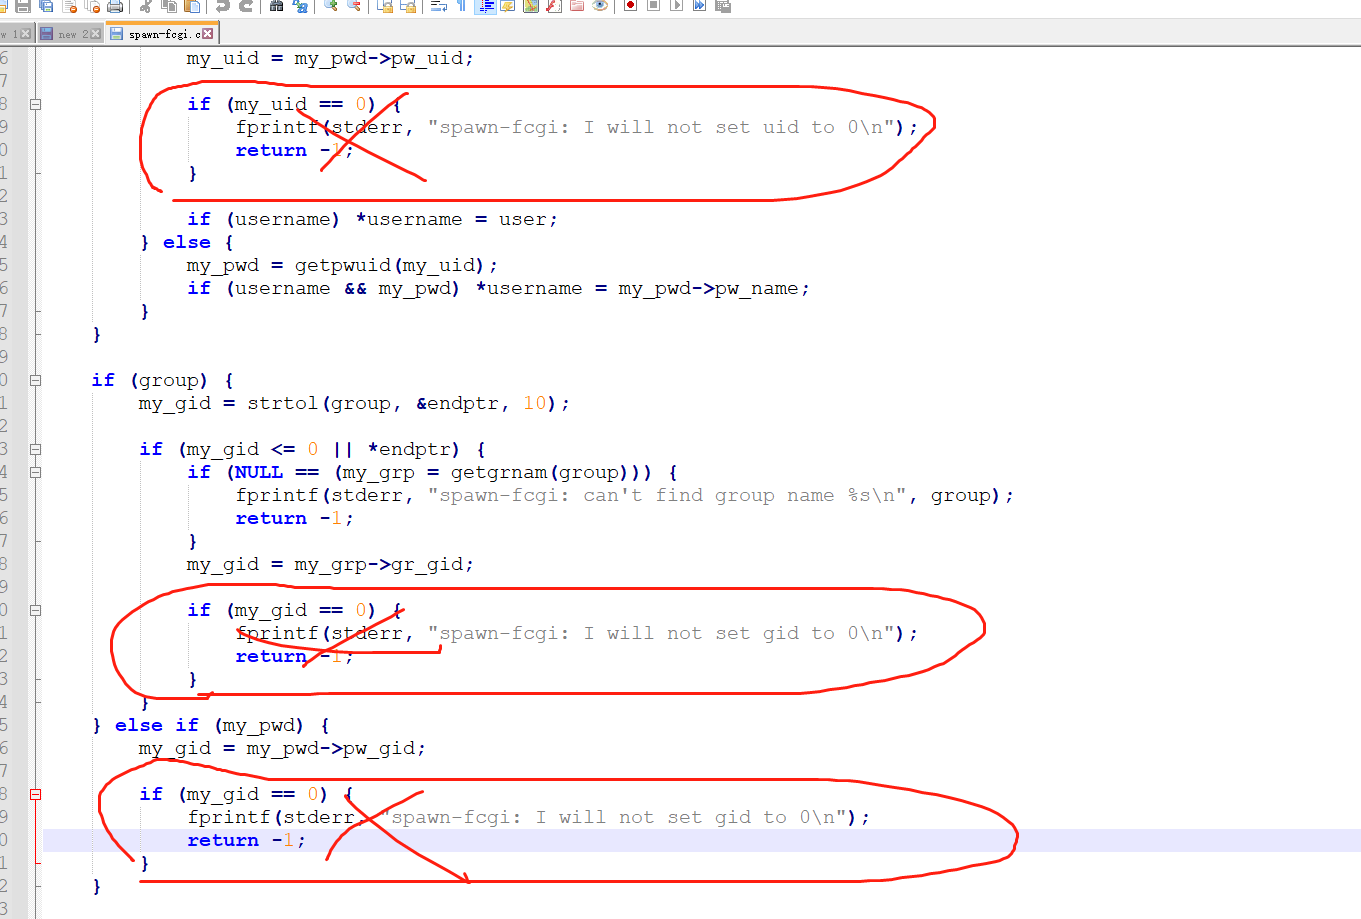
若是该脚本文件中使用root用户,启动的时候会报错:
stderr, "spawn-fcgi: I will not set uid to 0
因为用spawn-fcgi 启动不能使用 -u root 启动FastCGI进程。若是想使用root用户启动,需要修改源代码:
在文件src/spawn-fcgi.c中注释掉一段代码, 总共有三处需要注释
  /*
  if (my_uid == 0) {
          fprintf(stderr, "spawn-fcgi: I will not set uid to 0\n");
          return -1;
  }
  */
然后再编译源码进行安装
这样一来spawn-fcgi就行使用root启动了,修改启动脚本,把nginx修改成root,删除使用nginx用户生成的fcgiwrap.socket文件。
还需要修改nginx配置文件中nginx启动使用的用户,也修改为root。
然后重新启动fcgiwrap和nginx,就能实现使用root用户了
写好shell脚本访问报错:An error occurred while parsing CGI reply,nginx日志显示是502 bad gateway
shell脚本开头内容中加上如下:
echo "Content-Type:text/html;charset=utf-8"
echo ""
关于传递参数的进一步分析
在nginx的location配置文件中,比如如下:
    location ~ ^/api/(.*)$ {
        gzip off;
        root /usr/share/nginx/html;
        fastcgi_pass unix:/var/run/fcgiwrap.socket;
        include fastcgi_params;
        fastcgi_param SCRIPT_FILENAME $document_root/$fastcgi_script_name;
    }
里面有 include fastcgi_params;, fastcgi_params文件内容如下:
# cat fastcgi_params

fastcgi_param  QUERY_STRING       $query_string;
fastcgi_param  REQUEST_METHOD     $request_method;
fastcgi_param  CONTENT_TYPE       $content_type;
fastcgi_param  CONTENT_LENGTH     $content_length;

fastcgi_param  SCRIPT_NAME        $fastcgi_script_name;
fastcgi_param  REQUEST_URI        $request_uri;
fastcgi_param  DOCUMENT_URI       $document_uri;
fastcgi_param  DOCUMENT_ROOT      $document_root;
fastcgi_param  SERVER_PROTOCOL    $server_protocol;
fastcgi_param  REQUEST_SCHEME     $scheme;
fastcgi_param  HTTPS              $https if_not_empty;

fastcgi_param  GATEWAY_INTERFACE  CGI/1.1;
fastcgi_param  SERVER_SOFTWARE    nginx/$nginx_version;

fastcgi_param  REMOTE_ADDR        $remote_addr;
fastcgi_param  REMOTE_PORT        $remote_port;
fastcgi_param  SERVER_ADDR        $server_addr;
fastcgi_param  SERVER_PORT        $server_port;
fastcgi_param  SERVER_NAME        $server_name;

# PHP only, required if PHP was built with --enable-force-cgi-redirect
fastcgi_param  REDIRECT_STATUS    200;
看到这一行:fastcgi_param QUERY_STRING $query_string;,联想到接收参数的脚本内容写法,里面同样有变量:$QUERY_STRING:
#!/bin/bash

echo "Content-Type:text/html;charset=utf-8"
echo ""

echo "$QUERY_STRING" | awk -F '=' '{print $1}'
echo "$QUERY_STRING" | awk -F '=' '{print $2}'
这就很好理解了, 传递的参数是给变量$QUERY_STRING赋值,然后进一步使用该变量进行其他操作。
从安全性上考虑,nginx的location配置文件中没必要指定引用fastcgi_param文件,可以只配置其中需要使用到的变量参数。比如:
    location ~ ^/api/(.*)$ {
        gzip off;
        root /usr/share/nginx/html;
        fastcgi_pass unix:/var/run/fcgiwrap.socket;
        #include fastcgi_params;
        fastcgi_param QUERY_STRING $query_string;
        fastcgi_param SCRIPT_FILENAME $document_root/$fastcgi_script_name;
    }
此时,就只能传递参数使用,而不是获取其他默认变量的值了。
举例说明:
nginx的location配置如下:
    location ~ ^/api/(.*)$ {
        gzip off;
        root /usr/share/nginx/html;
        fastcgi_pass unix:/var/run/fcgiwrap.socket;
        include fastcgi_params;
        #fastcgi_param QUERY_STRING $query_string;
        fastcgi_param SCRIPT_FILENAME $document_root/$fastcgi_script_name;
    }
shell脚本内容如下:
#!/bin/bash

echo "Content-Type:text/html;charset=utf-8"
echo ""

for i in a b c; do
        echo $i
done
echo "$QUERY_STRING" | awk -F '=' '{print $1}'
echo "$QUERY_STRING" | awk -F '=' '{print $2}'

echo "$REQUEST_METHOD"

echo "$SCRIPT_NAME"

echo "$DOCUMENT_ROOT"
此时访问该脚本内容,结果如下:
# curl http://10.16.16.101/api/disk?name=123
a
b
c
name
123
GET
/api/disk
/usr/share/nginx/html
若是修改nginx的location配置如下:
    location ~ ^/api/(.*)$ {
        gzip off;
        root /usr/share/nginx/html;
        fastcgi_pass unix:/var/run/fcgiwrap.socket;
        #include fastcgi_params;
        fastcgi_param QUERY_STRING $query_string;
        fastcgi_param SCRIPT_FILENAME $document_root/$fastcgi_script_name;
    }
shell脚本内容不变,此时访问该脚本内容,结果如下:
# curl http://10.16.16.101/api/disk?name=123
a
b
c
name
123
可以看到,nginx的location中未被引用的变量则不再输出变量值
nginx和fcgiwrap都配置启动了,但是访问报错,nginx日志中找不到fcgiwrap.socket文件
解决办法:如果把该文件放在/tmp路径下,比如是:/tmp/fcgiwrap.socket,此时就算nginx和fcgiwrap都配置启动了,访问的时候查看nginx日志,会提示找不到/tmp/fcgiwrap.socket文件。
给该文件换个路径就行了,比如上文中说的路径:/var/run/fcgiwrap.socket