一、前言
Spring Security系列教程中,前五篇为同一人所写,而本文是博主依据第三方文章整合而出,与前五篇文章的作者不是同一系列。
但本文以前五篇文章为基础,在前面文章所建立的Spring Security的基础上,整合SpringMVC框架。
二、配置文件
spring-mvc.xml配置文件的存放位置可根据实际情况进行调整配置,如可以放在resource文件夹中,对应的web.xml配置classpath:spring-mvc.xml
<?xml version="1.0" encoding="UTF-8"?>
<beans xmlns="http://www.springframework.org/schema/beans"
    xmlns:context="http://www.springframework.org/schema/context"
    xmlns:p="http://www.springframework.org/schema/p"
    xmlns:mvc="http://www.springframework.org/schema/mvc"
    xmlns:xsi="http://www.w3.org/2001/XMLSchema-instance"
    xsi:schemaLocation="
        http://www.springframework.org/schema/beans
        http://www.springframework.org/schema/beans/spring-beans.xsd
        http://www.springframework.org/schema/mvc
        http://www.springframework.org/schema/mvc/spring-mvc.xsd
        http://www.springframework.org/schema/context
        http://www.springframework.org/schema/context/spring-context.xsd">

     <!-- 启动注解驱动的Spring MVC功能,注册请求url和注解POJO类方法的映射-->
     <mvc:annotation-driven />
     <!-- 启动包扫描功能,以便注册带有@Controller、@Service、@repository、@Component等注解的类成为spring的bean -->
     <context:component-scan base-package="com.mvc.test" />  <!--这个包根据自己的项目来配置,我的是com.mvc.test-->
     <!-- 对模型视图名称的解析,在请求时模型视图名称添加前后缀 -->
     <bean class="org.springframework.web.servlet.view.InternalResourceViewResolver" p:prefix="/WEB-INF/view/" p:suffix=".jsp" />
</beans>

然后配置web.xml:

     <context-param>
        <param-name>contextConfigLocation</param-name>
        <!-- 应用上下文配置文件 -->
        <param-value>/WEB-INF/spring-mvc.xml</param-value>
    </context-param>
    <listener>
        <listener-class>org.springframework.web.context.ContextLoaderListener</listener-class>
    </listener>

  <!-- 配置spring核心servlet -->
  <servlet>
      <servlet-name>spring</servlet-name>
      <servlet-class>org.springframework.web.servlet.DispatcherServlet</servlet-class>
      <load-on-startup>1</load-on-startup>
  </servlet>
  <!-- url-pattern配置为/ 拦截 -->
  <servlet-mapping>
      <servlet-name>spring</servlet-name>
      <url-pattern>/</url-pattern>
  </servlet-mapping>
web.xml
然后我们需要一个spring security 的过滤器配置、spring mvc Servlet完整配置的web.xml:
<?xml version="1.0" encoding="UTF-8"?>
<web-app version="2.5"
    xmlns="http://java.sun.com/xml/ns/javaee"
    xmlns:xsi="http://www.w3.org/2001/XMLSchema-instance"
    xsi:schemaLocation="http://java.sun.com/xml/ns/javaee
    http://java.sun.com/xml/ns/javaee/web-app_2_5.xsd">


    <context-param>
        <param-name>contextConfigLocation</param-name>
        <!-- 应用上下文配置文件 -->
        <param-value>/WEB-INF/spring-servlet.xml,/WEB-INF/applicationContext-security.xml</param-value>
    </context-param>

    <listener>
        <listener-class>org.springframework.web.context.ContextLoaderListener</listener-class>
    </listener>

    <!-- spring securit start -->
    <filter>
      <filter-name>springSecurityFilterChain</filter-name>
      <filter-class>org.springframework.web.filter.DelegatingFilterProxy</filter-class>
    </filter>
    <filter-mapping>
      <filter-name>springSecurityFilterChain</filter-name>
      <url-pattern>/*</url-pattern>
    </filter-mapping>
    <!-- spring securit start -->

    <!-- 配置spring核心servlet -->
    <servlet>
        <servlet-name>spring</servlet-name>
        <servlet-class>org.springframework.web.servlet.DispatcherServlet</servlet-class>
        <load-on-startup>1</load-on-startup>
    </servlet>
    <!-- url-pattern配置为/,不带文件后缀,会造成其它静态文件(js,css等)不能访问。如配为*.do,则不影响静态文件的访问 -->
    <servlet-mapping>
        <servlet-name>spring</servlet-name>
        <url-pattern>/</url-pattern>
    </servlet-mapping>


    <welcome-file-list>
      <welcome-file>index.jsp</welcome-file>
   </welcome-file-list>
</web-app>
三、添加Controller
@Controller
@Request("/student")
public class StudentController {

  @RequestMapping("/index")
  public ModelAndView index() {
    ModelAndView mav = new ModelAndView();
    mav.setViewName("student/index");
    return mav;
  }
}
四、添加student的index页面
在WEB-INF/student文件夹下添加index.jsp页面
<%@ page language="java" contentType="text/html; charset=UTF-8"
    pageEncoding="UTF-8"%>
<!DOCTYPE html>
<html>
<head>
<meta charset="UTF-8">
<title>Insert title here</title>
</head>
<body>
<h1>This is news index Page</h1>
</body>
</html>
五、在项目首页index.jsp中添加跳转到student/index.jsp页面的连接
<a href="${pageContext.request.contextPath }/student/index">goto student</a>
六、数据库中输入数据
在数据库resc表中,添加数据,其中res_string字段的值为/student/*
insert into resc values(null,'','URL','/student/*','学生页面');
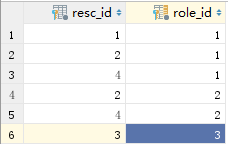
并在对应的角色-资源中间表中插入数据,关联user角色和admin角色:
七、测试
输入:绝对路径/student/index会自动跳到登录页面,必须先登录才能访问连接。
Reference:
Beyond-bit, SpringMVC 3.1集成Spring Security 3.1, https://www.cnblogs.com/Beyond-bit/p/SpringMVC_And_SpringSecurity.html