这里先给出我们的rails应用的最终形态!(图片都是比较大,请下载回来仔细看!)
第一部分已经大体完成了授权系统,但即使这样项目依然离我们心目中的微缩版维基差很远,我们必须增加更多的模块,完善其功能。
新建Lamme模块,其中point属性是用来奖励的(积分系统)
ruby script/generate scaffold Lemma title:string body:text point:integer
打开迁移任务,默认每个词条的奖励分是5。
class CreateLemmas < ActiveRecord::Migration
  def self.up
    create_table :lemmas do |t|
      t.string :title
      t.text :body
      t.integer :point,:default => 5

      t.timestamps
    end
  end

  def self.down
    drop_table :lemmas
  end
end
新建迁移任务,继续完成积分系统。
ruby script/generate migration AddPointToUser point:integer
修改迁移任务,每个维客的初始积分为0。
class AddPointToUser < ActiveRecord::Migration
  def self.up
    add_column :users, :point, :integer,:default => 0
  end

  def self.down
    remove_column :users, :point
  end
end
新建Coauthor模块,它是维基的共笔系统的基础。从数据库角度来看,它是作为User与Lamme的中间表的存在,User与Lamme通过它成多对多关系。也就是,一个词条可以有许多作者,一个作者能编写许多词条。在rails中实现多对多关系有两种方式has_and_belongs_to_many与has_many :through,后者更为强大,拥有给连接表使用的模型类与更多属性,命名也更加灵活直观准确。
ruby script/generate scaffold Coauthor user:belongs_to lemma:belongs_to activion:boolean
属性activion默认是false,它是我们为维客添加积分的一个判断标准。
class CreateCoauthors < ActiveRecord::Migration
  def self.up
    create_table :coauthors do |t|
      t.belongs_to :user
      t.belongs_to :lemma
      t.boolean :activion,:default => false

      t.timestamps
    end
  end

  def self.down
    drop_table :coauthors
  end
end
我们先修改路由规则
ActionController::Routing::Routes.draw do |map|

  map.resources :lemmas do |lemma|
    lemma.resources :coauthors
  end

  map.logout '/logout', :controller => 'sessions', :action => 'destroy'
  map.login '/login', :controller => 'sessions', :action => 'new'
  map.register '/register', :controller => 'users', :action => 'create'
  map.signup '/signup', :controller => 'users', :action => 'new'
  map.resources :users
  map.resource :session
  map.root :lemmas
  map.connect ':controller/:action/:id'
  map.connect ':controller/:action/:id.:format'
end
修改Coauthor模型,添加一个方法。
class Coauthor < ActiveRecord::Base
  belongs_to :user
  belongs_to :lemma
  validates_presence_of :user, :lemma
  validates_associated :user, :lemma
  def active?
    activion
  end
end
修改Lemma模型,完善多对多关系,并添加两个辅助方法,用来判断当前用户是否该词条的共同创作者。
class Lemma < ActiveRecord::Base
  has_many :coauthors
  has_many :users ,:through => :coauthors

  def contains?(user)
    not contains(user).nil?
  end

  def contains(user)
    coauthors.find_by_user_id(user)
  end
end
为User模型添加以下代码,完成多对多关系。
has_many :coauthors
has_many :lemmas ,:through => :coauthors
修改lemmas_controller,完成积分系统。
class LemmasController < ApplicationController
before_filter :load_lemma, :only => [:show, :edit, :update, :destroy]
before_filter :new_lemma, :only => :new
def index
@lemmas = Lemma.all
end
def show;end
def new;end
def edit;end
def create
@lemma = Lemma.new params[:lemma]
if @lemma.save
#为词条的创建者添加积分。
coauthor = Coauthor.create!(:lemma => @lemma,:user => current_user,:activion => true)
coauthor.user.increment!(:point,@lemma.point) if coauthor.active?
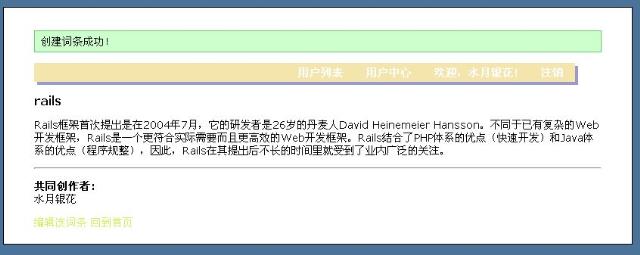
flash[:notice] = '创建词条成功!'
redirect_to @lemma
else
render :action => "new"
end
end
def update
if @lemma.update_attributes(params[:lemma])
coauthor = Coauthor.find_by_user_id_and_lemma_id current_user.id,@lemma.id
#只为后来的编辑者添加积分。
#activation 为 true,表示在这词条上,该作者已被奖励过了!
coauthor.user.increment!(:point,@lemma.point) unless coauthor.active?
coauthor.update_attribute(:activion,true) unless coauthor.active?
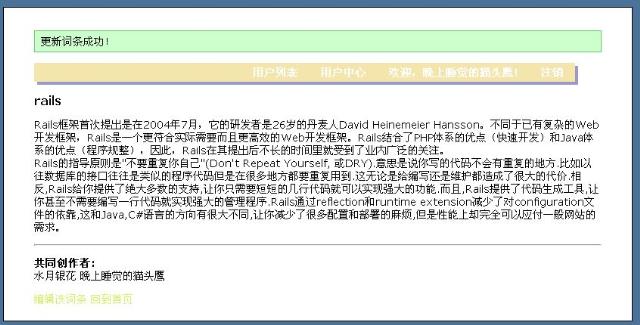
flash[:notice] = '更新词条成功!'
redirect_to @lemma
else
render :action => "edit"
end
end
def destroy
@lemma.destroy
flash[:notice] = '删除词条成功!'
redirect_to lemmas_url
end
protected
def load_lemma
@lemma = Lemma.find params[:id]
end
def new_lemma
@lemma = Lemma.new
end
end
现在lemmas#index是网站的首页,由于还缺乏足够的材料,因此我们还是不要动它。打开lemmas#show,让我们添加链接,让后来的维客也可以申请成为该词条的作者。
<h3><%=h @lemma.title %></h3>

<%=simple_format @lemma.body %>

<% unless @lemma.contains?(current_user) %>
  <% form_for [@lemma,Coauthor.new] do |f| %>
    <%= f.submit "申请成为此词条的共同创作者" %>
  <% end %>
<% end %>
<hr />
<p>
  <b>共同创作者:</b><br/>
  <% @lemma.coauthors.each do |coauthor| %>
    <%= coauthor.user.login if coauthor.active? %>
  <% end %>
</p>
<% if @lemma.contains?(current_user) %>
  <%= link_to '编辑该词条', [:edit,@lemma] %>
<% end %>
<%= link_to '回到首页', lemmas_path %>
删除Coauthor的所有视图,我们不需要用到它们。修改coauthors_controller,删除多余action。
class CoauthorsController < ApplicationController
  before_filter :load_coauthor
  before_filter :new_coauthor_from_params, :only => :create
  filter_access_to :all, :attribute_check => true
  def create
    if @coauthor.save
      flash[:notice] = '成功加入该词条的共同创作者!'
      redirect_to @lemma
    else
      flash[:notice] = '试图加入该词条的共同创作者失败!'
      redirect_to @lemma
    end
  end

  def destroy
    @coauthor = Coauthor.find(params[:id])
    @coauthor.destroy
    flash[:notice] = "成功退出该词条的共同创作者!"
    redirect_to @lemma
  end

  protected
  def load_coauthor
    @lemma = Lemma.find(params[:lemma_id])
  end

  def new_coauthor_from_params
    @coauthor = @lemma.coauthors.new(:user => current_user)
  end
end
修改lemmas#new,让我们创建一个词条看看(注意删除app/views下的多余全局模板)。
<% title "新建词条" %>
<fieldset>
  <% form_for(@lemma) do |f| %>
    <%= f.error_messages %>

    <p>
      <%= f.label :title,"标题" %><br />
      <%= f.text_field :title %>
    </p>
    <p>
      <%= f.label :body,"正文" %><br />
      <%= f.text_area :body %>
    </p>
    <p>
      <%= f.submit '创建' %>
    </p>
  <% end %>
</fieldset>
<%= link_to '返回首页', url_for(:back) %>
用另一个帐号登录,加入成为共同作者,就可以编辑别人创建的词条。
由于现在的模块还是比较少,我们稍后再对它们进行授权控制。在第一部分中,你们也看到利用declarative authorization插件实现授权控制是何等轻松的,所以不用着急。
现在我们将实现标签系统。随着词条的增加,我们很有必要对词条进行分类。标签在web1.0时代可能只是网页的装饰,内容的摆设,技术的鸡肋。但在web2.0时代,标签将是整个网站内容关联体系最重要的一环。
标签在web2.0网站中的作用如下:
标签在web2.0网站最伟大的应用就是标签云(Tag Cloud),也是我们标签系统的重点。看起来很美,但也很复杂,但由于是在rails上实现,一切都变得很简单,一个插件足矣!
安装插件
ruby script/plugin install git://github.com/jviney/acts_as_taggable_on_steroids.git
ruby script/generate acts_as_taggable_migration
rake db:migrate
我们这个微缩版维基能应用标签的地方不多,也只有Lemma这个模块。如果是大型应用,你尽可以在贴子、新闻、图片、附件、博客等等都贴上标签……
class Lemma < ActiveRecord::Base
  acts_as_taggable
  has_many :coauthors
  has_many :users ,:through => :coauthors

  def contains?(user)
    not contains(user).nil?
  end

  def contains(user)
    coauthors.find_by_user_id(user)
  end
end
这样它就为Lemma添加一系列方法,常用的有:
实例方法tag_list,返回该对象的所有标签的名字的数组,它的to_s经过改写,默认是返回用英文逗号分开的字符串。
实例方法tag_counts,返回该对象的所有标签对象的数组(很囧的命名,我还以为是返回一个数字。)
类方法find_tagged_with,返回的是被标签模型的对象数组,具体用法见下面例子,
Post.find_tagged_with("web-development, tutorial", :match_all => true)
类方法tag_counts,这个也是实例方法,不过这次是返回这个模块所关联的所有标签对象的数组。
此外,要使用tag_cloud这个帮助方法,必须在application_help这个全局帮助模块中包含TagsHelper。不过,github给出的那个标签云的例子功能太弱,没有字体与颜色的变化,基本无法突出它们的热门程度,仅仅是超链接的堆砌,不要也罢。我一会儿提供一个功能更强大的同名方法来实现标签云。
更详细的内容可以翻看其源码,那么让我们开始吧。
我们打算在lemmas#show视图中列出该词条的所有标签,因此得修改lemmas#show action。
def show
     @tags = Lemma.tag_counts
end
我们还想在视图中增加两个链接,用来动态增加与删除标签,这得在控制器添加两个action——add_tag与remove_tag。
此外,当我们点击该词条的标签云的集合时,我们希望该链接将带我们到拥有同一个标签的词条列表中,从而使所有词条有机地联结在一起。这就又要增加一个action与视图了。修改后的控制器为:
class LemmasController < ApplicationController
  before_filter :load_lemma, :only => [:show, :edit, :update, :add_tag,:remove_tag,:destroy]
  before_filter :new_lemma, :only => :new
 # filter_access_to :all
 # filter_access_to [:new,:create, :edit, :update], :attribute_check => true

  def tag
    @lemmas = Lemma.find_tagged_with params[:id]
  end

  def show
    @tags = @lemma.tag_counts
  end


  def add_tag
    @lemma.tag_list.add params[:tag]
    @lemma.save_tags
    id = dom_id(@lemma) + "_tags"
    render :update do |page|
      page.replace_html id, tag_cloud(@lemma.tag_counts)
      page << %{
         new Effect.Highlight('#{id}',{startcolor:'#80FF00',duration: 3.0 });
      }
    end
  end

  def remove_tag
    @lemma.tag_list.remove params[:tag]
    @lemma.save_tags
    id = dom_id(@lemma) + "_tags"
    render :update do |page|
      page.replace_html id, tag_cloud(@lemma.tag_counts)
      page << %{
         new Effect.Highlight('#{id}',{startcolor:'#80FF00',duration: 3.0 });
      }
    end
  end

#……………………………………

end
注意:现在先关闭lemmas的授权控制,否则无法访问。
为了,提高性能,我们通常还要用tag caching,也就是在被标签的模型的表添加一个字段cache_tag_list,那么当我们查询标签时就不再找tags表的麻烦了,直接问cache_tag_list要!
script/generate migration AddCacheTagListToLemma cache_tag_list:string
rake db:migrate
但有利必有弊,这样我们更新删除标签时,rails都直接与lemmas与taggings打交道,对tags表不闻不问,而tag表对于tag_counts(无论是实例方法还是类方法)都非常重要,tag_counts返回的对象数组拥有一个 count属性,它是统计某个标签在模型中出现的次数(热门程度的别名)。而save_cached_tag_list只对cache_tag_list处理,连save也不如(当我们删除某标签后,save会修改cache_tag_list里的字段,并删除taggings里tag_id为我们删除了的标签的ID的记录),这时只有让save_tags出马了,它会同时修正这三个表!
修改lemmas#show视图。
<h3><%=h @lemma.title %></h3>

<%=simple_format @lemma.body %>

<% unless @lemma.contains?(current_user) %>
  <% form_for [@lemma,Coauthor.new] do |f| %>
    <%= f.submit "申请成为此词条的共同创作者" %>
  <% end %>
<% end %>
<hr />
<p>
  <span style="font-weight: bold">共同创作者:</span><br/>
  <% @lemma.coauthors.each do |coauthor| %>
    <%= coauthor.user.login if coauthor.active? %>
  <% end %>
</p>
<%= javascript_include_tag :defaults %>
<div>
  <p style="font-weight: bold">开放分类:</p>
  <p>
    <span id="<%= dom_id @lemma %>_tags"><%= tag_cloud @tags %></span>
    <%= link_to_remote "添加标签", :url => add_tag_lemma_url(@lemma),
      :method => 'put',
      :before => "$tag = prompt('输入要添加的标签,多个标签请用英文逗号隔开!')",
      :with => "'tag=' + $tag",
      :html => {:class => "adjust_tag"}
  %>
    <%= link_to_remote "删除标签", :url => remove_tag_lemma_url(@lemma),
      :method => 'delete',
      :before => "$tag = prompt('输入要删除的标签,多个标签请用英文逗号隔开!')",
      :with => "'tag=' + $tag",
      :html => {:class => "adjust_tag"}
  %>
  </p>
</div>

<% if @lemma.contains?(current_user) %>
  <%= link_to '编辑该词条', [:edit,@lemma] %>
<% end %>
<%= link_to '回到首页', lemmas_path %>

添加lemmas#tag视图。
<% @lemmas.each do |lemma| %>
  <h3><%= lemma.title %></h3>
  <%= truncate lemma.body ,:length => 300 %>
<% end %>
<p>
  <%= link_to "返回",url_for(:back) %>|<%= link_to "回到首页",root_url %>
</p>
修改路由规则,保证我们上面的链接生效。
ActionController::Routing::Routes.draw do |map|

  map.resources :lemmas,:member => {:add_tag => :put,:remove_tag =>:delete},:collection => {:tag => :get}  do |lemma|
    lemma.resources :coauthors
  end

 #……………………
end
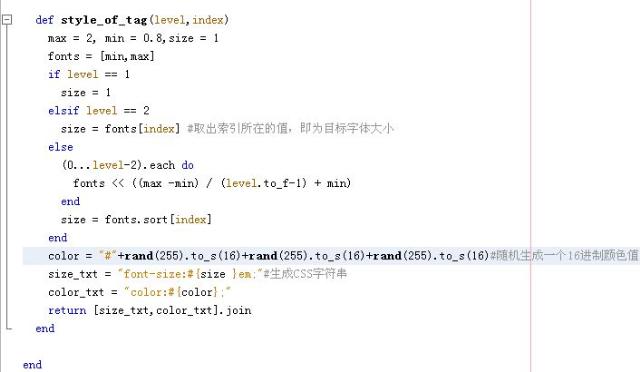
最后是tag_cloud帮助方法

现在是时候为项目加上分页功能了,安装will_paginate
git clone git://github.com/mislav/will_paginate.git vendor/plugins/will_paginate
修改lemmas#tag action
  def tag
    options = Lemma.find_options_for_find_tagged_with(params[:id],\
      :order => "updated_at DESC").merge(:page => params[:page] ||1,:per_page =>3 )
    @lemmas = Lemma.paginate(options)
  end
修改对应视图
<% @lemmas.each do |lemma| %>
  <%= link_to lemma.title,lemma,:class => "lemma_title",:hidefocus=>"true" %>
  <%= truncate simple_format(lemma.body) ,:length => 250,:omission => "……#{link_to '全文',lemma}"%>
<% end %>
<%= will_paginate @lemmas %>
<p>
  <%= link_to "返回",url_for(:back) %>|<%= link_to "回到首页",root_url %>
</p>

好了,接着下来我们打算统计一下每个词条的点击率,既然有热门标签(通过Tag.count属性),当然有人气词条。
ruby script/generate migration AddHitsToLemma hits:integer
修改迁移任务
class AddHitsToLemma < ActiveRecord::Migration
  def self.up
    add_column :lemmas, :hits, :integer,:default => 0
  end

  def self.down
    remove_column :lemmas, :hits
  end
end
执行!
rake db:migrate
我们在lemmas#show action中进行统计,并且不得本人刷屏作弊!首先我们在模型中添加一个方法
  def hit!
    self.class.increment_counter :hits, id
  end
然后修改action
  def show
    @lemma.hit! unless logged_in? && @lemma.users.include?(current_user)
    @tags = @lemma.tag_counts
  end
如果我们翻看百度百科,就会发现一个叫“相关词条”的链接。它是基于搜索引擎实现,计算两个词条中被搜索的关键字群的重合程度。很显然,我们单用JOIN与LIKE去实现是非常不明智的,但acts_as_taggable_on_steroids提供了一个find_related_tags方法,返回关系紧密的标签,我们可以用它来搞个相关标签。可能还有些人对关系紧密的标签糊里糊涂,我举个例子。比如,我们有三个词条:a9vg,levelup,tgfc。a9vg有4个标签:游戏,神机,高贵饭,下限。levelup有三个标签:游戏,小白,下限。tgfc有5个标签:游戏,下限,小白,脑残,虚拟内存。我们就可以说游戏与下限的关系非常紧密,总是一起出现,如果放宽一点,发现游戏与小白也经常搭配在一起……这有点找近义词的意味。如果我们最近注册一些邮箱,它可能要你填写你的兴趣或职业,然后自作聪明发一些与这些字眼搭边的垃圾邮件过来……嘛,扯远了,让我们完成这功能吧。>
我们先搞出一个帮助方法,用来计算这个词条的一些标签哪一个最热门。
module LemmasHelper

  def hot_tag tags
    a = 0
    result = nil
    tags.each do |tag|
      if a < tag.count
        a = tag.count
        result = tag
      end
    end
    return result
  end

#……………………
end
>最找出这个热门标签通常和哪些标签经常一起出现,选出排名最前的五个。
def show
    @lemma.hit! unless logged_in? && @lemma.users.include?(current_user)
    @tags = @lemma.tag_counts
    tag = hot_tag @tags
    @related_tags =  Lemma.find_related_tags tag.name,:limit => 5
  end
当然这样是无法运行,之前我们的tag_cloud是放在inline RJS里面,怎么说还是视图的范畴,但我们这个很明显是控制器的东西,因此我们得想个办法。其实 也不太难、include它就是!
 class ApplicationController < ActionController::Base
   include LemmasHelper

  #………………
 end
视图中添加
<div style="border-bottom:1px solid #66EC20">
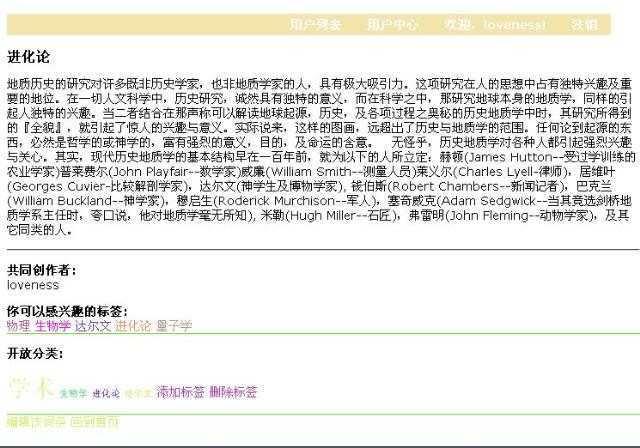
<span style="font-weight: bold">你可以感兴趣的标签:</span><br/>
<% @related_tags.each do |tag| %>
<%= link_to tag.name, { :action => :tag, :id => tag.name },\
:style => tag_style(@related_tags,tag.name) %>
<% end %>
</div>
看到这些多标签,我想是否要做些SEO优化呢。现在它们都是放在普通的链接中,威力太小,放在keywords的meta标签中效果应该会增加两三倍。同样,我们先做帮助方法,不宜在视图中直接写逻辑。
module LayoutHelper
  #……………………

  def keywords *args
    content_for(:keywords){ args }
  end

  def description *args
    content_for(:description){ args }
  end

end
在lemmas#show 视图中添加
<% keywords h(@lemma.tag_list.to_s)  %>
<% description h(@lemma.title + "——"+ truncate(@lemma.body ,:length => 120)) %>
然后在全局模板的头部添加对应代码。
<!DOCTYPE html PUBLIC "-//W3C//DTD XHTML 1.0 Transitional//EN"
"http://www.w3.org/TR/xhtml1/DTD/xhtml1-transitional.dtd">
<html xmlns="http://www.w3.org/1999/xhtml" xml:lang="en" lang="en">
  <head>
    <meta http-equiv="content-type" content="text/html;charset=UTF-8" />
    <meta name="keywords" content="<%= yield(:keywords) %>" />
    <meta name="description" content="<%= yield(:description) %>" />
    <title><%= h(yield(:title) || controller.action_name ) %></title>
#……………………
#……………………
翻看网页的源码,发现成功了!

但我们还是觉得在视图上写得太多逻辑了,再对它们做些封装。
module LemmasHelper
 def seo_meta lemma
    unless lemma.blank?
      keywords h(lemma.tag_list.to_s)
      description h(lemma.title + "——"+ truncate(lemma.body ,:length => 120))
    end
  end
#………………
end
这样在视图中就可以很简洁搞定了!
<% seo_meta @lemma %>
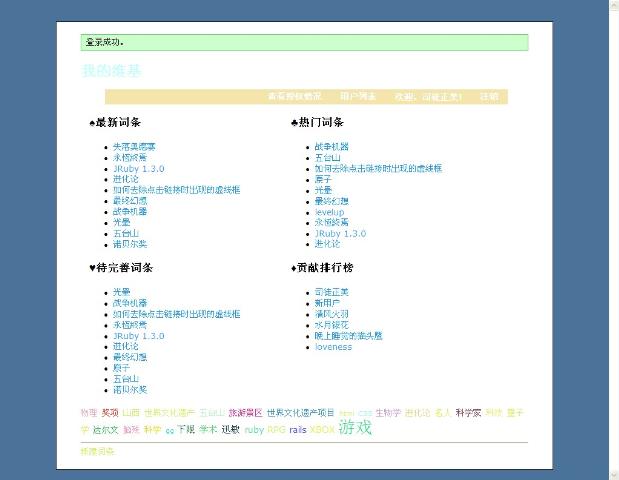
现在我们动一动首页吧,那里还是一片处女地。通常首页上查询非常多,而且很多排行,我们的应用也是如此。我们得在模型中添加一些方法,以达到Skinny Controller, Fat Model的功效。
在User模型中添加
named_scope :worthy,:limit => 10,:select => "id,login,point",:order =>"point DESC"
在Lemma模型中添加
 named_scope :reward, :select => "id,title,point",:limit=> 10,:order =>"point DESC"
 named_scope :latest, :select => "id,title,updated_at",:limit=> 10,:order =>"updated_at DESC"
 named_scope :hot, :select => "id,title,hits",:limit=> 10,:order =>"hits DESC"
修改首页
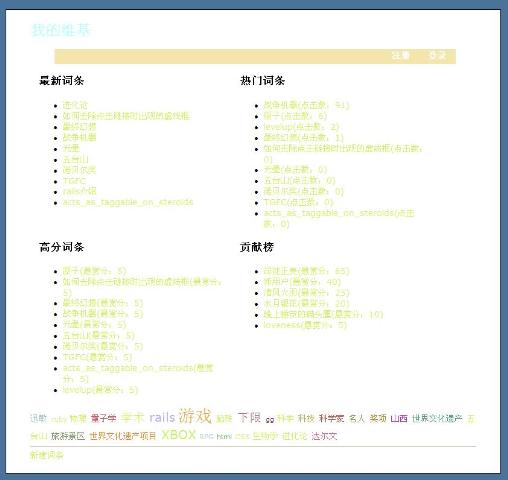
<% title "我的维基" %>
<table class="columns" >
  <tr>
    <td>
      <h3>最新词条</h3>
      <ul>
        <% @latest_lemmas.each do |lemma| %>
          <li><%= link_to lemma.title,lemma %></li>
        <% end %>
      </ul>
    </td>
    <td>
      <h3>热门词条</h3>
      <ul>
        <% @hot_lemmas.each do |lemma| %>
          <li><%= link_to lemma.title+ "(点击数:#{lemma.hits})",lemma %></li>
        <% end %>
      </ul>
    </td>
  </tr>
  <tr>
    <td>
      <h3>高分词条</h3>
      <ul>
        <% @reward_lemmas.each do |lemma| %>
          <li><%= link_to lemma.title+ "(悬赏分:#{lemma.point})" ,lemma %></li>
        <% end %>
      </ul>
    </td>
    <td>
      <h3>贡献榜</h3>
      <ul>
        <% @worthy_user.each do |wikier| %>
          <li><%= link_to wikier.login+ "(悬赏分:#{wikier.point})" ,wikier %></li>
        <% end %>
      </ul>
    </td>
  </tr>
</table>
<hr />

<%= link_to '新建词条', new_lemma_path %>
<div>
  <%= tag_cloud @tags%>
</div>
好了,网站的功能基本就完成了。我们可以专注搞lemma模块的授权控制了。修改授权规则。
authorization do
  role :guest do
    has_permission_on :users, :to => [:read_index,:create]
    has_permission_on :lemmas, :to => :read
  end

  role :wikier do
    includes :guest
    has_permission_on :users, :to => [:read_show,:update] do
      if_attribute :id => is {user.id}
    end
    has_permission_on  :coauthors, :to => :create
    has_permission_on  :lemmas, :to => [:create,:add_tags,:remove_tags]
    has_permission_on  :lemmas, :to => :update do
      if_attribute :users => contains {user}
    end
  end

  role :peace_maker do
    includes :wikier
    has_permission_on :users, :to => :read_show
    has_permission_on :lemmas, :to => :update
  end

  role :providence_breaker do
    has_permission_on [:users,:lemmas,:coauthors], :to =>:manage
  end
end

privileges do
  privilege :manage, :includes => [:create, :read, :update, :delete,:add_tags,:remove_tags]
  privilege :read, :includes => [:index, :show, :tag]
  privilege :read_index, :includes => :index
  privilege :read_show, :includes => :show
  privilege :create, :includes => :new
  privilege :add_tags,:includes => :add_tag
  privilege :remove_tags,:includes => :remove_tag
  privilege :update, :includes => :edit
  privilege :delete, :includes => :destroy
end
这个有点像视图中的层叠样式表(CSS),能继承能覆盖。
和其他授权插件一样,在视图中都是对链接下手。
<% title "我的维基" %>
<table class="columns" >
  <tr>
    <td>
      <h3>♠最新词条</h3>
      <ul class="poker">
        <% @latest_lemmas.each do |lemma| %>
          <li><%= link_to lemma.title,lemma,:title => "创建于:#{lemma.created_at.to_s(:db)}" %></li>
        <% end %>
      </ul>
    </td>
    <td>
      <h3>♣热门词条</h3>
      <ul class="poker">
        <% @hot_lemmas.each do |lemma| %>
          <li><%= link_to lemma.title,lemma,:title => "点击数:#{lemma.hits}" %></li>
        <% end %>
      </ul>
    </td>
  </tr>
  <tr>
    <td>
      <h3>♥待完善词条</h3>
      <ul class="poker">
        <% @reward_lemmas.each do |lemma| %>
          <li><%= link_to lemma.title ,lemma,:title => "悬赏分:#{lemma.point}"  %></li>
        <% end %>
      </ul>
    </td>
    <td>
      <h3>♦贡献排行榜</h3>
      <ul class="poker">
        <% @worthy_user.each do |wikier| %>
          <li>
            <span title="得分:<%= wikier.point %>">
              <%=link_to_if((permitted_to? :read_show, wikier ), wikier.login,wikier,:class => "myself") %>
            </span>
          </li>
        <% end %>
      </ul>
    </td>
  </tr>
</table>
<div>
  <%= tag_cloud @tags %>
</div>
<hr />
<%= link_to '新建词条', new_lemma_path if permitted_to? :create, :lemmas %>
<% keywords @tags.to_sentence  %>
<% description "Ruby's Louvre, rails版的微型维基" %>
修改lemmas#show。
#……………………
<% if !@lemma.contains?(current_user) && permitted_to?(:create,Coauthor.new) %>
  <% form_for [@lemma,Coauthor.new] do |f| %>
    <%= f.submit "申请成为此词条的共同创作者" %>
  <% end %>
<% end %>
#………………………………
<%= link_to_remote "添加标签", :url => add_tag_lemma_url(@lemma),
      :method => 'put',
      :before => "$tag = prompt('输入要添加的标签,多个标签请用中文逗号隔开!')",
      :with => "'tag=' + $tag",
      :html => {:class => "adjust_tag"} \
      if permitted_to? :add_tags,:lemmas
    %>
      <%= link_to_remote "删除标签", :url => remove_tag_lemma_url(@lemma),
        :method => 'delete',
        :before => "$tag = prompt('输入要删除的标签,多个标签请用中文逗号隔开!')",
        :with => "'tag=' + $tag",
        :html => {:class => "adjust_tag"} \
        if permitted_to? :remove_tags,:lemmas
      %>
#…………………………………………
   <%# 注释掉不要 if @lemma.contains?(current_user) %>
      <%= link_to '编辑该词条', [:edit,@lemma] if permitted_to?:update,@lemma %>
    <%# end %>
#……………………………………………………
这里讲一些细节(请对照授权规则),对于那些自定义actions(即非restful actions),它们只能一个action对应一个特权,如:
privilege :add_tags,:includes => :add_tag
privilege :remove_tags,:includes => :remove_tag
不能够像其他restful 特权那样对应两个或多个action。下面这个是错误的:
privilege :abjust_tag,:includes => [:add_tag,:remove_tag]
另,这些自定义特权向上组合(即与其他特权组成一个范围更广的特权),除了取名为create,read,update,delete,manage,否则统统无效!下面代码的最后一行是错误的。
privilege :add_tags,:includes => :add_tag
privilege :remove_tags,:includes => :remove_tag
privilege :inoperative,:includes => [:add_tags,:remove_tags]
再次,如果这些链接的授权访问,如果不用进行属性检查,我们直接permitted_to? :add_tags,:lemmas就可以了,表示对Lamme这种资源,而不特定到某个个体。我们在第一部分提过了,这叫做粗颗粒的(授权)访问控制。像要编辑词条特定到某个具体的对象,就要用细颗粒的访问控制。
最后一个,为了不用在输入中文标签的时候切换英文逗号,我们修改了其间隔号,在environment.rb的最下边添加:
TagList.delimiter = ","
接着是new与edit视图了,为了Don't Repeat Yourself!我们添加一个_form.html.erb。
<% form_for(@lemma) do |f| %>
  <%= f.error_messages %>
  <p>
    <%= f.label :title,"标题" %><br />
    <%= f.text_field :title %>
  </p>
  <p>
    <%= f.label :body,"正文" %><br />
    <%= f.text_area :body %>
  </p>
  <p>
    <%= f.label :tag_list,"标签(用中文逗号隔开)" %><br />
    <%= f.text_area :tag_list,:rows=> 2 %>
  </p>
  <% role = Authorization.current_user.role_symbols.to_s  %>
  <% if action_name == "edit" &&  @lemma.contains?(current_user) && (role == "peace_maker" || role == "providence_breaker") %>
    <p>
      <%= f.label :point,"修改悬赏分" %><br />
      <%= f.text_field :point %>
    </p>
  <% end %>
  <p>
    <%= f.submit button_name %>
  </p>
<% end %>
好了,现在修改new视图:
<% title "新建词条" %>
<fieldset>
  <%=render :partial => "lemmas/form",:locals => {:button_name => "创建"}   %>
</fieldset>
<%= link_to '返回首页', url_for(:back) %>
修改update视图:
<% title "修改词条" %> <fieldset> <%=render :partial => "lemmas/form",:locals => {:button_name => "更新"} %> </fieldset> <%= link_to '返回', url_for(:back) %> | <%= link_to '回到首页', root_path %>修改tag视图,增加SEO支持
<% content = [] %>
<% @lemmas.each do |lemma| %>
  <% content << lemma.title  %>
  <%= link_to lemma.title,lemma,:class => "lemma_title",:hidefocus=>"true" %>
  <%= truncate simple_format(lemma.body) ,:length => 250,:omission => "……#{link_to '全文',lemma}"%>
<% end %>
<%= will_paginate @lemmas %>
<p>
  <%= link_to "返回",url_for(:back) %>|<%= link_to "回到首页",root_url %>
</p>
<% keywords @tag %>
<% description content.to_sentence %>
修改_user_bar.html.erb
#………………………………
    <%= link_to "用户中心",current_user if permitted_to? :read_show, current_user %>
#………………………………
修改users#edit视图,让只有权限最高的人才能修改别人的角色
#…………………………
   <% if Authorization.current_user.role_symbols.to_s  == "providence_breaker" %>

        <%= f.label :roles,"角色" %>

        <%= f.select :roles, [['维客','wikier'],['秩序守护者','peace_maker'],
          ['违逆天意之人','providence_breaker']], {:include_blank=>"请选择",:selected => 0} %>

    <% end %>
#………………………………
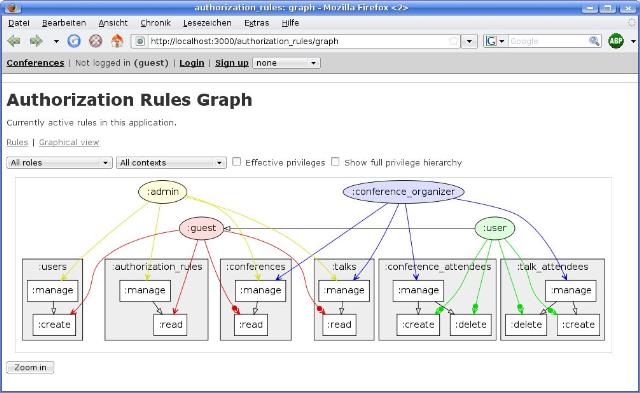
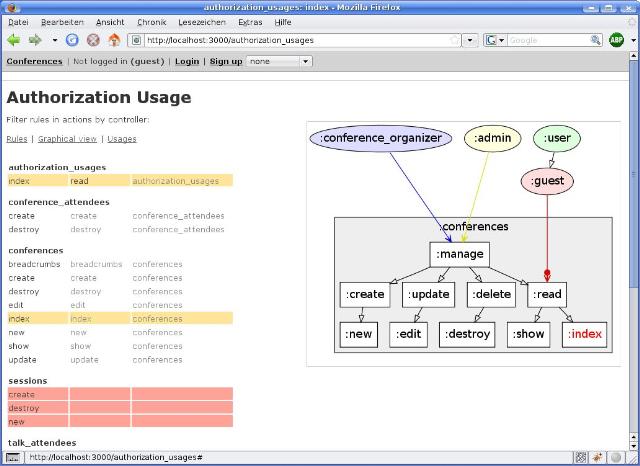
最后让我们见识一下此插件引以为荣的图形化界面吧。添加授权规则。
 role :providence_breaker do
    has_permission_on [:users,:lemmas,:coauthors], :to =>:manage
    has_permission_on :authorization_rules, :to => :manage
    has_permission_on :authorization_usages, :to => :manage
  end
_user_bar.html.erb增加链接
<%= link_to "查看授权情况",authorization_usages_url if permitted_to? :manage,:authorization_usages %>

不过BUG太多了,每个游览器都不一样,IE死得最惨!或许是rails升级太快,declarative authorization插件跟不上吧。等插件作者更新吧!
这是插件作者 Steffen Bartsch 给出的效果图