项目基本完成,是时候花点时间整理一下最近的姿势了
1 什么是跨域?
网上对于跨域的概念会有大篇幅的文章去解释,似乎有点玄乎,初学者很容易对这个概念产生恐惧,跨域其实很简单,其实只要知道一点,无法跨域访问的本质原因其实是浏览器为了安全对前端脚本(一般脚本都是js)请求的一种限制,注意是浏览器的限制,而不是服务器的限制
即同一域下的js只能请求同一域下的接口,何为同一域?何为不同域?端口号相同且请求协议相同且主机名相同即为同一域,三个条件任意一条不满足都是跨域访问
下面实战一个简单的栗子:
如图,我们在本地IIS新建一个端口号为8081的web1,地址为http://localhost:8081,再新建一个端口号为8083的web2,地址为http://localhost:8083

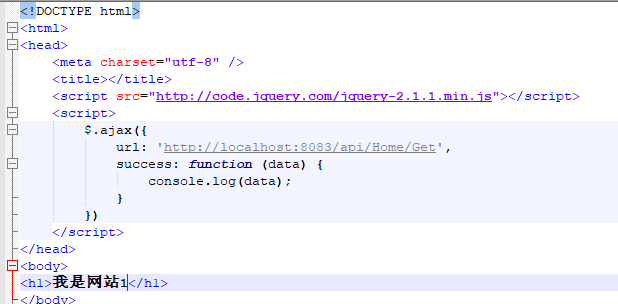
然后在web1放一个代码如下的静态html,用ajax去请求web1下面的接口

web2里面为打包发布的.net webapi,代码如下
   public class HomeController : ApiController
    {
        // GET api/home/get
        [HttpGet]
        public IEnumerable<string> Get()
        {
            return new string[] { "value1", "value2" };
        }
    }
一切就绪后我们http://localhost:8081打开web1,浏览器调试发现会有如下报错

由于端口号不同,XMLHttpruqest对象无法请求http://localhost:8083的数据,这就是端口号不同导致的Ajax无法跨域请求。跨域其实就这么简单
2 那么如何解决跨域问题呢?
网上关跨域问题的解决方案有多种多样,我大概整理了一下大概有这么多跨域解决方案
1、 通过jsonp跨域
2、 document.domain + iframe跨域
3、 location.hash + iframe
4、 window.name + iframe跨域
5、 postMessage跨域
6、 跨域资源共享(CORS)
7、 nginx代理跨域
8、 nodejs中间件代理跨域
9、 WebSocket协议跨域
上述方案前6种方案都有大大小小的问题:
比如方案1中的jsonp实现跨域的缺点:只能实现get一种请求,传输数据有限制。又比如方案6中的CORS跨域虽然支持Post请求,但是必须要所跨域的服务器需要实现Cors,而且还有少量浏览器不兼容,上述8,9两种方案可能是相对比较新的解决方案,我这边也没深入了解学习过,有兴趣的朋友可以自行百度学习一下,在这里主要分享一下关于Nginx的实战总结
3 Nginx反向代理解决跨域问题
什么是反向代理?什么是正向代理?我之前有文章写过这概念,这里就不过多的解释这个概念了,可以参考文章https://www.cnblogs.com/ruanraun/p/agent.html
3.1 ngnix安装配置
首先去官网下载 ngnix http://nginx.org/en/download.html
解压安装包后发现如下目录,不要急着点击nginx.exe

cmd打开命令提示符,cd命令定位到当前目录(还有一种快捷的定位到当前目录的方法:打开到要定位的目录,Shift+鼠标右键 选择此处打开命令提示窗口,不过win10安装了PowerShell的好像就没有这个选项,那就老老实实用命令定位到当前目录了,不要用PowerShell)
定位到上图nginx的目录之后,用start nginx命令启动nginx.exe

然后输入tasklist /fi "imagename eq nginx.exe" 检查程序是否运行成功,如图即为运行成功

如果没有运行成功一般都是80端口被占用,去logs目录下查看日志

两种解决方案:
1,禁用占用80端口的程序,输入命令netstat -ano |more,查看到pid为4的程序占用了改端口,禁用掉这个程序,个人觉得这个方法不太靠谱,因为你可能不知道被禁用程序的作用,有时可能是系统程序,也有可能是部署的其他程序,所以直接禁用可能会引起其他问题,除非非要部署到80端口且知道80端口被占用程序的作用的情况下使用这个解决方案

2,改nginx配置,使用其他端口,打开conf文件下的nginx.conf文件,把里面的80端口改成其他端口,我这里用的是8082端口


修改完配置完成后保存,然后到之前的命令提示符窗口输入:nginx -s reload 重启nginx,记住每次修改完配置后都要重启nginx
然后访问http://localhost:8082,出现下面界面说明就配置OK啦

3,继续配置nginx.conf文件实现跨域

配置说明:
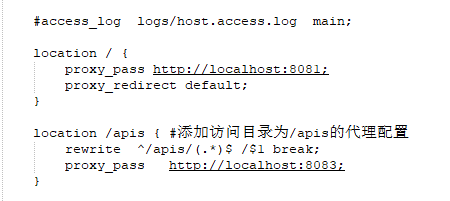
1.由配置信息可知,我们让nginx监听localhost的8082端口,web1与web2的访问都是经过localhost的8082端口进行访问。
2.我们特殊配置了一个“/apis”目录的访问,并且对url执行了重写,最后使以“/apis”开头的地址都转到“http://localhost:8081”进行处理。
3.rewrite ^/apis/(.*)$ /$1 break;
代表重写拦截进来的请求,并且只能对域名后边以“/apis”开头的起作用,例如www.a.com/apis/msg?x=1重写。只对/apis重写。
rewrite后面的参数是一个简单的正则 ^/apis/(.*)$ ,$1代表正则中的第一个(),$2代表第二个()的值,以此类推。
break代表匹配一个之后停止匹配。
全部配置文件如下
#user  nobody;
worker_processes  1;

#error_log  logs/error.log;
#error_log  logs/error.log  notice;
#error_log  logs/error.log  info;

#pid        logs/nginx.pid;


events {
    worker_connections  1024;
}


http {
    include       mime.types;
    default_type  application/octet-stream;

    #log_format  main  '$remote_addr - $remote_user [$time_local] "$request" '
    #                  '$status $body_bytes_sent "$http_referer" '
    #                  '"$http_user_agent" "$http_x_forwarded_for"';

    #access_log  logs/access.log  main;

    sendfile        on;
    #tcp_nopush     on;

    #keepalive_timeout  0;
    keepalive_timeout  65;

    #gzip  on;

    server {
        listen       8082;
        server_name  localhost;

        #charset koi8-r;

        #access_log  logs/host.access.log  main;

        location / {
            proxy_pass http://localhost:8081;
            proxy_redirect default;
        }

        location /apis { #添加访问目录为/apis的代理配置
            rewrite  ^/apis/(.*)$ /$1 break;
            proxy_pass   http://localhost:8083;
        }

        #error_page  404              /404.html;

        # redirect server error pages to the static page /50x.html
        #
        error_page   500 502 503 504  /50x.html;
        location = /50x.html {
            root   html;
        }

        # proxy the PHP scripts to Apache listening on 127.0.0.1
        #
        #location ~ .php$ {
        #    proxy_pass   http://127.0.0.1;
        #}

        # pass the PHP scripts to FastCGI server listening on 127.0.0.1:9000
        #
        #location ~ .php$ {
        #    root           html;
        #    fastcgi_pass   127.0.0.1:9000;
        #    fastcgi_index  index.php;
        #    fastcgi_param  SCRIPT_FILENAME  /scripts$fastcgi_script_name;
        #    include        fastcgi_params;
        #}

        # deny access to .htaccess files, if Apache's document root
        # concurs with nginx's one
        #
        #location ~ /.ht {
        #    deny  all;
        #}
    }


    # another virtual host using mix of IP-, name-, and port-based configuration
    #
    #server {
    #    listen       8000;
    #    listen       somename:8082;
    #    server_name  somename  alias  another.alias;

    #    location / {
    #        root   html;
    #        index  index.html index.htm;
    #    }
    #}


    # HTTPS server
    #
    #server {
    #    listen       443 ssl;
    #    server_name  localhost;

    #    ssl_certificate      cert.pem;
    #    ssl_certificate_key  cert.key;

    #    ssl_session_cache    shared:SSL:1m;
    #    ssl_session_timeout  5m;

    #    ssl_ciphers  HIGH:!aNULL:!MD5;
    #    ssl_prefer_server_ciphers  on;

    #    location / {
    #        root   html;
    #        index  index.html index.htm;
    #    }
    #}

}
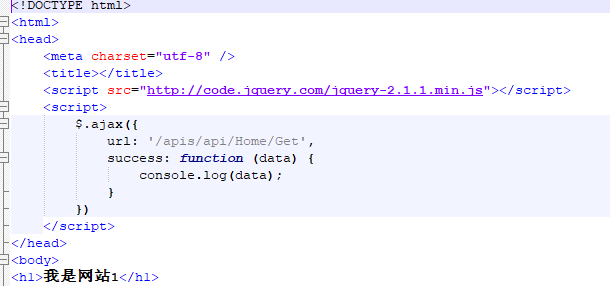
还有一最后一步就是修改web1下面的静态文件代码,将请求url改成/apis/api/Home/Get

最后重启nginx,访问http://localhost:8082,有时可能会有缓存问题显示之前的欢迎界面用Ctrl+F5刷新一下就好了,如下图:
我们看到http://localhost:8082显示了web1的界面,并且正常输web2接口返回的数据,是不是换了个思维解决了跨域的问题,我们最终访问的地址时间是nginx代理的http://localhost:8082,这也就是所说的反向代理,访问http://localhost:8082的客户端并不知道用户界面实际是放在http://localhost:8081端口的web1下,接口程序放在http://localhost:8083端口的web2下。

4 总结
反向代理不仅仅可以解决跨域问题,还有很多好处,大型项目中前端文件和接口程序完全可以发布到不同的服务器中,使用反向代理技术,前后端各自维护自己的服务器,接口程序还可以供不同平台使用.......