http://www.liaoxuefeng.com/wiki/0013739516305929606dd18361248578c67b8067c8c017b000/001375840038939c291467cc7c747b1810aab2fb8863508000
https://www.zhihu.com/question/20431718
仓库初始化
   git init
     echo "# xx项目--" >> README.md
    git add README.md
    git commit -m "-线下的本地文件-现在提交 2018年8月22日 22:42:28"
    git remote add origin http://my.com/uid//xxProject.git
    git push -u origin master

    echo "# xx项目--" >> newFile.test
    git add newFile.test
    git commit -m "-newfile 2018年8月22日 22:46:02"
    git push -u origin master

</pre>

…or create a new repository on the command line
echo "# testU" >> README.md
git init
git add README.md
git commit -m "first commit"
git remote add origin https://github.com/uid/testU.git
git push -u origin master
…or push an existing repository from the command line
git remote add origin https://github.com/uid/testU.git
git push -u origin master
查看修改 全局配置
Administrator@PC-20160727BOAG MINGW64 /d/wepyAction/new
$ git config --global -l
filter.lfs.required=true
filter.lfs.clean=git-lfs clean -- %f
filter.lfs.smudge=git-lfs smudge -- %f
user.name=tei
user.email=g3@qq.com
Administrator@PC-20160727BOAG MINGW64 /d/wepyAction/new
$ git config --global user.name=start0627
error: invalid key: user.name=start0627
Administrator@PC-20160727BOAG MINGW64 /d/wepyAction/new
$ git config --global user.name start0627
Administrator@PC-20160727BOAG MINGW64 /d/wepyAction/new
$ git config --global -l
filter.lfs.required=true
filter.lfs.clean=git-lfs clean -- %f
filter.lfs.smudge=git-lfs smudge -- %f
user.name=start0627
user.email=g13@qq.com
Administrator@PC-20160727BOAG MINGW64 /d/wepyAction/new
gitignore
target/
#DIY
my*txt
nls*
*BAK*
Administrator@PC-20160727BOAG MINGW64 /d/javaDM (master)
$ git add ./*
The following paths are ignored by one of your .gitignore files:
mynb.txt
mynote.txt
nls-service-sdk-1.0.0
nls-service-sdk-1.0.0.jar
pom.xml.BAK.txt
target
Use -f if you really want to add them.
Administrator@PC-20160727BOAG MINGW64 /d/javaDM (master)
$
git commit命令 - Git教程™ https://www.yiibai.com/git/git_commit.html
$ git commit -a # 会先把所有已经track的文件的改动`git add`进来,然后提交(有点像svn的一次提交,不用先暂存)。对于没有track的文件,还是需要执行`git add <file>` 命令。
$ git commit --amend # 增补提交,会使用与当前提交节点相同的父节点进行一次新的提交,旧的提交将会被取消。
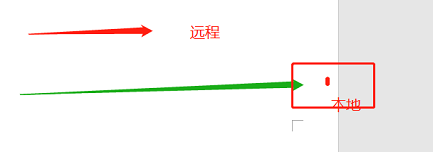
推送到远程仓库
https://git-scm.com/book/zh/v2/Git-基础-远程仓库的使用
推送到远程仓库
当你想分享你的项目时,必须将其推送到上游。 这个命令很简单:git push [remote-name] [branch-name]。 当你想要将 master 分支推送到 origin 服务器时(再次说明,克隆时通常会自动帮你设置好那两个名字),那么运行这个命令就可以将你所做的备份到服务器:
$ git push origin master只有当你有所克隆服务器的写入权限,并且之前没有人推送过时,这条命令才能生效。 当你和其他人在同一时间克隆,他们先推送到上游然后你再推送到上游,你的推送就会毫无疑问地被拒绝。 你必须先将他们的工作拉取下来并将其合并进你的工作后才能推送。 阅读 Git 分支 了解如何推送到远程仓库服务器的详细信息。
不可以push
可以

推理:因为是你的这个帐号a在更新这个分支B,没有其他帐号,那么
在B不被更新的时间段内
帐号a在本地仓库r1 clone了B
帐号a在本地仓库r2 clone了B
之后
r1向B提交了更新
之后
r2本地更新后没有fetch、mergeB的更新,直接向Bpush,
于是出现了截图的错误
push标准格式应该 git push 远程仓库名(如果clone时没-o配置,则为origin) 本地仓库的某个分支名:远程仓库的分支名(如果没有:及后的,则认为远程仓库的分支名同该次push的本地仓库分支名)
这个项目有一个个仓库,每个仓库有一个个分支
每个分支 都在前进
不同的帐号 管理不同的仓库 或仓库下的分支
一个帐号 可以开很多仓库 ;比如 clone P到文件夹1,又到文件夹2 ,那就是P的2个仓库了
如果你对其它的 VCS 系统(比如说Subversion)很熟悉,请留心一下你所使用的命令是"clone"而不是"checkout"。 这是 Git 区别于其它版本控制系统的一个重要特性,Git 克隆的是该 Git 仓库服务器上的几乎所有数据,而不是仅仅复制完成你的工作所需要文件。 当你执行 git clone 命令的时候,默认配置下远程 Git 仓库中的每一个文件的每一个版本都将被拉取下来。 事实上,如果你的服务器的磁盘坏掉了,你通常可以使用任何一个克隆下来的用户端来重建服务器上的仓库(虽然可能会丢失某些服务器端的挂钩设置,但是所有版本的数据仍在,详见 在服务器上搭建 Git )。
克隆仓库的命令格式是 git clone [url] 。 比如,要克隆 Git 的可链接库 libgit2,可以用下面的命令:
$ git clone https://github.com/libgit2/libgit2这会在当前目录下创建一个名为 “libgit2” 的目录,并在这个目录下初始化一个 .git 文件夹,从远程仓库拉取下所有数据放入 .git 文件夹,然后从中读取最新版本的文件的拷贝。 如果你进入到这个新建的libgit2 文件夹,你会发现所有的项目文件已经在里面了,准备就绪等待后续的开发和使用。 如果你想在克隆远程仓库的时候,自定义本地仓库的名字,你可以使用如下命令:
$ git clone https://github.com/libgit2/libgit2 mylibgit这将执行与上一个命令相同的操作,不过在本地创建的仓库名字变为 mylibgit。
【自定义本地仓库名】
【自定义远程分支名】
远程仓库名字 “origin” 与分支名字 “master” 一样,在 Git 中并没有任何特别的含义一样。 同时 “master” 是当你运行 git init 时默认的起始分支名字,原因仅仅是它的广泛使用,“origin” 是当你运行 git clone 时默认的远程仓库名字。 如果你运行 git clone -o booyah,那么你默认的远程分支名字将会是 booyah/master。
【origin master】
不是git的保留字,是初始化后缺省赋值情况下的默认值
master 分支在缺省赋值情况下的默认名
origin 被clone的仓库在本地的缺省赋值情况下的默认名
【跟踪与未跟踪】仅2种状态
请记住,你工作目录下的每一个文件都不外乎这两种状态:已跟踪或未跟踪。 已跟踪的文件是指那些被纳入了版本控制的文件,在上一次快照中有它们的记录,在工作一段时间后,它们的状态可能处于未修改,已修改或已放入暂存区。 工作目录中除已跟踪文件以外的所有其它文件都属于未跟踪文件,它们既不存在于上次快照的记录中,也没有放入暂存区。 初次克隆某个仓库的时候,工作目录中的所有文件都属于已跟踪文件,并处于未修改状态。
编辑过某些文件之后,由于自上次提交后你对它们做了修改,Git 将它们标记为已修改文件。 我们逐步将这些修改过的文件放入暂存区,然后提交所有暂存了的修改,如此反复。所以使用 Git 时文件的生命周期如下:
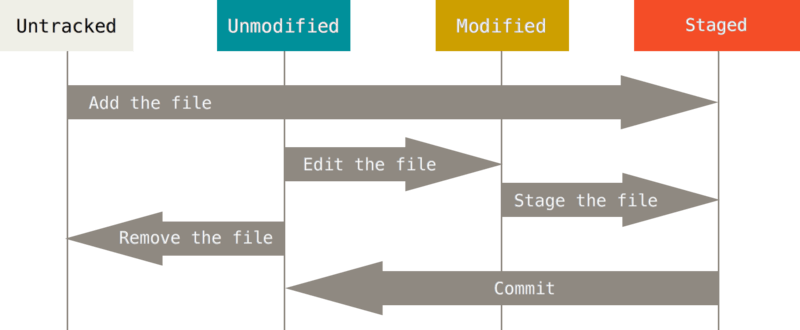
未跟踪的文件意味着 Git 在之前的快照(提交)中没有这些文件;Git 不会自动将之纳入跟踪范围,除非你明明白白地告诉它“我需要跟踪该文件”, 这样的处理让你不必担心将生成的二进制文件或其它不想被跟踪的文件包含进来。
【clean 干净】
仓库是否干净
检查当前文件状态
要查看哪些文件处于什么状态,可以用 git status 命令。 如果在克隆仓库后立即使用此命令,会看到类似这样的输出:
$ git status
On branch master
nothing to commit, working directory clean
这说明你现在的工作目录相当干净。换句话说,所有已跟踪文件在上次提交后都未被更改过。 此外,上面的信息还表明,当前目录下没有出现任何处于未跟踪状态的新文件,否则 Git 会在这里列出来。 最后,该命令还显示了当前所在分支,并告诉你这个分支同远程服务器上对应的分支没有偏离。
【add2个功能】
git add 命令。 这是个多功能命令:可以用它开始跟踪新文件,或者把已跟踪的文件放到暂存区,还能用于合并时把有冲突的文件标记为已解决状态等。 将这个命令理解为“添加内容到下一次提交中”而不是“将一个文件添加到项目中”要更加合适。
【时间轴】
仓库的add命令有执行时间的概念,作用执行至执行时间
【M的3种形式】
M
MM
M
git status 命令的输出十分详细,但其用语有些繁琐。 如果你使用 git status -s 命令或 git status --short 命令,你将得到一种更为紧凑的格式输出。 运行 git status -s ,状态报告输出如下:
$ git status -s
 M README
MM Rakefile
A  lib/git.rb
M  lib/simplegit.rb
?? LICENSE.txt
新添加的未跟踪文件前面有 ?? 标记,新添加到暂存区中的文件前面有 A 标记,修改过的文件前面有 M 标记。 你可能注意到了 M 有两个可以出现的位置,出现在右边的 M 表示该文件被修改了但是还没放入暂存区,出现在靠左边的 M 表示该文件被修改了并放入了暂存区。 例如,上面的状态报告显示: README 文件在工作区被修改了但是还没有将修改后的文件放入暂存区,lib/simplegit.rb 文件被修改了并将修改后的文件放入了暂存区。 而 Rakefile 在工作区被修改并提交到暂存区后又在工作区中被修改了,所以在暂存区和工作区都有该文件被修改了的记录。
【已经暂存的未暂存的】
git diff
此命令比较的是工作目录中当前文件和暂存区域快照之间的差异, 也就是修改之后还没有暂存起来的变化内容。
只显示尚未暂存的改动,而不是自上次提交以来所做的所有改动。
git diff --cached 查看已经暂存起来的变化:(--staged 和 --cached 是同义词)
【文件是否被仓库追踪?如果追踪了,修改是否被暂存了?如果暂存了,是暂存到哪个时刻的?】
每次准备提交前,先用 git status 看下,是不是都已暂存起来了。
【从暂存区域移除】
git rm 命令完成此项工作,并连带从工作目录中删除指定的文件,这样以后就不会出现在未跟踪文件清单中了。
下一次提交时,该文件就不再纳入版本管理了。
【git rm -f 强制什么?】
如果删除之前修改过并且已经放到暂存区域的话,则必须要用强制删除选项 -f(译注:即 force 的首字母)。 这是一种安全特性,用于防止误删还没有添加到快照的数据,这样的数据不能被 Git 恢复。
【跳过 git add,不建议】
Git 提供了一个跳过使用暂存区域的方式, 只要在提交的时候,给 git commit 加上 -a 选项,Git 就会自动把所有已经跟踪过的文件暂存起来一并提交,从而跳过 git add 步骤。
【创建指针】
Git 的分支,其实本质上仅仅是指向提交对象的可变指针。 Git 的默认分支名字是 master。 在多次提交操作之后,你其实已经有一个指向最后那个提交对象的 master 分支。 它会在每次的提交操作中自动向前移动。
Git 的 “master” 分支并不是一个特殊分支。 它就跟其它分支完全没有区别。 之所以几乎每一个仓库都有 master 分支,是因为 git init 命令默认创建它,并且大多数人都懒得去改动它。
Git 是怎么创建新分支的呢? 很简单,它只是为你创建了一个可以移动的新的指针。
比如,创建一个 testing 分支, 你需要使用 git branch 命令:
$ git branch testing这会在当前所在的提交对象上创建一个指针。
【Git 又是怎么知道当前在哪一个分支上呢? HEAD指针】
那么,Git 又是怎么知道当前在哪一个分支上呢? 也很简单,它有一个名为 HEAD 的特殊指针。 请注意它和许多其它版本控制系统(如 Subversion 或 CVS)里的 HEAD 概念完全不同。 在 Git 中,它是一个指针,指向当前所在的本地分支(译注:将 HEAD 想象为当前分支的别名)。 在本例中,你仍然在 master 分支上。 因为 git branch 命令仅仅 创建 一个新分支,并不会自动切换到新分支中去
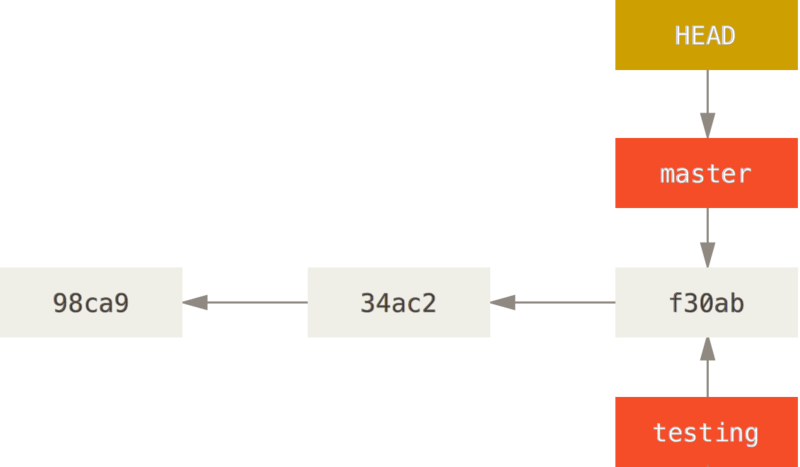
Figure 13. HEAD 指向当前所在的分支
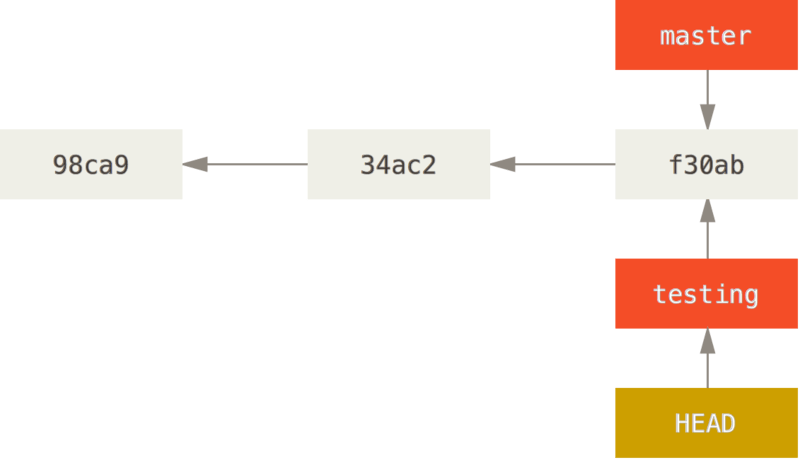
【改变HEAD】
分支切换
$ git checkout testing这样 HEAD 就指向 testing 分支了。
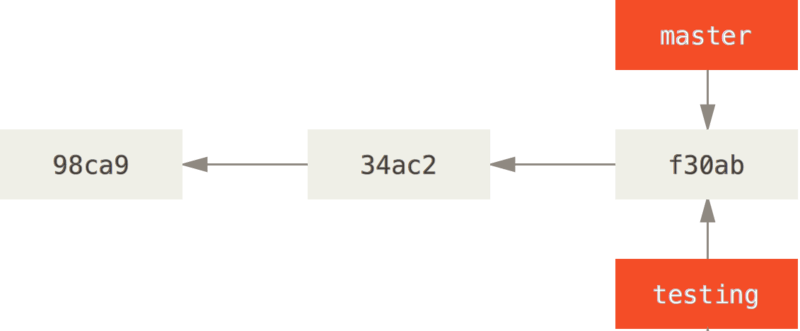
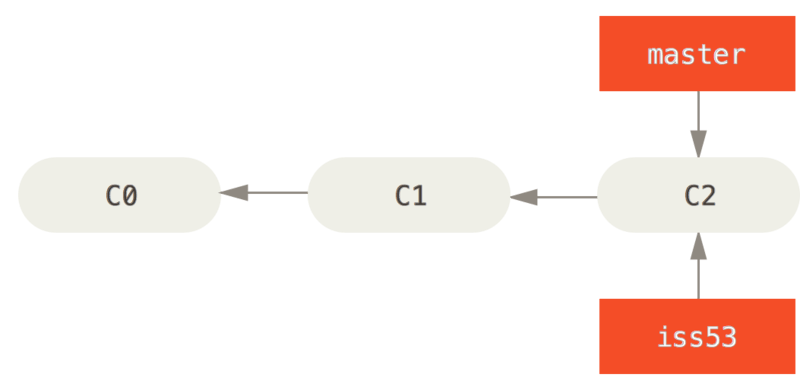
【项目分支历史】
你可以简单地使用 git log 命令查看分叉历史。 运行 git log --oneline --decorate --graph --all ,它会输出你的提交历史、各个分支的指向以及项目的分支分叉情况。
$ git log --oneline --decorate --graph --all
* c2b9e (HEAD, master) made other changes
| * 87ab2 (testing) made a change
|/
* f30ab add feature #32 - ability to add new formats to the
* 34ac2 fixed bug #1328 - stack overflow under certain conditions
* 98ca9 initial commit of my project
【分支实质和分支创建销毁高效的原因】
由于 Git 的分支实质上仅是包含所指对象校验和(长度为 40 的 SHA-1 值字符串)的文件,所以它的创建和销毁都异常高效。 创建一个新分支就相当于往一个文件中写入 41 个字节(40 个字符和 1 个换行符),如此的简单能不快吗?
这与过去大多数版本控制系统形成了鲜明的对比,它们在创建分支时,将所有的项目文件都复制一遍,并保存到一个特定的目录。 完成这样繁琐的过程通常需要好几秒钟,有时甚至需要好几分钟。所需时间的长短,完全取决于项目的规模。而在 Git 中,任何规模的项目都能在瞬间创建新分支。 同时,由于每次提交都会记录父对象,所以寻找恰当的合并基础(译注:即共同祖先)也是同样的简单和高效。 这些高效的特性使得 Git 鼓励开发人员频繁地创建和使用分支。
【git checkout -b iss53】
Switched to a new branch "iss53" 它是下面两条命令的简写:
$ git branch iss53
$ git checkout iss53

【分支前进】
你继续在 #53 问题上工作,并且做了一些提交。 在此过程中,iss53 分支在不断的向前推进,因为你已经检出到该分支(也就是说,你的 HEAD 指针指向了 iss53 分支)
$ vim index.html
$ git commit -a -m 'added a new footer [issue 53]'
分支在不断的向前推进

【在你切换分支之前,保持好一个干净的状态】
现在你接到那个电话,有个紧急问题等待你来解决。 有了 Git 的帮助,你不必把这个紧急问题和 iss53 的修改混在一起,你也不需要花大力气来还原关于 53# 问题的修改,然后再添加关于这个紧急问题的修改,最后将这个修改提交到线上分支。 你所要做的仅仅是切换回 master 分支。
但是,在你这么做之前,要留意你的工作目录和暂存区里那些还没有被提交的修改,它可能会和你即将检出的分支产生冲突从而阻止 Git 切换到该分支。 最好的方法是,在你切换分支之前,保持好一个干净的状态。 有一些方法可以绕过这个问题(即,保存进度(stashing) 和 修补提交(commit amending)),我们会在 储藏与清理 中看到关于这两个命令的介绍。
【分支快进(fast-forward)】
现在,我们假设你已经把你的修改全部提交了,这时你可以切换回 master 分支了:
$ git checkout master
Switched to branch 'master'
这个时候,你的工作目录和你在开始 #53 问题之前一模一样,现在你可以专心修复紧急问题了。 请牢记:当你切换分支的时候,Git 会重置你的工作目录,使其看起来像回到了你在那个分支上最后一次提交的样子。 Git 会自动添加、删除、修改文件以确保此时你的工作目录和这个分支最后一次提交时的样子一模一样。
接下来,你要修复这个紧急问题。 让我们建立一个针对该紧急问题的分支(hotfix branch),在该分支上工作直到问题解决:
$ git checkout -b hotfix
Switched to a new branch 'hotfix'
$ vim index.html
$ git commit -a -m 'fixed the broken email address'
[hotfix 1fb7853] fixed the broken email address
1 file changed, 2 insertions(+) 
master 分支的紧急问题分支 hotfix branch
你可以运行你的测试,确保你的修改是正确的,然后将其合并回你的 master 分支来部署到线上。 你可以使用 git merge 命令来达到上述目的:
$ git checkout master
$ git merge hotfix
Updating f42c576..3a0874c
Fast-forward
 index.html | 2 ++
 1 file changed, 2 insertions(+)
在合并的时候,你应该注意到了"快进(fast-forward)"这个词。 由于当前 master 分支所指向的提交是你当前提交(有关 hotfix 的提交)的直接上游,所以 Git 只是简单的将指针向前移动。 换句话说,当你试图合并两个分支时,如果顺着一个分支走下去能够到达另一个分支,那么 Git 在合并两者的时候,只会简单的将指针向前推进(指针右移),因为这种情况下的合并操作没有需要解决的分歧——这就叫做 “快进(fast-forward)”。
master 被快进到 hotfix关于这个紧急问题的解决方案发布之后,你准备回到被打断之前时的工作中。 然而,你应该先删除 hotfix分支,因为你已经不再需要它了 —— master 分支已经指向了同一个位置。 你可以使用带 -d 选项的 git branch 命令来删除分支:
$ git branch -d hotfix
Deleted branch hotfix (3a0874c).
【2个分支的直接祖先不同的情况】
2个分支的直接祖先相同的情况,merge涉及2个快照
2个分支的直接祖先不相同的情况,merge涉及3个快照
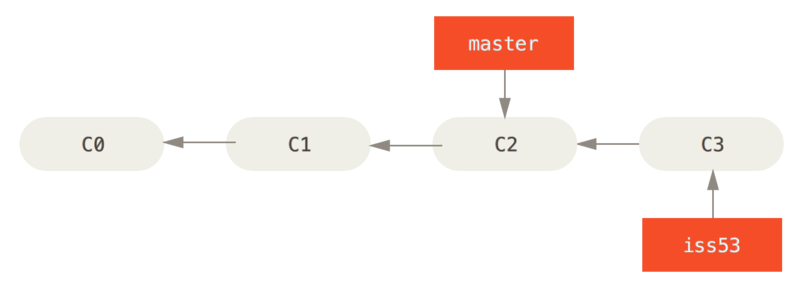
假设你已经修正了 #53 问题,并且打算将你的工作合并入 master 分支。 为此,你需要合并 iss53 分支到 master 分支,这和之前你合并 hotfix 分支所做的工作差不多。 你只需要检出到你想合并入的分支,然后运行 git merge 命令:
$ git checkout master
Switched to branch 'master'
$ git merge iss53
Merge made by the 'recursive' strategy.
index.html |    1 +
1 file changed, 1 insertion(+)
这和你之前合并 hotfix 分支的时候看起来有一点不一样。 在这种情况下,你的开发历史从一个更早的地方开始分叉开来(diverged)。 因为,master 分支所在提交并不是 iss53 分支所在提交的直接祖先,Git 不得不做一些额外的工作。 出现这种情况的时候,Git 会使用两个分支的末端所指的快照(C4 和 C5)以及这两个分支的工作祖先(C2),做一个简单的三方合并。
【直接父祖先不同的情况,git创建新的快照】
和之前将分支指针向前推进所不同的是,Git 将此次三方合并的结果做了一个新的快照并且自动创建一个新的提交指向它。 这个被称作一次合并提交,它的特别之处在于他有不止一个父提交。

该例子中是切回到了master分支,master分支 merge iss53分支
【合并成功后,无用的分支,及时在merge命令后删除】
需要指出的是,Git 会自行决定选取哪一个提交作为最优的共同祖先,并以此作为合并的基础;这和更加古老的 CVS 系统或者 Subversion (1.5 版本之前)不同,在这些古老的版本管理系统中,用户需要自己选择最佳的合并基础。 Git 的这个优势使其在合并操作上比其他系统要简单很多。
既然你的修改已经合并进来了,你已经不再需要 iss53 分支了。 现在你可以在任务追踪系统中关闭此项任务,并删除这个分支。
$ git branch -d iss53
【分支冲突的情况】
【Git 做了合并,但是没有自动地创建一个新的合并提交。 Git 会暂停下来,等待你去解决合并产生的冲突。】可以在tool、ide或者命令行修改
如果你在两个不同的分支中,对同一个文件的同一个部分进行了不同的修改,Git 就没法干净的合并它们。如果你对 #53 问题的修改和有关 hotfix 的修改都涉及到同一个文件的同一处,在合并它们的时候就会产生合并冲突:
$ git merge iss53
Auto-merging index.html
CONFLICT (content): Merge conflict in index.html
Automatic merge failed; fix conflicts and then commit the result.
此时 Git 做了合并,但是没有自动地创建一个新的合并提交。 Git 会暂停下来,等待你去解决合并产生的冲突。你可以在合并冲突后的任意时刻使用 git status 命令来查看那些因包含合并冲突而处于未合并(unmerged)状态的文件:
$ git status
On branch master
You have unmerged paths.
  (fix conflicts and run "git commit")

Unmerged paths:
  (use "git add <file>..." to mark resolution)

    both modified:      index.html

no changes added to commit (use "git add" and/or "git commit -a")
任何因包含合并冲突而有待解决的文件,都会以未合并状态标识出来。 Git 会在有冲突的文件中加入标准的冲突解决标记,这样你可以打开这些包含冲突的文件然后手动解决冲突。出现冲突的文件会包含一些特殊区段,看起来像下面这个样子:
<<<<<<< HEAD:index.html
<div id="footer">contact : email.support@github.com</div>
=======
<div id="footer">
 please contact us at support@github.com
</div>
>>>>>>> iss53:index.html
这表示 HEAD 所指示的版本(也就是你的 master 分支所在的位置,因为你在运行 merge 命令的时候已经检出到了这个分支)在这个区段的上半部分(======= 的上半部分),而 iss53 分支所指示的版本在 ======= 的下半部分。为了解决冲突,你必须选择使用由 ======= 分割的两部分中的一个,或者你也可以自行合并这些内容。例如,你可以通过把这段内容换成下面的样子来解决冲突:
<div id="footer">
please contact us at email.support@github.com
</div>
上述的冲突解决方案仅保留了其中一个分支的修改,并且 <<<<<<< , ======= , 和 >>>>>>> 这些行被完全删除了。在你解决了所有文件里的冲突之后,对每个文件使用 git add 命令来将其标记为冲突已解决。一旦暂存这些原本有冲突的文件,Git 就会将它们标记为冲突已解决。
【head即当前分支,另一个冲突的分支,可能来自本地,也可能来自fetch其他仓库的,去.git中查head cat git/FETCH_HEAD cat .git/ORIG_HEAD】
【动手所得】
场景:2个帐号同步代码
accountA accountB 2个帐号 一块在开发mpBMCwepy项目,
前期accountA主要写.vue文件中的es部分代码,accountB主要写相应的同名文件中的less代码
各自的远程仓库地址
accountA git@a.com:accountA/mpBMCwepy.git
accountB git@a.com:accountB/mpBMCwepy.git
各自每日将本地仓库的master分支更新自己的远程仓库的master分支
一段时间后,es/less开发告一段落,accountA要在文件中合并accountB的相应文件中的的less代码
accountA要在本地合并accountB的代码,然后提交到accountA的远程仓库
accountA本地当前分支
git branch
master
新建分支
git branch accountB
切换分支
git checkout accountB
添加accountB远程仓库,命名为accountBOrigin
git remote add accountBOrigin git@a.com:accountB/mpBMCwepy.git
在本地的accountB分支合并远程accountB:master分支
admin@winPC MINGW64 /d/GPUGO/MP/studyGit/mpBMCwepy (accountB)
$ git fetch accountBOrigin
From a.com:accountB/mpBMCwepy
* [new branch] master -> accountBOrigin/master
admin@winPC MINGW64 /d/GPUGO/MP/studyGit/mpBMCwepy (accountB)
$ git merge accountBOrigin/master
Updating 028ebd4..e915162
Fast-forward
package.json | 3 +-
project.config.json | 124 ++++-
src/app.vue | 85 +++-
src/pages/aboutUs.vue | 120 +++--
src/pages/advertisement.vue | 318 ++++++-------
src/pages/aliInstantPayView.vue | 50 +--
src/pages/cloundAd.vue | 544 ++++++++++++++++------
src/pages/cloundNews.vue | 271 ++++++++---
src/pages/cloundSEM.vue | 621 ++++++++++++-------------
src/pages/commonService.vue | 32 +-
src/pages/companyBK.vue | 373 +++++++++++----
src/pages/companyInfo.vue | 61 ++-
src/pages/companyQA.vue | 226 +++++-----
src/pages/companyShow.vue | 672 ++++++++++++++++------------
src/pages/consumeRecord.vue | 174 +++++--
src/pages/helpCenter.vue | 21 +-
src/pages/imgUpload.vue | 567 ++++++++++++++---------
src/pages/index.vue | 32 +-
src/pages/news.vue | 136 +++---
src/pages/newsWebView.vue | 70 +--
src/pages/personalInfo.vue | 18 +-
src/pages/questionsAnswers.vue | 164 +++++++
src/pages/recharge.vue | 311 ++++++++++---
src/pages/shortVideo.vue | 36 +-
src/pages/userCenter.vue | 334 +++++++-------
src/pages/userLogin.vue | 7 +-
src/pages/videoUpload.vue | 140 +++---
src/store/actions/index.js | 2 +-
src/style/weui.wxss | 12 +-
src/style/widget/weui-agree/weui-agree.wxss | 6 -
src/style/widget/weui-cell/weui-access.wxss | 12 +-
src/style/widget/weui-cell/weui-form.wxss | 12 +-
src/utils/tip.js | 228 +++++-----
src/utils/wxRequest.js | 114 ++---
34 files changed, 3738 insertions(+), 2158 deletions(-)
create mode 100644 src/pages/questionsAnswers.vue
delete mode 100644 src/style/widget/weui-agree/weui-agree.wxss
admin@winPC MINGW64 /d/GPUGO/MP/studyGit/mpBMCwepy (accountB)
【至此完成在本地accountB分支上合并远程accountB:master分支】
将本地的master分支和本地accountB分支合并
切换到本地master分支
git checkout master
比较本地的master分支和本地的accountB分支
git diff accountB
- },
- fail: function(res) {
- // TODO
- }
+ })^M
+ }^M
+ onTab() {^M
+ this.notHere.toUpload = true^M
+ }^M
-表示master分支删除
+表示master分支新增
合并本地accountB分支
$ git merge accountB
Updating 028ebd4..e915162
Fast-forward
package.json | 3 +-
project.config.json | 124 ++++-
src/app.vue | 85 +++-
src/pages/aboutUs.vue | 120 +++--
src/pages/advertisement.vue | 318 ++++++-------
src/pages/aliInstantPayView.vue | 50 +--
src/pages/cloundAd.vue | 544 ++++++++++++++++------
src/pages/cloundNews.vue | 271 ++++++++---
src/pages/cloundSEM.vue | 621 ++++++++++++-------------
src/pages/commonService.vue | 32 +-
src/pages/companyBK.vue | 373 +++++++++++----
src/pages/companyInfo.vue | 61 ++-
src/pages/companyQA.vue | 226 +++++-----
src/pages/companyShow.vue | 672 ++++++++++++++++------------
src/pages/consumeRecord.vue | 174 +++++--
src/pages/helpCenter.vue | 21 +-
src/pages/imgUpload.vue | 567 ++++++++++++++---------
src/pages/index.vue | 32 +-
src/pages/news.vue | 136 +++---
src/pages/newsWebView.vue | 70 +--
src/pages/personalInfo.vue | 18 +-
src/pages/questionsAnswers.vue | 164 +++++++
src/pages/recharge.vue | 311 ++++++++++---
src/pages/shortVideo.vue | 36 +-
src/pages/userCenter.vue | 334 +++++++-------
src/pages/userLogin.vue | 7 +-
src/pages/videoUpload.vue | 140 +++---
src/store/actions/index.js | 2 +-
src/style/weui.wxss | 12 +-
src/style/widget/weui-agree/weui-agree.wxss | 6 -
src/style/widget/weui-cell/weui-access.wxss | 12 +-
src/style/widget/weui-cell/weui-form.wxss | 12 +-
src/utils/tip.js | 228 +++++-----
src/utils/wxRequest.js | 114 ++---
34 files changed, 3738 insertions(+), 2158 deletions(-)
create mode 100644 src/pages/questionsAnswers.vue
delete mode 100644 src/style/widget/weui-agree/weui-agree.wxss
admin@winPC MINGW64 /d/GPUGO/MP/studyGit/mpBMCwepy (master)
$ git merge accountB
任务完成,删除无用分支
$ git branch -d accountB
Deleted branch accountB (was e915162).
admin@winPC MINGW64 /d/GPUGO/MP/studyGit/mpBMCwepy (master)
$ git branch
* master
注意:merge时,没有冲突的地方会自动合并
例如
注意:merge时,没有冲突的地方会自动合并
例如
master
<input type="text" placeholder="请输入产品/网站链接地址" value="{{input.productUrl}}" name="productUrl" maxlength="40" />
accountB
<input type="text" placeholder-style="color:#d3d3d3" placeholder="请输入产品/网站链接地址" value="{{input.productUrl}}" name="productUrl"
maxlength="40" />
在执行上git merge accountB后,取accountB分支的值
【merge算法】
【动手所得】
git commit -a -m "M 1、新增srcapiconvertData.js服务于对api返回数据的处理;1、完成api-返回数据的map方法;2、1中map方法在问答状态翻译中的应用 ;";git push origin master:master
【已有文件的可以按照预期提交,但是convertData.js不被提交】
git add .
开始跟踪convertData.js,可以正常提交,注意git命令的路径
git commit -a -m "M 1、补交srcapiconvertData.js;";git push origin master:master
Git Magic - 前言 http://www-cs-students.stanford.edu/~blynn/gitmagic/intl/zh_cn/
【标准】
git init; git clone ssh..;
git add .; git commit -m "分析子系统v2.8.0"; git push origin master:statistics;
https://salferrarello.com/git-failed-to-push-some-refs/
Git failed to push some refs
At some point when pushing your code to a remote server (e.g. GitHub, Bitbucket, GitLab) you’re going to see an error like the following
To github.com:salcode/myrepo.git
 ! [rejected]        master -> master (non-fast-forward)
error: failed to push some refs to 'git@github.com:salcode/myrepo.git'
hint: Updates were rejected because the tip of your current branch is behind
hint: its remote counterpart. Integrate the remote changes (e.g.
hint: 'git pull ...') before pushing again.
hint: See the 'Note about fast-forwards' in 'git push --help' for details.
The important part here is “Updates were rejected because the tip of your current branch is behind its remote counterpart.”
How did this happen?
Typically, someone else has pushed code to your remote server that you do not yet have.
What you wanted to happen
Imagine the commits for both your local master branch and the remote server origin/master branch look something like
master     origin/master

cem32k     cem32k
b4d2o1     b4d2o1
abc123     abc123
(If viewing your Git branch as a list of commits like this seems unfamiliar, I suggest checking out my post on How to Improve Git Log)
Once you’re comfortable with the commits above, you add a new commit (dg34mp) to your local (master) branch.
master     origin/master

dg34mp
cem32k     cem32k
b4d2o1     b4d2o1
abc123     abc123
Then you use
git push
and the remote server origin/master is brought up-to-date.
master     origin/master

dg34mp     dg34mp
cem32k     cem32k
b4d2o1     b4d2o1
abc123     abc123
This is what we wanted to happen.
What really happened
While you were creating your new commit (dg34mp) on your local (master) branch, someone else added their own commit (zyx911) to the remote server
master     origin/master

dg34mp     zyx911
cem32k     cem32k
b4d2o1     b4d2o1
abc123     abc123
Now when you use
git push
Git says, “Whoa, hold on! I can’t add the dg34mp commit because there is an extra commit on the remote server we haven’t taken into account!” (a.k.a. I don’t know how to handle zyx911, “failed to push some refs”).
What do we do?
First, we make a backup copy of our master branch, in case something goes wrong. (This isn’t strictly necessary because of git reflog, but I find making a backup branch quicker and involving less thought). Once we make this backup branch we’re going to ignore it and ultimately when we’re done with this process we can delete it.
git branch bkup
Now, we rebase our master branch with the remote branch origin/master.
git rebase origin/master
This replaces our local master branch with the remote origin/master and then adds our new commit (dg34mp) on top.
master     origin/master

dg34mp
zyx911     zyx911
cem32k     cem32k
b4d2o1     b4d2o1
abc123     abc123
Now we can push our changes to the remote server (origin/master)
git push
and there is no problem because we are simply adding our new commit (dg34mp) to the remote branch.
git diff ^M的消除
https://www.cnblogs.com/chunguang/p/5541896.html
git config --local core.whitespace cr-at-eol
git 在浏览器从master新建了分支 fxl
场景
本地是只有master
本地的修改要提交到远程fxl;
注意本地master落后
git rebase master;更新至线上;
git pull;
修改本地master;
注意git add .;之后 创建分支;
在本地,从本地master新建localfxl分支;
查本地分支清单
git branch;
创建分支、检查分支
git branch localfxl;git branch;
分支切换
git checkout localfxl;
检查分支变化
git staus;git diff;
跟踪变化,提交分支;
git add .;git commit -m "dev-配置项添加t_api_log分流mq";git push origin fxl:fxl;
切换到master分支,删除本地fxl分支;
注意:
$ git branch -d fxl;
error: The branch 'fxl' is not fully merged.
If you are sure you want to delete it, run 'git branch -D fxl'.
没有合并
$ git branch -D fxl;
Deleted branch fxl (was 4ee9698).
场景:
线上dev1,在dev1的基础上开发dev2
git branch;检查分支,保持本地非开发状态1个分支,开发状态2个分支;分支的经常创建和删除。
git rebase dev1;git pull;coding;git push dev2;
在commit 上添加强制添加issue号的hook,保证commit信息的规范性,便于自动化CI邮件发送。
场景:
运维在局域网安装的gitlab没有使用静态ip,物理机重启后ip发生改变
remote.origin.url=git@192.168.11.123:root/mypro.git
需要变更为
remote.origin.url=git@192.168.11.234:root/mypro.git
git修改远程仓库地址
git
方法有三种:
1、修改命令
git remote set-url origin [url]
git remote set-url origin git@192.168.11.234:root/mypro.git
2、先删后加
git remote rm origin
git remote add origin [url]
3、直接修改config文件
.git/config