官方教程:Getting Started
准备工作:
安装istio之前,需要先将kubernetes集群跑起来。我们可以使用服务商提供的云服务k8s集群,对于如何准备这些Kubernetes 平台,官网也提供了文档,可以参考平台安装,其中还包含了阿里云。
当然,我们也可以使用minikube来搭建本地k8s集群,这也是我在这里使用的方式,整个搭建步骤可以参考我之前写的博客:使用minikube创建k8s本地单节点集群。
一、安装istio
1.下载istio
可以去Istio发布页面去直接下载,或者使用下面的命令来下载和自动解压缩。
#下载
curl -L https://istio.io/downloadIstio | sh -
#下载,指定版本、平台架构
curl -L https://istio.io/downloadIstio | ISTIO_VERSION=1.6.8 TARGET_ARCH=x86_64 sh -

#将istioctl客户端添加到环境变量 (这里下载的版本是1.9.5)
cd istio-1.9.5
export PATH=$PWD/bin:$PATH
2.安装istio
为了学习和测试的目的,这里的profile配置文件使用的demo。还有一些其他的profile配置文件用于生产环境和性能测试。
$ istioctl install --set profile=demo -y
✔ Istio core installed
✔ Istiod installed
✔ Egress gateways installed
✔ Ingress gateways installed
✔ Installation complete
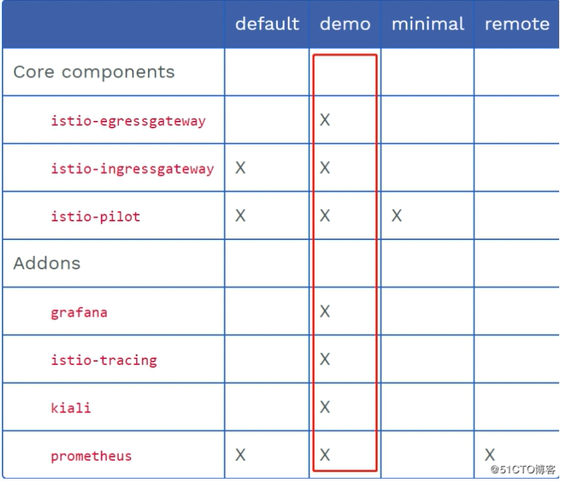
注意: 安装时选择不同的profile安装的组件与插件不一样。生产上因为性能原因建议安装default profile,一般熟练的老手都会使用empty profile,然后根据需求开启组件与插件, 不同profile安装组件与插件列表(其中x代表安装):
3.为default命名空间打上标签istio-injection=enabled。Istio 默认自动注入边车。
$ kubectl label namespace default istio-injection=enabled
namespace/default labeled
二、部署应用
官方文档:Istio / Bookinfo 应用
1.启动应用服务
istio安装包中提供了sample案例。
1)使用 kubectl 部署应用
$ kubectl apply -f samples/bookinfo/platform/kube/bookinfo.yaml
service/details created
serviceaccount/bookinfo-details created
deployment.apps/details-v1 created
service/ratings created
serviceaccount/bookinfo-ratings created
deployment.apps/ratings-v1 created
service/reviews created
serviceaccount/bookinfo-reviews created
deployment.apps/reviews-v1 created
deployment.apps/reviews-v2 created
deployment.apps/reviews-v3 created
service/productpage created
serviceaccount/bookinfo-productpage created
deployment.apps/productpage-v1 created
上面的命令会启动全部的四个服务,其中也包括了 reviews 服务的三个版本(v1、v2 以及 v3)
2)确认所有的服务和 Pod 都已经正确的定义和启动:
$ kubectl get services
NAME          TYPE        CLUSTER-IP       EXTERNAL-IP   PORT(S)    AGE
details       ClusterIP   10.104.222.167   <none>        9080/TCP   2m21s
kubernetes    ClusterIP   10.96.0.1        <none>        443/TCP    5h20m
productpage   ClusterIP   10.102.235.10    <none>        9080/TCP   2m20s
ratings       ClusterIP   10.107.206.19    <none>        9080/TCP   2m21s
reviews       ClusterIP   10.109.70.255    <none>        9080/TCP   2m20s
还有:
$ kubectl get pods
NAME                              READY   STATUS            RESTARTS   AGE
details-v1-79f774bdb9-m7k57       0/2     PodInitializing   0          2m44s
productpage-v1-6b746f74dc-v9zbn   0/2     PodInitializing   0          2m42s
ratings-v1-b6994bb9-s4ln5         0/2     PodInitializing   0          2m44s
reviews-v1-545db77b95-hqrj6       0/2     PodInitializing   0          2m44s
reviews-v2-7bf8c9648f-pnf6f       0/2     PodInitializing   0          2m44s
reviews-v3-84779c7bbc-zkhpx       0/2     PodInitializing   0          2m43s
3)要确认 Bookinfo 应用是否正在运行,请在某个 Pod 中用 curl 命令对应用发送请求,例如 ratings:
$ kubectl exec -it $(kubectl get pod -l app=ratings -o jsonpath='{.items[0].metadata.name}') -c ratings -- curl productpage:9080/productpage | grep -o "<title>.*</title>"
<title>Simple Bookstore App</title>
2.确定 Ingress 的 IP 和端口
现在 Bookinfo 服务启动并运行中,您需要使应用程序可以从外部访问 Kubernetes 集群,例如使用浏览器。可以用 Istio Gateway 来实现这个目标。
1)为应用程序定义 Ingress 网关:
kubectl apply -f samples/bookinfo/networking/bookinfo-gateway.yaml
2)确认网关创建完成:
$ kubectl get gateway
NAME               AGE
bookinfo-gateway   72s
3)根据文档设置访问网关的 INGRESS_HOST 和 INGRESS_PORT 变量。确认并设置。
这里要根据文档按照文档的说明来操作。由于我使用的mibikube方式启动集群,所以根据文档执行的是下面这个命令。
#设置INGRESS_PORT
export INGRESS_PORT=$(kubectl -n istio-system get service istio-ingressgateway -o jsonpath='{.spec.ports[?(@.name=="http2")].nodePort}')

#设置INGRESS_HOST
export INGRESS_HOST=$(minikube ip)
4)设置 GATEWAY_URL:
export GATEWAY_URL=$INGRESS_HOST:$INGRESS_PORT
3.确认可以从集群外部访问应用
可以用 curl 命令来确认是否能够从集群外部访问 Bookinfo 应用程序:
$ curl -s http://${GATEWAY_URL}/productpage | grep -o "<title>.*</title>"
<title>Simple Bookstore App</title>
还可以用浏览器打开网址 http://$GATEWAY_URL/productpage,来浏览应用的 Web 页面。如果刷新几次应用的页面,就会看到 productpage 页面中会随机展示 reviews 服务的不同版本的效果(红色、黑色的星形或者没有显示)。reviews 服务出现这种情况是因为我们还没有使用 Istio 来控制版本的路由。
三、应用默认目标规则
在使用 Istio 控制 Bookinfo 版本路由之前,需要在目标规则中定义好可用的版本,命名为 subsets 。
运行以下命令为 Bookinfo 服务创建的默认的目标规则:
- 如果没有启用双向 TLS,请执行以下命令
$ kubectl apply -f samples/bookinfo/networking/destination-rule-all.yaml
destinationrule.networking.istio.io/productpage created
destinationrule.networking.istio.io/reviews created
destinationrule.networking.istio.io/ratings created
destinationrule.networking.istio.io/details created
- 如果启用了双向 TLS,请执行以下命令:
kubectl apply -f samples/bookinfo/networking/destination-rule-all-mtls.yaml
等待几秒钟,以使目标规则生效。
可以使用以下命令查看目标规则:
kubectl get destinationrules -o yaml