w3_set_file_function
- 30、第02章节-Python3.5-上节内容回顾
- 31、第03章节-Python3.5-集合及其运算
- 32、第04章节-Python3.5-文件读与写详解1
- 33、第05章节-Python3.5-文件读与写详解2
- 34、第06章节-Python3.5-文件读与写详解3
- 36、第08章节-Python3.5-文件修改详解
- 37、第09章节-Python3.5-字符编码转换详解1
- 38、第10章节-Python3.5-字符编码转换详解2
- 39、第11章节-Python3.5-函数与函数式编程1
- 40、第12章节-Python3.5-函数与函数式编程2
- 41、第13章节-Python3.5-函数式编程之参数详解1
- 42、第14章节-Python3.5-函数式编程之参数详解2
- 43、第15章节-Python3.5-局部变量与全局变量作用域1
- 44、第16章节-Python3.5-局部变量与全局变量作用域2
- 45、第17章节-Python3.5-递归
- 46、第18章节-Python3.5-函数式编程与函数不同
- 47、第19章节-Python3.5-高阶函数
- 程序练习
30、第02章节-Python3.5-上节内容回顾
1.列表,元组操作
2.字符串操作
3.字典操作
31、第03章节-Python3.5-集合及其运算
集合运算
list_1 = [1,2,3,2]
print("list_1:",list_1)
set_1 = set(list_1)
print("set_1:",set_1)
set_2 = {2,3,4}
print("set_2",set_2)
#交集
print("交集:",set_1.intersection(set_2))
print(set_1 & set_2)
#并集
print("并集:",set_1.union(set_2))
print(set_1 | set_2)
#差集
print("差集",set_1.difference(set_2)) #从set_1中去掉set_2中也有的元素
print(set_1 - set_2)
#子集
print("子集",set_1.issubset(set_2))
set_3 = {2,3}
print("set_3:",set_3)
print("子集",set_3.issubset(set_2))
#父集
print("父集",set_1.issuperset(set_3))
#对称差集:把两个集合中重复的元素去掉后合并的新集合
print("对称差集",set_1.symmetric_difference(set_2))
print(set_1 ^ set_2)
#判断是否无交集,无有交集返回true,有则返回false
print(set_1.isdisjoint(set_2))
集合操作
#增加
set_1.add("") #增加一个元素
set_1.update(['','1','1']) #增加多个元素
print(set_1)
#删一项
set_1.remove("1")
print(set_1)
#set_1.pop() #随机删除一个元素,并把删除的字符返回
#set_1.discard("1") #删除指定元素,如果元素不存在,就什么也不做
#如果不指定元素,则删除所有的set_1的元素
#判断x是否是a的成员(适用于字典,列表,集合,字符串)
# x in a
strings = "my name is"
if "name" in strings:
print("name in strings")
#x not in a
32、第04章节-Python3.5-文件读与写详解1
只读模式,只写模式(创建文件),追加模式
f = open("file_test.txt",'w',encoding="utf-8") #文件句柄
f.write("I love python!
")
f.write("I love python3!
")
f.close()
f = open("file_test.txt",'r',encoding="utf-8") #文件句柄
date = f.read()
print(date)
f.close()
f = open("file_test.txt",'a',encoding="utf-8") #文件句柄
f.write("I love python4!
")
f.write("I love python5!
")
f.close()
33、第05章节-Python3.5-文件读与写详解2
读取文件每行
小文件:可以将文件整个读取到内存中
f = open("file_test.txt",'r',encoding="utf-8")
# print(f.readlines().strip())
# print(f.readline().strip())
for line in f.readlines():
    print(line.strip())
f.close()
大文件:
f = open("file_test.txt",'r',encoding="utf-8")
count = 0
for line in f:
    if count == 2:
        print("---我是分割线---")
        count += 1
        continue

    print(line.strip())
    count += 1
f.close()
34、第06章节-Python3.5-文件读与写详解3
f.fileno() #文件在内存中的编号
f.flush() #将内存中缓存的未真正写入文件的数据强制立即写入文件
f.readable()
f.seekable()
f.writable()
f.seek()
f.tell() #告知句柄指针指向文件的位置
f = open("file_test.txt",'r+',encoding="utf-8") #读写
#f = open("file_test.txt",'w+',encoding="utf-8") #写读,先创建一个文件,再写入
#f = open("file_test.txt",'a+',encoding="utf-8") #追加读写
#f = open("file_test.txt",'wb',encoding="utf-8") #二进制编码处理
36、第08章节-Python3.5-文件修改详解
f = open("file_test.txt","r",encoding="utf-8")
f_new = open("file_new_test.txt","w",encoding="utf-8")
for line in f:
    if "I love python3" in line:
        line = line.replace("I love python3","------alex是分割线---------")
    f_new.write(line)
f.close()
f_new.close()
37、第09章节-Python3.5-字符编码转换详解1
为了避免文件打开后,忘记关闭,可以使用with open() as f:
代替以前的open()赋值给f
example:
with open("file_test.txt","r",encoding="utf-8") as f,
     open("file_new_test.txt","w",encoding="utf-8") as f_new:
    for line in f:
        if "I love python3" in line:
            line = line.replace("I love python3","------alex是分割线---------")
        f_new.write(line)
规范:python建议每行不超过80个字符,如果超过,可使用‘’来连接
编码
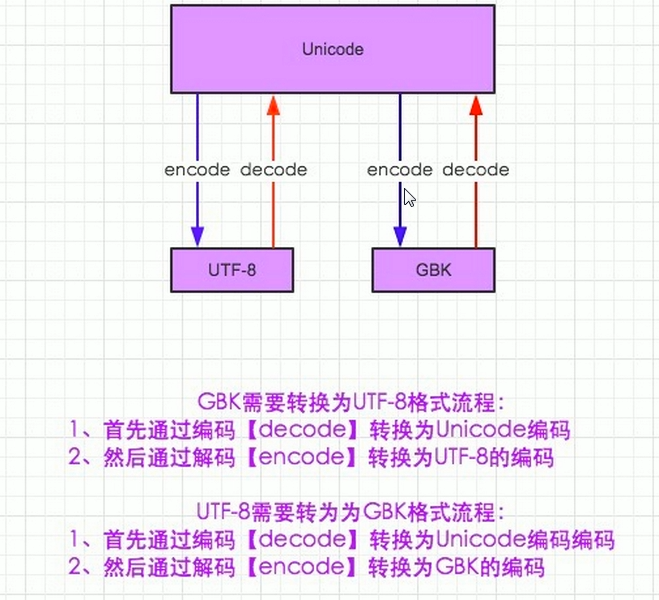
编码补充
ascii码:只能显示英语,数字,特殊字符
万国码:unicode,最开始16位,中文或亚洲文字不够,采用32位(即4个字节)
升级:utf-8,utf-16,utf-32
utf-8:最少用8位来表示一个英文;欧洲16位(2个字节);亚洲24位(3个字节)
gbk: 中国的编码,只能表示中文和ascii码中的字符
打印默认编码
import sys
print(sys.getdefaultencoding())
38、第10章节-Python3.5-字符编码转换详解2
python3中默认编码unicode,
python3中默认以byte存储
#!/usr/bin/env python
#-*-coding:gbk -*-
#author: Mr.Wu
import sys
s = '你好'
print(s.encode("gbk"))
print(s.encode("utf-8"))
print(sys.getdefaultencoding())
print(s.encode("utf-8").decode("utf-8").encode("gbk").decode("gbk"))
39、第11章节-Python3.5-函数与函数式编程1
40、第12章节-Python3.5-函数与函数式编程2
import time

def logger():
    time_format = '%Y-%m-%d %X'
    current_time = time.strftime(time_format)
    print(current_time)
41、第13章节-Python3.5-函数式编程之参数详解1
关于return
当返回值的个数为0,则返回None
当返回值的个数为1,则返回object
当返回值的个数为>1,则返回tuple类型,tuple中元素为返回的各个值
形参和实参
标准调用和关键字调用
def test(x,y,z):
    print(x)
    print(y)
    print(z)

test(1,2,3) #标准调用,形式参数的位置必须一一对应
test(y=4,z=5,x=6) #关键字调用,形式参数位置无需固定
test(4,z=5,y=6)
特别注意:同时使用位置调用与关键字调用,关键字参数不能写在位置参数之前
42、第14章节-Python3.5-函数式编程之参数详解2
函数默认参数
def test(x,y=1):
    print(x)
    print(y)

test(1)
test(1,2)
参数列表
接受位置参数调用,不能接受关键字参数调用
def test(*args):
    print(args)
test(1,2,3)
test({'a':1})
#####
#组合应用
def test(x,*args):
    print(x)
    print(args)
test(1,2,3)
test({'a':1})
关于**kwargs参数
把关键字参数转为字典的形貌传入,只能接受关键字参数调用
def test(**kwargs):
    print(kwargs)
test(name='alex',age=100,job='IT')
43、第15章节-Python3.5-局部变量与全局变量作用域1
1.在子程序中定义的变量为局部变量,在程序的一开始定文的变量 称为全局变量;
2.全局变量作用域是整个程序,局部变量作用域是定义该变量的子程序
3.当全局变量与局部变量同名时:
在定义局部变量的子程序内,局部变量起作用,在其它地方全局变量起作用
4.函数中的变量默认都为局部变量,如果需要转为全局变量,就使用global声明
但是,只有字符串,整数不能被局部改变
列表,字典可能被函数中全局改变
注意:这种方式极不推荐使用,容易在调用时出错
school = "old boy"
def change_name(name):

    school = "Mage Linux"
    print(name)
    print(school)
name = "test_name"
change_name(name)
print(school)

def test_global(name):
    global school
    school = "Mage Linux"
    print(name)
    print(school)
test_global(name)
print(school)
44、第16章节-Python3.5-局部变量与全局变量作用域2
list = [1,2,3,4]
def test(test):
    print(test)
    list[0] = "string"

test(list)
print(list)
45、第17章节-Python3.5-递归
在函数内部,可以调用其他函数。如果一个函数在内部调用自身本身,这个函数就是递归函数。
递归特性:
- 必须有一个明确的结束条件
- 每次进入更深一层递归时,问题规模相比上次递归都应有所减少
- 递归效率不高,递归层次过多会导致栈溢出(在计算机中,函数调用是通过栈(stack)这种数据结构实现的,每当进入一个函数调用,栈就会加一层栈帧,每当函数返回,栈就会减一层栈帧。由于栈的大小不是无限的,所以,递归调用的次数过多,会导致栈溢出)
例:
def calc(n):
    print(n)
    if int(n/2) > 0:
        return calc(int(n/2))
    print("->:",n)

calc(10)
46、第18章节-Python3.5-函数式编程与函数不同
47、第19章节-Python3.5-高阶函数
高阶函数:变量可以指向函数,函数的参数能接受变量,那么一个函数就可以接收另一个函数作为参数,这种函数就称之为高价函数
程序练习
http://www.cnblogs.com/alex3714/articles/5717620.html
1.写出简单的shell,sed替换功能
#!/usr/bin/env python
#-*-coding:utf-8-*-

import sys,os

if len(sys.argv) < 4:
    print("please make sure 3 parameters be given")
    exit(1)
else:
    ori_string = sys.argv[1]
    new_string = sys.argv[2]
    filename = sys.argv[3]

if not os.path.isfile(filename):
    print("{filename} not exist!".format(filename = filename))
else:
    with open(filename,"r",encoding="utf-8") as f,
         open("file_temp","w", encoding="utf-8") as f_temp:
        count = 0
        for line in f:
            if ori_string in line:
                line = line.replace(ori_string,new_string)
                count += 1
            f_temp.write(line)
        if count > 0:
            os.rename("file_temp",filename)
            print("replaced:{count}".format(count = count))
        else:
            os.remove("file_temp")
            print("no string need to be replaced")
2.修改haproxy配置文件
1、查
    输入:www.oldboy.org
    获取当前backend下的所有记录

2、新建
    输入:
        arg = {
            'bakend': 'www.oldboy.org',
            'record':{
                'server': '100.1.7.9',
                'weight': 20,
                'maxconn': 30
            }
        }

3、删除
    输入:
        arg = {
            'bakend': 'www.oldboy.org',
            'record':{
                'server': '100.1.7.9',
                'weight': 20,
                'maxconn': 30
            }
        }
global
        log 127.0.0.1 local2
        daemon
        maxconn 256
        log 127.0.0.1 local2 info
defaults
        log global
        mode http
        timeout connect 5000ms
        timeout client 50000ms
        timeout server 50000ms
        option  dontlognull

listen stats :8888
        stats enable
        stats uri       /admin
        stats auth      admin:1234

frontend oldboy.org
        bind 0.0.0.0:80
        option httplog
        option httpclose
        option  forwardfor
        log global
        acl www hdr_reg(host) -i www.oldboy.org
        use_backend www.oldboy.org if www

backend www.oldboy.org
        server 100.1.7.9 100.1.7.9 weight 20 maxconn 3000

原配置文件