1.创建工程并引入坐标


<parent>
        <groupId>org.springframework.boot</groupId>
        <artifactId>spring-boot-starter-parent</artifactId>
        <version>2.1.3.RELEASE</version>
        <relativePath/> <!-- 设定一个空值将始终从仓库中获取,不从本地路径获取 查找顺序:relativePath元素中的地址–本地仓库–远程仓库 -->
    </parent>
    <dependencies>
        <!-- web -->
        <dependency>
            <groupId>org.springframework.boot</groupId>
            <artifactId>spring-boot-starter-web</artifactId>
        </dependency>
        <!-- SpringSecurity -->
        <dependency>
            <groupId>org.springframework.boot</groupId>
            <artifactId>spring-boot-starter-security</artifactId>
        </dependency>
        <!-- jsp页面使用jstl标签 -->
        <dependency>
            <groupId>javax.servlet</groupId>
            <artifactId>jstl</artifactId>
        </dependency>
        <!-- 用于编译jsp -->
        <dependency>
            <groupId>org.apache.tomcat.embed</groupId>
            <artifactId>tomcat-embed-jasper</artifactId>
            <scope>provided</scope>
        </dependency>
        <!-- Provided 编译和测试的时候使用-->
        <dependency>
            <groupId>org.springframework.boot</groupId>
            <artifactId>spring-boot-starter-tomcat</artifactId>
            <scope>provided</scope>
        </dependency>
        <!-- mysql -->
        <dependency>
            <groupId>mysql</groupId>
            <artifactId>mysql-connector-java</artifactId>
            <version>5.1.47</version>
        </dependency>
        <!-- 通用mapper -->
        <dependency>
            <groupId>tk.mybatis</groupId>
            <artifactId>mapper-spring-boot-starter</artifactId>
            <version>2.1.5</version>
        </dependency>
    </dependencies>
2.加入jsp页面等静态资源:
在src/main目录下创建webapp目录

这时webapp目录并不能正常使用,因为只有web工程才有webapp目录,在pom文件中修改项目为web工程

3.编写控制器
@Controller
@RequestMapping("/product")
public class ProductController {

    @Secured({"ROLE_PRODUCT", "ROLE_ADMIN"}) // SpringSecurity内部制定的注解
    // @RolesAllowed({"ROLE_PRODUCT", "ROLE_ADMIN"}) // jsr250注解
    // @PreAuthorize("hasAnyRole('ROLE_PRODUCT', 'ROLE_ADMIN')") // spring的el表达式注解
    @GetMapping("/findAll")
    public String findAll() {
        return "product-list";
    }
}
4.创建角色 pojo对象
这里直接使用SpringSecurity的角色规范,实现GrantedAuthority接口
public class SysRole implements GrantedAuthority {

    private Integer id;
    private String roleName;
    private String roleDesc;

    public Integer getId() {
        return id;
    }

    public void setId(Integer id) {
        this.id = id;
    }

    public String getRoleName() {
        return roleName;
    }

    public void setRoleName(String roleName) {
        this.roleName = roleName;
    }

    public String getRoleDesc() {
        return roleDesc;
    }

    public void setRoleDesc(String roleDesc) {
        this.roleDesc = roleDesc;
    }

    @JsonIgnore // 在将来我们可能会拿这个实体类转成json字符串,或者json转成java对象,需要忽略重写的几个属性
    @Override
    public String getAuthority() {
        return roleName;
    }
}
5.创建用户pojo对象
这里直接实现SpringSecurity的用户对象接口UserDetails,并添加角色集合私有属性。
public class SysUser implements UserDetails {

    private Integer id;
    private String username;
    private String password;
    // 在MySql中是没有直接定义成Boolean这种数据类型.
    // 它只能定义成 tinyint(1) ;
    // status等于1时代表true,status等于0时代表false;
    private Boolean status;
    private List<SysRole> roles;

    public List<SysRole> getRoles() {
        return roles;
    }

    public void setRoles(List<SysRole> roles) {
        this.roles = roles;
    }

    public Integer getId() {
        return id;
    }

    public void setId(Integer id) {
        this.id = id;
    }

    public void setUsername(String username) {
        this.username = username;
    }

    public void setPassword(String password) {
        this.password = password;
    }

    public Boolean getStatus() {
        return status;
    }

    public void setStatus(Boolean status) {
        this.status = status;
    }

    @JsonIgnore // 在将来我们可能会拿这个实体类转成json字符串,或者json转成java对象,需要忽略重写的几个属性
    @Override
    public Collection<? extends GrantedAuthority> getAuthorities() {
        return roles;
    }

    @Override
    public String getPassword() {
        return password;
    }

    @Override
    public String getUsername() {
        return username;
    }

    /**
     * 账户是否失效
     * @return
     */
    @JsonIgnore
    @Override
    public boolean isAccountNonExpired() {
        return true;
    }

    /**
     * 账户是否锁定
     * @return
     */
    @JsonIgnore
    @Override
    public boolean isAccountNonLocked() {
        return true;
    }

    /**
     * 密码是否失效
     * @return
     */
    @JsonIgnore
    @Override
    public boolean isCredentialsNonExpired() {
        return true;
    }

    /**
     * 指定当前用户是否可用
     * @return
     */
    @JsonIgnore
    @Override
    public boolean isEnabled() {
        return status;
    }
}
6.提供角色mapper接口
public interface RoleMapper extends Mapper<SysRole> {

    @Select("select * from sys_role r, sys_user_role ur where r.id=ur.rid and ur.uid = #{uid}")
    List<SysRole> findByUid(Integer uid);
}
7.提供用户mapper接口
public interface UserMapper extends Mapper<SysUser> {

    @Select("select * from sys_user where username = #{username}")
    @Results({
            @Result(id = true, property = "id", column = "id"),
            @Result(property = "username", column = "username"),
            @Result(property = "password", column = "password"),
            @Result(property = "roles", column = "id",
                many = @Many(
                      select = "com.fgy.mapper.RoleMapper.findByUid",
                      fetchType = FetchType.EAGER
                )
            )
    })
    SysUser findByName(String username);
}
8.提供认证service接口
public interface UserService extends UserDetailsService {
}
9.提供认证 service实现类
@Service("userService")
@Transactional
public class UserServiceImpl implements UserService {

    @Autowired
    private UserMapper userMapper;

    @Override
    public UserDetails loadUserByUsername(String s) throws UsernameNotFoundException {
        return userMapper.findByName(s);
    }
}
10.自定义异常页面
@ControllerAdvice
public class HandlerControllerException {

    @ExceptionHandler(RuntimeException.class)
    public String exceptionHandler(RuntimeException e) {

        if (e instanceof AccessDeniedException) {
            // 如果是权限不足异常,则跳转到权限不足页面!
            return "redirect:/403.jsp";
        }
        // 其余的异常都到500页面!
        return "redirect:/500.jsp";
    }
}
11.编写配置文件(.yml)
server:
  port: 8080

spring:
  mvc:
    view:
      prefix: /pages/
      suffix: .jsp
  datasource:
    driver-class-name: com.mysql.jdbc.Driver
    url: jdbc:mysql:///springsecurity
    username: root
    password: root

mybatis:
  type-aliases-package: com.fgy.domain
  # mybatis默认是属性名和数据库字段名一一对应的,即
  # 数据库表列:user_name
  # 实体类属性:user_name

  # 但是java中一般使用驼峰命名
  # 数据库表列:user_name
  # 实体类属性:userName

  # 在Springboot中,可以通过设置map-underscore-to-camel-case属性为true来开启驼峰功能
  configuration:
    map-underscore-to-camel-case: true
logging:
  level:
    com.fgy: debug
12.提供 SpringSecurity 配置类,放在config包下
/**
 * springSecurity配置类
 */
@Configuration
@EnableWebSecurity
@EnableGlobalMethodSecurity(jsr250Enabled = true,
                            prePostEnabled = true,
                            securedEnabled = true) // 实际只开一种即可,这里只是演示
public class SecurityConfig extends WebSecurityConfigurerAdapter {

    @Autowired
    private UserService userService;

    /**
     * 生成认证使用的加密对象,添加到容器中
     * @return
     */
    @Bean
    public BCryptPasswordEncoder passwordEncoder() {
        return new BCryptPasswordEncoder();
    }

    // 认证用户的来源【内存或数据库】
    @Override
    public void configure(AuthenticationManagerBuilder auth) throws Exception {
        // 指定用户的来源,一般不会这么做,这里只是测试
        /*auth.inMemoryAuthentication()
                .withUser("user")
                .password("{noop}user")
                .roles("USER");*/

        auth.userDetailsService(userService).passwordEncoder(passwordEncoder());
    }

    // 配置springSecurity相关信息
    @Override
    public void configure(HttpSecurity http) throws Exception {
        // 释放静态资源,指定资源拦截规则,指定自定义认证页面,指定退出认证配置,csrf配置
        http.authorizeRequests()
                .antMatchers("/login.jsp", "/failer.jsp", "/css/**", "/img/**", "/plugins/**")
                .permitAll() //释放上面的资源,不需要认证即可访问
                .antMatchers("/**").hasAnyRole("ROLE_USER", "ROLE_ADMIN")
                .anyRequest().authenticated() // .anyRequest().authenticated() 表示其他请求资源需要认证之后才能访问
                .and() // 表示一个新的配置开始(配置认证信息)
                .formLogin()
                .usernameParameter("username")
                .passwordParameter("password")
                .loginPage("/login.jsp")
                .loginProcessingUrl("/login")
                .successForwardUrl("/index.jsp")
                .failureForwardUrl("/failer.jsp")
                .permitAll() // 登录后,无论成功与否,都需要放行接下来的资源
                .and() // 配置退出登录信息
                .logout()
                .logoutUrl("/logout")
                .logoutSuccessUrl("/login.jsp")
                .invalidateHttpSession(true) // 是否清空session
                .permitAll()
                .and() // csrf配置(csrf功能默认开启,如果不需要关闭,下面都不用配置了)
                .csrf()
                .disable(); // 关闭csrf防护
    }
}
13.编写启动类
@SpringBootApplication
@MapperScan("com.fgy.mapper")
public class Application {

    public static void main(String[] args) {
        SpringApplication.run(Application.class, args);
    }
}
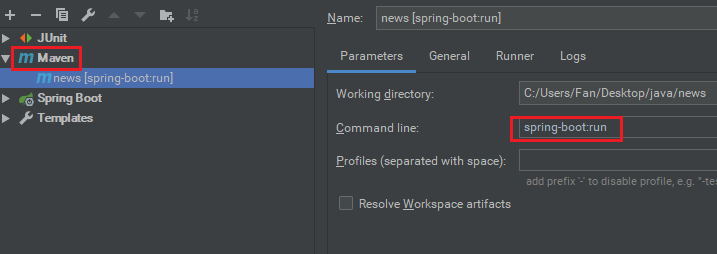
14.使用maven命令运行