2016.06.23、2016.07.27、2017.01.22增改
一、创建线程的方式
1、继承Thread(不多解释)
2、实现Runnable接口
通过查看源代码,我们可以知道Thread类是实现了Runnable的。
Runnable源代码:
public
interface Runnable {
    /**
     * When an object implementing interface <code>Runnable</code> is used
     * to create a thread, starting the thread causes the object's
     * <code>run</code> method to be called in that separately executing
     * thread.
     * <p>
     * The general contract of the method <code>run</code> is that it may
     * take any action whatsoever.
     *
     * @see     java.lang.Thread#run()
     */
    public abstract void run();
}
首先自己写一个类实现Runnable接口,重写其中run()方法。之后作为target参数创建线程(Thread的一个构造函数),下面是Thread源码:
    public Thread(Runnable target) {
        init(null, target, "Thread-" + nextThreadNum(), 0);
    }
该构造函数调用了init方法,我们之后可以看到init方法里有这样一句,this.target = target; 其中target是Thread成员变量。
    /* What will be run. */
    private Runnable target;
最后,Thread类的run方法其实调用的是这个target的run()
    @Override
    public void run() {
        if (target != null) {
            target.run();
        }
    }
这就是我从jdk源代码中看到的一切,源码之中,了无秘密,看不懂我的描述的,请自己去看源码。jdk这样设计Thread其实是运用了某种设计模式,具体哪种我还不清楚,以后学了设计模式再补充。
有了上面基础,可以比较两种创建线程的优劣:
(1)实现了Runnable的类还可以再继承别的类,而继承Thread类的类不能再继承别的类。(java不支持多继承)
(2)Runnable方式,可以多个线程共享一个target对象,所以适合多个相同线程来处理一份资源的情况。其实此处共享是指new不同的Thread类,但将同一个Runnable实现对象作为构造函数参数,也就是target。如下面的代码:
package cn;

/**
* @ClassName: Eat_Apples
* @author sonne
* @date 2017-1-22 上午11:35:16
* @version 1.0
 */
class Eat_Apples implements Runnable {
    private int apple_num = 90;

    @Override
    public void run() {
        for (int i = 0; i < 30; i++)
            if (apple_num > 0)
                System.out.println("eat one apple, now apple num is:" + Integer.toString(--this.apple_num) + " sailed by " + Thread.currentThread().getName());
    }
}

public class TestRunnable {
    public static void main(String[] args) {
        Eat_Apples ea = new Eat_Apples();
        new Thread(ea).start();
        new Thread(ea).start();
        new Thread(ea).start();
    }
}
运行:

Eat_Apples这个类的私有成员apple_num为创建的三个线程所共享。每个线程吃30个苹果,共90个。
如果是Thread方式创建,则只能达到每个线程有自己的apple_num。
3、使用Callable和FutureTask,这是java 5后新增的内容,实现了有返回值的线程。首先要继承Callable接口,然后实现其中call()方法。随后用FutureTask包装,最后将之作为Thread的target创建线程。下面是我写的示例代码:
package cn.thread;

import java.util.concurrent.Callable;
import java.util.concurrent.ExecutionException;
import java.util.concurrent.FutureTask;

/**
* @ClassName: MyThread00
* @Description: 测试Callable创建线程
* @author 无名
* @date 2016-6-23 下午9:06:14
* @version 1.0
 */
public class MyThread00 implements Callable<Integer>
{

    private int count;

    public MyThread00(int count)
    {
        this.count = count;
    }

    @Override
    public Integer call() throws Exception
    {
        int i = 0;
        for(; i < count; i++)
        {
            System.out.println(Thread.currentThread().getName()
                    + "いまは" + i);
        }
        return i;
    }

    public static void main(String[] args)
    {
        MyThread00 mt0 = new MyThread00(10);
        FutureTask<Integer> task0 = new FutureTask<Integer>(mt0);

        MyThread00 mt1 = new MyThread00(5);
        FutureTask<Integer> task1 = new FutureTask<Integer>(mt1);

        new Thread(task0).start();
        new Thread(task1).start();

        try
        {
            System.out.println("线程1返回值:" + task0.get());
            System.out.println("线程2返回值:" + task1.get());
        }
        catch (InterruptedException | ExecutionException e)
        {
            e.printStackTrace();
        }
    }

}
运行结果:

二、线程状态
就绪、运行、阻塞、死亡。
一个Thread对象运行start()方法则就绪。
就绪的线程得到了处理器资源则运行。
一言以蔽之,start()方法则就绪,而何时运行取决于jvm的调度。
运行和阻塞之间转换情况比较多,例如sleep()和notify():
一个Thread对象运行完run()方法则死亡。
三、Thread提供的一些方法(线程控制)
这个比较简单,看看Thread类源码基本就明白了。
sleep方法,该线程进入阻塞一段时间
yield方法,该线程进入就绪状态(与阻塞有差别)
做一道《thinking in java》的课后题吧:Implement a Runnable.Inside run(),print a message,and then call yield().Repeat this three times,and then return from run().Put a startup message in the constructor and a shutdown message when the task terminates.Create a number of these tasks and drive them using threads.
package cn.thread;

/**
* @ClassName: MyThread
* @Description: thinking in java chapter11
* @author 无名
* @date 2016-7-27 下午8:48:15
* @version 1.0
 */
class MyThread implements Runnable{
    MyThread(String startMsg,String endMsg){
        this.startMsg = startMsg;
        this.endMsg = endMsg;
    }
    private String startMsg;
    private String endMsg;

    @Override
    public void run() {
        System.out.println(Thread.currentThread().getName() + startMsg);
        for (int i = 0; i < 3; i++) {
            System.out.println("run " + Thread.currentThread().getName() + " " + i );
            Thread.yield();
        }
        System.out.println(Thread.currentThread().getName() + endMsg);
    }
}

public class YieldTest {
    public static void main(String[] args) {
        MyThread mt1 = new MyThread("start","end");
        Thread t1 = new Thread(mt1);
        Thread t2 = new Thread(mt1);
        Thread t3 = new Thread(mt1);
        Thread t4 = new Thread(mt1);
        Thread t5 = new Thread(mt1);
        Thread t6 = new Thread(mt1);
        Thread t7 = new Thread(mt1);
        t1.start();  t2.start();
        t3.start();  t4.start();
        t5.start();  t6.start();
        t7.start();
    }
}
运行结果:
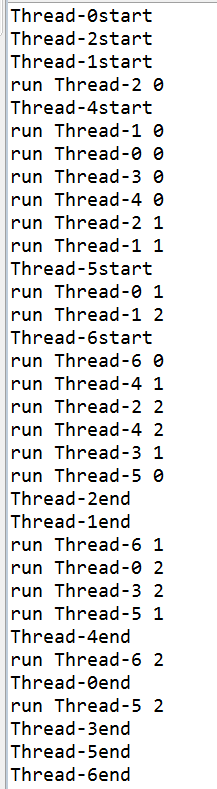
若把yield那行代码去掉:

结论:我们发现把yield去掉之后每个线程的三次循环基本都一下子输出了,因为任务比较简单可以在一个时间片内完成,所以在中途没有切换上下文。而增加了yield之后,执行完一次循环之后,该线程有很大几率被切换掉。
setDaemon方法,设置为后台(守护)线程。后台线程特点:当所有前台线程都死亡后,后台线程自动死亡(即使这时候该后台线程的run方法还没执行完毕),因为后台线程的存在就是为前台线程服务的。
package cn.thread;

/**
* @ClassName: TestDaemontThread
* @author sonne
* @date 2017-1-22 下午2:41:32
* @version 1.0
 */
public class TestDaemontThread implements Runnable {

    @Override
    public void run() {
        for (int i = 0; i < 1000; i++) {
            System.out.println("I am alive " + i + " " + Thread.currentThread().getName());
        }
    }

    public static void main(String[] args) {
        TestDaemontThread tdt = new TestDaemontThread();
        Thread t = new Thread(tdt);
        t.setDaemon(true);
        t.start();
        for (int i = 0; i < 10; i++) {
            System.out.println("hello, I am main " + i + " " + Thread.currentThread().getName());
        }
    }
}
运行结果:

可以看出守护进程并不会将run方法执行完毕(循环10000),因为前台方法main方法只循环10次,在前台方法执行完毕之后,守护进程就自动死掉了。
setPriority方法,设置线程优先级。
join方法,主线程调用的子线程启用join方法的话,主线程必须等待子线程。(在A线程中start B线程,A即为B的主线程,这时如果B.join(),则A必须等待B执行完)这个情况比较复杂:
package cn.thread;

/**
* @ClassName: MyThread01
* @Description: 线程join实验
* @author 无名
* @date 2016-6-23 下午10:29:32
* @version 1.0
 */
public class MyThread01 implements Runnable
{

    @Override
    public void run()
    {
        for(int i = 0; i < 10; i++)
        {
            System.out.println(Thread.currentThread().getName() + " " + i);
        }
    }

    public static void main(String[] args) throws InterruptedException
    {
        MyThread01 mt1 = new MyThread01();
        MyThread01 mt2 = new MyThread01();
        Thread t1 = new Thread(mt1);
        Thread t2 = new Thread(mt2);
        t1.start();
        t1.join();
        t2.start();
        for(int i = 0; i < 10; i++)
        {
            System.out.println(Thread.currentThread().getName() + i);
        }
    }

}
执行结果:

上面代码,main函数是主线程,在主线程里启用子线程1,子线程2。子线程1调用join方法。此时主线程让出资源给子线程1,而此时子线程2还未start(注意上面代码顺序),活着的只有子线程1,所以当子线程1执行完死掉,不再占用权限,主线程不再阻塞。子线程2也被start。此时主线程与子线程2并行执行。
若调换t1.join();与t2.start();顺序的话。因为主线程让出资源时候,子线程1、2都活着,所以子线程1、2并行执行。子线程1死掉以后,主线程执行。我们可以观察到子线程1死掉以后,子线程2和主线程并行执行的情况,但绝对不会出现子线程1和主线程并行执行的情况。

四、线程间同步(synchronized)
传统线程通信(notify、wait方式,object的方法)
自己写了些代码,来学习线程互斥和同步。
首先建立一个要在线程中运行的类:
/**
* @ClassName: Demo
* @Description: 线程中运行的demo类
* @author 无名
* @date 2016-5-14 下午9:37:36
* @version 1.0
 */
class Demo
{

    private boolean flg = true;

    public synchronized void output1(String name)
    {
        for (int i = 0; i < name.length(); i++)
        {
            System.out.print(name.charAt(i));
        }
        System.out.println();
    }

    public synchronized void sub(String name)
    {
        while (flg)
        {
            this.notify();
            for (int j = 0; j < 5; j++)
            {
                for (int i = 0; i < name.length(); i++)
                {
                    System.out.print(name.charAt(i));
                }
                System.out.println(j);
            }
            flg = false;
            try
            {
                this.wait();
            } catch (InterruptedException e)
            {
                e.printStackTrace();
            }
        }
    }

    public synchronized void main(String name)
    {
        while (!flg)
        {
            this.notify();

            for (int j = 0; j < 10; j++)
            {
                for (int i = 0; i < name.length(); i++)
                {
                    System.out.print(name.charAt(i));
                }
                System.out.println(j);
            }
            flg = true;
            try
            {
                this.wait();
            } catch (InterruptedException e)
            {
                e.printStackTrace();
            }
        }
    }
}
这个类中output1()方法用来测试syncronized互斥。
main方法和sub方法用来测试同步。
        final Demo demo = new Demo();
        new Thread(new Runnable()
        {
            public void run()
            {
                while (true)
                {
                    try
                    {
                        Thread.sleep(10);
                    } catch (InterruptedException e)
                    {
                        e.printStackTrace();
                    }
                    demo.output1("苍井空");
                }
            }
        }).start();
        new Thread(new Runnable()
        {
            public void run()
            {
                while (true)
                {
                    try
                    {
                        Thread.sleep(10);
                    } catch (InterruptedException e)
                    {
                        e.printStackTrace();
                    }
                    demo.output1("波多野结衣");
                }
            }
        }).start();
这种方式创建两个线程。因为两个线程使用的都是demo对象。该对象output1方法是syncronized,所以实现了互斥。
        new Thread(new Runnable()
        {
            public void run()
            {
                while (true)
                {
                    demo.main("苍井空");
                }
            }
        }).start();
        new Thread(new Runnable()
        {
            public void run()
            {
                while (true)
                {
                    demo.sub("波多野结衣");
                }
            }
        }).start();
运行这两个线程,可以实现每次线程1输出10次苍井空,每次线程2输出5次波多野结衣。因为这是一个对象的两个方法,所以要通过通信才能实现。
若没有通信,则由于加synchronized而一直只运行主函数。
若没有通信,且没有加synchronized而并行运行。
所以,可知:无论synchronized关键字加在方法上还是对象上,它取得的锁都是对象,而不是把一段代码或函数当作锁。
因为:
public synchronized void method(){
//
}
相当于
public void method() {
synchronized (this)
{
//..
}
}
synchronized来锁代码段时,取得的锁同样是对象。
将锁作用于static函数时,取得的锁是类。
五、线程间同步(Lock)
通常使用Lock的写法:
class MyClass {

  private final ReentrantLock lock = new ReentrantLock();
      //需要同步的方法

  public void method() {

       lock.lock();
       try{
      ...
     }
    finally {
      // 保证释放锁
      lock.unlock();
    }
  }
Lock锁的同步,需要配合Condition类。Condition的await()类似于wait(),signal()类似于notify()。
下面的代码使用Lock和Condition实现线程同步:
package cn.thread;

import java.util.concurrent.locks.Condition;
import java.util.concurrent.locks.ReentrantLock;

/**
* @ClassName: LockDemo
* @Description: test ReentrantLock and Condition
* @author sonne
* @date 2017-1-22 下午6:10:22
* @version 1.0
 */
class LockDemo {
    private final ReentrantLock lock = new ReentrantLock();
    //当flag为true运行苍井空的线程,当flag为false运行波多野结衣的线程
    private boolean flag = true;
    private Condition control = lock.newCondition();
    public void fuck_cangjingkong() {
        while (flag) {
            try {
                lock.lock();
                //苍井空线程进入运行状态
                control.signal();
                for (int i = 0; i < 5; i++)
                    System.out.println("苍井空 " + i);
                flag = false;
                //输出5次苍井空后进入阻塞状态
                control.await();
            } catch (InterruptedException e) {
                e.printStackTrace();
            } finally {
                lock.unlock();
            }
        }
    }
    public void fuck_boduoyejieyi() {
        while (!flag) {
            try {
                lock.lock();
                control.signal();
                for (int i = 0; i < 5; i++)
                    System.out.println("波多野结衣 " + i);
                flag = true;
                control.await();
            } catch (InterruptedException e) {
                e.printStackTrace();
            } finally {
                lock.unlock();
            }
        }
    }
}

public class LockTest {

    public static void main(String[] args) {
        final LockDemo fuck_action = new LockDemo();
        new Thread(new Runnable()
        {
            public void run()
            {
                while (true)
                {
                    fuck_action.fuck_boduoyejieyi();
                }
            }
        }).start();
        new Thread(new Runnable()
        {
            public void run()
            {
                while (true)
                {
                    fuck_action.fuck_cangjingkong();
                }
            }
        }).start();
    }
}
六、使用Executors(线程池)
下面是FixedThreadPool的使用。
package cn.thread;

import java.util.concurrent.ExecutorService;
import java.util.concurrent.Executors;

/**
* @ClassName: TestExecutorService
* @Description: TestExecutorService
* @author 无名
* @date 2017-2-4 下午3:40:45
* @version 1.0
 */
public class TestExecutorService {
    public static void main(String[] args) {
        ExecutorService exec = Executors.newFixedThreadPool(5);
        for (int i = 0; i < 5; i++)
            exec.execute(new LiftOff());
        exec.shutdown();
    }
}

class LiftOff implements Runnable {
    protected int countDown = 10;
    private static int taskCount = 0;
    private final int id = taskCount++;
    public LiftOff() {}
    public LiftOff(int countDown) {
        this.countDown = countDown;
    }
    public String status() {
        return "#" + id + "(" +
                (countDown > 0 ? countDown : "Liftoff!") + "), ";
    }
    @Override
    public void run() {
        while(countDown-- > 0) {
            System.out.println(status());
            Thread.yield();
        }
    }

}
The call to shutdown() prevents new tasks from being submitted to that Executor.The current thread(in this case,the one driving main()) will continue to run all tasks submitted before shutdown() was called.The program will exit as soon as the tasks in the Executor finish.
除了FixedThreadPool之外(可以限制并发线程数量),还有CachedThreadPool。
Although this book will use CachedThreadPools,consider using FixedThreadPools in production code.A CachedThreadPool will generally create as many threads as it needs during the execution of a program and then will stop creating new threads as it recycles the old ones,so it's a reasonable first choice as an Executor.Only if this approach causes problems do you need to switch to a FixedThreadPool.
------Thinking in Java