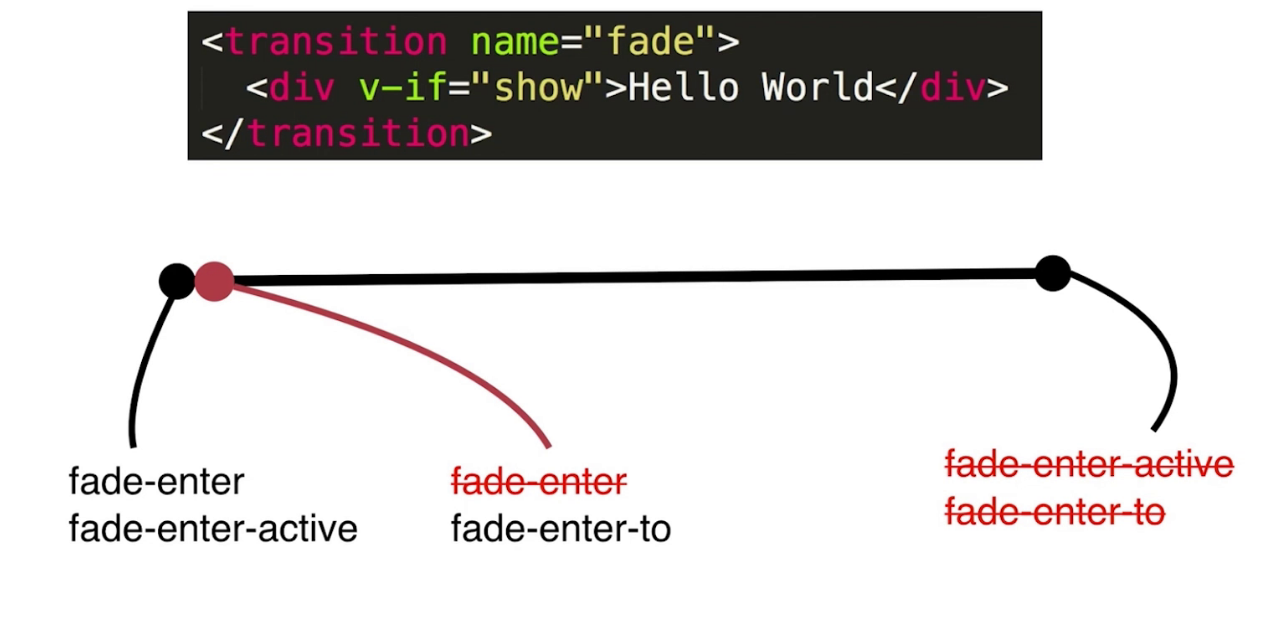
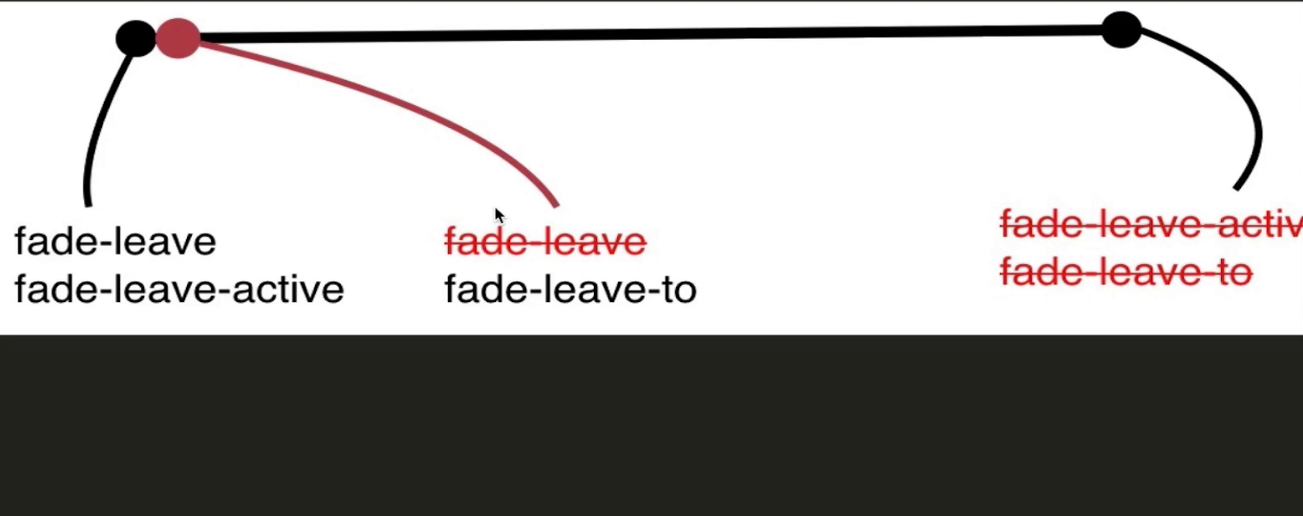
1、vue 的动画流程分为enter,和leave分别对应以下两幅图
<!doctype html>
<html lang="en">
<head>
    <meta charset="UTF-8">
    <meta name="viewport"
          content="width=device-width, user-scalable=no, initial-scale=1.0, maximum-scale=1.0, minimum-scale=1.0">
    <meta http-equiv="X-UA-Compatible" content="ie=edge">
    <title>动画</title>
    <link rel="stylesheet" href="./lib/bootstrap.css">
    <style>
        .yf-enter, .yf-leave-to {
            opacity: 0;
        }

        .yf-enter-active, .yf-leave-active {
            transition: opacity 2s;
        }
    </style>
    <script src="./lib/vue.js"></script>
    <script>
        window.onload = function () {
            let VM = new Vue({
                el: '#outdiv',
                data: {
                    content: 'this is test content',
                    show: false
                },
                methods: {
                    change() {
                        this.show = !this.show;
                    }
                }
            })
        }
    </script>
</head>
<body>
<div class="container" id="outdiv">
    <!--如果没有指定name那么默认为v-enter,v-enter-to,v-enter-active,v-leave,v-leave-to,v-leave-active-->
    <!--如果定义了name那么默认为name-enter,name-enter-to,name-enter-active,name-leave,name-leave-to,name-leave-active-->
    <!--当show为true的时候,即enter时opacity被赋值为0,随着动画的进行,yf-enter被删除掉那么opacity为1,同时定义的transition便起作用了-->
    <!--当show为false的时候,即leave时yf-leave的opacity为1,当动画进行时yf-leave-to的opacity为0,同时定义的transition便起作用了-->
   <!--如果要定义顺序,那么可以添加mode='in-out'或者mode='out-in'这个通常在多个组件之间切换时运用-->
    <transition name="yf">
        <div class="jumbotron" v-if="show">{{content}}</div>
    </transition>
    <input type="button" value="切换" class="btn btn-primary" @click="change">
</div>
</body>
</html>
2、如果添加自定义动画,如引入animate.css动画
<!doctype html>
<html lang="en">
<head>
    <meta charset="UTF-8">
    <meta name="viewport"
          content="width=device-width, user-scalable=no, initial-scale=1.0, maximum-scale=1.0, minimum-scale=1.0">
    <meta http-equiv="X-UA-Compatible" content="ie=edge">
    <title>test</title>
    <link rel="stylesheet" href="./lib/bootstrap.css">
    <link rel="stylesheet" href="./lib/animate.css">
    <style>
        v-enter, v-leave-to {
            opacity: 0;
        }

        v-enter-active, v-leave-active {
            transition: opacity 3s;
        }
    </style>
    <script src="./lib/vue.js"></script>
    <script>
        window.onload = function () {
            let VM = new Vue({
                el: '#outdiv',
                data: {
                    content: 'this is a text',
                    show: true

                },
                methods: {
                    change() {
                        this.show = !this.show;
                    }
                }
            })
        }
    </script>
</head>
<body>
<div class="container" id="outdiv">
    <!--添加自定义的类,那么enter-active-class与leave-active-class可以赋值自定义的类名-->
    <!--如果需要指定刷新页面时的动画,那么需要指定两个类,appear与appear-active-class,用法同enter-active-class一样-->
    <!--因为animate.css是keyframe动画,那么需要添加过渡动画,那么就需要添加默认的(name|v)-active-class这个类--->
    <!--指定动画时长,如果以transition的动画时长为主,那么可以指定一个type值为transition毕竟animate.css的动画时长只有1s-->
    <!--如果需要定义一个明确的动画时长,可以添加属性:duration="{enter:5000,leave:3000}"注意以毫秒为单位,更简单的写法就指定一个值表示进入和离开的时间:duration="3000"-->
    <transition
            type="transition"
            appear
            appear-active-class="animated zoomInDown v-enter-active"
            enter-active-class="animated zoomInDown v-enter-active"
            leave-active-class="animated zoomOutUp v-leave-active">
        <div class="jumbotron" v-if="show">{{content}}</div>
    </transition>
    <input type="button" value="点击" class="btn btn-primary" @click="change">
</div>
</body>
</html>
3、指定js的动画
通过transition这个标签的6个钩子函数执行动画before-enter,enter,after-enter,before-leave,leave,after-leave注意在每个enter或者leave的时候,会传入两个参数一个是执行动画的本体一个是函数,执行完动画后执行这个函数表示动画已经执行完毕,其余的只有一个函数表示动画执行的本体.
<!doctype html>
<html lang="en">
<head>
    <meta charset="UTF-8">
    <meta name="viewport"
          content="width=device-width, user-scalable=no, initial-scale=1.0, maximum-scale=1.0, minimum-scale=1.0">
    <meta http-equiv="X-UA-Compatible" content="ie=edge">
    <title>test</title>
    <link rel="stylesheet" href="./lib/bootstrap.css">
    <link rel="stylesheet" href="./lib/animate.css">
    <script src="./lib/vue.js"></script>
    <script src="./lib/jquery.js"></script>
    <script>
        window.onload = function () {
            let VM = new Vue({
                el: '#outdiv',
                data: {
                    show: true,
                    content: 'this is test content'
                },
                methods: {
                    change() {
                        this.show = !this.show;
                    },
                    beforeEnter(elem) {
                        $(elem).css('display', 'none');
                    },
                    handleEnter(elem, done) {
                        $(elem).fadeIn(400, () => {
                            done();
                        });
                    },
                    afterLeave(elem) {
                        console.log('this is leave');
                        console.log(arguments);
                    }
                }
            })
        }
    </script>
</head>
<body>
<div class="container" id="outdiv">
    <transition
            @before-enter="beforeEnter"
            @enter="handleEnter"
            @after-leave="afterLeave"
    >
        <div class="jumbotron" v-if="show">{{content}}</div>
    </transition>
    <div class="form-group">
        <div><input type="button" value="切换" class="btn btn-primary" @click="change"></div>
    </div>
</div>
</body>
</html>
4、如果是多个组件,那么可以使用transition-group这个标签来处理
<!doctype html>
<html lang="en">
<head>
    <meta charset="UTF-8">
    <meta name="viewport"
          content="width=device-width, user-scalable=no, initial-scale=1.0, maximum-scale=1.0, minimum-scale=1.0">
    <meta http-equiv="X-UA-Compatible" content="ie=edge">
    <title>test</title>
    <link rel="stylesheet" href="./lib/bootstrap.css">
    <link rel="stylesheet" href="./lib/animate.css">
    <script src="./lib/vue.js"></script>
    <script>
        window.onload = function () {
            Vue.component('yf-test', {
                props: {
                    list: {
                        type: Array,
                        required: false,
                        default() {
                            return []
                        }
                    }
                },
                template: '<ul class="list-group"><transition-group enter-active-class="animated zoomInUp"><li class="list-group-item" v-for="(value,index) of list" :key="index"><slot :data="value"></slot></li></transition-group></ul>'
            });

            let VM = new Vue({
                el: '#outdiv',
                data: {
                    count: 1,
                    list: []
                },
                methods: {
                    add() {
                        this.list.push(this.count++);
                    }
                }
            })
        }
    </script>
</head>
<body>
<div class="container" id="outdiv">
    <div class="jumbotron">
        <div class="row">
            <div class="col-md-6">
                <yf-test :list="list">
                    <template slot-scope="props">
                        <div>{{props.data}}</div>
                    </template>
                </yf-test>
            </div>
            <div class="col-md-6">
                <yf-test :list="list">
                    <template slot-scope="props">
                        <b>{{props.data}}</b>
                    </template>
                </yf-test>
            </div>
        </div>
    </div>
    <input type="button" value="增加" class="btn btn-primary" @click="add">
</div>
</body>
</html>
5、如果需要在vue项目是使用
import animated from 'animate.css' // npm install animate.css --save安装,在引入

Vue.use(animated)