修改于:2016.11.18 2017.1.10 2019.01.31
CocoaPods 源码 : https://github.com/CocoaPods/CocoaPods
CocoaPods工作原理:CocoaPods的工作主要是通过ProjectName.xcworkspace来组织的,在打开ProjectName.xcworkspace文件后,发现Xcode会多出一个Pods工程。
- 库文件引入及配置:
库文件的引入主要由Pods工程中的Pods-ProjectName-frameworks.sh脚本负责,在每次编译的时候,该脚本会帮你把预引入的所有三方库文件打包的成ProjectName.a静态库文件,放在我们原Xcode工程中Framework文件夹下,供工程使用。 -
Resource文件:
Resource资源文件主要由Pods工程中的Pods-ProjectName-resources.sh脚本负责,在每次编译的时候,该脚本会帮你将所有三方库的Resource文件copy到目标目录中。 -
依赖参数设置:
在Pods工程中的的每个库文件都有一个相应的SDKName.xcconfig,在编译时,CocoaPods就是通过这些文件来设置所有的依赖参数的,编译后,在主工程的Pods文件夹下会生成两个配置文件,Pods-ProjectName.debug.xcconfig、Pods-ProjectName.release.xcconfig。
CocoaPods的安装
1.准备工作
因为CocoaPods是跑在Ruby环境下面的软件,所以下载安装CocoaPods需要Ruby环境。OS X系统早已经默认可以运行Ruby了。但是ruby版本更新也很重要,可以参考:http://www.cnblogs.com/richard-youth/p/4676526.html
在安装的过程中,我们可能遇到下面的问题
问题①gem版本过老
先行解决:gem是管理Ruby库和程序的标准包, 升级gem执行下述命令即可(需要输入电脑密码)
sudo gem update --system
或者(Mac OSX 10.11之后)
sudo gem update -n /usr/local/bin —system
常见问题:ERROR: While executing gem ... (Errno::EPERM) Operation not permitted - /usr/bin/update_rubygems
说明:Mac OSX 10.11不能使用sudo gem update —system了,需要替换成:sudo gem update-n /usr/local/bin —system
问题②执行完install命令半天没反应
因为ruby的软件源rubygems.org因为使用的是亚马逊的云服务,被墙了,需要更新一下ruby的源,如下命令将官方的ruby源替换成国内淘宝的源:
如果出现了CocoaPods的ruby镜像文件问题 ( gem sources -a http://ruby.taobao.org/ 出现404了),那是因为http改为了https了:
步骤如下:
gem sources --remove https://rubygems.org/
等上面命令有反应之后再敲入以下命令
gem sources -a https://ruby.taobao.org/
要想验证是否替换成功了,可以执行:
gem sources -l
只有在终端中出现下面文字才表明你上面的命令是成功的:
*** CURRENT SOURCES ***
https://ruby.taobao.org/
提醒:如果曾经 gem sources -a http://ruby.taobao.org/ 过,那么还需要先进行如下清除操作:
gem sources --remove http://ruby.taobao.org/
问题3 淘宝镜像证书过期,无人维护后的解决方案(修改于2019.01.31)
清除淘宝的,然后添加原始的(需要科学上网)
$ gem sources --remove https://ruby.taobao.org/
$ gem sources -a https://rubygems.org/
https://rubygems.org/ added to sources
$ sudo gem install -n /usr/local/bin cocoapods
Password:
Successfully installed cocoapods-1.5.3
Parsing documentation for cocoapods-1.5.3
Done installing documentation for cocoapods after 3 seconds
1 gem installed
2.安装
终端输入以下命令:
sudo gem install cocoapods
或者(Mac OSX 10.11之后)
sudo gem install -n /usr/local/bin cocoapods
常见问题:ERROR: While executing gem ... (Errno::EPERM) Operation not permitted - /usr/bin/pod
说明: Mac OSX 10.11不能使用sudo gem install cocoapods了,需要替换成:sudo gem install -n /usr/local/bin cocoapods
2017.1.14遇到问题
$ sudo gem install -n /usr/local/bin cocoapods
ERROR: SSL verification error at depth 1: unable to get local issuer certificate (20)
ERROR: You must add /O=Digital Signature Trust Co./CN=DST Root CA X3 to your local trusted store
ERROR: SSL verification error at depth 2: self signed certificate in certificate chain (19)
ERROR: Root certificate is not trusted (/C=US/O=GeoTrust Inc./CN=GeoTrust Global CA)
Fetching: cocoapods-1.1.1.gem (100%)
Successfully installed cocoapods-1.1.1
Parsing documentation for cocoapods-1.1.1
Installing ri documentation for cocoapods-1.1.1
1 gem installed
$ pod --version
/Library/Ruby/Site/2.0.0/rubygems.rb:270:in `find_spec_for_exe': can't find gem cocoapods (>= 0.a) (Gem::GemNotFoundException)
from /Library/Ruby/Site/2.0.0/rubygems.rb:298:in `activate_bin_path'
from /usr/local/bin/pod:22:in `<main>'
解决方案:ruby出问题了,参考:http://www.cnblogs.com/richard-youth/p/4676526.html
在安装成功结束的时候,执行如下命令:
pod setup (如果没有报错,就说明一切安装就成功了!)
pod help 可以查找相关的pod命令以及使用方法。
pod search
pod search SDWebImage
3、升级CocoaPods
升级很简单,再次执行安装命令即可:
sudo gem install cocoapods
或者(Mac OSX 10.11之后)
sudo gem install -n /usr/local/bin cocoapods
需要注意的是,如果安装的时候使用了sudo,升级的时候一样需要使用该关键字,不然升级完了以后又会出现路径不匹配问题。
CocoaPods的使用
场景1:利用CocoaPods,在项目中导入AFNetworking类库
AFNetworking类库在GitHub地址是:https://github.com/AFNetworking/AFNetworking
1 、如果不知道CocoPods管理的库中是否有你想要的第三方类库,那么你可以通过pod search命令进行查找。在终端中输入:
pod search AFNetworking
2、如果支持的话,我们可以利用CocoaPods将AFNetworking导入你的项目中。
首先,我们需要在项目中加入CocoaPods的支持。
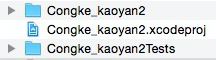
项目没有支持CocoaPods时的目录结构:
3、创建一个Podfile文件,然后在里面添加你需要下载的类库,每个项目只需要一个Podfile文件。
在终端中进入(cd命令到)你项目所在根目录,在项目的根目录下执行命令
pod init
回车后利用vim创建Podfile,运行:
vim podfile
键盘输入 i,进入编辑模式,
然后在Podfile文件中输入以下文字:
platform :ios, '7.0'
pod "AFNetworking", "~> 2.0"
这段文字可以在AFNetworking的github页面找到。这两句文字的意思是,当前AFNetworking支持的iOS最低版本是iOS 7.0, 要下载的AFNetworking版本是2.0。
然后按Esc,并且输入“ :”号进入vim命令模式,然后在冒号后边输入wq保存退出(vim环境下,保存退出命令是:wq) .
注意:键盘输入 :后,才能输入wq。
这时候,你会发现你的项目目录中,出现一个名字为Podfile的文件,而且打开文件后发现文件内容就是你刚刚输入的内容。
platform :ios, '7.0'
pod "AFNetworking", "~> 2.0"
注意,Podfile文件应该和你的工程文件.xcodeproj在同一个目录下。
这时候,你就可以利用CocoPods下载AFNetworking类库了。
常见问题:The dependency `` is not used in any concrete target
说明:Podfile升级之后到1.0.0版本,Pod里的内容必须明确指出所用第三方库的target,所以在podfile文件需要明确:
target “你的工程名称” do
end
例如:
platform :ios, '9.0'
target "ourApp" do
pod "AFNetworking", "~> 2.0"
target "ourAppTests" do
pod 'JSPatch', '~> 1.1.2'
end
end
platform: 可以指定平台的信息和deployment target的版本
target: 可以根据不同的target来引入不同的pod
pod: 引入依赖库
pod 'SSZipArchive' -- 引入最新版本
pod 'Objection', '0.9' -- 引入特定的版本
pod 'Objection', '>0.9'> -- 任何大于0.9的版本
pod 'Objection', '>=0.9'> -- 任何大于等于0.9的版本
pod 'Objection', '<0.9'> -- 任何小于0.9的版本
pod 'Objection', '<=0.9'> -- 任何小于等于0.9的版本
pod 'Objection', '~>0.9'> -- 任何介于0.9到1.0的最新版本,不包含1.0
pod 'AFNetworking', :path => '~/Documents/AFNetworking' -- 使用本地路径引入
pod 'AFNetworking', :git => 'https://github.com/gowalla/AFNetworking.git', :tag => '0.7.0' -- 使用git库引入
pod 'JSONKit', :podspec => 'https://example.com/JSONKit.podspec' -- 使用外部的podspec来引入
还是在终端中的当前项目目录下,运行以下命令
pod install
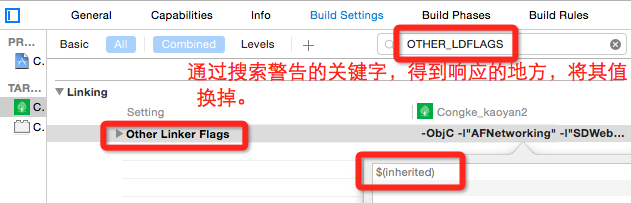
本人在操作的过程中真实的状况如下(出现了常见的警告,必须解决)(原来的项目的操作时候遇到的问题):
[!] The `Congke_kaoyan2 [Debug]` target overrides the `OTHER_CFLAGS` build setting defined in `Pods/Target Support Files/Pods/Pods.debug.xcconfig'. This can lead to problems with the CocoaPods installation
- Use the `$(inherited)` flag, or
- Remove the build settings from the target.
[!] The `Congke_kaoyan2 [Debug]` target overrides the `OTHER_LDFLAGS` build setting defined in `Pods/Target Support Files/Pods/Pods.debug.xcconfig'. This can lead to problems with the CocoaPods installation
- Use the `$(inherited)` flag, or
- Remove the build settings from the target.
[!] The `Congke_kaoyan2 [Release]` target overrides the `OTHER_CFLAGS` build setting defined in `Pods/Target Support Files/Pods/Pods.release.xcconfig'. This can lead to problems with the CocoaPods installation
- Use the `$(inherited)` flag, or
- Remove the build settings from the target.
[!] The `Congke_kaoyan2 [Release]` target overrides the `OTHER_LDFLAGS` build setting defined in `Pods/Target Support Files/Pods/Pods.release.xcconfig'. This can lead to problems with the CocoaPods installation
- Use the `$(inherited)` flag, or
- Remove the build settings from the target.
这种警告是不能忽视的,它带来的直接后果就是无法通过编译。
而产生此警告的原因是项目 Target 中的一些设置,CocoaPods 也做了默认的设置,如果两个设置结果不一致,就会造成问题。
我想要使用 CocoaPods 中的设置,分别在我的项目中定义`OTHER_CFLAGS` 和 `Other Linker Flags`的地方,把他们的值用`$(inherited)`替换掉,
进入终端,执行
pod update
警告没了,回到 Xcode,build通过。
网上还流行另外一种简单粗暴的方法
点击项目文件 project.xcodeproj,右键`显示包内容`,用文本编辑器打开`project.pbxproj`,删除`OTHER_LDFLAGS`的地方,保存,回到 Xcode,编译通过。
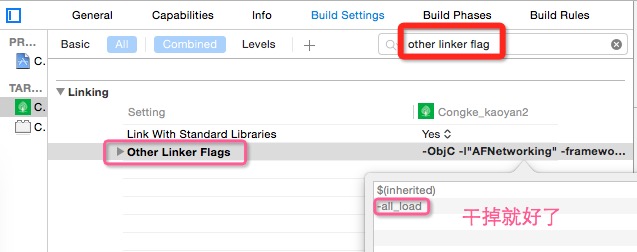
由于我原来项目中已经存在了AFNetworking的库,现在用cocospods又更新下载了一次,项目中会报错,所以需要将原来的删掉,
ld: 456 duplicate symbols for architecture x86_64
clang: error: linker command failed with exit code 1 (use -v to see invocation)
如果other linker Flags 还有诸如-all_load的值,也可能报错,所以也一并干掉,之后编译就ok了。
在pod install之后,你会发现:
[!] Please close any current Xcode sessions and use `Congke_kaoyan2.xcworkspace` for this project from now on.
意思是:以后打开项目就用 Congke_kaoyan2.xcworkspace 打开,而不是之前的.xcodeproj文件。
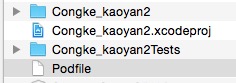
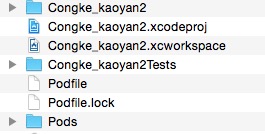
你刚刚运行pod install命令产生的新文件中除了这个文件,你会发现还多了另外一个文件“Podfile.lock”和一个文件夹“Pods”。 项目Xcode目录结构如下图:
AFNetwoking已经成功导入项目
场景2:如何正确编译运行一个包含CocoPods类库的项目
你可能好不容易在GitHub上找到一份代码符合自己的需求,编译发现有各种各样错误。一看,原来是缺失了各种其他第三方类库。如果发现你下载的代码包含了Podfile。这时候,打开终端,进入项目所在的目录,也就是和Podfile在同一目录下,和场景1一样,输入以下命令(由于已经有Podfile,所以不需要再创建Podfile):
pod update
注意如果刚刚你不是输入pod update,而是输入pod install,如果不成功,重新pod update一次即可。用 pod install只会按照Podfile的要求来请求类库,如果类库版本号有变化,那么将获取失败。但是 pod update会更新所有的类库,获取最新版本的类库。而且你会发现,如果用了 pod update,再用 pod install 就成功了。如果pod install不行,再用 pod update。总之优先使用pod update 命令。
install或update速度通常很慢,因为每次执行的时候都需要同步一下CocoaPods Specs,这个有几百兆的大小,同步一次非常耗时。所以如果你使用的第三方库并不是经常更新,则不用经常更新那个Specs库。可以使用以下命令:
pod install --verbose --no-repo-updatepod update --verbose --no-repo-update
场景3:如何给项目新添一个第三方库。
如果需要依赖多个第三方类库,那么将要导入新的第三方库。由于Podfile已经存在,只需要修改Podfile文件的内容,然后运行pod update命令即可,比如新增一个
SDWebImage第三方库,首先执行pod search SDWebImage查看一下SDWebImage的配置信息(或者直接到github上面查找),修改Podfile文件内容,在后面增加SDWebImage的对应配置信息,然后运行pod update命令就完成了对SDWebImage的集成。

然后再
$ pod update
2016.11.18日遇到问题:
$ pod install
[!] Attempt to read non existent folder `/Users/galahad/Desktop/学习资料(hello)/flowAssister/Pods/SDWebImage`.
网上说的什么重新卸载cocoapods,什么其他的办法都用了,还是这个问题,坑??????
最后发现学习资料4个汉字,真是艹艹
去掉汉字后,重新试试,ok(其实最后发现只是新建了一个文件夹,就可以了,无关汉字毛线关系。只是记录遇到问题并解决的过程)
2016.11.24遇到的问题
在跑一个demo的时候,总是出现
[!] Oh no, an error occurred.
的问题,查看上面的问题详细情况的时候,发现
```ruby
source 'https://github.com/CocoaPods/Specs.git'
target 'WKWebView+WBWebViewConsole' do
platform :ios, ??8.0??
pod 'WBWebViewConsole', :path => '../..'
end
```
我将podfile里面红色的这行去掉,然后再pod install 就OK了(可能是项目里面配置的支持版本问题,这样解决也是不能根治的,将电脑系统,所需的各种软件更新到最新再试)
2016.12.29 遇到的问题
总是遇到第三方的某个文件找不到的问题?
我的解决方式是:用cocopods将它先移除,再重新添加就好。
甚至是这样的问题 Undefined symbols for architecture x86_64: ..........
也可以这样解决。
2016.12.30 遇到的问题
$ pod install
Analyzing dependencies
[!] The version of CocoaPods used to generate the lockfile (1.2.0.beta.1) is higher than the version of the current executable (1.1.1). Incompatibility issues may arise.
[!] Unable to satisfy the following requirements:
- `UMengAnalytics-NO-IDFA` required by `Podfile`
- `UMengAnalytics-NO-IDFA (= 4.1.9)` required by `Podfile.lock`
None of your spec sources contain a spec satisfying the dependencies: `UMengAnalytics-NO-IDFA, UMengAnalytics-NO-IDFA (= 4.1.9)`.
You have either:
* out-of-date source repos which you can update with `pod repo update`.
* mistyped the name or version.
* not added the source repo that hosts the Podspec to your Podfile.
Note: as of CocoaPods 1.0, `pod repo update` does not happen on `pod install` by default.
[!] Your Podfile has had smart quotes sanitised. To avoid issues in the future, you should not use TextEdit for editing it. If you are not using TextEdit, you should turn off smart quotes in your editor of choice.
遇到这个问题的时候,我查询一下cocoapods上面的版本
$ pod search UMengAnalytics-NO-IDFA
发现最大的版本才:
pod 'UMengAnalytics-NO-IDFA', '~> 4.1.5'
修改podfile文件后,重新pod install,又出现以下问题:
$ pod install
Analyzing dependencies
[!] The version of CocoaPods used to generate the lockfile (1.2.0.beta.1) is higher than the version of the current executable (1.1.1). Incompatibility issues may arise.
[!] Unable to satisfy the following requirements:
- `UMengAnalytics-NO-IDFA (~> 4.1.5)` required by `Podfile`
- `UMengAnalytics-NO-IDFA (= 4.1.9)` required by `Podfile.lock`
None of your spec sources contain a spec satisfying the dependencies: `UMengAnalytics-NO-IDFA (~> 4.1.5), UMengAnalytics-NO-IDFA (= 4.1.9)`.
You have either:
* out-of-date source repos which you can update with `pod repo update`.
* mistyped the name or version.
* not added the source repo that hosts the Podspec to your Podfile.
Note: as of CocoaPods 1.0, `pod repo update` does not happen on `pod install` by default.
[!] Your Podfile has had smart quotes sanitised. To avoid issues in the future, you should not use TextEdit for editing it. If you are not using TextEdit, you should turn off smart quotes in your editor of choice.
解决方法:用xcode打开Podfile.lock文件,修改UMengAnalytics-NO-IDFA (= 4.1.9)为UMengAnalytics-NO-IDFA (= 4.1.5) 。
想法:其实上面如果用pod update会不会就不会出现这样的问题?
2017.6.13遇到的问题
[!] Attempt to read non existent folder `/Users/galahad/Desktop/研究代码/callNum(集成下载/Pods/BaiduMapKit`.
我用pod install 操作后会报上面的错误,pod update后没有效果。发现项目文件夹中有汉字“callNum(集成下载”,最后将汉字和括号移除,变成callNum,再次操作pod install 就OK了。
补充:
1.创建一个 Podfile 文件(可以用vim,也可以用如下方式)。
先使用 cd 操作 进入你的项目目录例如 $ cd /Users/XQ/Desktop/未命名文件夹
在这个目录下创建文件
touch Podfile 然后回车继续输入
open -e Podfile 这时将直接打开一个空的文件
现在在刚才打开的空白Podfile中加入你想要的,如
platform :ios, '7.0'
pod "AFNetworking", "~> 2.0"
当你执行pod install之后,除了Podfile外,CocoaPods还会生成一个名为Podfile.lock的文件,你不应该把这个文件加入到.gitignore中。因为Podfile.lock会锁定当前各依赖库的版本,之后如果多次执行pod install 不会更改版本,要pod update才会改Podfile.lock了。这样多人协作的时候,可以防止第三方库升级时造成大家各自的第三方库版本不一致。
3、移除cocoapods
编辑Podfile文件,清除里面所有库,然后终端输入:pod install。这时会清空第三方库和相关依赖库。
- TARGETS - Build Phases 删除有关pods的选项,至此完成删除。
说明:2017.1.14日我将mac 的系统更新到最新:10.12.2 之后,部分本文中提到的问题不复存在了。