centos7.8环境下通过快照功能恢复数据到elasticsearch6.8.12集群中
需求:
elasticsearch老的集群部署不规范,需要迁移到新的集群中,并且启用x-pach的密码验证功能
整体步骤:
1.搭建新集群,并启用repo功能
2.将老集群的数据创建快照,并导入到新集群中(esdump在超过1G数据的情况下效率极低,不推荐)
3.新集群状态没有问题后,启用密码验证功能
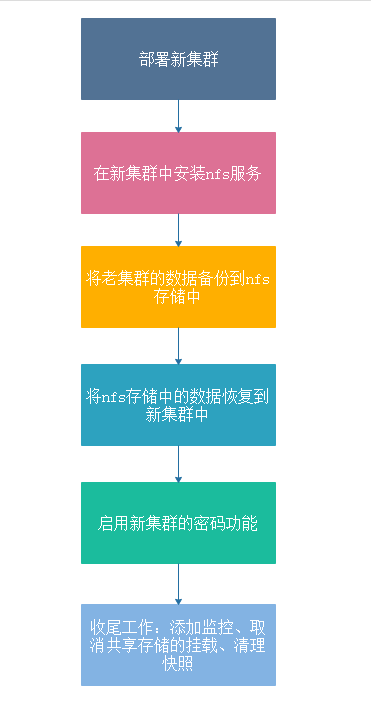
老集群的状态为yellow,操作是成功的,不知道集群在red状态下是否能成功
一、搭建新集群环境
a.创建相关的日志和数据目录
mkdir -p /data/es/data
mkdir -p /data/es/logs
mkdir -p /data/esback
b.添加es程序运行的专用账户
groupadd -g 1500 elasticsearch
useradd -u 1500 -g elasticsearch elasticsearch
c.修改系统配置
# 关闭swap分区
swapoff -a
# 配置内核参数
echo "fs.file-max = 1000000" >> /etc/sysctl.conf
echo "vm.max_map_count=262144" >> /etc/sysctl.conf
echo "vm.swappiness = 1" >> /etc/sysctl.conf
sysctl -p
sed -i 's/* soft nofile 65535/* soft nofile 655350/g' /etc/security/limits.conf
sed -i 's/* hard nofile 65535/* hard nofile 655350/g' /etc/security/limits.conf
sed -i 's#* soft nproc 4096##' /etc/security/limits.d/20-nproc.conf
# 最终效果
# vim /etc/security/limits.conf
root soft nofile 655350
root hard nofile 655350
* soft nofile 6553500
* hard nofile 6553500
elasticsearch soft memlock unlimited
elasticsearch hard memlock unlimited
# 注释文件/etc/pam.d/su中的
session include system-auth
一行即可
# 修改/etc/security/limits.d/20-nproc.conf,新增
* soft memlock unlimited
* hard memlock unlimited
d.下载es程序,并修改配置(可以修改好一台后拷贝到其他节点中,修改机器名、是否主节点、是否数据节点、ip地址信息)
mkdir /usr/local/elk
cd /usr/local/elk
wget https://artifacts.elastic.co/downloads/elasticsearch/elasticsearch-6.8.12.tar.gz
tar xf elasticsearch-6.8.12.tar.gz
# 安装jdk1.8.181,此处使用rpm包安装
# vim /etc/profile
export JAVA_HOME=/usr/java/jdk1.8.0_181-amd64
export PATH=$JAVA_HOME/bin:$PATH
#修改 /usr/local/elk/elasticsearch-6.8.12/config/elasticsearch.yml
# 一般为物理内存的一半,可以适当调整
-Xms4g
-Xmx4g
# 修改各自 /etc/hosts 文件
192.168.12.186 cms-elk01
192.168.12.187 cms-elk02
192.168.12.188 cms-elk03
# cms-elk01 主节点配置
# vim /usr/local/elk/elasticsearch-6.8.12/config/elasticsearch.yml
# 节点名
cluster.name: cms-elastic
# 集群的名称,可以不写
discovery.zen.ping.unicast.hosts: ["cms-elk01","cms-elk02","cms-elk03"]
node.name: cms-elk01
node.master: true
node.data: true
path.data: /data/es/data
path.logs: /data/es/logs
#action.auto_create_index: false
indices.fielddata.cache.size: 1g
bootstrap.memory_lock: false
# 内网地址,可以加快速度
network.host: 192.168.12.186
http.port: 9200
# 增加新的参数head插件可以访问es
http.cors.enabled: true
http.cors.allow-origin: "*"
gateway.recover_after_time: 8m
# 以下配置可以减少当es节点短时间宕机或重启时shards重新分布带来的磁盘io读写浪费
discovery.zen.fd.ping_timeout: 300s
discovery.zen.fd.ping_retries: 8
discovery.zen.fd.ping_interval: 30s
discovery.zen.ping_timeout: 180s
indices.query.bool.max_clause_count: 10240
path.repo: ["/data/esback"]
transport.tcp.port: 9300
discovery.zen.minimum_master_nodes: 1
# cms-elk02配置
# 节点名
cluster.name: cms-elastic
# 集群的名称,可以不写
discovery.zen.ping.unicast.hosts: ["cms-elk01","cms-elk02","cms-elk03"]
node.name: cms-elk02
node.master: false
node.data: true
path.data: /data/es/data
path.logs: /data/es/logs
#action.auto_create_index: false
indices.fielddata.cache.size: 1g
bootstrap.memory_lock: false
# 内网地址,可以加快速度
network.host: 192.168.12.187
http.port: 9200
# 增加新的参数head插件可以访问es
http.cors.enabled: true
http.cors.allow-origin: "*"
gateway.recover_after_time: 8m
# 以下配置可以减少当es节点短时间宕机或重启时shards重新分布带来的磁盘io读写浪费
discovery.zen.fd.ping_timeout: 300s
discovery.zen.fd.ping_retries: 8
discovery.zen.fd.ping_interval: 30s
discovery.zen.ping_timeout: 180s
indices.query.bool.max_clause_count: 10240
path.repo: ["/data/esback"]
transport.tcp.port: 9300
discovery.zen.minimum_master_nodes: 1
# cms-elk03配置
# 节点名
cluster.name: cms-elastic
# 集群的名称,可以不写
discovery.zen.ping.unicast.hosts: ["cms-elk01","cms-elk02","cms-elk03"]
node.name: cms-elk03
node.master: false
node.data: true
path.data: /data/es/data
path.logs: /data/es/logs
#action.auto_create_index: false
indices.fielddata.cache.size: 1g
bootstrap.memory_lock: false
# 内网地址,可以加快速度
network.host: 192.168.12.188
http.port: 9200
# 增加新的参数head插件可以访问es
http.cors.enabled: true
http.cors.allow-origin: "*"
gateway.recover_after_time: 8m
# 以下配置可以减少当es节点短时间宕机或重启时shards重新分布带来的磁盘io读写浪费
discovery.zen.fd.ping_timeout: 300s
discovery.zen.fd.ping_retries: 8
discovery.zen.fd.ping_interval: 30s
discovery.zen.ping_timeout: 180s
indices.query.bool.max_clause_count: 10240
path.repo: ["/data/esback"]
transport.tcp.port: 9300
discovery.zen.minimum_master_nodes: 1
e.启动程序
修改目录属主和属组
chown -R elasticsearch.elasticsearch /data/es
chown -R elasticsearch.elasticsearch /data/esback
chown -R elasticsearch.elasticsearch /usr/local/elk/elasticsearch-6.8.12
启动elasticsearch程序
cd /usr/local/elk/elasticsearch-6.8.12
su elasticsearch
bin/elasticsearch -d
# 查看集群状态
# curl http://192.168.12.188:9200/_cluster/health?pretty
{
"cluster_name" : "cms-elastic",
"status" : "red",
"timed_out" : false,
"number_of_nodes" : 3,
"number_of_data_nodes" : 3,
"active_primary_shards" : 0,
"active_shards" : 0,
"relocating_shards" : 0,
"initializing_shards" : 0,
"unassigned_shards" : 0,
"delayed_unassigned_shards" : 0,
"number_of_pending_tasks" : 0,
"number_of_in_flight_fetch" : 0,
"task_max_waiting_in_queue_millis" : 0,
"active_shards_percent_as_number" : "NaN"
}
# 要等大概10分钟成为绿色状态
[2020-10-10T14:52:14,229][INFO ][o.e.x.m.e.l.LocalExporter] [cms-elk02] waiting for elected master node [{cms-elk01}{HYWZ_drQQ_W_eajBYOSPsg}{CsUUG0EuTWqVFKgEu6zpLA}{192.168.12.186}{192.168.12.186:9300}{ml.machine_memory=8360607744, ml.max_open_jobs=20, xpack.installed=true, ml.enabled=true}] to setup local exporter [default_local] (does it have x-pack installed?)
# curl http://192.168.12.188:9200/_cluster/health?pretty
{
"cluster_name" : "cms-elastic",
"status" : "green",
"timed_out" : false,
"number_of_nodes" : 3,
"number_of_data_nodes" : 3,
"active_primary_shards" : 0,
"active_shards" : 0,
"relocating_shards" : 0,
"initializing_shards" : 0,
"unassigned_shards" : 0,
"delayed_unassigned_shards" : 0,
"number_of_pending_tasks" : 0,
"number_of_in_flight_fetch" : 0,
"task_max_waiting_in_queue_millis" : 0,
"active_shards_percent_as_number" : 100.0
}
二、备份老集群中的数据
具体策略:在新集群的某个节点中安装nfs服务端,并且挂载到老、新集群的所有节点中,将数据备份到nfs存储,然后通过备份数据恢复到新集群中
此处我们选择新集群的cms-elk01节点作为nfs服务端,并在所有老集群和新集群节点中进行挂载
a.nfs服务端配置
cms-elk01:192.168.12.186 中安装nfs服务端
# 安装exportsfs服务
# yum install -y exportfs
创建目录:
mkdir /data/esback
# vim /etc/exports
/data/esback *(insecure,rw,no_root_squash,sync,anonuid=1500,anongid=1500)
# 重启启动新集群机器的NFS服务
systemctl restart nfs
b.nfs客户端配置旧集群的每台机器上创建共享目录
mkdir /data/esback
# 安装客户端工具
yum install -y nfs-utils
# 进行Mount挂载(将nfs的 192.168.12.186:/data/esback 挂载到本地的 /data/esback 目录中,每一台老集群和新集群节点都需要挂载)
mount -t nfs 192.168.12.186:/data/esback /data/esback -o proto=tcp -o nolock
在nfs客户端查看挂载是否成功
# showmount -e 192.168.12.186
Export list for 192.168.12.186:
/data/esback *
报错1:
如下则需要安装nfs-utils:
mount: wrong fs type, bad option, bad superblock on 192.168.12.186:/opt/data07,
missing codepage or helper program, or other error
(for several filesystems (e.g. nfs, cifs) you might
need a /sbin/mount.<type> helper program)
In some cases useful info is found in syslog - try
dmesg | tail or so.
解决:
yum install -y nfs-utils
报错2:
mount.nfs: access denied by server while mounting 192.168.12.186:/data/esback
解决:
nfs服务端
vim /etc/sysconfig/nfs
修改如下:
RPCNFSDARGS="-N 2 -N 3"
----->启用
# Turn off v4 protocol support
RPCNFSDARGS="-N 4" ---->启用
重启生效
systemctl restart nfs
c.授权处理,将共享目录的权限付给ES的运行用户
chown elasticsearch:elasticsearch -R /data/esback
d.修改老集群所有节点的配置并重启,进行备份操作
# vim elasticsearch.yml
添加如下选项(即nfs的共享目录)
path.repo: ["/data/esback"]
# 老集群中操作
创建快照仓库
curl -XPUT http://192.168.11.54:8201/_snapshot/my_backup -H 'Content-Type: application/json' -d '{
"type": "fs",
"settings": {
"location": "/data/esback",
"compress": true
}
}
'
查看仓库
[root@cms_elk ~]# curl -XGET 'http://192.168.11.54:8201/_snapshot/my_backup?pretty'
{
"my_backup" : {
"type" : "fs",
"settings" : {
"compress" : "true",
"location" : "/data/esback"
}
}
}
创建所有索引的快照
[root@cms_elk ~]# curl -XPUT http://192.168.11.54:8201/_snapshot/my_backup/snapshot20201010
{"accepted":true}
执行上面的命令会快照ealsticsearch上所有的索引
快照指定的索引命令:
# 只对voice 这个索引进行快照备份
curl -XPUT http://192.168.11.54:8201/_snapshot/my_backup/snapshot20201010 -d '
{
"indices": "voice"
}
'
# 删除快照命令
curl -XDELETE http://192.168.11.54:8201/_snapshot/my_backup/snapshot20201010
{"acknowledged":true}
查看快照创建进度
[root@cms_elk ~]# curl -XGET http://192.168.11.54:8201/_snapshot/my_backup/snapshot20201010?pretty
{
"snapshots" : [
{
"snapshot" : "snapshot20201010",
"uuid" : "T3jPGWNmSLmMsc1Is_er0w",
"version_id" : 6030299,
"version" : "6.3.2",
"indices" : [
".monitoring-es-6-2020.10.10",
".monitoring-es-6-2020.10.05",
"article_search",
".monitoring-es-6-2020.10.07",
"templates_page_search",
".monitoring-es-6-2020.10.04",
".monitoring-es-6-2020.10.03",
".monitoring-es-6-2020.10.08",
"templates_search",
"article_version",
".monitoring-es-6-2020.10.06",
"templates_page_version",
".monitoring-es-6-2020.10.09",
"templates",
"templates_version",
".kibana",
"site_page_search",
"blocks_search",
"blocks_version"
],
"include_global_state" : true,
"state" : "IN_PROGRESS",
"start_time" : "2020-10-10T07:16:43.135Z",
"start_time_in_millis" : 1602314203135,
"end_time" : "1970-01-01T00:00:00.000Z",
"end_time_in_millis" : 0,
"duration_in_millis" : -1602314203135,
"failures" : [ ],
"shards" : {
"total" : 0,
"failed" : 0,
"successful" : 0
}
}
]
}
[root@cms_elk ~]# curl -XGET http://192.168.11.54:8201/_snapshot/my_backup/snapshot20201010?pretty
{
"snapshots" : [
{
"snapshot" : "snapshot20201010",
"uuid" : "T3jPGWNmSLmMsc1Is_er0w",
"version_id" : 6030299,
"version" : "6.3.2",
"indices" : [
".monitoring-es-6-2020.10.10",
".monitoring-es-6-2020.10.05",
"article_search",
".monitoring-es-6-2020.10.07",
"templates_page_search",
".monitoring-es-6-2020.10.04",
".monitoring-es-6-2020.10.03",
".monitoring-es-6-2020.10.08",
"templates_search",
"article_version",
".monitoring-es-6-2020.10.06",
"templates_page_version",
".monitoring-es-6-2020.10.09",
"templates",
"templates_version",
".kibana",
"site_page_search",
"blocks_search",
"blocks_version"
],
"include_global_state" : true,
"state" : "SUCCESS",
"start_time" : "2020-10-10T07:16:43.135Z",
"start_time_in_millis" : 1602314203135,
"end_time" : "2020-10-10T07:19:23.729Z",
"end_time_in_millis" : 1602314363729,
"duration_in_millis" : 160594,
"failures" : [ ],
"shards" : {
# 总计和successful一样表示快照创建成功
"total" : 57,
"failed" : 0,
"successful" : 57
}
}
]
}
e.恢复旧集群的快照到新集群中
# 在新集群创建仓库
curl -XPUT 192.168.12.186:9200/_snapshot/my_backup -H 'Content-Type: application/json' -d'
{
"type": "fs",
"settings": {
"location": "/data/esback",
"compress": true
}
}
'
# 将老集群的数据恢复到新集群中
curl -XPOST http://192.168.12.186:9200/_snapshot/my_backup/snapshot20201010/_restore
{"accepted":true}
# 查看新集群的恢复快照进度
curl -XGET http://192.168.12.186:9200/_snapshot/my_backup/snapshot20201010/_status
# 查看集群状态,当所有的分片和索引分配正常后,集群状态为green即表示数据导入成功
curl -XGET http://192.168.12.186:9200/_cat/indices
curl -XGET http://192.168.12.186:9200/_cat/shards
curl -XGET http://192.168.12.186:9200/_cat/health
三、启用新集群的密码验证功能
a.修改新集群所有节点中config/elasticsearch.yml配置,并重启所有节点
xpack.security.enabled: true
xpack.security.transport.ssl.enabled: true
xpack.security.transport.ssl.verification_mode: certificate
xpack.security.transport.ssl.keystore.path: /usr/local/elk/elasticsearch-6.8.12/config/elastic-certificates.p12
xpack.security.transport.ssl.truststore.path: /usr/local/elk/elasticsearch-6.8.12/config/elastic-certificates.p12
chown elasticsearch.elasticsearch /usr/local/elk/elasticsearch-6.8.12/config/elastic-certificates.p12
b.创建ca证书
[root@sz_sjzx_cms_elk01_12_186 elasticsearch-6.8.12]# su elasticsearch
[elasticsearch@sz_sjzx_cms_elk01_12_186 elasticsearch-6.8.12]$ bin/elasticsearch-certutil ca
This tool assists you in the generation of X.509 certificates and certificate
signing requests for use with SSL/TLS in the Elastic stack.
The 'ca' mode generates a new 'certificate authority'
This will create a new X.509 certificate and private key that can be used
to sign certificate when running in 'cert' mode.
Use the 'ca-dn' option if you wish to configure the 'distinguished name'
of the certificate authority
By default the 'ca' mode produces a single PKCS#12 output file which holds:
* The CA certificate
* The CA's private key
If you elect to generate PEM format certificates (the -pem option), then the output will
be a zip file containing individual files for the CA certificate and private key
Please enter the desired output file [elastic-stack-ca.p12]:
Enter password for elastic-stack-ca.p12 :
[elasticsearch@sz_sjzx_cms_elk01_12_186 elasticsearch-6.8.12]$ ls
bin config elastic-stack-ca.p12 lib LICENSE.txt logs modules NOTICE.txt plugins README.textile
c.签发证书
[elasticsearch@sz_sjzx_cms_elk01_12_186 elasticsearch-6.8.12]$ bin/elasticsearch-certutil cert --ca elastic-stack-ca.p12
This tool assists you in the generation of X.509 certificates and certificate
signing requests for use with SSL/TLS in the Elastic stack.
The 'cert' mode generates X.509 certificate and private keys.
* By default, this generates a single certificate and key for use
on a single instance.
* The '-multiple' option will prompt you to enter details for multiple
instances and will generate a certificate and key for each one
* The '-in' option allows for the certificate generation to be automated by describing
the details of each instance in a YAML file
* An instance is any piece of the Elastic Stack that requires an SSL certificate.
Depending on your configuration, Elasticsearch, Logstash, Kibana, and Beats
may all require a certificate and private key.
* The minimum required value for each instance is a name. This can simply be the
hostname, which will be used as the Common Name of the certificate. A full
distinguished name may also be used.
* A filename value may be required for each instance. This is necessary when the
name would result in an invalid file or directory name. The name provided here
is used as the directory name (within the zip) and the prefix for the key and
certificate files. The filename is required if you are prompted and the name
is not displayed in the prompt.
* IP addresses and DNS names are optional. Multiple values can be specified as a
comma separated string. If no IP addresses or DNS names are provided, you may
disable hostname verification in your SSL configuration.
* All certificates generated by this tool will be signed by a certificate authority (CA).
* The tool can automatically generate a new CA for you, or you can provide your own with the
-ca or -ca-cert command line options.
By default the 'cert' mode produces a single PKCS#12 output file which holds:
* The instance certificate
* The private key for the instance certificate
* The CA certificate
If you specify any of the following options:
* -pem (PEM formatted output)
d.拷贝证书到指定目录,并拷贝到集群其他节点中
# cp elastic-certificates.p12 /usr/local/elk/elasticsearch-6.8.12/config/elastic-certificates.p12
e.创建密码
加上 --verbose 可以看到详情
[elasticsearch@sz_sjzx_cms_elk01_12_186 elasticsearch-6.8.12]$ bin/elasticsearch-setup-passwords interactive --verbose
Running with configuration path: /usr/local/elk/elasticsearch-6.8.12/config
Testing if bootstrap password is valid for http://192.168.12.186:9200/_xpack/security/_authenticate?pretty
{
"username" : "elastic",
"roles" : [
"superuser"
],
"full_name" : null,
"email" : null,
"metadata" : {
"_reserved" : true
},
"enabled" : true,
"authentication_realm" : {
"name" : "reserved",
"type" : "reserved"
},
"lookup_realm" : {
"name" : "reserved",
"type" : "reserved"
}
}
# 当集群状态为green时才能成功设置密码
Checking cluster health: http://192.168.12.186:9200/_cluster/health?pretty
{
"cluster_name" : "cms-elastic",
"status" : "green",
"timed_out" : false,
"number_of_nodes" : 3,
"number_of_data_nodes" : 3,
"active_primary_shards" : 57,
"active_shards" : 114,
"relocating_shards" : 0,
"initializing_shards" : 0,
"unassigned_shards" : 0,
"delayed_unassigned_shards" : 0,
"number_of_pending_tasks" : 0,
"number_of_in_flight_fetch" : 0,
"task_max_waiting_in_queue_millis" : 0,
"active_shards_percent_as_number" : 100.0
}
Initiating the setup of passwords for reserved users elastic,apm_system,kibana,logstash_system,beats_system,remote_monitoring_user.
You will be prompted to enter passwords as the process progresses.
Please confirm that you would like to continue [y/N]y
Enter password for [elastic]:
Reenter password for [elastic]:
Enter password for [apm_system]:
Reenter password for [apm_system]:
Enter password for [kibana]:
Reenter password for [kibana]:
Enter password for [logstash_system]:
Reenter password for [logstash_system]:
Enter password for [beats_system]:
Reenter password for [beats_system]:
Enter password for [remote_monitoring_user]:
Reenter password for [remote_monitoring_user]:
Trying user password change call http://192.168.12.186:9200/_xpack/security/user/apm_system/_password?pretty
{ }
Changed password for user [apm_system]
Trying user password change call http://192.168.12.186:9200/_xpack/security/user/kibana/_password?pretty
{ }
Changed password for user [kibana]
Trying user password change call http://192.168.12.186:9200/_xpack/security/user/logstash_system/_password?pretty
{ }
Changed password for user [logstash_system]
Trying user password change call http://192.168.12.186:9200/_xpack/security/user/beats_system/_password?pretty
{ }
Changed password for user [beats_system]
Trying user password change call http://192.168.12.186:9200/_xpack/security/user/remote_monitoring_user/_password?pretty
{ }
Changed password for user [remote_monitoring_user]
Trying user password change call http://192.168.12.186:9200/_xpack/security/user/elastic/_password?pretty
{ }
Changed password for user [elastic]
[elasticsearch@sz_sjzx_cms_elk01_12_186 elasticsearch-6.8.12]$
四、添加集群的监控
# 集群的状态监控
UserParameter=es_status,curl -sXGET -u elastic:pass http://192.168.12.186:9200/_cluster/health/?pretty | grep "status"|awk -F '[ "]+' '{print $4}'|grep -c 'green'
UserParameter=es_debug,sudo /bin/find /usr/local/elk/elasticsearch-6.8.12 -name hs_err_pid*.log -o -name java_pid*.hprof|wc -l
# 自动触发action重启集群脚本
vim /usr/local/zabbix_agents_3.2.0/scripts/start_es.sh
#!/bin/bash
# if elasticsearch exists kill it
source /etc/profile
# 删除java报错产生的文件
/usr/bin/sudo /bin/find /usr/local/elk/elasticsearch-6.8.12 -name hs_err_pid*.log -o -name java_pid*.hprof | xargs rm -f
# kill并重新启动elasticsearch
count_es=`ps -ef|grep elasticsearch|grep -v grep|wc -l`
if [ $count_es -ge 1 ];then
ps -ef|grep elasticsearch|grep -v grep|/bin/kill -9 `awk '{print $2}'`
fi
# start it
su elasticsearch -c "cd /usr/local/elk/elasticsearch-6.8.12/bin && /bin/bash elasticsearch -d"
# 使用systemctl对程序进行管理
# vim /etc/systemd/system/elasticsearch.service
[Unit]
Description=elasticsearch
[Service]
User=elasticsearch
LimitNOFILE=500000
LimitNPROC=500000
LimitMEMLOCK=infinity
ExecStart=/usr/local/elk/elasticsearch-6.8.12/bin/elasticsearch
[Install]
WantedBy=multi-user.target
# systemctl enable elasticsearch