环境准备:
2台CentOS 6.9
安装MySQL
1.wget https://dev.mysql.com/get/mysql57-community-release-el6-9.noarch.rpm
2.yum localinstall -y mysql57-community-release-el6-9.noarch.rpm
3.yum install mysql-community-server
我们的方案设计基于 MySQL 的主从数据复制功能,以下是基于 mysql5.7 最新版本的主从配置。
开启 MySQL 主从数据复制,主要在 MySQL 的 my.ini 文件中设置:
Windows 系统一般在 C:ProgrameDataMySQL 中:
Linux 系统一般在 /etc/my.cnf 中:
打开 my.cnf 文件,在[mysqld]下 添加:
port=3306
server_id=1
log-bin=mysql-bin
relay_log=mysql-relay-bin
binlog_format = row
binlog-ignore-db=mysql
binlog-ignore-db=information_schema
auto-increment-offset=1
auto-increment-increment=2
创建一个允许从服务器来访问的用户(
grant replication slave on *.* to 'root'@'10.0.0.6' identified by 'root';
说明:
- root:Slave 使用的账号
- IDENTIFIED BY 'root' :Slave 使用的密码
- 10.0.0.6:Slave 数据库 IP
master 端,通过 show master statusG 显示信息。如图:

注意上图中的 File,和 Position。Slave 中会用到这些信息。
从 数据库服务器配置:
打开 my.cnf 文件,在[mysqld]下 添加:
port=3306
server_id=2
log-bin=mysql-bin
relay_log=mysql-relay-bin
binlog_format = row
binlog-ignore-db=mysql
binlog-ignore-db=information_schema
auto-increment-offset=2
auto-increment-increment=2
关联上 Master 信息:
change master to
master_host='10.0.0.5',master_user='root',master_port=3306,master_password='root'
master_log_file='mysql-bin.000001',master_log_pos=120;
命令说明:
- master_host:master 数据库服务器 ip
- master_user: master 数据库通过 GRANT 授权的账号
- master_port:master 数据库使用的端口号
- master_password:master 数据库通过 GRANT 授权的密码
- master_log_file:master 数据库中通过 show master status 显示的 File 名称
- master_log_pos:master 数据库中通过 show master status 显示的 Position 数据
重启 Slave 的 MySql 服务
在命令行中输入 start slave.
在命令行中输入 show slave status,显示如下:
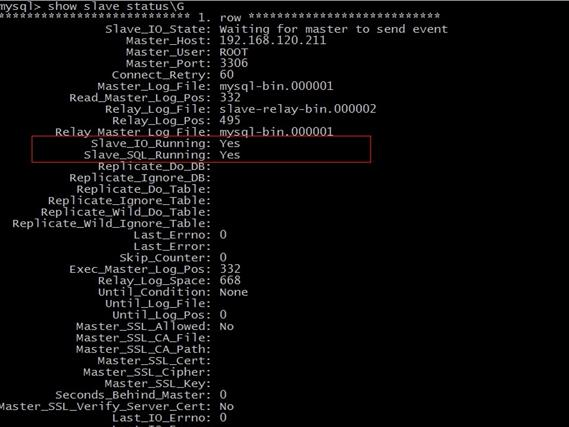
注意:只有 Slave_IO_Running 与 Slave_SQL_Running 都为 Yes 才配置成功。
至此,配置全部完成。这样,Master 服务器上 Industry 里的数据就能同步到 slave 的 Industry
数据库中。
其实主主复制就是互相为主从,所以我们只需要反过来再配置一次主从就OK了。