官方
https://docs.spring.io/spring-framework/docs/current/reference/html/core.html
https://repo.spring.io/release/org/springframework/spring/
七大模块
核心容器(Spring Core)
- 提供Spring框架的基本功能。
- Spring以bean的方式组织和管理Java应用中的各个组件及其关系
- Spring使用BeanFactory来产生和管理Bean,它是工厂模式的实现
- BeanFactory使用控制反转(IoC)模式将应用的配置和依赖性规范与实际的应用程序代码分开
应用上下文(Spring Context)
- Spring上下文是一个配置文件,向Spring框架提供上下文信息
- Spring上下文包括各种企业服务
Spring面向切面编程(Spring AOP)
- 通过配置管理特性,Spring AOP 模块直接将面向切面的编程功能集成到了 Spring框架中
- 可以很容易地使 Spring框架管理的任何对象支持 AOP
- Spring AOP 模块为基于 Spring 的应用程序中的对象提供了事务管理服务
- 通过使用 Spring AOP,可以将声明性事务管理集成到应用程序中
JDBC和DAO模块(Spring DAO)
- JDBC、DAO的抽象层提供了有意义的异常层次结构,可用来管理异常处理
- 及处理不同数据库供应商所抛出的错误信息
- 异常层次结构简化了错误处理,并且极大的降低了需要编写的代码数量,比如打开和关闭链接
对象实体映射(Spring ORM)
- 插入ORM框架
- 都遵从Spring的通用事务和DAO异常层次结构
Web模块(Spring Web)
- Web上下文模块建立在应用程序上下文模块之上,为基于web的应用程序提供了上下文
- web模块简化了处理多部分请求以及将请求参数绑定到域对象的工作
MVC模块(Spring Web MVC)
- 高度可配置的
- 容纳了大量视图技术
- 不绑定到特定JavaEE服务的可重用业务和数据访问的对象
IOC 容器
-
对象由Spring来创建、管理、装配
-
使用set方式传入需要new的对象(由主动创建对象到被动接收对象注入)
-
DI是实现IOC的方式。
-
IOC的核心是工厂模式,AOP的核心是代理模式
Spring 上下文
创建对象,对象名为id属性值,property为对象的属性进行赋值(要求属性拥有set方法)
依赖注入
-
构造器注入、set方式注入、其他方式
-
p命名空间、c命名空间
Bean 的作用域
| Scope | Description |
|---|---|
| singleton | (Default) Scopes a single bean definition to a single object instance for each Spring IoC container. |
| prototype | Scopes a single bean definition to any number of object instances. |
| request | Scopes a single bean definition to the lifecycle of a single HTTP request. That is, each HTTP request has its own instance of a bean created off the back of a single bean definition. Only valid in the context of a web-aware Spring ApplicationContext. |
| session | Scopes a single bean definition to the lifecycle of an HTTP Session. Only valid in the context of a web-aware Spring ApplicationContext. |
| application | Scopes a single bean definition to the lifecycle of a ServletContext. Only valid in the context of a web-aware Spring ApplicationContext. |
| websocket | Scopes a single bean definition to the lifecycle of a WebSocket. Only valid in the context of a web-aware Spring ApplicationContext. |
<bean id="accountService" class="com.something.DefaultAccountService" scope="singleton"/>
<bean id="accountService" class="com.something.DefaultAccountService" scope="prototype"/>
Bean 的自动装配
表示对象(bean)注册到容器中,交由spring托管,或者说装配
- 自动装配是Spring满足bean依赖的一种方式
- spring会在上下文中自动寻找,并自动给bean装配属性
spring中由三种装备方式
1、在xml中显示的配置
2、在Java中显示配置
3、隐式的自动装配
bean标签的autowird属性
- autowird=“byName”表示自动在容器上下文中查找,和自己对象set方法后面的值对应的beanid
- autowird=“byType”表示自动在容器上下文中查找,和自己对象set方法后面的类型对应的beanid
注解实现自动装配
<!-- 导入约束,添加配置 -->
<context:annotation-config/>
-
@Autowird方式:类型,名字。@Qualifier
-
java的@Resource方式:名字,类型
-
实体类添加@Component注解即可自动装配
-
dao层使用@Repository自动装配
-
service层使用@Service自动装配
-
controller层使用@Controller自动装配
-
需要设置作用域的话,直接加@Scope;需要注入值(赋值)的话,@Value
xml和注解结合才是装配的最佳实践:xml用来负责管理bean、注解只负责完成属性的注入
javaconfig方式配置spring
@Configuration
public class AppConfig {
    @Bean
    public MyService myService() {
        return new MyServiceImpl();
    }
}
等效于xml中的
<beans>
    <bean id="myService" class="com.acme.services.MyServiceImpl"/>
</beans>
-
@Configuration、@ComponentScan("com.hello.pojo")等注解都是都是为了替代xml配置中的那些配置项而生的
-
如果完全使用了配置类方式去做,我们就只能通过AnnotationConfig应用上下文来获取容器(进而getBean(方法)),通过配置类的class对象加载
-
同样的以往xml中可以用import来引入其他xml,@Import注解同样可以引入其他配置类
代理模式
静态代理
- 可以使真实角色的操作更加纯粹,不用去关注一些公共的业务
- 公共业务交给代理角色,实现了业务的分工
- 公共业务需要扩展的时候,方便集中管理
- 缺点是:一个真实角色就会产生一个代理角色,代码量会翻倍,开发效率会变低
//租房(抽象角色:一般使用接口或者抽象类)
public interface Rent {
    public void rent();
}
//房东(真实角色:被代理的角色)
public class Host implements Rent {
    public void rent() {
        System.out.println("本房东要出租房子了");
    }
}
//租客(访问代理对象的人)
public class Client {
    public static void main(String[] args) {
        Host host = new Host();
        //host.rent();//如果我们能直接联系到房东,就可以不通过中介
        //通过代理的方式,找专业的房屋中介
        Proxy proxy = new Proxy(host);
        proxy.rent();
    }
}
//中介(代理角色:代理真实角色,通常会做一些附加操作)
public class Proxy implements Rent {

    private Host host;

    public Proxy() {
    }

    public Proxy(Host host) {//或使用set方式注入
        this.host = host;
    }

    public void rent() {
        hetong();
        host.rent();
        jiaoqian();
    }

    public void hetong() {
        System.out.println("链家:你们两方签合同");
    }

    public void jiaoqian() {
        System.out.println("链家:这边把费用算一下");
    }
}
例二
public interface UserService {
    public void add();
    public void delete();
    public void update();
    public void query();
}
public class UserServiceImpl implements UserService{
    public void add() {
        System.out.println("增加用户");
    }

    public void delete() {
        System.out.println("删除用户");
    }

    public void update() {
        System.out.println("更新用户");
    }

    public void query() {
        System.out.println("查询用户");
    }
}
public class Client {
    public static void main(String[] args) {
        UserServiceImpl service = new UserServiceImpl();
        //service.add();//不使用代理时
        UserServiceProxy proxy = new UserServiceProxy();
        proxy.setUserService(service);
        proxy.add();
    }
}
public class UserServiceProxy implements UserService {

    private UserServiceImpl userService;

    public void setUserService(UserServiceImpl userService) {
        this.userService = userService;
    }

    public void add() {
        log("add");
        userService.add();
    }

    public void delete() {
        log("delete");
        userService.delete();
    }

    public void update() {
        log("update");
        userService.update();
    }

    public void query() {
        log("query");
        userService.query();
    }

    public void log(String msg){
        System.out.println("[debug]使用了"+msg+"方法");
    }
}
涉及到一个背景:改动原有代码是公司中的大忌,用代理模式轻松绕开,那么完了的同时,aop也就是这个思想
因为静态代理,这种扩展代码的方式是每次成倍增加,所以,引出一个动态代理
动态代理
- 基于接口的动态代理(jdk:InvocationHandler)
- 基于类的动态代理(cglib)
- 基于Java字节码实现:javasist
例一
//租房
public interface Rent {
    public void rent();
}
//房东
public class Host implements Rent {
    public void rent() {
        System.out.println("本房东要出租房子了");
    }
}
public class Client {
    public static void main(String[] args) {
        //真实角色
        Host host = new Host();
        //创建代理角色
        ProxyInvocationHandler handler = new ProxyInvocationHandler();
        handler.setRent(host);
        Rent proxy = (Rent) handler.getProxy();
        proxy.rent();
    }
}
//用这个类自动生成代理类
public class ProxyInvocationHandler implements InvocationHandler {

    //被代理的接口(写成Object就通用了)
    private Rent rent;

    public void setRent(Rent rent) {
        this.rent = rent;
    }

    //生成得到代理类
    public Object getProxy() {
        return Proxy.newProxyInstance(this.getClass().getClassLoader(), rent.getClass().getInterfaces(), this);
    }

    //处理代理实例 并返回结果
    public Object invoke(Object proxy, Method method, Object[] args) throws Throwable {
        hetong();
        //动态代理的本质就是使用反射机制
        Object object = method.invoke(rent, args);
        jiaoqian();
        return object;
    }

    public void hetong() {
        System.out.println("链家:你们两方签合同");
    }

    public void jiaoqian() {
        System.out.println("链家:这边把费用算一下");
    }
}
例二
public interface UserService {
    public void add();
    public void delete();
    public void update();
    public void query();
}
public class UserServiceImpl implements UserService {
    public void add() {
        System.out.println("增加用户");
    }

    public void delete() {
        System.out.println("删除用户");
    }

    public void update() {
        System.out.println("更新用户");
    }

    public void query() {
        System.out.println("查询用户");
    }
}
public class Client {
    public static void main(String[] args) {
        //真实角色
        UserServiceImpl userService = new UserServiceImpl();
        //代理角色
        ProxyInvocationHandler handler = new ProxyInvocationHandler();
        handler.setTarget(userService);//设置要代理的对象
        //动态生成代理类
        UserService proxy = (UserService) handler.getProxy();
        proxy.add();
    }
}
//用这个类自动生成代理类
public class ProxyInvocationHandler implements InvocationHandler {

    //被代理的接口
    private Object target;

    public void setTarget(Object target) {
        this.target = target;
    }

    //生成得到代理类
    public Object getProxy() {
        return Proxy.newProxyInstance(this.getClass().getClassLoader(), target.getClass().getInterfaces(), this);
    }

    //处理代理实例 并返回结果
    public Object invoke(Object proxy, Method method, Object[] args) throws Throwable {
        log(method.getName());
        //动态代理的本质就是使用反射机制
        Object object = method.invoke(target, args);
        return object;
    }

    public void log(String msg){
        System.out.println("[debug]使用了"+msg+"方法");
    }
}
好处:一个动态代理类代理的是一个接口,一般就是对应的一类业务
AOP 面向切面编程
-
横切关注点:跨越应用程序多个模块的方法或功能。如日志、安全、缓存、事务等等。
-
通知(Advice):切面的工作被称为通知。通知定义了切面是什么以及何时使用。除了描述切面要完成的工作,通知还解决了何时执行这个工作的问题(Log的方法)
- 前置通知(Before):在目标方法被调用之前调用通知功能
- 后置通知(After):在目标方法完成之后调用通知,此时不会关心方法的输出是什么
- 返回通知(After-returning):在目标方法成功执行之后调用通知
- 异常通知(After-throwing):在目标方法抛出异常后调用通知
- 环绕通知(Around):通知包裹了被通知的方法,在被通知的方法调用之前和之后执行自定义的行为
-
连接点(Join point):连接点是在应用执行过程中能够插入切面的一个点。
-
切点(Pointcut):一个切面并不需要通知应用的所有连接点,切点有助于缩小切面所通知的连接点范围。如果说通知定义了切面的“什么”和“何时”的话,那么切点就定义了“何处”。因此,切点其实就是定义了需要执行在哪些连接点上执行通知。
-
切面(Aspect):通知和切点的结合。通知和切点共同定义了切面的全部内容——它是什么,在何时和在何处完成其功能(Log类)
-
引入(Introduction):引入允许我们向现有的类添加新方法或属性。
-
织入(Weaving):织入是把切面应用到目标对象并创建新的代理对象的过程。切面在指定的连接点被织入到目标对象中。在目标对象的生命周期中有很多个点可以进行织入:
- 编译期:切面在目标类编译时被织入。这种方式需要特殊的编译器。AspectJ的织入编译器就是以这种方式织入切面的。
- 类加载期:切面在目标类加载到JVM时被织入。这种方式需要特殊的类加载器,它可以在目标类被引入应用之前增强该目标类的字节码。AspectJ 5的加载时织入就支持这种方式织入切面。
- 运行期:切面在应用运行的某个时刻被织入。一般情况下,在织入切面时,AOP容器会为目标对象动态的创建一个代理对象。Spring AOP就是以这种方式织入切面的。
-
目标对象(Target Object):被切面所通知的对象,即业务逻辑处理对象。这个对象永远是一个被代理(proxied)对象。
-
代理对象(Proxy Object):目标对象被切入切面之后形成的对象,从客户端看目标对象和代理对象是一样的效果。
使用aop需要先导入织入包
<dependency>
    <groupId>org.aspectj</groupId>
    <artifactId>aspectjweaver</artifactId>
    <version>1.9.4</version>
</dependency>
aop实现方式一
想要切进入的内容
public class Log implements MethodBeforeAdvice {
    //要执行的目标对象的方法 参数  目标对象
    public void before(Method method, Object[] objects, Object o) throws Throwable {
        System.out.println(o.getClass().getName()+"的"+method.getName()+"被执行了");
    }
}
public class AfterLog implements AfterReturningAdvice {
    //返回值
    public void afterReturning(Object o, Method method, Object[] objects, Object o1) throws Throwable {
        System.out.println("执行了"+method.getName()+"方法,返回结果为:"+o);
    }
}
配置切入点
<?xml version="1.0" encoding="UTF-8"?>
<beans xmlns="http://www.springframework.org/schema/beans"
xmlns:xsi="http://www.w3.org/2001/XMLSchema-instance"
xmlns:aop="http://www.springframework.org/schema/aop"
xsi:schemaLocation="http://www.springframework.org/schema/beans
https://www.springframework.org/schema/beans/spring-beans.xsd
http://www.springframework.org/schema/aop
https://www.springframework.org/schema/aop/spring-aop.xsd">
<!--注册bean-->
<bean id="userService" class="com.hello.service.UserServiceImpl"/>
<bean id="log" class="com.hello.log.Log"/>
<bean id="afterLog" class="com.hello.log.AfterLog"/>
<!--方式一:使用原生spring api接口-->
<!--需要导入aop的约束-->
<aop:config>
<!--要执行的位置-->
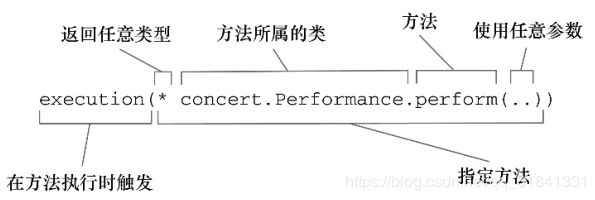
<aop:pointcut id="pointcut" expression="execution(* com.hello.service.UserServiceImpl.*(..))"/>
<!--执行环绕增加-->
<aop:advisor advice-ref="log" pointcut-ref="pointcut"/>
<aop:advisor advice-ref="afterLog" pointcut-ref="pointcut"/>
</aop:config>
</beans>
aop实现方式二
(更简单)
public class DiyPointcut {
    public void before() {
        System.out.println("方法执行前");
    }
    public void after() {
        System.out.println("方法执行hou");
    }
}
<?xml version="1.0" encoding="UTF-8"?>
<beans xmlns="http://www.springframework.org/schema/beans"
       xmlns:xsi="http://www.w3.org/2001/XMLSchema-instance"
       xmlns:aop="http://www.springframework.org/schema/aop"
       xsi:schemaLocation="http://www.springframework.org/schema/beans
        https://www.springframework.org/schema/beans/spring-beans.xsd
        http://www.springframework.org/schema/aop
        https://www.springframework.org/schema/aop/spring-aop.xsd">

    <!--注册bean-->
    <bean id="userService" class="com.hello.service.UserServiceImpl"/>
    <bean id="log" class="com.hello.log.Log"/>
    <bean id="afterLog" class="com.hello.log.AfterLog"/>

    <!--方式一:使用原生spring api接口-->
    <!--需要导入aop的约束-->
        <!--要执行的位置-->
        <!--执行环绕增加-->
    <!--<aop:config>
        <aop:pointcut id="pointcut" expression="execution(* com.hello.service.UserServiceImpl.*(..))"/>
        <aop:advisor advice-ref="log" pointcut-ref="pointcut"/>
        <aop:advisor advice-ref="afterLog" pointcut-ref="pointcut"/>
    </aop:config>-->

    <!--方式二:自定义类-->
    <bean id="diy" class="com.hello.diy.DiyPointcut"/>
    <aop:config>
        <!--自定义切面,ref要引用的类-->
        <aop:aspect ref="diy">
            <!--切入点-->
            <aop:pointcut id="point" expression="execution(* com.hello.service.UserServiceImpl.*(..))"/>
            <!--通知-->
            <aop:before method="before" pointcut-ref="point"/>
            <aop:after method="after" pointcut-ref="point"/>
        </aop:aspect>
    </aop:config>
</beans>
aop实现方式三
(注解实现)
//使用注解方式实现aop
@Aspect //标注这个类是一个切面
public class AnnotationPointCut {
    @Before("execution(* com.hello.service.UserServiceImpl.*(..))")
    public void before() {
        System.out.println("方法执行前");
    }
    @After("execution(* com.hello.service.UserServiceImpl.*(..))")
    public void after() {
        System.out.println("方法执行hou");
    }
    //在环绕增强中,我们可以给定一个参数,代表我们要获取处理切人的点
    @Around("execution(* com.hello.service.UserServiceImpl.*(..))")
    public void around(ProceedingJoinPoint jp) throws Throwable {
        System.out.println("环绕前");
        //Signature signature = jp.getSignature();
        //System.out.println("signature:"+signature);
        //执行方法
        Object proceed = jp.proceed();
        System.out.println("环绕后");
    }
}
<?xml version="1.0" encoding="UTF-8"?>
<beans xmlns="http://www.springframework.org/schema/beans"
xmlns:xsi="http://www.w3.org/2001/XMLSchema-instance"
xmlns:aop="http://www.springframework.org/schema/aop"
xsi:schemaLocation="http://www.springframework.org/schema/beans
https://www.springframework.org/schema/beans/spring-beans.xsd
http://www.springframework.org/schema/aop
https://www.springframework.org/schema/aop/spring-aop.xsd">
<!--注册bean-->
<bean id="userService" class="com.hello.service.UserServiceImpl"/>
<bean id="log" class="com.hello.log.Log"/>
<bean id="afterLog" class="com.hello.log.AfterLog"/>
<!--方式一:使用原生spring api接口-->
<!--需要导入aop的约束-->
<!--<aop:config>
<!–要执行的位置–>
<aop:pointcut id="pointcut" expression="execution(* com.hello.service.UserServiceImpl.*(..))"/>
<!–执行环绕增加–>
<aop:advisor advice-ref="log" pointcut-ref="pointcut"/>
<aop:advisor advice-ref="afterLog" pointcut-ref="pointcut"/>
</aop:config>-->
<!--方式二:自定义类-->
<bean id="diy" class="com.hello.diy.DiyPointcut"/>
<!--<aop:config>
<!–自定义切面,ref要引用的类–>
<aop:aspect ref="diy">
<!–切入点–>
<aop:pointcut id="point" expression="execution(* com.hello.service.UserServiceImpl.*(..))"/>
<!–通知–>
<aop:before method="before" pointcut-ref="point"/>
<aop:after method="after" pointcut-ref="point"/>
</aop:aspect>
</aop:config>-->
<!--方式三-->
<bean id="annotationPointCut" class="com.hello.diy.AnnotationPointCut"/>
<!--开启注解支持 默认jdk接口方式实现动态代理-->
<aop:aspectj-autoproxy/>
</beans>
Spring整合Mybatis
http://mybatis.org/spring/zh/index.html(要考虑版本)
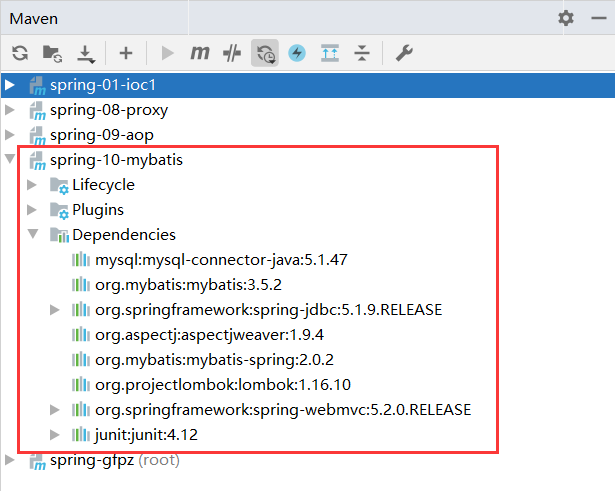
围绕着将Mybatis相关的内容交给Spring(各种配置文件的引用都是很灵活的)
整合方式一
将属于Mybatis的部分拆到Spring,剩下的mybatis-config.xml
<?xml version="1.0" encoding="UTF-8" ?>
<!DOCTYPE configuration
        PUBLIC "-//mybatis.org//DTD Config 3.0//EN"
        "http://mybatis.org/dtd/mybatis-3-config.dtd">
<configuration>
    <typeAliases>
        <package name="com.hello.pojo"/>
    </typeAliases>

    <!--设置setting-->
</configuration>
整合到Spring容器spring-dao.xml
<?xml version="1.0" encoding="UTF-8"?>
<beans xmlns="http://www.springframework.org/schema/beans"
xmlns:xsi="http://www.w3.org/2001/XMLSchema-instance"
xmlns:aop="http://www.springframework.org/schema/aop"
xsi:schemaLocation="http://www.springframework.org/schema/beans
https://www.springframework.org/schema/beans/spring-beans.xsd
http://www.springframework.org/schema/aop
https://www.springframework.org/schema/aop/spring-aop.xsd">
<!--Datasource:使用spring的数据源替换mybatis的配置-->
<bean id="dataSource" class="org.springframework.jdbc.datasource.DriverManagerDataSource">
<property name="driverClassName" value="com.mysql.jdbc.Driver"/>
<property name="url" value="jdbc:mysql://xxx.xxx.xxx.xxx:3306/mybatis?useSSL=false&useUnicode=true&serverTimezone=UTC&characterEncoding=UTF-8&autoReconnect=true&failOverReadOnly=false"/>
<property name="username" value="root"/>
<property name="password" value="root"/>
</bean>
<bean id="sqlSessionFactory" class="org.mybatis.spring.SqlSessionFactoryBean">
<property name="dataSource" ref="dataSource" />
<!--绑定mybatis配置文件 显然,也可以在此配置文件按中配置mybatis相关的所有配置-->
<property name="configLocation" value="classpath:mybatis-config.xml"/>
<property name="mapperLocations" value="classpath:com/hello/mapper/*.xml"/>
</bean>
<!--整合方式二的话,这个也可以不要-->
<bean id="sqlSession" class="org.mybatis.spring.SqlSessionTemplate">
<!--构造器注入-->
<constructor-arg index="0" ref="sqlSessionFactory"/>
</bean>
</beans>
将spring-dao.xml引入到applicationContext.xml中
<?xml version="1.0" encoding="UTF-8"?>
<beans xmlns="http://www.springframework.org/schema/beans"
       xmlns:xsi="http://www.w3.org/2001/XMLSchema-instance"
       xmlns:aop="http://www.springframework.org/schema/aop"
       xsi:schemaLocation="http://www.springframework.org/schema/beans
        https://www.springframework.org/schema/beans/spring-beans.xsd
        http://www.springframework.org/schema/aop
        https://www.springframework.org/schema/aop/spring-aop.xsd">

    <import resource="spring-dao.xml"/>

    <bean id="userMapper" class="com.hello.mapper.UserMapperImpl">
        <property name="sqlSession" ref="sqlSession"/>
    </bean>

    <bean id="userMapper2" class="com.hello.mapper.UserMapperImpl2">
        <property name="sqlSessionFactory" ref="sqlSessionFactory" />
    </bean>
</beans>
需要多出一个Impl实现类来
/**
 * 将sqlSession私有,set注入
 * 完了去注册到spring
 */
public class UserMapperImpl implements UserMapper {
    private SqlSessionTemplate sqlSession;

    public void setSqlSession(SqlSessionTemplate sqlSession) {
        this.sqlSession = sqlSession;
    }

    public List<User> selectUser() {
        UserMapper mapper = sqlSession.getMapper(UserMapper.class);
        return mapper.selectUser();
    }
}
整合方式二
http://mybatis.org/spring/zh/sqlsession.html
前文配置文件中已经注册
<bean id="userMapper2" class="com.hello.mapper.UserMapperImpl2">
    <property name="sqlSessionFactory" ref="sqlSessionFactory" />
</bean>
实现类
public class UserMapperImpl2 extends SqlSessionDaoSupport implements UserMapper{
    public List<User> selectUser() {
        return getSqlSession().getMapper(UserMapper.class).selectUser();
    }
}
测试
public class MyTest {
    @Test
    public void test2() throws IOException {
        ApplicationContext context = new ClassPathXmlApplicationContext("applicationContext.xml");
        UserMapper userMapper = context.getBean("userMapper2", UserMapper.class);
        for (User user : userMapper.selectUser()) {
            System.out.println(user);
        }
    }
}
配置声明式事务
http://mybatis.org/spring/zh/transactions.html#programmatic
spring-dao.xml
<?xml version="1.0" encoding="UTF-8"?>
<beans xmlns="http://www.springframework.org/schema/beans"
xmlns:xsi="http://www.w3.org/2001/XMLSchema-instance"
xmlns:aop="http://www.springframework.org/schema/aop"
xmlns:tx="http://www.springframework.org/schema/tx"
xsi:schemaLocation="http://www.springframework.org/schema/beans
https://www.springframework.org/schema/beans/spring-beans.xsd
http://www.springframework.org/schema/aop
https://www.springframework.org/schema/aop/spring-aop.xsd
http://www.springframework.org/schema/tx
https://www.springframework.org/schema/tx/spring-tx.xsd">
<!--Datasource:使用spring的数据源替换mybatis的配置-->
<bean id="dataSource" class="org.springframework.jdbc.datasource.DriverManagerDataSource">
<property name="driverClassName" value="com.mysql.jdbc.Driver"/>
<property name="url" value="jdbc:mysql://xxx.xxx.xxx.xxx:3306/mybatis?useSSL=false&useUnicode=true&serverTimezone=UTC&characterEncoding=UTF-8&autoReconnect=true&failOverReadOnly=false"/>
<property name="username" value="root"/>
<property name="password" value="root"/>
</bean>
<bean id="sqlSessionFactory" class="org.mybatis.spring.SqlSessionFactoryBean">
<property name="dataSource" ref="dataSource" />
<!--绑定mybatis配置文件 显然,也可以在此配置文件按中配置mybatis相关的所有配置-->
<property name="configLocation" value="classpath:mybatis-config.xml"/>
<property name="mapperLocations" value="classpath:com/hello/mapper/*.xml"/>
</bean>
<!--整合方式二的话,这个也可以不要-->
<bean id="sqlSession" class="org.mybatis.spring.SqlSessionTemplate">
<!--构造器注入-->
<constructor-arg index="0" ref="sqlSessionFactory"/>
</bean>
<!--配置声明式事务-->
<bean id="transactionManager" class="org.springframework.jdbc.datasource.DataSourceTransactionManager">
<property name="dataSource" ref="dataSource"/>
</bean>
<!--结合aop实现事务的织入-->
<!--配置事务通知-->
<tx:advice id="txAdivce" transaction-manager="transactionManager">
<!--给哪些地方配置事务-->
<!--配置事务的传播特性 propagation="REQUIRED"s-->
<tx:attributes>
<tx:method name="add"/>
<tx:method name="delete"/>
<tx:method name="update"/>
<tx:method name="query"/>
<tx:method name="*"/>
</tx:attributes>
</tx:advice>
<!--配置事务切入-->
<aop:config>
<aop:pointcut id="txPointCut" expression="execution(* com.hello.mapper.*.*(..))"/>
<aop:advisor advice-ref="txAdivce" pointcut-ref="txPointCut"/>
</aop:config>
</beans>