https://github.com/ChenCurry/test_struts2/tree/struts2
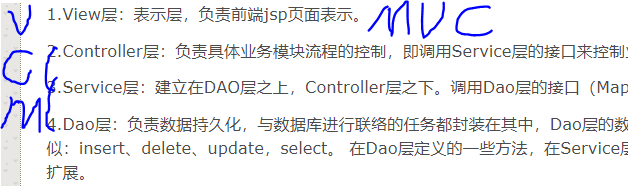
MVC个人理解
(后话:第二课中有讲解)
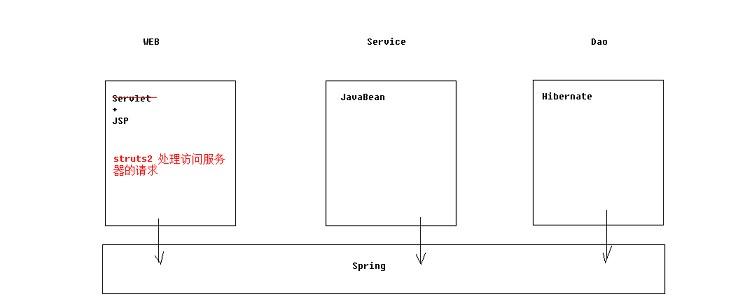
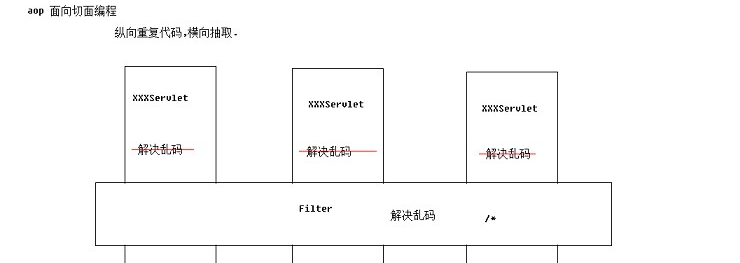
从下图可见struts2是web层的框架,用于处理或者说响应web请求而用(代替传统servlet);
而spring,是提供的容器,用以管理web层,service层和dao层注入其中的对象;
特性罗列(直观上):
- 自动封装参数
- 参数校验
- 结果的处理(转发,重定向)
- 国际化
- 显示等待页面
- 表单的防止重复提交
(架构和思想上还有很多牛逼的地方)
历史:
struts2和struts1没太大关系
struts1是基于servlet(而servlet是线程不安全)
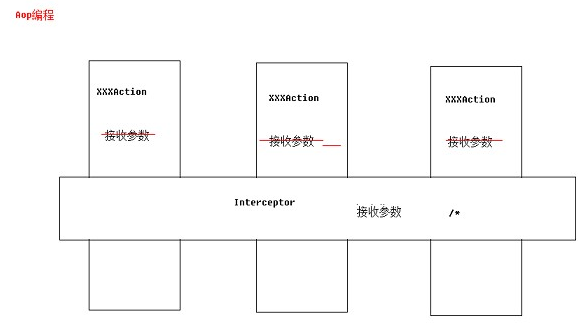
struts2是基于filter和interceptor拦截器的(原本是webwork项目)(filter同interceptor皆有:AOP思想)
搭建struts2框架
新建项目

克隆到本地

(暂时先移到别处,源项目先在IDE中该命,内容复制到才文件夹下)
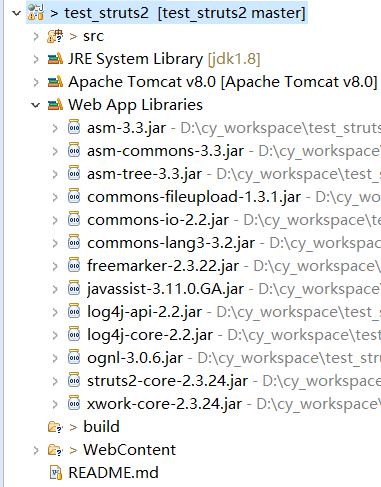
1.导入相应的包(可以到这里看导哪些包struts2/apps/struts-blank.war/WEB-INF/lib)
核心是xwork-core-2.3.24.jar和struts2-core-2.3.24.jar
2.创建XxxAction类及相应的jsp
3.配置struts.xml
4.将struts2过滤器配置到web.xml中
struts2就搭建完了!
struts.xml约束
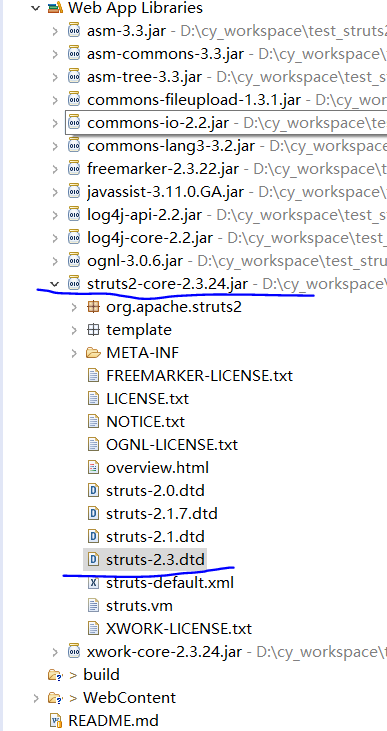
(将这东西弄出来,用拷贝内容和重命名的方式)
复制其中的一个路径
http://struts.apache.org/dtds/struts-2.3.dtd
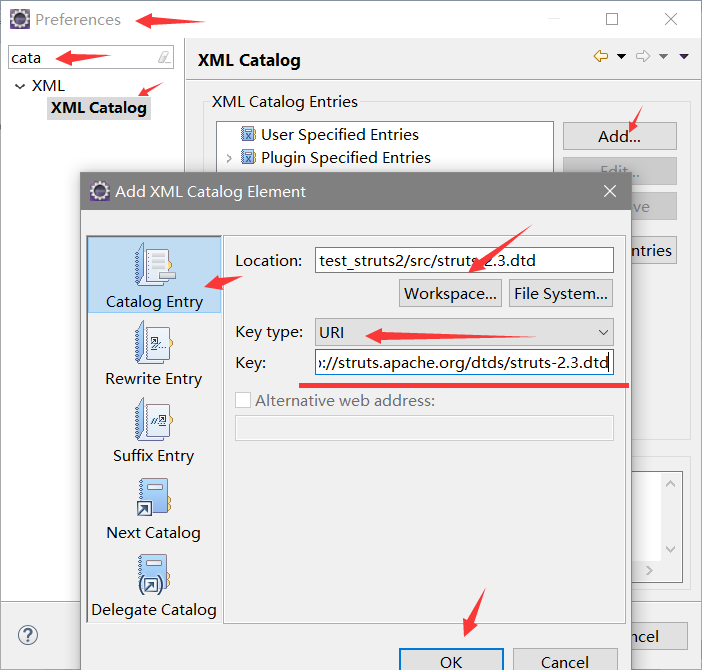
(这样,不用联网即可找到此文件使在编辑struts.xml时有提示信息)
并将
<!DOCTYPE struts PUBLIC
"-//Apache Software Foundation//DTD Struts Configuration 2.3//EN"
"http://struts.apache.org/dtds/struts-2.3.dtd">
粘到struts.xml中
接下来就是书写struts.xml核心配置
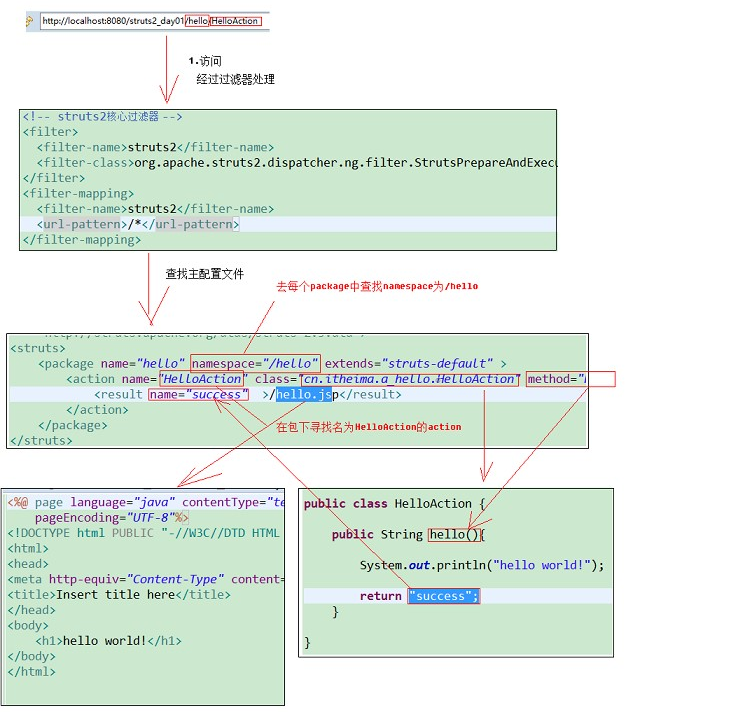
<!-- package:将Action配置封装.就是可以在Package中配置很多action.
        name属性: 给包起个名字,起到标识作用.随便起.不能其他包名重复.
        namespace属性:给action的访问路径中定义一个命名空间 http://localhost:8080/test_struts2/hello
        extends属性: 继承一个 指定包
        abstract属性:包是否为抽象的; 标识性属性.标识该包不能独立运行.专门被继承
  -->
<package name="hello" namespace="/hello" extends="struts-default" >
    <!-- action元素:配置action类
            name属性: 决定了Action访问资源名.  http://localhost:8080/test_struts2/hello/HelloAction
            class属性: action的完整类名
            method属性: 指定调用Action中的哪个方法来处理请求
     -->
    <action name="HelloAction" class="cn.itheima.a_hello.HelloAction" method="hello" >
        <!-- result元素:结果配置
                name属性: 标识结果处理的名称.与action方法的返回值对应.
                type属性: 指定调用哪一个result类来处理结果,默认使用转发.
                标签体:填写页面的相对路径
        -->
        <result name="success" type="dispatcher" >/hello.jsp</result>
    </action>
</package>
(struts2-core-2.3.24.jar包下struts-default.xml是一个核心配置文件)
struts2核心过滤器添加到web.xml
  <filter>
    <filter-name>struts2</filter-name>
    <filter-class>org.apache.struts2.dispatcher.ng.filter.StrutsPrepareAndExecuteFilter</filter-class>
  </filter>
  <filter-mapping>
    <filter-name>struts2</filter-name>
    <url-pattern>/*</url-pattern>
  </filter-mapping>
至此,struts2便搭建完成了!
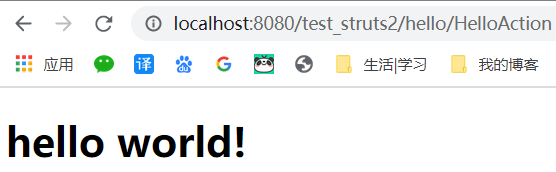
http://localhost:8080/test_struts2/hello/HelloAction
http://localhost:8080/test_struts2/hello/HelloAction.action
简单流程是这样的
访问流程及架构
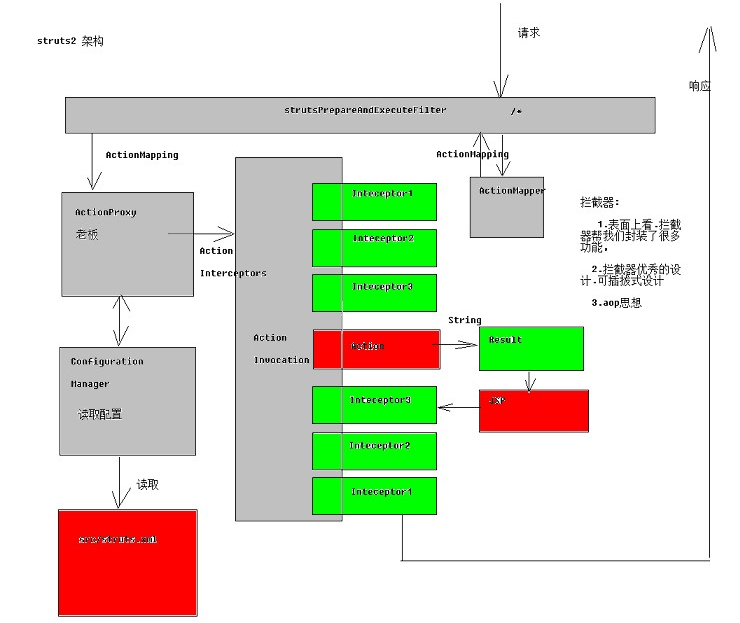
filter:过滤器;interceptor:拦截器;invocation:调用
filter过滤器的特性/作用
interceptor拦截器实现aop及可插拔
struts2常量配置
位置:struts2-core-2.3.24.jar包下default.properties
修改方式一
在struts.xml中配
<constant name="struts.i18n.encoding" value="UTF-8"></constant>
修改方式二
src下新建strtus.properties,并在其中“覆写”常量值
struts.i18n.encoding=UTF8
修改方式三
在web.xml中进行配置
  <!-- 配置常量 -->
  <context-param>
      <param-name>struts.i18n.encoding</param-name>
      <param-value>UTF-8</param-value>
  </context-param>
(方式一二三是按顺序进行加载的)
struts2配置的进阶
动态方法调用就是你只需要配置一个配置项,它可以动态的调用8个方法,而不需要去配置8个固定的配置
<!-- 配置动态方法调用是否开启常量 默认是关闭的,需要开启 -->
<constant name="struts.enable.DynamicMethodInvocation" value="true"></constant>
配置方式一(了解)
<package name="dynamic" namespace="/dynamic" extends="struts-default">
    <action name="Demo1Action" class="cn.itheima.b_dynamic.Demo1Action">
        <result name="success">/hello.jsp</result>
    </action>
</package>
(不利于搜索引擎推广)
通过如下方式进行访问
http://localhost:8080/test_struts2/dynamic/Demo1Action!add.action
http://localhost:8080/test_struts2/dynamic/Demo1Action!delete.action
http://localhost:8080/test_struts2/dynamic/Demo1Action!update.action
http://localhost:8080/test_struts2/dynamic/Demo1Action!find.action
配置方式二
<package name="dynamic" namespace="/dynamic" extends="struts-default">
    <!-- 动态方法调用方式2:通配符方式 使用{1} 取出第一个星号通配的内容 -->
    <action name="Demo1Action_*" class="cn.itheima.b_dynamic.Demo1Action" method="{1}">
        <result name="success">/hello.jsp</result>
    </action>
</package>
调用方式
http://localhost:8080/test_struts2/dynamic/Demo1Action_add.action
http://localhost:8080/test_struts2/dynamic/Demo1Action_delete.action
http://localhost:8080/test_struts2/dynamic/Demo1Action_update.action
http://localhost:8080/test_struts2/dynamic/Demo1Action_find.action
关于默认配置(了解)
<package name="default" namespace="/default" extends="struts-default">
    <!-- 找不到包下的action,会使用Demo2Action作为默认action处理请求 -->
    <default-action-ref name="Demo2Action"></default-action-ref>
    <!-- method属性:execute -->
    <!-- result的name属性:success -->
    <!-- result的type属性:dispatcher 转发 -->
    <!-- class属性:com.opensymphony.xwork2.ActionSupport -->
    <action name="Demo2Action">
        <result>/hello.jsp</result>
    </action>
</package>
访问http://localhost:8080/test_struts2/default/Demo2Actionnnnnnn.action
action类的详解
方式一
//方式1: 创建一个类.可以是POJO
//POJO:不用继承任何父类.也不需要实现任何接口.
//使struts2框架的代码侵入性更低.
public class Demo3Action {

}
方式二
//方式2: 实现一个接口Action
//里面有execute方法,提供action方法的规范.
//Action接口预置了一些字符串.可以在返回结果时使用.为了方便
public class Demo4Action implements Action {

    @Override
    public String execute() throws Exception {
        return null;
    }

}
方式三
//方式3: 继承一个类.ActionSupport
//帮我们实现了 Validateable, ValidationAware, TextProvider, LocaleProvider .
//如果我们需要用到这些接口的实现时,不需要自己来实现了.
public class Demo5Action  extends ActionSupport{

}
练习:客户列表显示
导入项目
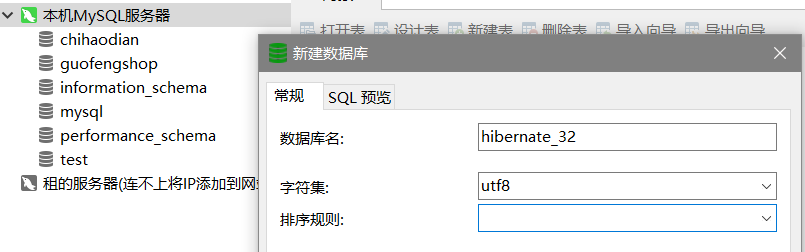
建数据库
导入sql
访问http://localhost:8080/test_struts2/
(十分之恐怖的页面……)
(代码提交GitHub仓库,用户名ChenCurry)