SpringData简介
- 对于数据访问层,无论是 SQL(关系型数据库) 还是 NOSQL(非关系型数据库),Spring Boot 底层都是采用 Spring Data 的方式进行统一处理。
- Spring Data 是 Spring 中与 Spring Boot、Spring Cloud 等齐名的知名项目。
- Sping Data 官网:https://spring.io/projects/spring-data
- 数据库相关的启动器:https://docs.spring.io/spring-boot/docs/2.3.2.RELEASE/reference/htmlsingle/#using-boot-starter
创建项目连接数据库
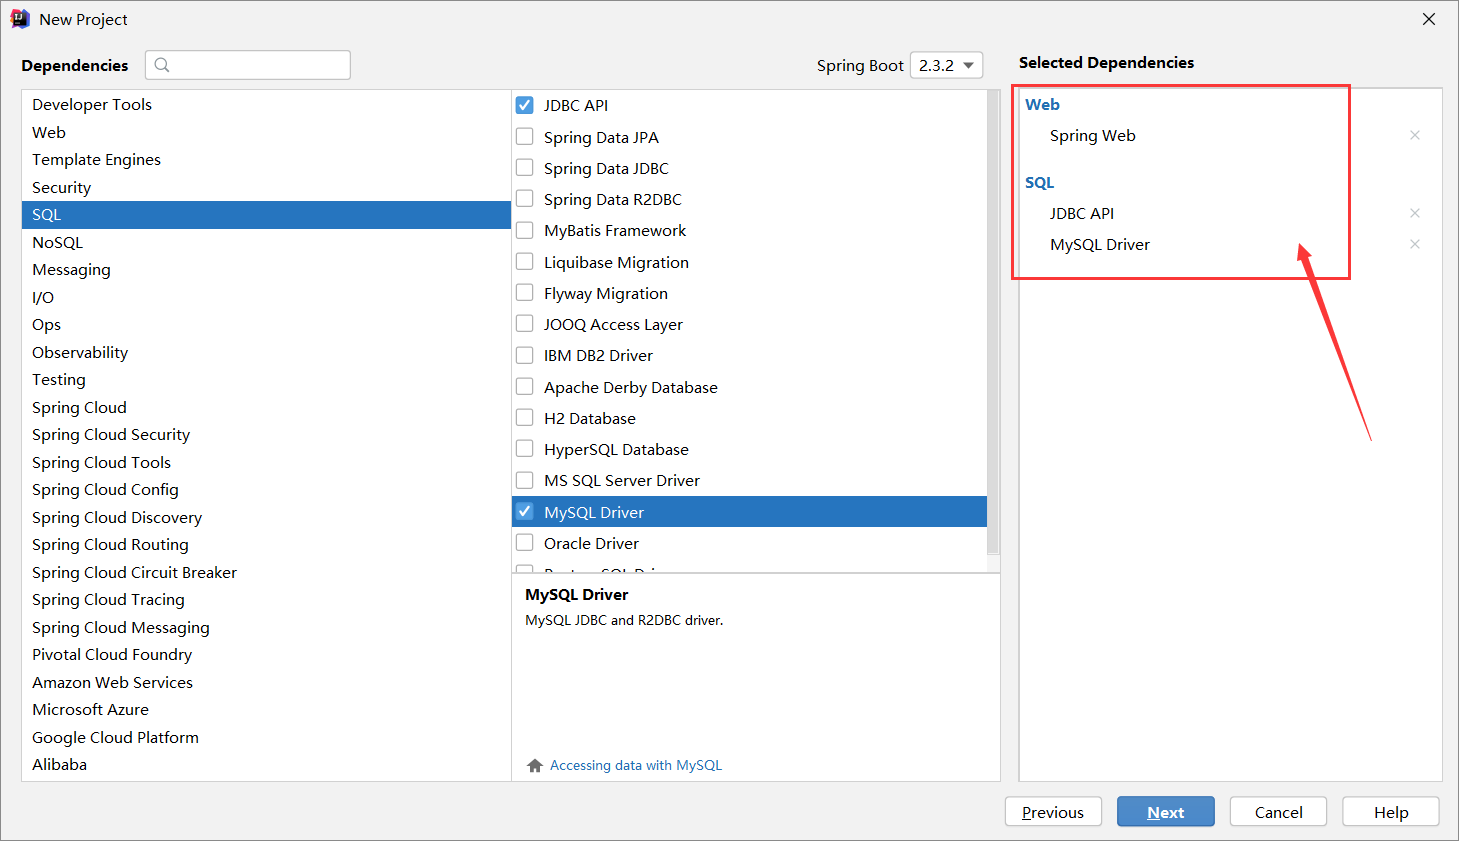
项目建好之后,发现已经自动导入了如下启动器
<dependency>
    <groupId>org.springframework.boot</groupId>
    <artifactId>spring-boot-starter-jdbc</artifactId>
</dependency>
<dependency>
    <groupId>mysql</groupId>
    <artifactId>mysql-connector-java</artifactId>
    <scope>runtime</scope>
</dependency>
编写 application.yaml 配置文件连接数据库
spring:
  datasource:
    username: root
    password: root
    #?serverTimezone=UTC解决时区的报错
    url: jdbc:mysql://localhost:3306/springboot?serverTimezone=UTC&useUnicode=true&characterEncoding=utf-8
    driver-class-name: com.mysql.cj.jdbc.Driver
配置完这些东西后,就可以直接去使用了,因为SpringBoot已经默认进行了自动配置。写测试方法进行测试。
@SpringBootTest
class DemoApplicationTests {

    //DI注入数据源
    @Autowired
    DataSource dataSource;

    @Test
    public void contextLoads() throws SQLException {
        //看一下默认数据源
        System.out.println(dataSource.getClass());
        //获得连接
        Connection connection =   dataSource.getConnection();
        System.out.println(connection);
        //关闭连接
        connection.close();
    }

}
可以看到默认配置的数据源为 class com.zaxxer.hikari.HikariDataSource
数据源的所有自动配置都在 DataSourceAutoConfiguration
@Configuration(proxyBeanMethods = false)
@Conditional(PooledDataSourceCondition.class)
@ConditionalOnMissingBean({ DataSource.class, XADataSource.class })
@Import({ DataSourceConfiguration.Hikari.class, DataSourceConfiguration.Tomcat.class,
        DataSourceConfiguration.Dbcp2.class, DataSourceConfiguration.Generic.class,
        DataSourceJmxConfiguration.class })
protected static class PooledDataSourceConfiguration {

}
HikariDataSource 号称 Java WEB 当前速度最快的数据源,相比于传统的 C3P0 、DBCP、Tomcat jdbc 等连接池更加优秀;
可以使用 spring.datasource.type 指定自定义的数据源类型,值为 要使用的连接池实现的完全限定名。
有了数据库连接,显然就可以 CRUD 操作数据库了。但是需要先了解一个对象 JdbcTemplate。
了解JdbcTemplate
1、有了数据源(com.zaxxer.hikari.HikariDataSource),就可以拿到数据库连接(java.sql.Connection),有了连接,就可以使用原生的 JDBC 语句来操作数据库;
2、即使不使用第三方第数据库操作框架(如 MyBatis等),Spring 本身也对原生的JDBC 做了轻量级的封装,即JdbcTemplate。
3、数据库操作的所有 CRUD 方法都在 JdbcTemplate 中。
4、Spring Boot 不仅提供了默认的数据源,同时默认已经配置好了 JdbcTemplate 放在了容器中,程序员只需自己注入即可使用
5、JdbcTemplate 的自动配置是依赖 org.springframework.boot.autoconfigure.jdbc 包下的 JdbcTemplateConfiguration 类
JdbcTemplate主要提供以下几类方法:
-
execute方法:可以用于执行任何SQL语句,一般用于执行DDL语句;
-
update方法及batchUpdate方法:update方法用于执行新增、修改、删除等语句;batchUpdate方法用于执行批处理相关语句;
-
query方法及queryForXXX方法:用于执行查询相关语句;
-
call方法:用于执行存储过程、函数相关语句。
进行测试
SET NAMES utf8mb4;
SET FOREIGN_KEY_CHECKS = 0;

-- ----------------------------
-- Table structure for employee
-- ----------------------------
DROP TABLE IF EXISTS `employee`;
CREATE TABLE `employee`  (
  `id` int(11) NOT NULL AUTO_INCREMENT,
  `last_name` varchar(50) CHARACTER SET utf8 COLLATE utf8_general_ci NULL DEFAULT NULL,
  `email` varchar(255) CHARACTER SET utf8 COLLATE utf8_general_ci NULL DEFAULT NULL,
  `gender` tinyint(255) NULL DEFAULT NULL,
  `department` tinyint(255) NULL DEFAULT NULL,
  `birth` date NULL DEFAULT NULL,
  PRIMARY KEY (`id`) USING BTREE
) ENGINE = InnoDB AUTO_INCREMENT = 1 CHARACTER SET = utf8 COLLATE = utf8_general_ci ROW_FORMAT = Compact;

SET FOREIGN_KEY_CHECKS = 1;
package com.example.demo.controller;

import org.springframework.beans.factory.annotation.Autowired;
import org.springframework.jdbc.core.JdbcTemplate;
import org.springframework.web.bind.annotation.GetMapping;
import org.springframework.web.bind.annotation.PathVariable;
import org.springframework.web.bind.annotation.RequestMapping;
import org.springframework.web.bind.annotation.RestController;

import java.util.Date;
import java.util.List;
import java.util.Map;

@RestController
@RequestMapping("/jdbc")
public class JdbcController {

    /**
     * Spring Boot 默认提供了数据源,默认提供了 org.springframework.jdbc.core.JdbcTemplate
     * JdbcTemplate 中会自己注入数据源,用于简化 JDBC操作
     * 还能避免一些常见的错误,使用起来也不用再自己来关闭数据库连接
     */
    @Autowired
    JdbcTemplate jdbcTemplate;

    //查询employee表中所有数据
    //List 中的1个 Map 对应数据库的 1行数据
    //Map 中的 key 对应数据库的字段名,value 对应数据库的字段值
    @GetMapping("/list")
    public List<Map<String, Object>> userList(){
        String sql = "select * from employee";
        List<Map<String, Object>> maps = jdbcTemplate.queryForList(sql);
        return maps;
    }

    //新增一个用户
    @GetMapping("/add")
    public String addUser(){
        //插入语句,注意时间问题
        String sql = "insert into employee(last_name, email,gender,department,birth)" +
                " values ('xiaoming','123456@qq.com',1,101,'"+ new Date().toLocaleString() +"')";
        jdbcTemplate.update(sql);
        //查询
        return "addOk";
    }

    //修改用户信息
    @GetMapping("/update/{id}")
    public String updateUser(@PathVariable("id") int id){
        //插入语句
        String sql = "update employee set last_name=?,email=? where id="+id;
        //数据
        Object[] objects = new Object[2];
        objects[0] = "xiaoming2";
        objects[1] = "88888888@sina.com";
        jdbcTemplate.update(sql,objects);
        //查询
        return "updateOk";
    }

    //删除用户
    @GetMapping("/delete/{id}")
    public String delUser(@PathVariable("id") int id){
        //插入语句
        String sql = "delete from employee where id=?";
        jdbcTemplate.update(sql,id);
        //查询
        return "deleteOk";
    }

}
启动程序,浏览器访问
http://localhost:8080/jdbc/list

http://localhost:8080/jdbc/add

http://localhost:8080/jdbc/list

http://localhost:8080/jdbc/update/1

http://localhost:8080/jdbc/list

http://localhost:8080/jdbc/delete/1

http://localhost:8080/jdbc/list