I want to send data from my RPI (master) to one or multiple Arduinos (slave) via I2C bus.
Hint: The RPI is running with 3.3V while the Arduino is running at 5.0V. I read some tutorials where they used a level shifter for the I2c communication. This is NOT needed IF the RPI is running as master and the Arduino is running as slave device. You can use the I2C bus without level shifter as only the master will push the data line high!
*Edit 8.4.2013:*
Pete G. wrote a comment which describe it much better:
One small point, I2C data bus will be bi-directional, not single as you
stated. Both devices will send data on it. The reason it works, is that
the devices using it have open-collector drivers, and pull-up resistors
to the power supply rail. An arduino does not have any pull-ups
installed, but the P1 header on the Ras-Pi has 1k8 resistors to the 3.3v
power rail. Data is transmitted by pulling the lines to 0v, for a
“high” logic signal, and then letting them float (pulled-up to the
supply rail) for “low” logic. Because there is no pull-up resistor in
the Arduino and because 3.3v is within the “low” logic level range for
the Arduino everything works as it should. Remember though that if other
I2C devices are added to the bus they must have their pull-up resistors
removed.
More details.
Buy your RPi here and help support neophob.com!
Prepare I2C on the RPI
There are tons of tutorials out there how to enable I2C on the RPI. That’s why I keep the following part very short.
Remove I2C from the Blacklist:
|
1
2 3 4 |
$ cat /etc/modprobe.d/raspi-blacklist.conf
# blacklist spi and i2c by default (many users don't need them) blacklist spi-bcm2708 #blacklist i2c-bcm2708 |
Load i2c.dev:
add
|
1
|
i2c-dev
|
to the end of /etc/modules
Install i2c tools
|
1
|
$ sudo apt-get install i2c-tools
|
Allow pi user to access the i2c devices
|
1
|
$ sudo adduser pi i2c
|
Now reboot the RPI. After that you should see the i2c devices:
|
1
2 3 |
pi@raspberrypi ~ $ ll /dev/i2c*
crw-rw---T 1 root i2c 89, 0 Apr 4 14:26 /dev/i2c-0 crw-rw---T 1 root i2c 89, 1 Apr 4 14:26 /dev/i2c-1 |
Now we run a simple test, scan the i2c bus:
|
1
2 3 4 5 6 7 8 9 10 |
pi@raspberrypi ~ $ i2cdetect -y 1
0 1 2 3 4 5 6 7 8 9 a b c d e f 00: -- -- -- -- -- -- -- -- -- -- -- -- -- 10: -- -- -- -- -- -- -- -- -- -- -- -- -- -- -- -- 20: -- -- -- -- -- -- -- -- -- -- -- -- -- -- -- -- 30: -- -- -- -- -- -- -- -- -- -- -- -- -- -- -- -- 40: -- -- -- -- -- -- -- -- -- -- -- -- -- -- -- -- 50: -- -- -- -- -- -- -- -- -- -- -- -- -- -- -- -- 60: -- -- -- -- -- -- -- -- -- -- -- -- -- -- -- -- 70: -- -- -- -- -- -- -- -- |
Hint: if you’re using the first revision of the RPI board, use “-y 0″ as parameter. The i2c bus address changed between those two revisions.
Prepare the Arduino Slave
Load this very complicated sketch to your Arduino:
|
1
2 3 4 5 6 7 8 9 10 11 12 13 14 15 16 17 18 19 20 21 22 23 24 |
#include <Wire.h>
void setup() { Wire.begin(4); // join i2c bus with address #4 Wire.onReceive(receiveEvent); // register event Serial.begin(115200); // start serial for output Serial.println("hello!"); } void loop() { delay(100); } void receiveEvent(int howMany) { int a=0; while(Wire.available()>0) { Wire.read(); a++; } Serial.print("read bytes: "); Serial.println(a); } |
Prepare the RPI Master
Ok we have a listening Arduino client, we now need a I2C Master for the RPI. Most examples out there are using c (WiringPi) or python. I’m more that Java guy and was lucky I found the pi4j project (Github).
Make sure you installed a hard float JRE on your RPI! Oh and dont forget to add
|
1
|
export PATH=$PATH:/usr/local/java/bin
|
to your .bashrc file.
I wrote a quick hack, that send’s data to an I2C device
|
1
2 3 4 5 6 7 8 9 10 11 12 13 14 15 16 17 18 19 20 21 22 23 24 25 26 27 28 29 30 31 32 33 34 35 36 37 38 39 40 41 42 |
package com.neophob.com;
import com.pi4j.io.i2c.I2CBus; import com.pi4j.io.i2c.I2CDevice; import com.pi4j.io.i2c.I2CFactory; public class I2CExample { /** * @param args */ public static void main(String[] args) throws Exception { System.out.println("I2C Sender, parmeter [Paket size] [Loop count]"); int size = Integer.parseInt(args[0]); int loops = Integer.parseInt(args[1]); System.out.println("Starting, i2c size: "+size+", loops: "+loops); System.out.println("get bus 1"); // get I2C bus instance final I2CBus bus = I2CFactory.getInstance(I2CBus.BUS_1); System.out.println("get device with id 4"); I2CDevice arduino = bus.getDevice(0x04); byte[] buffer = new byte[size]; for (int i=0; i<buffer.length; i++) { buffer[i] = (byte)i; } for (int i=0; i<loops; i++) { System.out.println("send buffer now"); long l = System.currentTimeMillis(); //write(int address, byte[] buffer, int offset, int size) throws IOException arduino.write(buffer, 0, buffer.length); long needed = System.currentTimeMillis() - l; //arduino.write((byte)65); System.out.println("done in "+needed+"ms"); } } } |
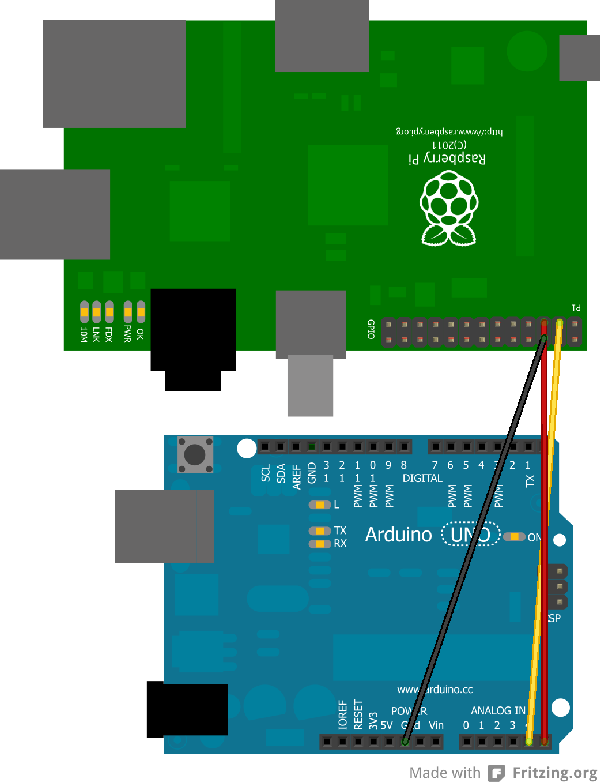
Connect RPI with the Arduino
You need to connect 3 cables:
|
1
2 3 4 5 |
RPI Arduino (Uno/Duemillanove)
-------------------------------------------- GPIO 0 (SDA) <--> Pin 4 (SDA) GPIO 1 (SDL) <--> Pin 5 (SDL) Ground <--> Ground |
I connected the Arduino USB connector on the RPI itself to power the Arduino and debug the Arduino sketch on the RPI itself using
|
1
|
screen /dev/ttyUSB0
|
Scan now the i2c bus, you should see the Arduino slave:
|
1
2 3 4 5 6 7 8 9 10 |
pi@raspberrypi ~ $ i2cdetect -y 1
0 1 2 3 4 5 6 7 8 9 a b c d e f 00: -- 04 -- -- -- -- -- -- -- -- -- -- -- 10: -- -- -- -- -- -- -- -- -- -- -- -- -- -- -- -- 20: -- -- -- -- -- -- -- -- -- -- -- -- -- -- -- -- 30: -- -- -- -- -- -- -- -- -- -- -- -- -- -- -- -- 40: -- -- -- -- -- -- -- -- -- -- -- -- -- -- -- -- 50: -- -- -- -- -- -- -- -- -- -- -- -- -- -- -- -- 60: -- -- -- -- -- -- -- -- -- -- -- -- -- -- -- -- 70: -- -- -- -- -- -- -- -- |
Advanced Stuff
Per default the I2C bus is running at 100kHz. You can increase the I2C bus speed to increase the data throughput. Keep in mind that a faster speed means you *might* run into troubles if you’re using longer cables.
Increase the I2C speed on the RPI:
You can load the I2C module with an optional parameter which define the I2C speed, in the following example I use 400kHz:
|
1
2 |
sudo rmmod i2c_bcm2708
sudo modprobe i2c_bcm2708 baudrate=400000 |
If you want to make that change persistent use this command:
|
1
|
sudo bash -c "echo options i2c_bcm2708 baudrate=400000 > /etc/modprobe.d/i2c.conf"
|
Edit 25.4.2013:
I first used a I2C speed of 1200kHz. That worked for 3 devices, if I
connected more devices on the I2C bus it started to be unstable.
Increase the I2C speed on the Arduino:
You need to change some source files, close the Arduino IDE and open the
Arduino library located at utility/twi.h. search the string “#define
TWI_FREQ 100000L” and change it to:
|
1
|
#define TWI_FREQ 400000L (was 100000L)
|
The Arduino use a hard coded I2C buffer size of 32 bytes. If you send more than 32 bytes the Arduino will crash and you need to power cycle the board! I changed the buffer size from 32 bytes to 96 bytes, by editing those Arduino library files (make sure the Arduino IDE is closed):
|
1
2 3 4 5 |
utility/twi.h:
#define TWI_BUFFER_LENGTH 96 (was 32) wire.h: #define BUFFER_LENGTH 96 (was 32) |
Recompile your sketch and reupload it.
Test it!
Now its time to start the Java code, send 96 bytes and loop 3 times.
|
1
2 3 4 5 6 7 8 9 10 |
pi@raspberrypi ~/test $ java -cp *:./pi4j-core-0.0.5.jar com.neophob.com.I2CExample 96 3
Starting, i2c size: 96, loops: 10 get bus 1 get device with id 4 send buffer now done in 4ms send buffer now done in 2ms send buffer now done in 3ms |
when I first used the default I2C clock speed of 100kHz, the RPI needed about 10ms to send a data packet of 96 bytes.