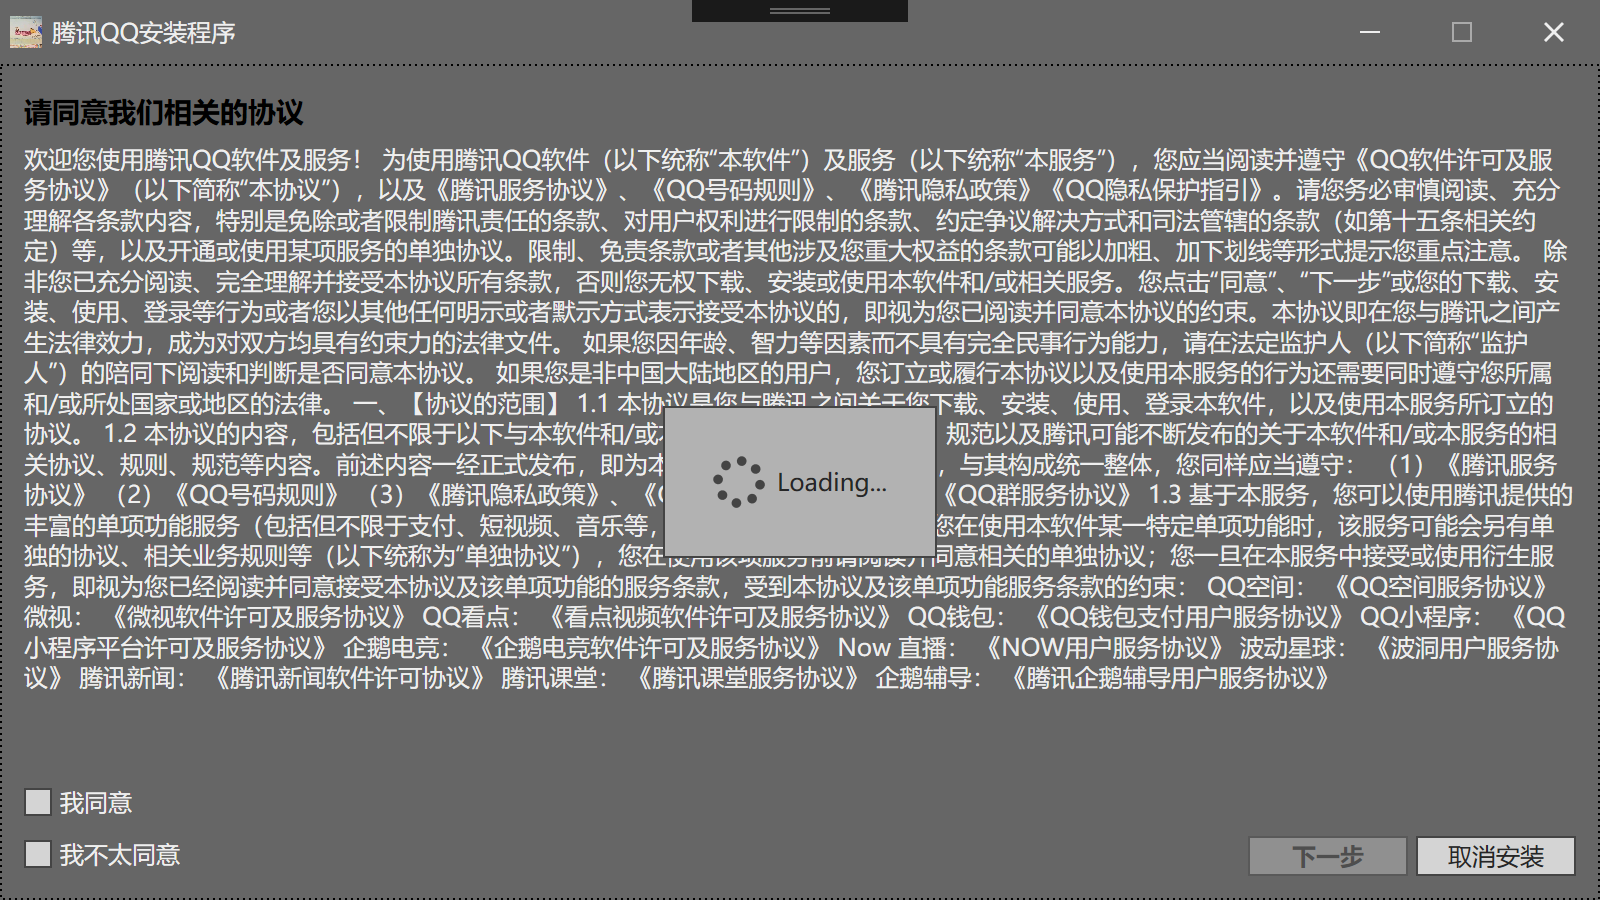
话不多说先上图

点击下一步
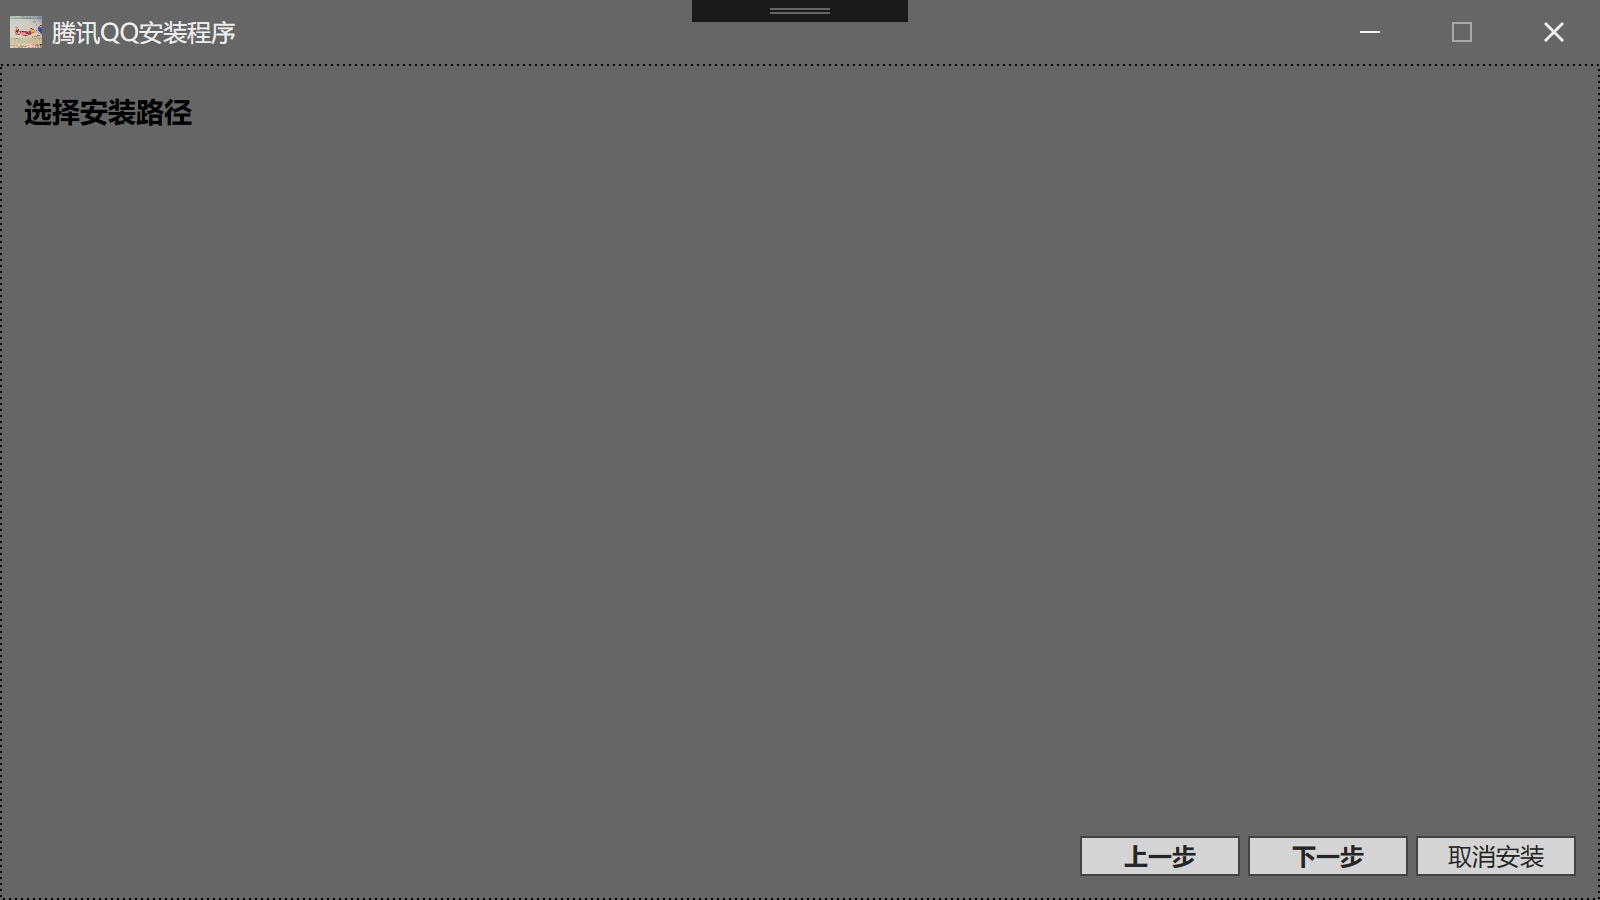
跳转到第二页
项目准备:
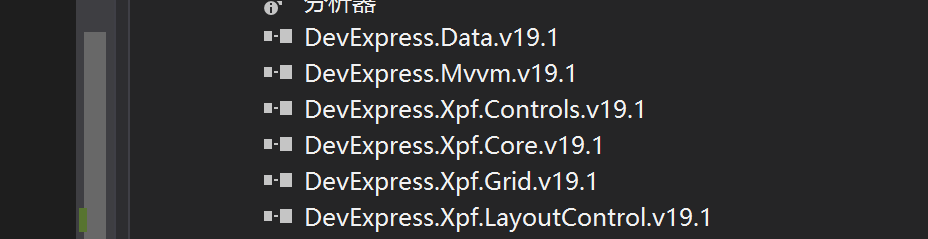
1.DevExpress 19/18/17(三个版本都可以)
2.Vs2019
3..Net framework>4.0
项目结构:

项目步骤:
1.导入项目所需的DLL
每个DLL的含义和作用可以去官网或者客户端工具查看
2.构建主界面
DevExpress的导航控件具有跳转的功能,我们这里使用的就是DevExpress的NavigationFrame控件。
它存在DevExpress.Xpf.Controls的DevExpress.Xpf.WindowsUI命名空间下。

我们在主界面里面装入此控件,并且在控件内设置第一页指向的界面。
<dx:ThemedWindow x:Class="NextDemo.MainWindow"
        xmlns="http://schemas.microsoft.com/winfx/2006/xaml/presentation"
        xmlns:x="http://schemas.microsoft.com/winfx/2006/xaml"
        xmlns:d="http://schemas.microsoft.com/expression/blend/2008"
        xmlns:dx="http://schemas.devexpress.com/winfx/2008/xaml/core"
        xmlns:dxmvvm="http://schemas.devexpress.com/winfx/2008/xaml/mvvm"
        xmlns:dxwui="http://schemas.devexpress.com/winfx/2008/xaml/windowsui"
        xmlns:mc="http://schemas.openxmlformats.org/markup-compatibility/2006"
        xmlns:local="clr-namespace:NextDemo"
        mc:Ignorable="d"
        ResizeMode="CanMinimize"
        Title="腾讯QQ安装程序" Height="450" Width="800">
    <Grid>
        <dx:LoadingDecorator>
            <dxwui:NavigationFrame x:Name="frame" Source="InstallStep1" BackNavigationMode="Root"//这里的source就是指向的界面的名字
                               AnimationType="SlideHorizontal"
                               AnimationSpeedRatio="1">
            </dxwui:NavigationFrame>
        </dx:LoadingDecorator>
    </Grid>
</dx:ThemedWindow>
那么这里的Source属性是如何指向界面的呢?
其实它会根据名字去同一个命名空间下寻找同名的类,所以这里要确保你的界面要和主界面是一个命名空间,不然寻找失败,DevExpress就会将之转化为字符串进行展示
下图中,我们在Views文件夹中创建第一页显示的用户控件,并且将命名空间与主界面修改为一致
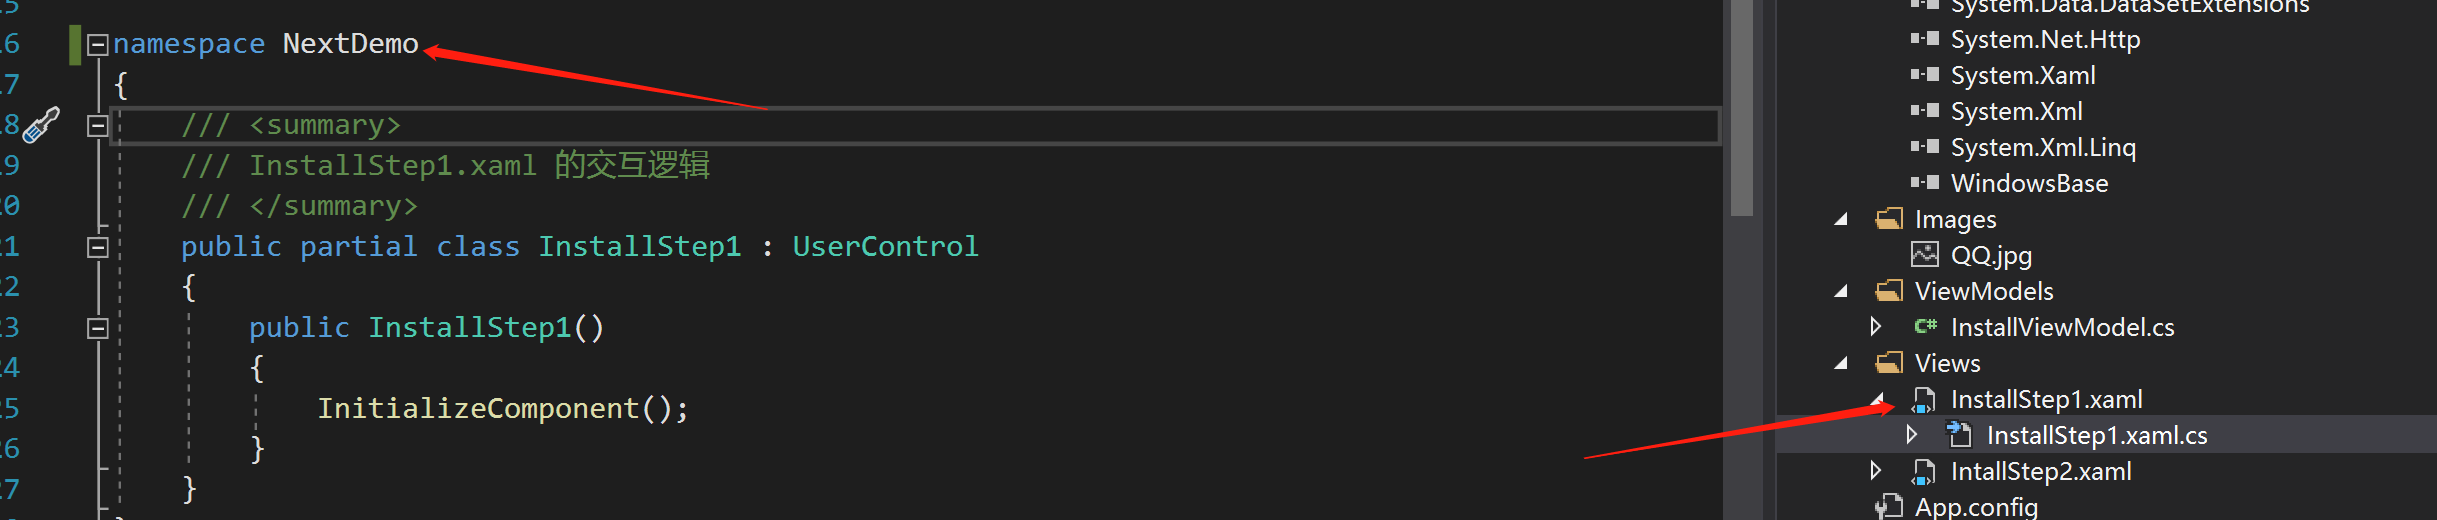
主界面对应后台代码
public partial class MainWindow
    {
        public MainWindow()
        {
            InitializeComponent();
            //设置样式
            ApplicationThemeHelper.UseLegacyDefaultTheme = true;
            ApplicationThemeHelper.ApplicationThemeName = Theme.Office2019DarkGray.Name;
            this.WindowStyle = System.Windows.WindowStyle.SingleBorderWindow;
            this.BorderThickness = new Thickness(0);
            this.Margin = new Thickness(0);
            this.Padding = new Thickness(0);
            this.Icon = new BitmapImage(new Uri("pack://application:,,,/Images/QQ.jpg"));
            //绑定模型
            var viewModel = new InstallViewModel();
            viewModel.NavigatePage += frame.Navigate;//重点:绑定导航切换方法
            this.DataContext = viewModel;
        }
    }
我们将NavigationFrame的导航切换事件绑定到我们视图模型上面,并且这是一个总的ViewModel,为什么不在每个界面里做这种操作
1.因为NavigationFrame控件在主界面中,如果我们在每一页都想去操作它,就得作为传输参数,提高了耦合
2.我们可以使每一页的视图模型都去继承MainWindow的视图模型,重写该事件,从而可以根据具体业务定制页面跳转,实现多态。(demo中并没有这样做。hhhhh)
3.对第一个界面进行处理,我就稍微模仿了下一些程序的安装程序
直接上代码
<UserControl x:Class="NextDemo.InstallStep1"
             xmlns="http://schemas.microsoft.com/winfx/2006/xaml/presentation"
             xmlns:x="http://schemas.microsoft.com/winfx/2006/xaml"
             xmlns:mc="http://schemas.openxmlformats.org/markup-compatibility/2006"
             xmlns:d="http://schemas.microsoft.com/expression/blend/2008"
             xmlns:dx="http://schemas.devexpress.com/winfx/2008/xaml/core"
             xmlns:dxe="http://schemas.devexpress.com/winfx/2008/xaml/editors"
             xmlns:dxlc="http://schemas.devexpress.com/winfx/2008/xaml/layoutcontrol"
             xmlns:dxg="http://schemas.devexpress.com/winfx/2008/xaml/grid"
             xmlns:dxmvvm="http://schemas.devexpress.com/winfx/2008/xaml/mvvm"
             xmlns:local="clr-namespace:NextDemo"
             mc:Ignorable="d"
             d:DesignHeight="450" d:DesignWidth="800">
    <dxmvvm:Interaction.Behaviors>
        <dx:DXMessageBoxService/>
        <dx:CurrentDialogService/>
    </dxmvvm:Interaction.Behaviors>
    <Grid>
        <dxlc:LayoutControl VerticalAlignment="Stretch" Orientation="Vertical" TextBlock.FontSize="12">
            <Label VerticalAlignment="Top" FontWeight="Bold" TextBlock.FontSize="14" Content="请同意我们相关的协议" Foreground="Black"></Label>
            <dxlc:LayoutGroup Orientation="Horizontal">
                <TextBlock TextWrapping = "Wrap">欢迎您使用腾讯QQ软件及服务</TextBlock>
            </dxlc:LayoutGroup>
            <dxlc:LayoutGroup VerticalAlignment="Bottom" Orientation="Horizontal">
                <dxlc:LayoutGroup Orientation="Vertical" HorizontalAlignment="Left">
                    <dxe:CheckEdit   Content="我同意" HorizontalAlignment="Left"/>
                    <dxe:CheckEdit   Content="我不太同意" HorizontalAlignment="Left"/>
                </dxlc:LayoutGroup>
                <dxlc:LayoutGroup  HorizontalAlignment="Right" VerticalAlignment="Bottom">
                    <dx:SimpleButton Content="下一步" Width="80" Height="20" FontWeight="Bold"  Command="{Binding NextCommand}" VerticalAlignment="Bottom"></dx:SimpleButton>
                    <dx:SimpleButton Content="取消安装" Width="80" Height="20" Command="{Binding CancelCommand}" VerticalAlignment="Bottom"></dx:SimpleButton>
                </dxlc:LayoutGroup>
            </dxlc:LayoutGroup>
        </dxlc:LayoutControl>
        <dx:WaitIndicator  DeferedVisibility="{Binding IsLoading}" />
    </Grid>
</UserControl>
这里使用到了DevExpress自带的MVVM模式,不太了解的同学可以去官网或者我的文章了解下,其实和WPF自带的很像。
对"下一步"进行命令绑定。
WaitIndicator是WPF自带的一个加载中控件。我将之是否显示绑定到一个IsLoading属性。
4.处理业务,完成VIewModel
internal Action<string> NavigatePage;
这就是步骤二中绑定的导航的跳转事件对象
有了它我们就可以自由调用它,进行跳转。委托参数是跳转的视图的名字,同样也得是统一命名空间。
private void JumpToStepTwo()
        {
           //业务或者跳转判断
           //....
           //跳转到对应的命名空间下的用户控件
            NavigatePage?.Invoke("IntallStep2");
        }
对下一步就行命令绑定的实现
public event Action NextAction;//跳转下一步的事件,
private async Task Next()
        {
            IsLoading = true;
            try
            {
                await Task.Delay(2000);//模拟业务耗时

                NextAction?.Invoke();
            }
            catch(Exception ex) { throw ex; }
            finally
            {
                IsLoading = false;
            }
        }
NextCommand = new AsyncCommand(Next);
这样下一步的功能就可以使用了,具体业务自己实现就行了。
ViewModel代码
public class InstallViewModel:ViewModelBase
    {
        bool _loading;
        public bool IsLoading
        {
            get { return _loading; }
            set { SetProperty(ref _loading, value,nameof(IsLoading) ); }
        }
        internal Action<string> NavigatePage;
        //以下两个建议提交到基类中定义
        public AsyncCommand NextCommand { get; set; }//下一步的命令
        public event Action NextAction;//跳转下一步的事件,
        //业务逻辑
        public InstallViewModel()
        {
            NextCommand = new AsyncCommand(Next);
            NextAction += JumpToStepTwo;
        }
        private async Task Next()
        {
            IsLoading = true;
            try
            {
                await Task.Delay(2000);//模拟业务耗时

                NextAction?.Invoke();
            }
            catch(Exception ex) { throw ex; }
            finally
            {
                IsLoading = false;
            }
        }
        private void JumpToStepTwo()
        {
           //业务或者跳转判断
           //....
           //跳转到对应的命名空间下的用户控件
            NavigatePage?.Invoke("IntallStep2");
        }
    }
最后提一下,就是下一步,上一步,取消,都应该提到一个基类视图模型中,然后继承,自己根据业务实现特定的功能。
代码已经上传GitHub
觉得有用的话给个星星吧ballball你们!!!