这一次我们要学习Gesture、TableView、AlertView三种技术。
一、Gesture
在iOS中,可以使用系统内置的手势识别(GestureRecognizer),也可以创建自己的手势。
GestureRecognizer将低级别的转换到高级别的执行行为,然后绑定到view的对象,所以当发生手势时,绑定到的view对象会响应,它确定这个动作是否对应一个特定的手势(swipe,pinch,pan,rotation)
如果它能识别手势,那么就会向绑定它的view发送消息。
UIKit框架提供了预定义的GestureRecognizer:UITapGestureRecognizer、UIPanGestureRecognizer、UIPinchGestureRecognizer、UISwipeGestureRecognizer、UIRotationGestureRecognizer、UILongPressGestureRecognizer。
添加手势只需三步:
- 建立手势识别器(如 UITapGestureRecognizer)实例,在其 addTarget 方法中设置 target(一般就是 self)、action 方法,指定一些属性,如识别器实例的 isUserInteractionEnable = true
- 附加识别器到视图:*View.addGestureRecognizer(识别器实例)
- 实现 action指定的方法
完整代码:
import UIKit
class ViewController: UIViewController {
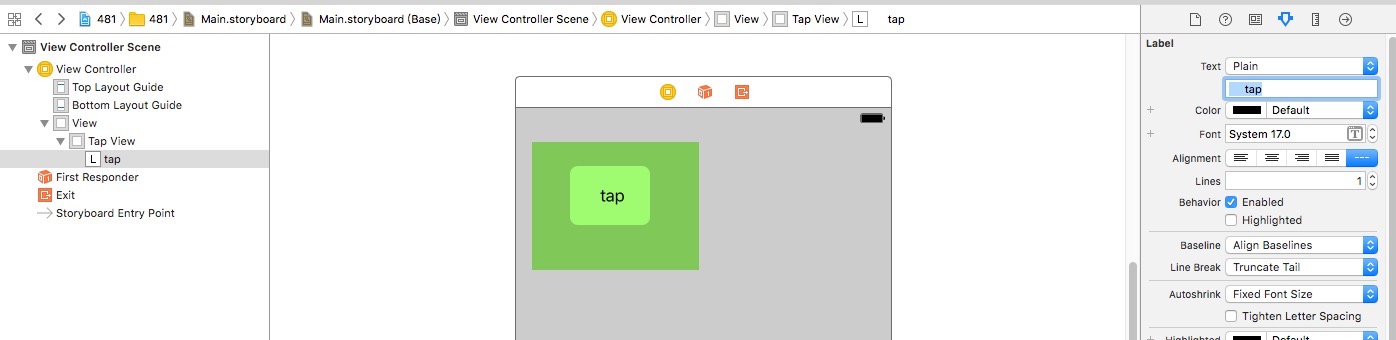
@IBOutlet weak var tapView: UIView!
var lastRotation = CGFloat()
let tapRec = UITapGestureRecognizer()
override func viewDidLoad() {
super.viewDidLoad()
tapRec.addTarget(self, action: #selector(ViewController.tappedView))
tapView.addGestureRecognizer(tapRec)
tapView.isUserInteractionEnabled = true
}
func tappedView()
{
print("hello")
}
}
二、UITableView
Table是最常用的展示数据的一种UI控件。资料展示风格:列表风格Plain,分块风格Grouped。
TableView实现步骤:
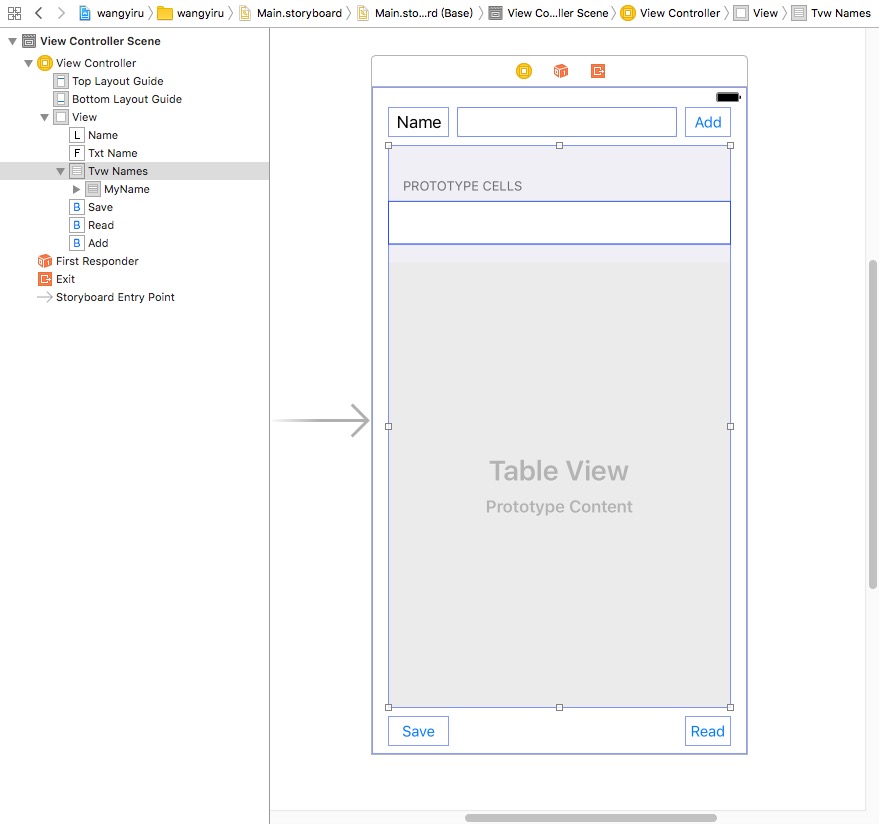
- 添加UITableView及Prototype Cells。
- 需要某一个类遵循UITableViewDelegate、UITableViewDataSource协议(并在后面实现三个特定的方法),然后对TableView设置代理,设置为刚才的类:tableView.delegate = self(或者其他类名)、tableView.dataSource = self。
- 设置TableViewCell的Identifier(只要唯一就行)
- 初始化数据
- 实现UITableViewDataSource协议的三个特定的、必须的方法,在这三个方法中实现数据显示:设置section数量、单个section内的行的数量、显示单元格数据。
下面是TableView的一个实例:
import UIKit
class ViewController: UIViewController,UITableViewDelegate,UITableViewDataSource {
var myName = [String]()
@IBOutlet weak var txtName: UITextField!
@IBOutlet weak var tvwNames: UITableView!
override func viewDidLoad() {
super.viewDidLoad()
tvwNames.delegate = self //第2步
tvwNames.dataSource = self
myName.append("aa") //最初的默认值
}
@IBAction func btn_Add(_ sender: UIButton) {
if let name = txtName.text {
myName.append(name)
tvwNames.reloadData()
}
}
@IBAction func btn_Save(_ sender: UIButton) {
}
@IBAction func btn_Read(_ sender: UIButton) {
}
func numberOfSections(in tableView: UITableView) -> Int {
return 1
}
//单个section内的行的数量
func tableView(_ tableView: UITableView, numberOfRowsInSection section: Int) -> Int {
return myName.count
}
func tableView(_ tableView: UITableView, cellForRowAt indexPath: IndexPath) -> UITableViewCell {
let cellIdentifier = "MyName"
let cell = tableView.dequeueReusableCell(withIdentifier: cellIdentifier, for: indexPath) //第4步设置数据
cell.textLabel?.text = myName[indexPath.row] //设置初始数据
return cell //返回数据
}
}
TableView还可以自定义表格:制定每一行(cell)的显示模板。
Alert ActionView:
iOS有两种弹框提示:Alert(屏幕弹出提示)、ActionSheet(底部弹出菜单)。
先放一个button,然后右键button拖一个@IBAction方法,然后。。。
完整代码:
@IBAction func btnExit(sender: UIButton) {
let alertController = UIAlertController(title: "标题", message: "这是我要显示的内容", preferredStyle: .Alert) //表示是弹框Alert,也可以是ActionSheet
let okAction = UIAlertAction(title: "好的", style: .Default, handler: {
action in
print("hello")
// exit(0)
})
let cancelAction = UIAlertAction(title: "取消", style: .Cancel, handler: nil) //可以用.Destructive表示警告:文字颜色变红
alertController.addAction(cancelAction)
alertController.addAction(okAction)
self.presentViewController(alertController, animated: true, completion: nil)
//有些是self.present(alertController, animated: true, completion: nil),总之就是打出一个模式框
}
第二次考试完整代码:files.cnblogs.com/files/quanxi/2014110231.zip
files.cnblogs.com/files/quanxi/最新.zip