spring七大模块
IoC、DI
控制反转(ioc):是一种思想,创建对象的控制权,从程序代码转移到了ioc容器。
依赖注入(di):是控制反转的实现方法,bean对象的创建依赖于容器,bean对象中所有的属性由容器注入。
IoC的实现:采用XML配置 / 使用注解
依赖注入的方式
1.构造器注入,【在配置文件加载的时候,容器中管理的对象就已经创建了】
<!--1.下标赋值-->
<bean id="id_name" class="全类名">
    <construct-arg index="0" value="xx"/>
    <construct-arg index="1" value="xxx"/>
</bean>
<!--2.类型赋值,不推荐使用,当多个参数类型相同时 会报错-->
<bean id="id_name" class="全类名">
    <construct-arg type="java.lang.String" value="xx"/>
</bean>
<!--3.参数名赋值-->
<bean id="id_name" class="全类名">
    <construct-arg name="name" value="xx"/>
</bean>
2.set注入,常用
<!--1.普通注入-->
<bean id="id_name" class="全类名">
    <property name="name" value="xx"/>
</bean>
<!--2.bean注入-->
<bean id="id_name" class="全类名">
    <property name="name" ref="bean_id"/>
</bean>
<!--3.数组-->
<bean id="id_name" class="全类名">
   <property name="name">
     <array>
         <value>xx</value>
         <value>xxx</value>
     </array>
    </property>
</bean>
<!--4.list-->
<bean id="id_name" class="全类名">
   <property name="name">
     <list>
         <value>xx</value>
         <value>xxx</value>
     </list>
    </property>
</bean>
<!--5.set-->
<bean id="id_name" class="全类名">
   <property name="name">
     <set>
         <value>xx</value>
         <value>xxx</value>
     </set>
    </property>
</bean>
<!--6.map-->
<bean id="id_name" class="全类名">
   <property name="name">
     <map>
         <entry key="x" value="xx"/>
     </map>
    </property>
</bean>
<!--7.空值注入-->
<bean>
  <property>
    <null/>
  </property>
</bean>
<!--properties-->
<bean>
  <property>
     <pros>
        <prop key="x">xx</prop>
        <prop key="xx">xxx</prop>
     </pros>
  </property>
</bean>
3.接口注入(spring不支持)
bean的作用域
| Scope | Description |
|---|---|
| singleton | 容器中只有一个bean的实例 |
| prototype | 每次从容器中获取bean时,都会产生一个新的实例 |
| request | 每次http请求都会创建一个新对象 |
| session | 同一个会话共享一个实例,不同的会话使用不同的实例 |
| global-session | 所有会话共享同一个实例 |
singleton:单例,一个类只有一个实例。【spring默认作用域】
prototype:原型,每次从容器中获取对象的时候都会产生一个新对象。
其余三个只能在web开发中使用。
bean的自动装配
xml实现在自动装配:autowired = "byName / byType"
-
byName自动装配:保证bean的id唯一
-
byType自动装配:保证bean的class唯一
使用注解实现自动装配:
- @Autowired; 【最常用】
- 字段上
- set方法上
- 构造方法上
- 如果@Autowired自动装配的环境比较复杂(bean的id 不唯一,类中有多个相同的属性),可以使用@Qulifier(value="xx")配合@Autowired,指定一个唯一的bean对象注入。
- @Resource(name="xx");【功能更强大】
@Autowired和@Resource的区别:
- 都是用来实现自动装配的,都可以放在属性上
- @Autowired通过byType实现,如果xml中有多个相同类型的bean,就会注入失败,报空指针异常
- @Resource通过byName实现,如果找不到对应的bean的id,就通过byType实现!如果xml中有多个相同类型的bean,就会注入失败,报bean不唯一异常
@Component有三个衍生注解
对应三成架构中的每一层
- Dao【@Repository】
- Service【@Service】
- Controller【@Controller】
这四个注解的功能都是一样的,为当前类注册bean对象,交给spring容器管理
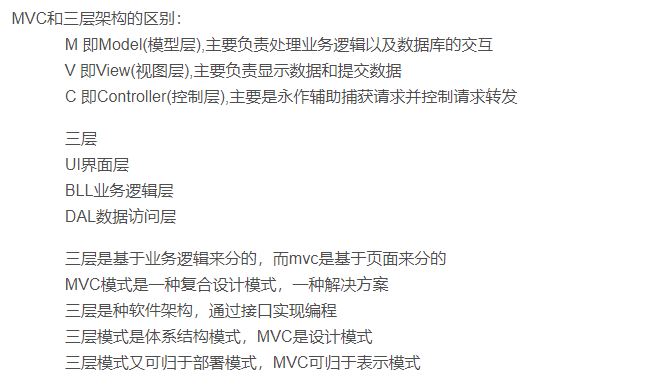
三层架构和MVC的区别
AOP是一种技术
提取并封装跟核心业务无关的重复代码。在需要调用的时候,使用动态代理技术,在不修改源码的基础上对方法进行增强。比如:权限管理、事务处理、日志记录。
代理模式:静态代理,动态代理
静态代理
角色分析:
- 抽象角色:一般使用接口或者抽象类
- 具体角色:被代理的角色
- 代理角色:代理真实角色,相当于中间商,代理后会做一些附属操作
- 客户:访问代理对象的人
好处:
- 使具体角色的操作更纯粹!不用再去关注一些公共的业务
- 公共的业务交给代理角色,实现了业务的分工
- 公共业务集中管理,需要扩展功能时候更加方便
缺:
- 一个真实角色就会产生一个代理角色,代码量翻倍==开发效率变低
动态代理
- 角色和静态代理角色一样
- 动态代理的代理类是动态生成的,不是我们写好的!
- 动态代理分为两大类:
- 基于接口:JDK动态代理
- 基于子类:cglib代理
需要了解两个类:Proxy(用于生成代理类),InvocationHandler(接口,调用处理程序)
JDK动态代理好处:
- 有静态代理的所有优点
- 一个动态代理代理的是一个接口,对应一类业务
- 一个动态代理可以代理多个类,只要这些类实现了同一个接口
缺:
- 只会增强最先调用的方法,内部之间相互调用的方法,是不会被增强的。【这在基于子类和基于接口的动态代理方法中都存在。】
AOP的实现方式
-
使用spring的API
<?xml version="1.0" encoding="UTF-8"?> <beans xmlns="http://www.springframework.org/schema/beans" xmlns:xsi="http://www.w3.org/2001/XMLSchema-instance" xmlns:aop="http://www.springframework.org/schema/aop" xsi:schemaLocation="http://www.springframework.org/schema/beans http://www.springframework.org/schema/beans/spring-beans.xsd http://www.springframework.org/schema/aop http://www.springframework.org/schema/aop/spring-aop.xsd"> <!--注册bean--> <bean id="afterLog" class="proxy.AfterLog"></bean> <bean id="beforeLog" class="proxy.BeforeLog"></bean> <bean id="user2" class="proxy.User"></bean> <!--配置aop,需要导入aop的约束--> <aop:config> <aop:pointcut id="pointcut" expression="execution(* proxy.User.*(..))"/> <!--执行增强--> <aop:advisor advice-ref="afterLog" pointcut-ref="pointcut"/> <aop:advisor advice-ref="beforeLog" pointcut-ref="pointcut"/> </aop:config> </beans> -
自定义切面(是一个类)来实现aop
<?xml version="1.0" encoding="UTF-8"?> <beans xmlns="http://www.springframework.org/schema/beans" xmlns:xsi="http://www.w3.org/2001/XMLSchema-instance" xmlns:aop="http://www.springframework.org/schema/aop" xsi:schemaLocation="http://www.springframework.org/schema/beans http://www.springframework.org/schema/beans/spring-beans.xsd http://www.springframework.org/schema/aop http://www.springframework.org/schema/aop/spring-aop.xsd"> <!--注册bean--> <bean id="user2" class="proxy.User"></bean> <!--自定义切面--> <bean id="aspect" class="proxy.DiyLog"/> <aop:config> <aop:aspect ref="aspect"> <!--切入点--> <aop:pointcut id="point" expression="execution(* proxy.User.*(..))"/> <!--通知--> <aop:before method="before" pointcut-ref="point"/> <aop:after method="after" pointcut-ref="point"/> </aop:aspect> </aop:config> </beans> -
使用注解实现
<!--    方式三,使用注解实现-->
    <bean id="annotationPointCut" class="proxy.DiyLog"/>
<!--    开启注解支持-->
    <aop:aspectj-autoproxy/>


package proxy;
import org.aspectj.lang.annotation.After;
import org.aspectj.lang.annotation.Aspect;
import org.aspectj.lang.annotation.Before;

//自定义切面,是一个类
@Aspect   //表明当前类是一个切面
public class DiyLog {
    @Before("execution(* proxy.User.*(..))")
    public void before(){
        System.out.println("======方法执行前=======");
    }
    @After("execution(* proxy.User.*(..))")
    public void after(){
        System.out.println("======方法执行后=======");
    }
}
spring中的事务管理
- 声明式事务
- 编程式事务(不使用)
配置声明式事务
<!--配置 事务管理器-->
<bean id="dataSourceTransactionManager"
      class="org.springframework.jdbc.datasource.DataSourceTransactionManager">
        <property name="dataSource" ref="dataSource"></property>
    </bean>
<!--配置事务通知-->
<tx:advice id="txAdvice"
               transaction-manager="dataSourceTransactionManager">
        <!--给哪些方法配置事务-->
        <tx:attributes>
            <tx:method name="add*" propagation="REQUIRED"/>
        </tx:attributes>
    </tx:advice>
<!--配置aop-->
<aop:config>
        <aop:pointcut id="pointc"
                      expression="execution(* com.kk.service.BookServiceImp.*(..))"/>
        <aop:advisor advice-ref="txAdv" pointcut-ref="pointc"/>
    </aop:config>
为什么需要事务:
如果不配置事务,可能存在数据提交不一致的情况,涉及到数据的一致性和完整性问题。