文章目录
0. BERT介绍
google 在2018年放出的大杀器, 作为当前NLP的最新技术,此模型在NLP的多个上游下游问题上都取得很好的成绩,刷新记录, 具体原理可以自行google, 这样一个新的技术, 值得我们学习一下, 下面我将给出一个使用BERT进行情感分类预测及代码实例, 供大家分享学习。
1. BERT配置
要求配置如下, tensorflow版本不能太低。
tensorflow >= 1.11.0   # CPU Version of TensorFlow.
tensorflow-gpu  >= 1.11.0  # GPU version of TensorFlow.
1.1. clone BERT 代码
首先clone 官方代码,地址如下
https://github.com/google-research/bert.git
之后我们主要专注于run_classifier.py, 因为这个py文件是BERT的分类任务接口, 接下来我们主要就是对这个文件进行修改, 然后运行即可。 同理 其他任务则运行其他文件,例如问答训练是run_squad.py等
1.2. 数据处理
我们一共需要两种数据
- 数据是BERT开放的预训练模型
- 我们的数据集
1.2.1预训练模型
这是google花费大量资源训练出来的预训练模型, 我的数据集是英文句子, 所以我们使用 BERT-base,uncased
也就是基础版本+有大小写版本, 当然如果你用中文,google也提供了相应的数据集
下载地址如下: BERT-Base, Uncased下载地址
其他的可以在仓库的readme里找到相应的下载地址

然后随便放到一个地方,这里我放到了新建的uncased文件夹里, 路径不一样,模型运行参数会有一点点变化
1.2.2数据集
数据集介绍如下:
这是一个面向句子的情感分类问题。训练集和测试集已给出,使用训练集进行模型训练并对测试集中各句子进行情感预测。训练集包含10026行数据,测试集包含4850行数据。
训练集
训练集中,每一行代表一条训练语句,包括四部分内容,使用’ ’分隔符:
ID1 ID2 polarity text
其中ID1和ID2是爬取句子内容的定位信息,同学们无需使用。text是句子内容,polarity是句子对应情感类型,有positive、negative、neutral三种。
测试集
测试集中,每一行代表一条待预测语句,包括四部分内容,使用’ ’分隔符:
NA line_num unknwn text
以上是我得到的数据集, 但是我们需要从训练集里面挑10%作为开发集
开发集
开发集是由训练集得到的,我们使用pandas得到开发集, 代码如下, 开发集和训练集比例为9:1, 两个数据集数据不重合, 我们运行以下代码,得到训练集和开发集, 测试集不用重新划分, 用现成的即可
data_cut_off.py
import os
import pandas as pd
from sklearn.utils import shuffle
if __name__ == '__main__':
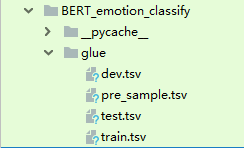
path = "glue/"
pd_all = pd.read_csv(os.path.join(path, "data.tsv"), sep=' ' )
pd_all = shuffle(pd_all)
dev_set = pd_all.iloc[0:int(pd_all.shape[0]/10)]
train_set = pd_all.iloc[int(pd_all.shape[0]/10): int(pd_all.shape[0])]
dev_set.to_csv("glue/dev.tsv", index=False, sep=' ')
train_set.to_csv("glue/train.tsv", index=False, sep=' ')
这样我们就得到我们的数据集合。
2. 修改代码
因为这次是分类问题, 所以我们需要修改run_classify.py
2.1 加入新的处理类
因为我们是做一个分类的任务, 里面自带4个任务的处理类, 其中ColaProcessor是单句分类,和我们的任务较为相近, 所以我们模仿这个类,写一个自己的处理类。
class EmloProcessor(DataProcessor):
    """Processor for the Emotion data set ."""

    def get_train_examples(self, data_dir):
        """定义开发集的数据是什么,data_dir会作为参数传进去, 这里就是加上你的文件名即可 """
        return self._create_examples(
            self._read_tsv(os.path.join(data_dir, "train.tsv"), ), "train")

    def get_dev_examples(self, data_dir):
        """定义开发集的数据是什么,data_dir会作为参数传进去,模型训练的时候会用到,这里就是加上你的文件名即可 """
        return self._create_examples(
            self._read_tsv(os.path.join(data_dir, "dev.tsv")), "dev")

    def get_test_examples(self, data_dir):
        """定义测试集的数据是什么, 用于预测数据 ,在训练时没有用到这个函数, 这里写预测的数据集"""
        return self._create_examples(
            self._read_tsv(os.path.join(data_dir, "test.tsv")), "test")

    def get_labels(self):
        """ 这里是显示你一共有几个分类标签, 在此任务中我有3个标签,如实写上  标签值和 csv里面存的值相同 """
        return ["neutral", "positive", "negative"]

    def _create_examples(self, lines, set_type):
        """这个函数是用来把数据处理, 把每一个例子分成3个部分,填入到InputExample的3个参数
        text_a 是 第一个句子的文本
        text_b 是 第二个句子的文本 但是由于此任务是单句分类, 所以 这里传入为None
        guid 是一个二元组  第一个表示此数据是什么数据集类型(train dev test) 第二个表示数据标号
        label 表示句子类别
        """
        examples = []
        for (i, line) in enumerate(lines):

            guid = "%s-%s" % (set_type, i)
            #print(line, i)
            # 获取text  第三列和第四列分别是 类别  文本 所以分情况添加
            text_a = tokenization.convert_to_unicode(line[3])
            if set_type == "test":
                #测试集的label 是要预测的 所以我们暂时先随便填一个类别即可 这里我选择都是neutral类
                label = "neutral"
            else:
                label = tokenization.convert_to_unicode(line[2])

            # 加入样本
            examples.append(
                InputExample(guid=guid, text_a=text_a, text_b=None, label=label))
        return examples
有兴趣的盆友可以看看其他的3个类。
2.2 处理类注册
同样我们需要在主函数里把我们的类当做参数选项,给他加个选项, 也就是当参数填emlo时,使用的数据处理类是我们自己写的处理类
def main(_):
  tf.logging.set_verbosity(tf.logging.INFO)

  processors = {
      "cola": ColaProcessor,
      "mnli": MnliProcessor,
      "mrpc": MrpcProcessor,
      "xnli": XnliProcessor,
      "emlo": EmloProcessor
  }
3. 运行代码
运行代码需要提供参数, 这里我建议直接在pycharm编译器里加参数,或者直接命令行运行参数, 而不用按照官方教材 run xxx.sh
这里我给出我的编译参数, 如果你运行不了, 建议 改小max_seq_length, train_batch_size,
python
run_classifier.py
--task_name=emlo
--do_train=true
--do_eval=true
--data_dir=./glue
--vocab_file=./uncased/uncased_L-12_H-768_A-12/vocab.txt
--bert_config_file=./uncased/uncased_L-12_H-768_A-12/bert_config.json
--init_checkpoint=./uncased/uncased_L-12_H-768_A-12/bert_model.ckpt
--max_seq_length=128
--train_batch_size=32
--learning_rate=2e-5
--num_train_epochs=3.0
--output_dir=./tmp/emotion/
- task_name 表示我调用的是什么处理类 ,这里我们是用我们新的类所以选 emlo
- 文件dir 可以自己定义, 如果无定义到会出错, 我这里是有3个文件夹 uncased里面放预训练模型, glue放数据,tmp/emotion里面放结果
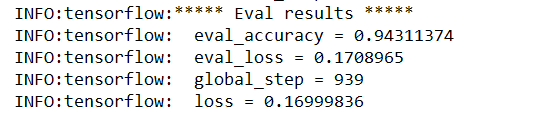
训练结果如下:
4. 分类预测
4.1 修改参数, 进行预测
预测的话, 将运行参数改为以下即可
python run_classifier.py
  --task_name=emlo
  --do_predict=true
  --data_dir=./glue
  --vocab_file=./uncased/uncased_L-12_H-768_A-12/vocab.txt
  --bert_config_file=./uncased/uncased_L-12_H-768_A-12/bert_config.json
  --init_checkpoint=./tmp/emotion/bert_model.ckpt
  --max_seq_length=128
  --output_dir=./tmp/emotion_out/
将会返回一个tsv, 每一列表示这一行的样本是这一类的概率

每一类代表的类别和 在run_classify.py里面定义的lab顺序相同

4.2 得到类别
结果不能是概率,而是类别, 所以我们写一个脚本进行转化
get_results.py
import os
import pandas as pd


if __name__ == '__main__':
    path = "tmp/emotion_out/"
    pd_all = pd.read_csv(os.path.join(path, "test_results.tsv") ,sep='	',header=None)

    data = pd.DataFrame(columns=['polarity'])
    print(pd_all.shape)

    for index in pd_all.index:
        neutral_score = pd_all.loc[index].values[0]
        positive_score = pd_all.loc[index].values[1]
        negative_score = pd_all.loc[index].values[2]

        if max(neutral_score, positive_score, negative_score) == neutral_score:
            # data.append(pd.DataFrame([index, "neutral"],columns=['id','polarity']),ignore_index=True)
            data.loc[index+1] = ["neutral"]
        elif max(neutral_score, positive_score, negative_score) == positive_score:
            #data.append(pd.DataFrame([index, "positive"],columns=['id','polarity']),ignore_index=True)
            data.loc[index+1] = [ "positive"]
        else:
            #data.append(pd.DataFrame([index, "negative"],columns=['id','polarity']),ignore_index=True)
            data.loc[index+1] = [ "negative"]
        #print(negative_score, positive_score, negative_score)

    data.to_csv(os.path.join(path, "pre_sample.tsv"),sep = '	')
    #print(data)
得到最终预测结果

5. 运行问题
5.1 出现内存不够
官方解释影响内存大小的参数
The factors that affect memory usage are:
max_seq_length: The released models were trained with sequence lengths
up to 512, but you can fine-tune with a shorter max sequence length to save
substantial memory. This is controlled by themax_seq_lengthflag in our
example code.train_batch_size: The memory usage is also directly proportional to
the batch size.- Model type,
BERT-Basevs.BERT-Large: TheBERT-Largemodel
requires significantly more memory thanBERT-Base. - Optimizer: The default optimizer for BERT is Adam, which requires a lot
of extra memory to store themandvvectors. Switching to a more memory
efficient optimizer can reduce memory usage, but can also affect the
results. We have not experimented with other optimizers for fine-tuning.
Using the default training scripts (run_classifier.py and run_squad.py), we
benchmarked the maximum batch size on single Titan X GPU (12GB RAM) with
TensorFlow 1.11.0:
| System | Seq Length | Max Batch Size |
|---|---|---|
BERT-Base |
64 | 64 |
| … | 128 | 32 |
| … | 256 | 16 |
| … | 320 | 14 |
| … | 384 | 12 |
| … | 512 | 6 |
BERT-Large |
64 | 12 |
| … | 128 | 6 |
| … | 256 | 2 |
| … | 320 | 1 |
| … | 384 | 0 |
| … | 512 | 0 |
- 对于参数max_seq_length, train_batch_size 越小, 内存使用越小
- 对于使用的预训练集 BERT-Base 使用内存比 BERT-Large小
- 使用不同的优化器也会造成一定的影响
作者给出了一些他使用的12g显存的搭配, 可以参考使用
6. 源码 GITHUB 地址
特意直接开放源码, 供大家参考