如何初始化和设置树莓派,请参考我另外一篇博文,好像还没写,哈哈。
言归正传,我们来说一下,如何在树莓派利用Docker实现NextCloud,个人感觉使用docker实现,比直接安装方便太多,前提是你要稍微熟悉下Docker和编排。
1、Docker规划
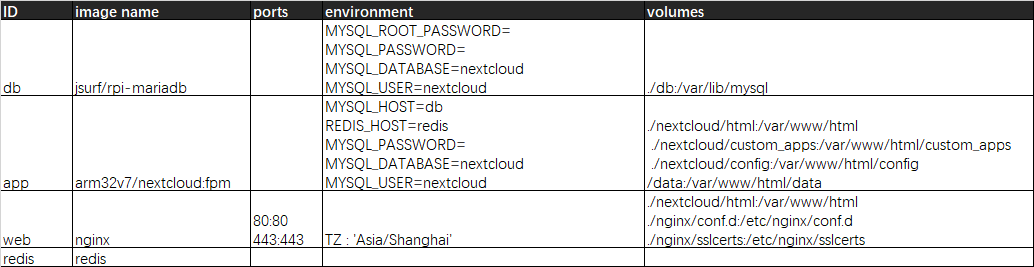
首先确认需要使用适用树莓派的nextcloud的fpm封装,不使用apache版本,降低资源消耗,方便配置https。对nextcloud的卷的规划,需要适应后期版本更新的需求。根据需要完成下面的容器规划。
所有的卷都规划到home目录下的nextcloud目录下,方便管理。除了nextcloud所需要的data目录,这个是单独挂载了一个硬盘作为存储。
2、编写编排文件
根据容器的规划,完成编排文件的编写。
docker-compose.yml
version: '2'

volumes:
  nextcloud:
  db:

services:
  db:
    image: jsurf/rpi-mariadb
    restart: always
    command: --transaction-isolation=READ-COMMITTED --binlog-format=ROW
    volumes:
      - ./db:/var/lib/mysql
    environment:
      - MYSQL_ROOT_PASSWORD=root@123
      - MYSQL_PASSWORD=nextcloud@123
      - MYSQL_DATABASE=nextcloud
      - MYSQL_USER=nextcloud

  app:
    image: arm32v7/nextcloud:fpm
    privileged: true
    links:
      - db
    environment:
      - MYSQL_HOST=db
      - REDIS_HOST=redis
      - MYSQL_PASSWORD=nextcloud@123
      - MYSQL_DATABASE=nextcloud
      - MYSQL_USER=nextcloud
    volumes:
      - ./nextcloud/html:/var/www/html
      - ./nextcloud/custom_apps:/var/www/html/custom_apps
      - ./nextcloud/config:/var/www/html/config
      - /data:/var/www/html/data
    restart: always

  web:
    image: nginx
    restart: always
    ports:
      - 80:80
      - 443:443
    environment:
      TZ : 'Asia/Shanghai'
    links:
      - app
    volumes_from:
      - app
    volumes:
      - ./nextcloud/html:/var/www/html
      - ./nginx/conf.d:/etc/nginx/conf.d
      - ./nginx/sslcerts:/etc/nginx/sslcerts

  redis:
    image: redis
    volumes_from:
      - app
    restart: always
3、安装Docker
curl -fsSL get.docker.com -o get-docker.shsudo sh get-docker.sh --mirror Aliyun
可以把当前用户加入到 docker 组,以便这个用户能方便的使用 docker 命令
sudo usermod -aG docker 当前用户
docker-compose 是基于 python 的一个 docker 编排工具
apt-get install docker-compose
4、安装Portainer
Portainer是一个可视化的容器镜像的图形管理工具,方便后期对容器的启停和管理,该软件提供了很便利的日志查询、容器内操作及容器网络管理。
#下载 Docker 图形化界面 portainer
sudo docker pull portainer/portainer
#创建 portainer 容器
sudo docker volume create portainer_data
#运行 portainer
sudo docker run -d -p 9000:9000 --name portainer --restart always -v /var/run/docker.sock:/var/run/docker.sock -v portainer_data:/data portainer/portainer
5、准备volumes目录
根据前期的规划,为nextcloud挂载外部存储,这个请参考其他的文档了。对于配置文件和其他的东西,都在home目录下创建好主目录即可,比如我这里,就在/home/pi/下创建了nextcloud目录,并将编排文件放到了该目录下。
6、准备nginx相应配置文件和ssl证书
需要根据规划,对nginx的配置文件,及证书进行准备。ssl证书可以到阿里云去申请免费证书。
nginx/conf.d/default.conf
upstream php-handler {
    server app:9000;    # app为docker容器的名称,9000为nextcloud fpm的端口
}

server {
    listen 80;
    listen [::]:80;
    server_name xxx;  # 修改为自己的域名
    # enforce https
    return 301 https://$server_name:443$request_uri;
}

server {
    listen 443 ssl http2;
    listen [::]:443 ssl http2;
    server_name xxx;   # 修改为自己的域名

    # Use Mozilla's guidelines for SSL/TLS settings
    # https://mozilla.github.io/server-side-tls/ssl-config-generator/
    # NOTE: some settings below might be redundant
    ssl_certificate /etc/nginx/sslcerts/xxx.pem;     # 替换为自己证书文件名
    ssl_certificate_key /etc/nginx/sslcerts/xxx.key; # 替换为自己证书文件名

    # Add headers to serve security related headers
    # Before enabling Strict-Transport-Security headers please read into this
    # topic first.
    #add_header Strict-Transport-Security "max-age=15768000; includeSubDomains; preload;";
    #
    # WARNING: Only add the preload option once you read about
    # the consequences in https://hstspreload.org/. This option
    # will add the domain to a hardcoded list that is shipped
    # in all major browsers and getting removed from this list
    # could take several months.
    add_header X-Content-Type-Options nosniff;
    add_header X-XSS-Protection "1; mode=block";
    add_header X-Robots-Tag none;
    add_header X-Download-Options noopen;
    add_header X-Permitted-Cross-Domain-Policies none;
    add_header Referrer-Policy no-referrer;
    add_header Strict-Transport-Security  15552000;
    add_header X-Frame-Options SAMEORIGIN;

    # Remove X-Powered-By, which is an information leak
    fastcgi_hide_header X-Powered-By;

    # Path to the root of your installation
    root /var/www/html;   # 此处需要对应nextcloud的文件目录

    # The following 2 rules are only needed for the user_webfinger app.
    # Uncomment it if you're planning to use this app.
    #rewrite ^/.well-known/host-meta /public.php?service=host-meta last;
    #rewrite ^/.well-known/host-meta.json /public.php?service=host-meta-json last;

    # The following rule is only needed for the Social app.
    # Uncomment it if you're planning to use this app.
    #rewrite ^/.well-known/webfinger /public.php?service=webfinger last;

    location = /.well-known/carddav {
      return 301 $scheme://$host:$server_port/remote.php/dav;
    }
    location = /.well-known/caldav {
      return 301 $scheme://$host:$server_port/remote.php/dav;
    }

    # set max upload size
    client_max_body_size 512M;
    fastcgi_buffers 64 4K;

    # Enable gzip but do not remove ETag headers
    gzip on;
    gzip_vary on;
    gzip_comp_level 4;
    gzip_min_length 256;
    gzip_proxied expired no-cache no-store private no_last_modified no_etag auth;
    gzip_types application/atom+xml application/javascript application/json application/ld+json application/manifest+json application/rss+xml application/vnd.geo+json application/vnd.ms-fontobject application/x-font-ttf application/x-web-app-manifest+json application/xhtml+xml application/xml font/opentype image/bmp image/svg+xml image/x-icon text/cache-manifest text/css text/plain text/vcard text/vnd.rim.location.xloc text/vtt text/x-component text/x-cross-domain-policy;

    # Uncomment if your server is build with the ngx_pagespeed module
    # This module is currently not supported.
    #pagespeed off;

    location / {
        rewrite ^ /index.php$request_uri;
    }

    location ~ ^/(?:build|tests|config|lib|3rdparty|templates|data)/ {
        deny all;
    }
    location ~ ^/(?:.|autotest|occ|issue|indie|db_|console) {
        deny all;
    }

    location ~ ^/(?:index|remote|public|cron|core/ajax/update|status|ocs/v[12]|updater/.+|oc[ms]-provider/.+).php(?:$|/) {
        fastcgi_split_path_info ^(.+?.php)(/.*|)$;
        include fastcgi_params;
        fastcgi_param SCRIPT_FILENAME $document_root$fastcgi_script_name;
        fastcgi_param PATH_INFO $fastcgi_path_info;
        fastcgi_param HTTPS on;
        # Avoid sending the security headers twice
        fastcgi_param modHeadersAvailable true;
        # Enable pretty urls
        fastcgi_param front_controller_active true;
        fastcgi_pass php-handler;
        fastcgi_intercept_errors on;
        fastcgi_request_buffering off;
    }

    location ~ ^/(?:updater|oc[ms]-provider)(?:$|/) {
        try_files $uri/ =404;
        index index.php;
    }

    # Adding the cache control header for js, css and map files
    # Make sure it is BELOW the PHP block
    location ~ .(?:css|js|woff2?|svg|gif|map)$ {
        try_files $uri /index.php$request_uri;
        add_header Cache-Control "public, max-age=15778463";
        # Add headers to serve security related headers (It is intended to
        # have those duplicated to the ones above)
        # Before enabling Strict-Transport-Security headers please read into
        # this topic first.
        #add_header Strict-Transport-Security "max-age=15768000; includeSubDomains; preload;";
        #
        # WARNING: Only add the preload option once you read about
        # the consequences in https://hstspreload.org/. This option
        # will add the domain to a hardcoded list that is shipped
        # in all major browsers and getting removed from this list
        # could take several months.
        add_header X-Content-Type-Options nosniff;
        add_header X-XSS-Protection "1; mode=block";
        add_header X-Robots-Tag none;
        add_header X-Download-Options noopen;
        add_header X-Permitted-Cross-Domain-Policies none;
        add_header Referrer-Policy no-referrer;

        # Optional: Don't log access to assets
        access_log off;
    }

    location ~ .(?:png|html|ttf|ico|jpg|jpeg|bcmap)$ {
        try_files $uri /index.php$request_uri;
        # Optional: Don't log access to other assets
        access_log off;
    }
}
7、执行 Docker Compose
一切准备好后,执行编排文件,会将docker下载好,并创建好卷和网络。必须在docker-compose.yml 文件所在目录。
docker-compose up -d
8、配置NextCloud
一切完成后,进入Portainer,查看容器运行情况,一切正常,就可以通过你配置的地址打开页面了。直接进入到nextcloud的配置界面,创建一个用户名密码,就可以登录了。
9、更新NextCloud
如果nextcloud版本有更新,可以删除现有NextClolud Docker镜像进行更新
docker stop arm32v7/nextcloud:fpm
docker rm   arm32v7/nextcloud:fpm
rm     -rvf /home/pi/nextcloud/nextcloud/html