颜色函数实战——七色卡
由于平台编辑器功能有限,下面这个实战项目需要小伙伴们,在自己配置好的 sass 环境的机子上自己操作。下面把项目的步骤教给大家:
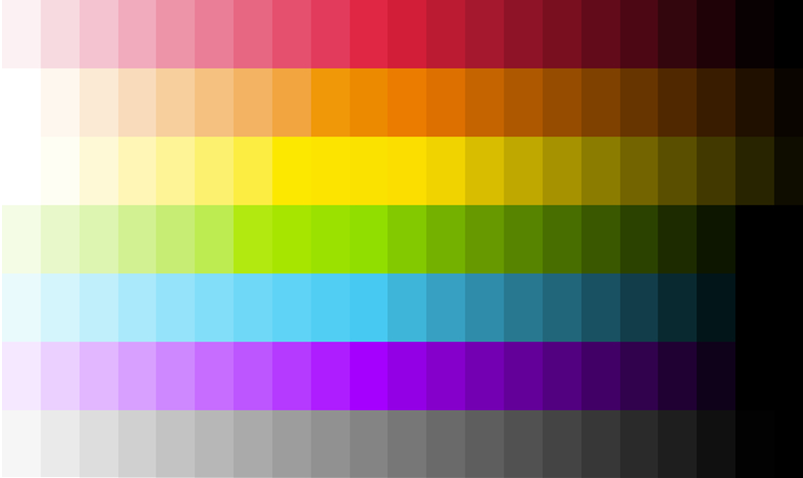
常见的颜色就是七彩色,红、橙、黄、蓝、绿、紫、黑。那么我们就使用 Sass 的颜色函数来制作一个这样的色卡。效果图如下:
第一步:编写 html 网页代码
<ul class="swatches red"> <li></li> ... <li></li> </ul> <ul class="swatches orange"> <li></li> … <li></li> </ul> <ul class="swatches yellow"> <li></li> … <li></li> </ul> <ul class="swatches green"> <li></li> … <li></li> </ul> <ul class="swatches blue"> <li></li> … <li></li> </ul> <ul class="swatches purple"> <li></li> … <li></li> </ul>
结构不做过多的描述。下面我们来看 Sass 实现色卡代码如何写:
第二步:定义七色变量
首要的就是变量,此处设置了一个红色系的变量值,然后其他色系的变量值,都是通过嵌套颜色函数完成:
//定义变量 $redBase: #DC143C; $orangeBase: saturate(lighten(adjust_hue($redBase, 39), 5), 7);//#f37a16 $yellowBase: saturate(lighten(adjust_hue($redBase, 64), 6), 13);//#fbdc14 $greenBase: desaturate(darken(adjust_hue($redBase, 102), 2), 11);//#73c620 $blueBase: saturate(darken(adjust_hue($redBase, 201), 2), 1);//#12b7d4 $purpleBase: saturate(darken(adjust_hue($redBase, 296), 2), 1);//#a012d4 $blackBase: #777; $bgc: #fff;
从上在的变量中可以看出,黄、橙、绿、蓝、紫这几个色系都和红色色系有关,因为这几个都是在红色基础上通过多个嵌套函数而生面的色系变量。这样做的好处是,修改一个变量,就能实现另外一套色卡。
第三步:定义 mixin
色卡是有很多种颜色的,我们需要在一个颜色的基础上,让颜色在亮度上做一个调整(当然也可以是在饱和度上),因此我们需要定义两个 mixins:
//定义颜色变暗的 mixin @mixin swatchesDarken($color) { @for $i from 1 through 10 { $x:$i+11; li:nth-child(#{$x}) { $n:$i*5; $bgc:darken($color,$n); //颜色变暗 background-color: $bgc; &:hover:before { //hover状态显示颜色编号 content: "#{$bgc}"; color: lighten($bgc,40); font-family: verdana; font-size: 8px; padding: 2px; } } } } //定义颜色变亮的 mixin @mixin swatchesLighten($color) { @for $i from 1 through 10 { $x:11-$i; li:nth-child(#{$x}) { $n:$i*5; $bgc:lighten($color,$n); background-color: $bgc; &:hover:before { content: "#{$bgc}"; color: darken($bgc,40); font-family: verdana; font-size: 8px; padding: 2px; } } } }
第三步、调用 mixin
完成上面的工作,只需要根据所需进行调用,生成色卡:
.swatches li { 4.7619047619%; float: left; height: 60px; list-style: none outside none; } ul.red { @include swatchesLighten($redBase); @include swatchesDarken($redBase); li:nth-child(11) { background-color: $redBase; } } ul.orange { @include swatchesLighten($orangeBase); @include swatchesDarken($orangeBase); li:nth-child(11) { background-color: $orangeBase; } } ul.yellow { @include swatchesLighten($yellowBase); @include swatchesDarken($yellowBase); li:nth-child(11) { background-color: $yellowBase; } } ul.green { @include swatchesLighten($greenBase); @include swatchesDarken($greenBase); li:nth-child(11) { background-color: $greenBase; } } ul.blue { @include swatchesLighten($blueBase); @include swatchesDarken($blueBase); li:nth-child(11) { background-color: $blueBase; } } ul.purple { @include swatchesLighten($purpleBase); @include swatchesDarken($purpleBase); li:nth-child(11) { background-color: $purpleBase; } } ul.black { @include swatchesLighten($blackBase); @include swatchesDarken($blackBase); li:nth-child(11) { background-color: $blackBase; } } 这样就完成了色卡的制作。
完整代码可见 http://sassmeister.com/gist/f055f8497c8c51067f1f。