1. 简介
1. NIO全称Non-Blocking IO,是指JDK提供的新API。从JDK1.4开始,Java提供了一系列改进的输入/输出的新特性,被称为NIO(new IO),是同步非阻塞的。
2. NIO的类被放在java.nio以及其子包下,并且对java.io包的很多类进行改造。
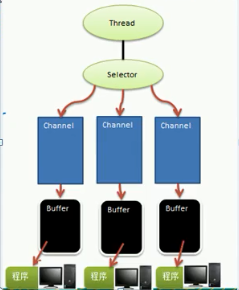
3. NIO有三大核心部分:Channel(通道)、Buffer(缓冲区)、Selector(选择器)。Selector可以选择一个通道Channel,通道和Buffer缓冲区交互,客户端和Buffer缓冲区交互。
4. NIO是面向缓冲区的,或者是面向块编程的。数据读到一个它稍后处理的缓冲区,需要时可在缓冲区中前后移动,这就增加了处理过程的灵活性,使用它可以提供非阻塞式的高伸缩性网络。
5. JavaNIO的非阻塞模式,使一个线程从某通道发送或者请求数据,但是它仅能得到目前可用的数据,如果目前没有可用数据时,就什么都不会读取,而不是保持线程阻塞。所以到数据可读时,线程可以做其他事情。非阻塞写也是如此,一个线程请求写入一些数据到某通道,但不需要等待它完全写入,这个线程就可以做其他的事情。
6. 通俗的来说,NIO 是可以做到一个线程来处理多个操作。
7. HTTP2.0 使用了多路复用的技术,做到同一个连接并发处理多个请求,而且并发请求的数量比HTTP1.1 大了好几个数量级。
2. BIO和NIO的关系
1. BIO以流的方式处理数据,而NIO以块的方式处理数据,块I/O 的效率比流I/O 高很多
2. BIO是阻塞的,而NIO则是非阻塞的
3. BIO基于字节流和字符流进行操作,而NIO基于Channel(通道)和Buffer(缓冲区)进行操作, 数据总是从通道读取到缓冲区中,或者从缓冲区写入通道中。Selector(选择器) 用于监听多个通道的事件(比如连接请求、数据到达等),因此使用单个线程就可以监听到多个客户端通道。
3. 三大组件的关系
1》一个线程对应一个Selector,一个Selector 对应多个channel
2》每个channel都对应一个buffer
3》程序切换到哪个channel是由事件决定的,Event是一个重要的概念;Selector会根据不同的事件在不同的channel切换
4》Buffer就是一个内存块,底层是有一个数组
5》数据的读写是通过Buffer,这个和BIO是有区别的,BIO流要么是输入流、要么是输出流,不能双向,而NIO的BUFFER是双向的,可读可写,需要使用flip() 方法切换。
6》channel 也是双向的,可以返回底层操作系统的操作情况,比如Linux底层的操作系统通道就是双向的。
4. Buffer的机制及其子类
Buffer 有四个重要的属性:
    // Invariants: mark <= position <= limit <= capacity
    private int mark = -1;
    private int position = 0;
    private int limit;
    private int capacity;
capacity 表示容量,也就是最多存放的数量
limit 表示缓冲区的当前终点,不能对缓冲区超过极限的位置进行读写操作。且极限是可以修改的。
position 下一个要读或写的元素的索引
mark 标记
类继承关系如下:

8大基本数据类型,除了bool都有对应的buffer。最常用的还是ByteBuffer。数据读取时根据数据类型放入到对应的Buffer。且每个子Buffer又有其子类,而且每个Buffer有存放数据的数组,比如IntBuffer如下:
    final int[] hb;                  // Non-null only for heap buffers
    final int offset;
    boolean isReadOnly;                 // Valid only for heap buffers
测试如下:
(1) 测试简单使用
package cn.qlq;

import java.nio.IntBuffer;

public class BufferTestCase {

    public static void main(String[] args) {
        IntBuffer buffer = IntBuffer.allocate(5);
        // 存放数据
        for (int i = 0; i < buffer.capacity(); i++) {
            buffer.put(i * 2);
        }

        // buffer 读写切换
        buffer.flip();

        // 读取数据
        while (buffer.hasRemaining()) {
            System.out.println(buffer.get());
        }
    }

}
结果:
0
2
4
6
8
查看flip 的源码实际上就是修改limit 为position 的位置,并且将position 置为0。
    public final Buffer flip() {
        limit = position;
        position = 0;
        mark = -1;
        return this;
    }
(2) 测试修改limit 和 position
    public static void main(String[] args) {
        IntBuffer buffer = IntBuffer.allocate(5);
        // 存放数据
        for (int i = 0; i < buffer.capacity(); i++) {
            buffer.put(i * 2);
        }

        // buffer 读写切换
        buffer.flip();

        // 修改limit 和 position
        buffer.limit(3);
        buffer.position(1);

        // 读取数据
        while (buffer.hasRemaining()) {
            System.out.println(buffer.get());
        }
    }
结果:
2
4
(3) 其他方法介绍
buffer.clear(); // 清除缓冲区,各个标记恢复到初始标记,但是不清楚数据
put(int index, byte b) 向指定位置插入数据
get(int index) 读取指定位置的数据
测试:
    public static void main(String[] args) {
        ByteBuffer buffer = ByteBuffer.allocate(5);
        // 存放数据
        buffer.put(2, (byte) 2);

        // buffer 读写切换
        buffer.flip(); // 反转缓冲区

        // 修改limit 和 position
        buffer.clear(); // 清除缓冲区,各个标记恢复到初始标记,但是不清楚数据
        System.out.println(buffer.get(2));
    }
结果:
2
(4) buffer 支持类型化的put和get,put进去什么类型的数据,get出来时就应该使用相应的数据类型取出,否则会报错:BufferUnderflowException, 当然如果可以自动类型转换不会报错
        ByteBuffer buffer = ByteBuffer.allocate(512);
        buffer.putInt(1);
        buffer.putLong(2L);
        buffer.putShort((short)2);
        buffer.putChar('2');

        // 切换读写
        buffer.flip();

        System.out.println(buffer.getInt());
        System.out.println(buffer.getLong());
        System.out.println(buffer.getShort());
        System.out.println(buffer.getLong());
结果:
1
2
2
Exception in thread "main" java.nio.BufferUnderflowException
    at java.nio.Buffer.nextGetIndex(Buffer.java:506)
    at java.nio.HeapByteBuffer.getLong(HeapByteBuffer.java:412)
    at nio.ChannelTest.bufferTest(ChannelTest.java:29)
    at nio.ChannelTest.main(ChannelTest.java:13)
(5) buffer 可以设置为只读,写入时会报错
        ByteBuffer buffer = ByteBuffer.allocate(512);
        System.out.println(buffer.getClass());
        System.out.println(buffer.isReadOnly());

        ByteBuffer byteBuffer = buffer.asReadOnlyBuffer();
        System.out.println(buffer.getClass());
        System.out.println(byteBuffer.isReadOnly());

        byteBuffer.putLong(2L);
结果:
class java.nio.HeapByteBuffer
false
class java.nio.HeapByteBuffer
true
Exception in thread "main" java.nio.ReadOnlyBufferException
    at java.nio.HeapByteBufferR.putLong(HeapByteBufferR.java:426)
    at nio.ChannelTest.bufferTest(ChannelTest.java:25)
    at nio.ChannelTest.main(ChannelTest.java:13)
(6) NIO还提供了MappedByteBuffer,可以让文件直接在内存(堆外内存)中直接修改,而如何同步到文件中由NIO来完成
类图如下:
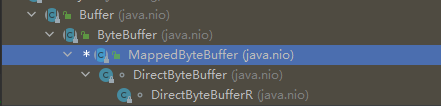
可以看到最底层的是一个只读的Buffer
1》测试如下:
        // 以读写模式打开文件1.txt
        RandomAccessFile file = new RandomAccessFile("1.txt", "rw");

        FileChannel channel = file.getChannel();

        /**
         * 映射成MappedByteBuffer(读写模式,从0开始,最多映射五个,也就是最多可以在内存中修改五个)
         *
         */
        MappedByteBuffer mappedByteBuffer = channel.map(FileChannel.MapMode.READ_WRITE, 0, 5);
        mappedByteBuffer.putChar(3, '3');

        file.close();
        System.out.println("修改成功" + mappedByteBuffer.getClass());
结果:文件会更新成功,最后控制台打印如下:
修改成功class java.nio.DirectByteBuffer
2》 测试二: 修改索引为5的时候报异常
        // 以读写模式打开文件1.txt
        RandomAccessFile file = new RandomAccessFile("1.txt", "rw");

        FileChannel channel = file.getChannel();

        /**
         * 映射成MappedByteBuffer(读写模式,从0开始,最多映射五个,也就是最多可以在内存中修改五个=也就是0-4)
         *
         */
        MappedByteBuffer mappedByteBuffer = channel.map(FileChannel.MapMode.READ_WRITE, 0, 5);
        mappedByteBuffer.putChar(3, '3');
        mappedByteBuffer.putChar(5, '3');

        file.close();
        System.out.println("修改成功" + mappedByteBuffer.getClass());
结果:
Exception in thread "main" java.lang.IndexOutOfBoundsException
    at java.nio.Buffer.checkIndex(Buffer.java:546)
    at java.nio.DirectByteBuffer.putChar(DirectByteBuffer.java:533)
    at nio.ChannelTest.bufferTest(ChannelTest.java:30)
    at nio.ChannelTest.main(ChannelTest.java:14)
(7) buffer也可以作为数组使用来完成读写操作,即Scattering(分散)和Gathering(聚集)
        // 使用ServerSocketChannel 和 SocketChannel
        ServerSocketChannel serverSocketChannel = ServerSocketChannel.open();
        // 绑定端口
        InetSocketAddress inetSocketAddress = new InetSocketAddress(7000);
        serverSocketChannel.socket().bind(inetSocketAddress);
        ByteBuffer[] byteBuffers = new ByteBuffer[2];
        byteBuffers[0] = ByteBuffer.allocate(5);
        byteBuffers[1] = ByteBuffer.allocate(3);

        SocketChannel socketChannel = serverSocketChannel.accept();
        int msgLength = 8;
        while (true) {
            int readed = 0;
            while (readed < msgLength) {
                long l = socketChannel.read(byteBuffers);
                readed += l;
                System.out.println("readed: " + readed);

                Arrays.asList(byteBuffers).stream()
                        .map(buffer -> "position = " + buffer.position() + ", limit = " + buffer.limit())
                        .forEach(System.out::println);
                Arrays.asList(byteBuffers).stream()
                        .forEach(buffer -> System.out.println("data: " + new String(buffer.array())));
            }

            // 数据显示到客户端
            Arrays.asList(byteBuffers).stream().forEach(buffer -> buffer.flip());
            long byteWrite = 0;
            while (byteWrite < msgLength) {
                long l = socketChannel.write(byteBuffers);
                byteWrite += l;
            }

            Arrays.asList(byteBuffers).stream().forEach(buffer -> buffer.clear());

            System.out.println("byteWrite = " + byteWrite + ",  readed = " + readed + " , msgLength = " + msgLength);
        }
测试:
1》telnet连接
telnet 127.0.0.1 7000
2》Ctrl +]
3》发送命令
Microsoft Telnet> send hello123
发送字符串 hello123
4》控制台日志如下
readed: 8
position = 5, limit = 5
position = 3, limit = 3
data: hello
data: 123
byteWrite = 8, readed = 8 , msgLength = 8
5. Channel通道
1. 简介
1. NIO channel 通道类似于流,但是有区别:
(1) 通道可以同时读或者写,而流只能读或者只能写
(2)通道可以实现异步读写数据
(3)通道可以从缓冲区读数据,也可以写数据到缓冲区
2. Channel 在NIO中是一个接口,下面有很多子接口和主要实现。主要实现有:
FileChannel 注意用于文件的数据读写,DatagramChannel 用于UDP的数据读写,ServerSocketChannel和 SocketChannel 用于TCP的数据读写。
2. FileChannel 简单使用
1. 简单的使用FileChannel将字符串写入到文件:
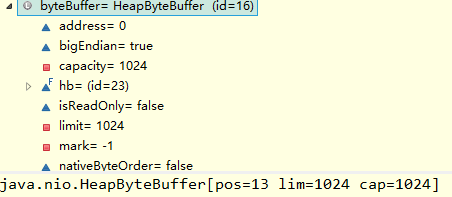
    private static void fileChannelTest() throws Exception {
        String string = "hello,中国!";
        FileOutputStream fileOutputStream = new FileOutputStream("F:/test.txt");

        // 通过FileOutputStream 获取 FileChannelImpl
        FileChannel channel = fileOutputStream.getChannel();

        // 创建一个缓冲区
        ByteBuffer byteBuffer = ByteBuffer.allocate(1024);
        // 数据放入buffer
        byteBuffer.put(string.getBytes());

        // 对buffer进行flip切换读写
        byteBuffer.flip();
        channel.write(byteBuffer);
        fileOutputStream.close();
    }
put完之后debug查看buffer信息:(一个汉字占三个字节,7个英文字母加2个汉字所以是13bytes)
2. 使用FileChannel 读取文件:
package cn.qlq;

import java.io.File;
import java.io.FileInputStream;
import java.io.FileNotFoundException;
import java.io.FileOutputStream;
import java.nio.ByteBuffer;
import java.nio.channels.FileChannel;

public class ChannelTest {

    public static void main(String[] args) throws Exception {
        fileChannelTest();
    }

    private static void fileChannelTest() throws Exception {
        File file = new File("F:/test.txt");
        FileInputStream inputStream = new FileInputStream(file);

        // 通过FileInputStream 获取 FileChannelImpl
        FileChannel channel = inputStream.getChannel();

        // 创建一个缓冲区
        ByteBuffer byteBuffer = ByteBuffer.allocate((int)file.length());
        // 数据读到缓冲中
        channel.read(byteBuffer);

        System.out.println(new String(byteBuffer.array()));
        inputStream.close();
    }
}
结果:
hello,中国!
3. 使用FileChannel读取一个文件并写入另一个文件:
    @SneakyThrows
    private static void fileChannelTest() {
        FileInputStream inputStream = new FileInputStream("1.txt");
        FileChannel channel1 = inputStream.getChannel();
        FileOutputStream outputStream = new FileOutputStream("2.txt");
        FileChannel channel2 = outputStream.getChannel();

        // 创建一个缓冲区
        ByteBuffer byteBuffer = ByteBuffer.allocate(512);

        while (true) {
            int read = channel1.read(byteBuffer);
            if (read == -1) {
                break;
            }

            byteBuffer.flip();
            channel2.write(byteBuffer);

            //关键操作. 清空Buffer, 将关键的属性重置. 如果没有这一步会一直read到0
            byteBuffer.clear();
            System.out.println(read);
        }

        inputStream.close();
        outputStream.close();
    }
4 . FileChannel 实现文件拷贝
    @SneakyThrows
    private static void fileChannelTest() {
        FileInputStream inputStream = new FileInputStream("1.txt");
        FileChannel channel1 = inputStream.getChannel();
        FileOutputStream outputStream = new FileOutputStream("3.txt");
        FileChannel channel2 = outputStream.getChannel();

        // channel拷贝,从输入流的channel拷贝到输出流的channel
        channel2.transferFrom(channel1, 0, channel1.size());

        inputStream.close();
        outputStream.close();
    }
经过上面四个例子明白。每个Stream都包含一个Channel,向Channel写入或者读取会操作到对应的Stream。
6. Selector 选择器
1. Java的NIO,用非阻塞的IO方式,可以用一个线程,处理多个客户端连接,就会使用到Selector(选择器)
2. Selector 能够检测多个注册的通道上是否有事件发生(多个Channel可以以事件的方式注册到Selector),如果有事件发生便获取事件然后针对每个事件进行相应的处理,这样就可以只用一个单线程去管理多个通道,也就是管理多个连接和请求
3. 只有在连接真正有读写事件发生时,才会进行读写,就大大地减少了系统开销,并且不必为每个连接都创建一个线程,不用去维护多个线程
4. 避免了多线程之间的上下文且护眼导致的开销
特点:
(1) Netty的IO线程NioEventLoop聚合了Selector(选择器,也叫多路复用器),可以同时并发处理成百上千个客户端连接
(2) 当线程从某客户端Socket 通道进行读写数据时,在线程没有数据可用时,该线程可以执行其他任务
(3) 线程通道将非阻塞IO的空闲时间用于在其他通道上执行IO操作,所以单独的线程可以管理多个输入和输出通道
(4) 由于读写操作都是非阻塞的,这就可以充分提升IO线程的运行效率,避免由于频繁IO阻塞导致的线程挂起
(5) 一个IO线程可以并发处理N个客户连接和读写操作,这从根本上解决了传统同步阻塞IO一连接一线程模型,架构的性能、弹性伸缩能力和可靠性都得到了极大的提升
Selector 源码如下:
public abstract class Selector implements Closeable {
    protected Selector() {
    }

    public static Selector open() throws IOException {
        return SelectorProvider.provider().openSelector();
    }

    public abstract boolean isOpen();

    public abstract SelectorProvider provider();

    public abstract Set<SelectionKey> keys();

    public abstract Set<SelectionKey> selectedKeys();

    public abstract int selectNow() throws IOException;

    public abstract int select(long var1) throws IOException;

    public abstract int select() throws IOException;

    public abstract Selector wakeup();

    public abstract void close() throws IOException;
}
核心方法:
open 得到一个选择器对象,也就是获取Selector的方法。
select() 选择一个准备好的key集合,为IO操作做准备。这个是一个阻塞的方法,会阻塞到获取到数据。
select(long var1) 监控所有注册的通道,当其中有IO操作可以进行时,将对应的SelectionKey加入到内部集合中并返回,参数用来设置超时时间,这个是非阻塞的。SelectionKey 是存在对象内部集合的一个元素,通过SelectionKey可以获取到Channel、注册的事件(读、写)等信息。
selectNow() 也是非阻塞的,只是获取一下,如果有SelectionKey 就加入内部集合,没有就放弃。
1. NIO 非阻塞 网络编程相关的(Selector、SelectionKey、ServerScoketChannel和SocketChannel) 关系

1. 当客户端连接时,会通过ServerSocketChannel 得到 SocketChannel
2. Selector 进行监听 select 方法, 返回有事件发生的通道的个数
3. 将socketChannel注册到Selector上, register(Selector sel, int ops), 一个selector上可以注册多个SocketChannel。ops 代表的是注册的事件。
java.nio.channels.SelectionKey#OP_READ 读事件
java.nio.channels.SelectionKey#OP_WRITE 写事件
java.nio.channels.SelectionKey#OP_CONNECT 连接建立成功事件
java.nio.channels.SelectionKey#OP_ACCEPT 有一个新连接事件
4. 注册后返回一个 SelectionKey, 会和该Selector 关联(集合)
5. 进一步得到各个 SelectionKey (有事件发生)
6. 在通过 SelectionKey 反向获取 SocketChannel , 方法 channel()
7. 可以通过 得到的 channel , 完成业务处理
2. 测试:
(1) 服务器端源码
package nio;

import java.net.InetSocketAddress;
import java.nio.ByteBuffer;
import java.nio.channels.SelectionKey;
import java.nio.channels.Selector;
import java.nio.channels.ServerSocketChannel;
import java.nio.channels.SocketChannel;
import java.util.Iterator;
import java.util.Set;

public class NIOServer {

    public static void main(String[] args) throws Exception {
        // 创建ServerSocketChannel -> ServerSocket
        // Java NIO中的 ServerSocketChannel 是一个可以监听新进来的TCP连接的通道, 就像标准IO中的ServerSocket一样。ServerSocketChannel类在 java.nio.channels包中。
        // 通过调用 ServerSocketChannel.open() 方法来打开ServerSocketChannel.如:
        ServerSocketChannel serverSocketChannel = ServerSocketChannel.open();

        // 得到一个Selecor对象 (sun.nio.ch.WindowsSelectorImpl)
        Selector selector = Selector.open();
        //绑定一个端口6666, 在服务器端监听
        serverSocketChannel.socket().bind(new InetSocketAddress(6666));
        //设置为非阻塞
        serverSocketChannel.configureBlocking(false);

        //把 serverSocketChannel 注册到  selector 关心 事件为 OP_ACCEPT
        //SelectionKey中定义的4种事件
        //SelectionKey.OP_ACCEPT —— 接收连接进行事件,表示服务器监听到了客户连接,那么服务器可以接收这个连接了
        // SelectionKey.OP_CONNECT —— 连接就绪事件,表示客户与服务器的连接已经建立成功
        //SelectionKey.OP_READ  —— 读就绪事件,表示通道中已经有了可读的数据,可以执行读操作了(通道目前有数据,可以进行读操作了)
        //SelectionKey.OP_WRITE —— 写就绪事件,表示已经可以向通道写数据了(通道目前可以用于写操作)
        serverSocketChannel.register(selector, SelectionKey.OP_ACCEPT);

        System.out.println("注册后的selectionkey 数量=" + selector.keys().size()); // 1

        //循环等待客户端连接
        while (true) {
            //这里我们等待1秒,如果没有事件发生, 返回
            if (selector.select(1000) == 0) { //没有事件发生
//                System.out.println("服务器等待了1秒,无连接");
                continue;
            }

            //如果返回的>0, 就获取到相关的 selectionKey集合
            //1.如果返回的>0, 表示已经获取到关注的事件
            //2. selector.selectedKeys() 返回关注事件的集合
            //   通过 selectionKeys 反向获取通道
            Set<SelectionKey> selectionKeys = selector.selectedKeys();
            System.out.println("selectionKeys 数量 = " + selectionKeys.size());

            //hasNext() :该方法会判断集合对象是否还有下一个元素,如果已经是最后一个元素则返回false。
            //next():把迭代器的指向移到下一个位置,同时,该方法返回下一个元素的引用。
            //remove() 从迭代器指向的集合中移除迭代器返回的最后一个元素。
            //遍历 Set<SelectionKey>, 使用迭代器遍历
            Iterator<SelectionKey> keyIterator = selectionKeys.iterator();

            while (keyIterator.hasNext()) {
                //获取到SelectionKey
                SelectionKey key = keyIterator.next();
                //根据key 对应的通道发生的事件做相应处理
                if (key.isAcceptable()) { //如果是 OP_ACCEPT, 有新的客户端连接
                    //该该客户端生成一个 SocketChannel
                    SocketChannel socketChannel = serverSocketChannel.accept();
                    System.out.println("客户端连接成功 生成了一个 socketChannel " + socketChannel.hashCode());
                    //将  SocketChannel 设置为非阻塞
                    socketChannel.configureBlocking(false);
                    //将socketChannel 注册到selector, 关注事件为 OP_READ, 同时给socketChannel 关联一个Buffer
                    socketChannel.register(selector, SelectionKey.OP_READ, ByteBuffer.allocate(1024));

                    System.out.println("客户端连接后 ,注册的selectionkey 数量=" + selector.keys().size()); //2,3,4..
                }

                if (key.isReadable()) {  //发生 OP_READ
                    //通过key 反向获取到对应channel
                    SocketChannel channel = (SocketChannel) key.channel();
                    //获取到该channel关联的buffer
                    ByteBuffer buffer = (ByteBuffer) key.attachment();
                    channel.read(buffer);
                    System.out.println("from 客户端: " + new String(buffer.array()));
                }

                //手动从集合中移动当前的selectionKey, 防止重复操作
                keyIterator.remove();
            }
        }
    }
}
(2) 客户端代码
package nio;

import java.net.InetSocketAddress;
import java.nio.ByteBuffer;
import java.nio.channels.SocketChannel;

public class NIOClient {

    public static void main(String[] args) throws Exception {
        //得到一个网络通道
        SocketChannel socketChannel = SocketChannel.open();
        //设置非阻塞
        socketChannel.configureBlocking(false);
        //提供服务器端的ip 和 端口
        InetSocketAddress inetSocketAddress = new InetSocketAddress("127.0.0.1", 6666);
        //连接服务器
        if (!socketChannel.connect(inetSocketAddress)) {
            while (!socketChannel.finishConnect()) {
                System.out.println("因为连接需要时间,客户端不会阻塞,可以做其它工作..");
            }
        }

        //如果连接成功,就发送数据
        String str = "hello, China ~ ";
        //Wraps a byte array into a buffer
        ByteBuffer buffer = ByteBuffer.wrap(str.getBytes());
        //发送数据,将 buffer 数据写入 channel
        socketChannel.write(buffer);
        System.in.read();
    }
}
结果:服务器端控制台
selectionKeys 数量 = 1
客户端连接成功 生成了一个 socketChannel 1722023916
客户端连接后 ,注册的selectionkey 数量=2
selectionKeys 数量 = 1
from 客户端 hello, China~
3. 小结
1 SelectionKey:表示 Selector 和网络通道的注册关系, 共四种:
java.nio.channels.SelectionKey#OP_READ 读事件
java.nio.channels.SelectionKey#OP_WRITE 写事件
java.nio.channels.SelectionKey#OP_CONNECT 连接建立成功事件
java.nio.channels.SelectionKey#OP_ACCEPT 有一个新连接事件
2. SelectionKey 的关键方法
public abstract class SelectionKey {
    public static final int OP_READ = 1;    // 读事件
    public static final int OP_WRITE = 4;    // 写事件
    public static final int OP_CONNECT = 8;    // 链接建立事件
    public static final int OP_ACCEPT = 16;    // 请求建立连接事件
    private volatile Object attachment = null;
    private static final AtomicReferenceFieldUpdater<SelectionKey, Object> attachmentUpdater = AtomicReferenceFieldUpdater.newUpdater(SelectionKey.class, Object.class, "attachment");

    protected SelectionKey() {
    }

    public abstract SelectableChannel channel();    // //得到与之关联的通道

    public abstract Selector selector();    //得到与之关联的 Selector 对象

    public abstract boolean isValid();

    public abstract void cancel();

    public abstract int interestOps();    //

    public abstract SelectionKey interestOps(int var1);    ////设置或改变监听事件

    public abstract int readyOps();

    public final boolean isReadable() {    // 是否可读,也就是是否读事件
        return (this.readyOps() & 1) != 0;
    }

    public final boolean isWritable() {
        return (this.readyOps() & 4) != 0;
    }

    public final boolean isConnectable() {
        return (this.readyOps() & 8) != 0;
    }

    public final boolean isAcceptable() {
        return (this.readyOps() & 16) != 0;
    }

    public final Object attach(Object var1) {
        return attachmentUpdater.getAndSet(this, var1);
    }

    public final Object attachment() {    // //得到与之关联的共享数据
        return this.attachment;
    }
}
3. ServerSocketChannel 关键方法-核心是连接过来之后建立连接
public abstract class ServerSocketChannel extends AbstractSelectableChannel implements NetworkChannel {
    protected ServerSocketChannel(SelectorProvider var1) {
        super(var1);
    }

    public static ServerSocketChannel open() throws IOException {    // 得到一个 ServerSocketChannel 通道
        return SelectorProvider.provider().openServerSocketChannel();
    }

    public final int validOps() {
        return 16;
    }

    public final ServerSocketChannel bind(SocketAddress var1) throws IOException {    // 设置服务器端端口号
        return this.bind(var1, 0);
    }

    public abstract ServerSocketChannel bind(SocketAddress var1, int var2) throws IOException;

    public abstract <T> ServerSocketChannel setOption(SocketOption<T> var1, T var2) throws IOException;

    public abstract ServerSocket socket();

    public abstract SocketChannel accept() throws IOException;    // 接受一个连接,返回代表这个连接的通道对象

    public abstract SocketAddress getLocalAddress() throws IOException;
}
还有从父类继承的一些重要方法:
java.nio.channels.spi.AbstractSelectableChannel#configureBlocking    // 设置阻塞或非阻塞模式,取值 false 表示采用非阻塞模式
java.nio.channels.SelectableChannel#register(java.nio.channels.Selector, int)    // 注册一个选择器并设置监听事件
4. SocketChannel 网络 IO 通道,具体负责进行读写操作。NIO 把缓冲区的数据写入通道,或者把通道里的数据读到缓冲区。
public abstract class SocketChannel extends AbstractSelectableChannel implements ByteChannel, ScatteringByteChannel, GatheringByteChannel, NetworkChannel {
    protected SocketChannel(SelectorProvider var1) {
        super(var1);
    }

    public static SocketChannel open() throws IOException {    // 打开一个SocketChannel
        return SelectorProvider.provider().openSocketChannel();
    }

    public static SocketChannel open(SocketAddress var0) throws IOException {
        SocketChannel var1 = open();

        try {
            var1.connect(var0);
        } catch (Throwable var5) {
            try {
                var1.close();
            } catch (Throwable var4) {
                var5.addSuppressed(var4);
            }

            throw var5;
        }

        assert var1.isConnected();

        return var1;
    }

    public final int validOps() {
        return 13;
    }

    public abstract SocketChannel bind(SocketAddress var1) throws IOException;

    public abstract <T> SocketChannel setOption(SocketOption<T> var1, T var2) throws IOException;

    public abstract SocketChannel shutdownInput() throws IOException;

    public abstract SocketChannel shutdownOutput() throws IOException;

    public abstract Socket socket();

    public abstract boolean isConnected();

    public abstract boolean isConnectionPending();

    public abstract boolean connect(SocketAddress var1) throws IOException;    // //连接服务器

    public abstract boolean finishConnect() throws IOException;    // 如果上面的connect方法连接失败,接下来就要通过该方法完成连接操作

    public abstract SocketAddress getRemoteAddress() throws IOException;

    public abstract int read(ByteBuffer var1) throws IOException;    //从通道里读数据

    public abstract long read(ByteBuffer[] var1, int var2, int var3) throws IOException;

    public final long read(ByteBuffer[] var1) throws IOException {
        return this.read(var1, 0, var1.length);
    }

    public abstract int write(ByteBuffer var1) throws IOException;    //往通道里写数据

    public abstract long write(ByteBuffer[] var1, int var2, int var3) throws IOException;

    public final long write(ByteBuffer[] var1) throws IOException {
        return this.write(var1, 0, var1.length);
    }

    public abstract SocketAddress getLocalAddress() throws IOException;
}
还有从父类继承的一些重要方法:
java.nio.channels.spi.AbstractSelectableChannel#configureBlocking    // 设置阻塞或非阻塞模式,取值 false 表示采用非阻塞模式
java.nio.channels.SelectableChannel#register(java.nio.channels.Selector, int)    // 注册一个选择器并设置监听事件