NIO 基础之 Buffer

文章目录

  1. 1. 概述
  2. 2. 基本属性
  3. 3. 创建 Buffer
    1. 3.1 关于 Direct Buffer 和 Non-Direct Buffer 的区别
  4. 4. 向 Buffer 写入数据
  5. 5. 从 Buffer 读取数据
  6. 6. rewind() v.s. flip() v.s. clear()
    1. 6.1 flip
    2. 6.2 rewind
    3. 6.3 clear
  7. 7. mark() 搭配 reset()
    1. 7.1 mark
    2. 7.2 reset
  8. 8. 其它方法
  9. 666. 彩蛋

1. 概述

一个 Buffer ,本质上是内存中的一块,我们可以将数据写入这块内存,之后从这块内存获取数据。通过将这块内存封装成 NIO Buffer 对象,并提供了一组常用的方法,方便我们对该块内存的读写。

Buffer 在 java.nio 包中实现,被定义成抽象类,从而实现一组常用的方法。整体类图如下:

类图

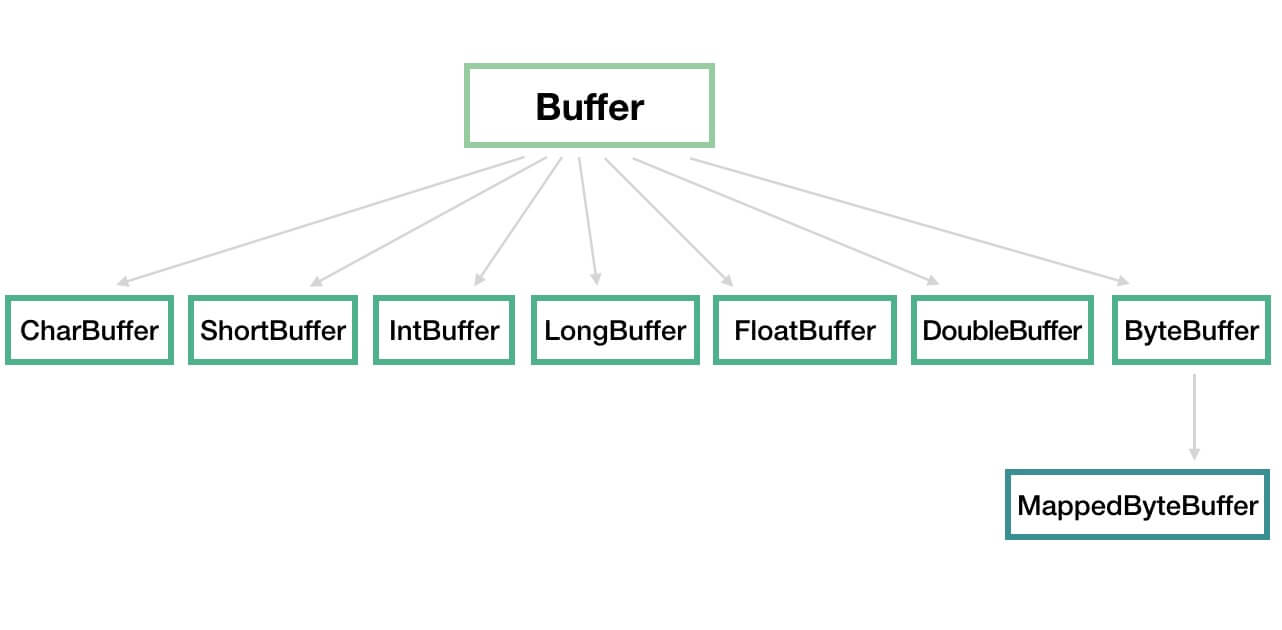
  • 我们可以将 Buffer 理解为一个数组的封装,例如 IntBuffer、CharBuffer、ByteBuffer 等分别对应 int[]char[]byte[] 等。
  • MappedByteBuffer 用于实现内存映射文件,不是本文关注的重点。因此,感兴趣的胖友,可以自己 Google 了解,还是蛮有趣的。

2. 基本属性

Buffer 中有 4 个非常重要的属性:capacitylimitpositionmark 。代码如下:

public abstract class Buffer {

// Invariants: mark <= position <= limit <= capacity
private int mark = -1;
private int position = 0;
private int limit;
private int capacity;

// Used only by direct buffers
// NOTE: hoisted here for speed in JNI GetDirectBufferAddress
long address;

Buffer(int mark, int pos, int lim, int cap) { // package-private
if (cap < 0)
throw new IllegalArgumentException("Negative capacity: " + cap);
this.capacity = cap;
limit(lim);
position(pos);
if (mark >= 0) {
if (mark > pos)
throw new IllegalArgumentException("mark > position: ("
+ mark + " > " + pos + ")");
this.mark = mark;
}
}

// ... 省略具体方法的代码
}
  • capacity 属性,容量,Buffer 能容纳的数据元素的最大值。这一容量在 Buffer 创建时被赋值,并且永远不能被修改
  • Buffer 分成写模式读模式两种情况。如下图所示:写模式 v.s. 读模式
    • 从图中,我们可以看到,两种模式下,position 和 limit 属性分别代表不同的含义。下面,我们来分别看看。
  • position 属性,位置,初始值为 0 。
    • 模式下,每往 Buffer 中写入一个值,position 就自动加 1 ,代表下一次的写入位置。
    • 模式下,每从 Buffer 中读取一个值,position 就自动加 1 ,代表下一次的读取位置。( 和写模式类似 )
  • limit 属性,上限。
    • 模式下,代表最大能写入的数据上限位置,这个时候 limit 等于 capacity 。
    • 模式下,在 Buffer 完成所有数据写入后,通过调用 #flip() 方法,切换到模式。此时,limit 等于 Buffer 中实际的数据大小。因为 Buffer 不一定被写满,所以不能使用 capacity 作为实际的数据大小。
  • mark 属性,标记,通过 #mark() 方法,记录当前 position ;通过 reset() 方法,恢复 position 为标记。
    • 模式下,标记上一次写位置。
    • 模式下,标记上一次读位置。
  • 从代码注释上,我们可以看到,四个属性总是遵循如下大小关系:

    mark <= position <= limit <= capacity

写到此处,忍不住吐槽了下,Buffer 的读模式和写模式,我认为是有一点“糟糕”。相信大多数人在理解的时候,都会开始一脸懵逼的状态。相比较来说,Netty 的 ByteBuf 就优雅的非常多,基本属性设计如下:

0 <= readerIndex <= writerIndex <= capacity
  • 通过 readerIndex 和 writerIndex 两个属性,避免出现读模式和写模式的切换。

3. 创建 Buffer

① 每个 Buffer 实现类,都提供了 #allocate(int capacity) 静态方法,帮助我们快速实例化一个 Buffer 对象。以 ByteBuffer 举例子,代码如下:

// ByteBuffer.java
public static ByteBuffer allocate(int capacity) {
if (capacity < 0)
throw new IllegalArgumentException();
return new HeapByteBuffer(capacity, capacity);
}
  • ByteBuffer 实际是个抽象类,返回的是它的基于堆内( Non-Direct )内存的实现类 HeapByteBuffer 的对象。

② 每个 Buffer 实现类,都提供了 #wrap(array) 静态方法,帮助我们将其对应的数组包装成一个 Buffer 对象。还是以 ByteBuffer 举例子,代码如下:

// ByteBuffer.java
public static ByteBuffer wrap(byte[] array, int offset, int length){
try {
return new HeapByteBuffer(array, offset, length);
} catch (IllegalArgumentException x) {
throw new IndexOutOfBoundsException();
}
}

public static ByteBuffer wrap(byte[] array) {
return wrap(array, 0, array.length);
}
  • 和 #allocate(int capacity) 静态方法一样,返回的也是 HeapByteBuffer 的对象。

③ 每个 Buffer 实现类,都提供了 #allocateDirect(int capacity) 静态方法,帮助我们快速实例化一个 Buffer 对象。以 ByteBuffer 举例子,代码如下:

// ByteBuffer.java
public static ByteBuffer allocateDirect(int capacity) {
return new DirectByteBuffer(capacity);
}
  • 和 #allocate(int capacity) 静态方法不一样,返回的是它的基于堆外( Direct )内存的实现类 DirectByteBuffer 的对象。

3.1 关于 Direct Buffer 和 Non-Direct Buffer 的区别

FROM 《Java NIO 的前生今世 之三 NIO Buffer 详解》

Direct Buffer:

  • 所分配的内存不在 JVM 堆上, 不受 GC 的管理.(但是 Direct Buffer 的 Java 对象是由 GC 管理的, 因此当发生 GC, 对象被回收时, Direct Buffer 也会被释放)
  • 因为 Direct Buffer 不在 JVM 堆上分配, 因此 Direct Buffer 对应用程序的内存占用的影响就不那么明显(实际上还是占用了这么多内存, 但是 JVM 不好统计到非 JVM 管理的内存.)
  • 申请和释放 Direct Buffer 的开销比较大. 因此正确的使用 Direct Buffer 的方式是在初始化时申请一个 Buffer, 然后不断复用此 buffer, 在程序结束后才释放此 buffer.
  • 使用 Direct Buffer 时, 当进行一些底层的系统 IO 操作时, 效率会比较高, 因为此时 JVM 不需要拷贝 buffer 中的内存到中间临时缓冲区中.

Non-Direct Buffer:

  • 直接在 JVM 堆上进行内存的分配, 本质上是 byte[] 数组的封装.
  • 因为 Non-Direct Buffer 在 JVM 堆中, 因此当进行操作系统底层 IO 操作中时, 会将此 buffer 的内存复制到中间临时缓冲区中. 因此 Non-Direct Buffer 的效率就较低.

笔者之前研究 JVM 内存时,也整理过一个脑图,感兴趣的胖友可以下载:传送门 。

4. 向 Buffer 写入数据

每个 Buffer 实现类,都提供了 #put(...) 方法,向 Buffer 写入数据。以 ByteBuffer 举例子,代码如下:

// 写入 byte
public abstract ByteBuffer put(byte b);
public abstract ByteBuffer put(int index, byte b);
// 写入 byte 数组
public final ByteBuffer put(byte[] src) { ... }
public ByteBuffer put(byte[] src, int offset, int length) {...}
// ... 省略,还有其他 put 方法

对于 Buffer 来说,有一个非常重要的操作就是,我们要讲来自 Channel 的数据写入到 Buffer 中。在系统层面上,这个操作我们称为读操作,因为数据是从外部( 文件或者网络等 )读取到内存中。示例如下:

int num = channel.read(buffer);
  • 上述方法会返回从 Channel 中写入到 Buffer 的数据大小。对应方法的代码如下:

    public interface ReadableByteChannel extends Channel {

    public int read(ByteBuffer dst) throws IOException;

    }

注意,通常在说 NIO 的读操作的时候,我们说的是从 Channel 中读数据到 Buffer 中,对应的是对 Buffer 的写入操作,初学者需要理清楚这个。

5. 从 Buffer 读取数据

每个 Buffer 实现类,都提供了 #get(...) 方法,从 Buffer 读取数据。以 ByteBuffer 举例子,代码如下:

// 读取 byte
public abstract byte get();
public abstract byte get(int index);
// 读取 byte 数组
public ByteBuffer get(byte[] dst, int offset, int length) {...}
public ByteBuffer get(byte[] dst) {...}
// ... 省略,还有其他 get 方法

对于 Buffer 来说,还有一个非常重要的操作就是,我们要讲来向 Channel 的写入 Buffer 中的数据。在系统层面上,这个操作我们称为写操作,因为数据是从内存中写入到外部( 文件或者网络等 )。示例如下:

int num = channel.write(buffer);
  • 上述方法会返回向 Channel 中写入 Buffer 的数据大小。对应方法的代码如下:

    public interface WritableByteChannel extends Channel {

    public int write(ByteBuffer src) throws IOException;

    }

6. rewind() v.s. flip() v.s. clear()

6.1 flip

如果要读取 Buffer 中的数据,需要切换模式,从写模式切换到读模式。对应的为 #flip() 方法,代码如下:

public final Buffer flip() {
limit = position; // 设置读取上限
position = 0; // 重置 position
mark = -1; // 清空 mark
return this;
}

使用示例,代码如下:

buf.put(magic);    // Prepend header
in.read(buf); // Read data into rest of buffer
buf.flip(); // Flip buffer
channel.write(buf); // Write header + data to channel

6.2 rewind

#rewind() 方法,可以重置 position 的值为 0 。因此,我们可以重新读取和写入 Buffer 了。

大多数情况下,该方法主要针对于读模式,所以可以翻译为“倒带”。也就是说,和我们当年的磁带倒回去是一个意思。代码如下:

public final Buffer rewind() {
position = 0; // 重置 position
mark = -1; // 清空 mark
return this;
}
  • 从代码上,和 #flip() 相比,非常类似,除了少了第一行的 limit = position 的代码块。

使用示例,代码如下:

channel.write(buf);    // Write remaining data
buf.rewind(); // Rewind buffer
buf.get(array); // Copy data into array

6.3 clear

#clear() 方法,可以“重置” Buffer 的数据。因此,我们可以重新读取和写入 Buffer 了。

大多数情况下,该方法主要针对于写模式。代码如下:

public final Buffer clear() {
position = 0; // 重置 position
limit = capacity; // 恢复 limit 为 capacity
mark = -1; // 清空 mark
return this;
}
  • 从源码上,我们可以看出,Buffer 的数据实际并未清理掉,所以使用时需要注意。
  • 读模式下,尽量不要调用 #clear() 方法,因为 limit 可能会被错误的赋值为 capacity 。相比来说,调用 #rewind() 更合理,如果有重读的需求。

使用示例,代码如下:

buf.clear();     // Prepare buffer for reading
in.read(buf); // Read data

7. mark() 搭配 reset()

7.1 mark

#mark() 方法,保存当前的 position 到 mark 中。代码如下:

public final Buffer mark() {
mark = position;
return this;
}

7.2 reset

#reset() 方法,恢复当前的 postion 为 mark 。代码如下:

public final Buffer reset() {
int m = mark;
if (m < 0)
throw new InvalidMarkException();
position = m;
return this;
}

8. 其它方法

Buffer 中还有其它方法,比较简单,所以胖友自己研究噢。代码如下:

// ========== capacity ==========
public final int capacity() {
return capacity;
}

// ========== position ==========
public final int position() {
return position;
}

public final Buffer position(int newPosition) {
if ((newPosition > limit) || (newPosition < 0))
throw new IllegalArgumentException();
position = newPosition;
if (mark > position) mark = -1;
return this;
}

// ========== limit ==========
public final int limit() {
return limit;
}

public final Buffer limit(int newLimit) {
if ((newLimit > capacity) || (newLimit < 0))
throw new IllegalArgumentException();
limit = newLimit;
if (position > limit) position = limit;
if (mark > limit) mark = -1;
return this;
}

// ========== mark ==========
final int markValue() { // package-private
return mark;
}

final void discardMark() { // package-private
mark = -1;
}

// ========== 数组相关 ==========
public final int remaining() {
return limit - position;
}

public final boolean hasRemaining() {
return position < limit;
}

public abstract boolean hasArray();

public abstract Object array();

public abstract int arrayOffset();

public abstract boolean isDirect();

// ========== 下一个读 / 写 position ==========
final int nextGetIndex() { // package-private
if (position >= limit)
throw new BufferUnderflowException();
return position++;
}

final int nextGetIndex(int nb) { // package-private
if (limit - position < nb)
throw new BufferUnderflowException();
int p = position;
position += nb;
return p;
}

final int nextPutIndex() { // package-private
if (position >= limit)
throw new BufferOverflowException();
return position++;
}

final int nextPutIndex(int nb) { // package-private
if (limit - position < nb)
throw new BufferOverflowException();
int p = position;
position += nb;
return p;
}

final int checkIndex(int i) { // package-private
if ((i < 0) || (i >= limit))
throw new IndexOutOfBoundsException();
return i;
}

final int checkIndex(int i, int nb) { // package-private
if ((i < 0) || (nb > limit - i))
throw new IndexOutOfBoundsException();
return i;
}

// ========== 其它方法 ==========
final void truncate() { // package-private
mark = -1;
position = 0;
limit = 0;
capacity = 0;
}

static void checkBounds(int off, int len, int size) { // package-private
if ((off | len | (off + len) | (size - (off + len))) < 0)
throw new IndexOutOfBoundsException();
}
原文地址:https://www.cnblogs.com/qiumingcheng/p/9487349.html