2.1 安装前环境准备
2.1.1 安装 ES5.2
1)上传 elasticsearch-5.2.2.tar.gz 到 hadoop102 的/opt/software 目录,并解压到/opt/module目录
[atguigu@hadoop102 software]$ tar -zxvf elasticsearch-5.2.2.tar.gz -C /opt/module/
2)修改/opt/module/elasticsearch-5.2.2/config/elasticsearch.yml 配置文件
[atguigu@hadoop102 config]$ vim elasticsearch.yml
network.host: hadoop102
http.port: 9200
http.cors.enabled: true
http.cors.allow-origin: "*"
bootstrap.memory_lock: false
bootstrap.system_call_filter: false
3)修改 Linux 系统配置文件/etc/security/limits.conf
[atguigu@hadoop102 elasticsearch-5.2.2]$ sudo vim /etc/security/limits.conf
#添加如下内容
* soft nproc 65536
* hard nproc 65536
* soft nofile 65536
* hard nofile 65536
[atguigu@hadoop102 elasticsearch-5.2.2]$ sudo vim /etc/sysctl.conf

#添加
vm.max_map_count=655360
[atguigu@hadoop102 elasticsearch-5.2.2]$ sudo vim /etc/security/limits.d/90-np

#修改配置
* soft nproc 2048
[atguigu@hadoop102 elasticsearch-5.2.2]$ sudo sysctl -p
4)需要重新启动虚拟机
[atguigu@hadoop102 elasticsearch-5.2.2]$ su root
root@hadoop102 elasticsearch-5.2.2]# reboot
5)在/opt/module/elasticsearch-5.2.2 路径上,启动 ES
[atguigu@hadoop102 elasticsearch-5.2.2]$ nohup /opt/module/elasticsearch-5.2.2/bin/elasticsearch &
6)在 ES 里创建 griffin 索引
[atguigu@hadoop102 ~]$ curl -XPUT http://hadoop102:9200/griffin -d '
{ "aliases": {},
"mappings": {
     "accuracy": {
         "properties": {
                "name": {
                       "fields": {
                             "keyword": {
                                     "ignore_above": 256,
                                      "type": "keyword"
                                 }
                                   },
                                     "type": "text"
                                  },
                                "tmst": {
                                     "type": "date"
                                }
                       }
              }
 },"settings": {
          "index": {
                "number_of_replicas": "2",
                "number_of_shards": "5"
           }
      }
}'
2.1.2 启动 HDFS & Yarn 服务
[atguigu@hadoop102 hadoop-2.7.2]$ sbin/start-dfs.sh
[atguigu@hadoop103 hadoop-2.7.2]$ sbin/start-yarn.sh
2.1.3 修改 Hive 配置
注意:Hive 版本至少 2.2 及以上
3)将 Mysql 的 mysql-connector-java-5.1.27-bin.jar 拷贝到/opt/module/hive/lib/
[atguigu@hadoop102 module]$ cp /opt/software/mysql-libs/mysql-connector-java-5.1.27/mysql-con nector-java-5.1.27-bin.jar /opt/module/hive/lib/
4)在/opt/module/hive/conf 路径上,修改 hive-site.xml 文件,添加红色部分。(注意 mysql
的密码要正确,否则元数据连接不上)
[atguigu@hadoop102 conf]$ vim hive-site.xml
#添加如下内容
<?xml version="1.0"?>
<?xml-stylesheet type="text/xsl" href="configuration.xsl"?> <configuration>
     <property>
        <name>javax.jdo.option.ConnectionURL</name>
        <value>jdbc:mysql://hadoop102:3306/metastore?createDatabaseIfNotExist=tru e</value>
         <description>JDBC connect string for a JDBC metastore</description>
      </property>
      <property>
           <name>javax.jdo.option.ConnectionDriverName</name>
           <value>com.mysql.jdbc.Driver</value>
           <description>Driver class name for a JDBC metastore</description>
       </property>
       <property>
              <name>javax.jdo.option.ConnectionUserName</name>
              <value>root</value> <description>username to use against metastore database</description>
        </property>
        <property>
               <name>javax.jdo.option.ConnectionPassword</name>
               <value>123456</value> <description>password to use against metastore database</description>
       </property>
       <property>
               <name>hive.metastore.warehouse.dir</name>
               <value>/user/hive/warehouse</value>
               <description>location of default database for the warehouse</description>
        </property>
        <property>
               <name>hive.cli.print.header</name>
               <value>true</value>
        </property>
        <property>
               <name>hive.cli.print.current.db</name>
               <value>true</value> </property>
        <property>
               <name>hive.metastore.schema.verification</name>
               <value>false</value>
         </property>
         <property>
               <name>datanucleus.schema.autoCreateAll</name>
               <value>true</value>
          </property>
         <property>
               <name>hive.metastore.uris</name>
               <value>thrift://hadoop102:9083</value>
          </property>
</configuration>
3)启动服务
[atguigu@hadoop102 hive]$ nohup /opt/module/hive/bin/hive --service metastore &
[atguigu@hadoop102 hive]$ nohup /opt/module/hive/bin/hive --service hiveserver2 &
注意:hive2.x 版本需要启动两个服务 metastore 和 hiveserver2,否则会报错 Exception in thread
"main"
java.lang.RuntimeException:
org.apache.hadoop.hive.ql.metadata.HiveException:
java.lang.RuntimeException:
Unable
to
instantiate
org.apache.hadoop.hive.ql.metadata.SessionHiveMetaStoreClient
4)服务启动完毕后在启动 Hive
[atguigu@hadoop102 hive]$ /opt/module/hive/bin/hive
2.1.4 安装 Spark2.4.6
注意:Spark 版本至少 2.2.1 及以上
1)把 spark-2.4.6-bin-hadoop2.7.tgz 上传到/opt/software 目录,并解压到/opt/module
[atguigu@hadoop102 software]$ tar -zxvf spark-2.4.6-bin-hadoop2.7.tgz -C /opt/module/
2)修改名称/opt/module/spark-2.4.6-bin-hadoop2.7 名称为 spark
[atguigu@hadoop102 module]$ mv spark-2.4.3-bin-hadoop2.7/ spark
3)修改/opt/module/spark/conf/spark-defaults.conf.template 名称为 spark-defaults.conf
[atguigu@hadoop102 conf]$ mv spark-defaults.conf.template spark-defaults.conf
4)在 spark-default.conf 文件中配置 Spark 日志路径
[atguigu@hadoop102 conf]$ vim spark-defaults.conf
#添加如下配置
spark.eventLog.enabled true
spark.eventLog.dir
hdfs://hadoop102:9000/spark_directory
5)修改配置文件 slaves 名称
[atguigu@hadoop102 conf]$ mv slaves.template slaves
6)修改 slave 文件,添加 work 节点:
[atguigu@hadoop102 conf]$ vim slaves
hadoop102
hadoop103
hadoop104
7)修改/opt/module/spark/conf/spark-env.sh.template 名称为 spark-env.sh
[atguigu@hadoop102 conf]$ mv spark-env.sh.template spark-env.sh
8)在/opt/module/spark/conf/spark-env.sh 文件中配置 YARN 配置文件路径、配置历史服务器相关参数
[atguigu@hadoop102 conf]$ vim spark-env.sh
#添加如下参数 YARN_CONF_DIR=/opt/module/hadoop-2.7.2/etc/hadoop
export SPARK_HISTORY_OPTS="-Dspark.history.ui.port=18080
-Dspark.history.retainedApplications=30
-Dspark.history.fs.logDirectory=hdfs://hadoop102:9000/spark_di rectory"
SPARK_MASTER_HOST=hadoop102
SPARK_MASTER_PORT=7077
9)在 hadoop 集群上提前创建 spark_directory 日志路径
[atguigu@hadoop102 spark]$ hadoop fs -mkdir /spark_directory
10)把 Hive 中/opt/module/hive/lib/datanucleus-*.jar 包拷贝到 Spark 的/opt/module/spark/jars路径
[atguigu@hadoop102 lib]$ cp /opt/module/hive/lib/datanucleus-*.jar /opt/module/spark/jars/
9)把 Hive 中/opt/module/hive/conf/hive-site.xml 包拷贝到 Spark 的/opt/module/spark/conf路径
[atguigu@hadoop102 conf]$ cp /opt/module/hive/conf/hive-site.xml /opt/module/spark/conf/
10)修改 hadoop 配置文件 yarn-site.xml,添加如下内容:
[atguigu@hadoop102 hadoop]$ vi yarn-site.xml
<!--是否启动一个线程检查每个任务正使用的物理内存量,如果任务超出分配值, 则直接将其杀掉,默认是 true -->
<property>
    <name>yarn.nodemanager.pmem-check-enabled</name>
    <value>false</value>
</property>
<!--是否启动一个线程检查每个任务正使用的虚拟内存量,如果任务超出分配值, 则直接将其杀掉,默认是 true -->
<property>
    <name>yarn.nodemanager.vmem-check-enabled</name>
    <value>false</value>
</property>
11)分发 spark & yarn-site.xml
[atguigu@hadoop102 conf]$ xsync /opt/module/hadoop-2.7.2/etc/hadoop/yarn-site.xml
[atguigu@hadoop102 conf]$ xsync /opt/module/spark
10)测试环境
[atguigu@hadoop102 spark]$ bin/spark-shell
scala>spark.sql("show databases").show
2.1.5 安装 Livy0.3
1)上传 livy-server-0.3.0.zip 到 hadoop102 的/opt/software 目录下,并解压到/opt/module
[atguigu@hadoop102 software]$ unzip livy-server-0.3.0.zip -d /opt/module/
2)修改/opt/module/livy-server-0.3.0 文件名称为 livy
[atguigu@hadoop102 module]$ mv livy-server-0.3.0/ livy
3)修改/opt/module/livy/conf/livy-env.sh 文件,添加 livy 环境相关参数
export HADOOP_CONF_DIR=/opt/module/hadoop-2.7.2/etc/hadoop/
export SPARK_HOME=/opt/module/spark/
3)修改/opt/module/livy/conf/livy.conf 文件,配置 livy 与 spark 相关参数
livy.server.host = hadoop102
livy.spark.master =yarn
livy.spark.deployMode = client
livy.repl.enableHiveContext = true
livy.server.port = 8998
4)配置需要的环境变量
[atguigu@hadoop102 conf]$ sudo vim /etc/profile
#SPARK_HOME
export SPARK_HOME=/opt/module/spark
export PATH=$PATH:$SPARK_HOME/bin
[atguigu@hadoop102 conf]$ source /etc/profile
5)在/opt/module/livy/路径上,启动 livy 服务
[atguigu@hadoop102 livy]$ bin/livy-server start
2.1.6 初始化 MySQL 数据库
1)上传 Init_quartz_mysql_innodb.sql 到 hadoop102 的/opt/software 目录
2)使用 mysql 创建 quartz 库,执行脚本初始化表信息
[atguigu@hadoop102 ~]$ mysql -uroot -p123456
mysql> create database quartz;
mysql> use quartz;
mysql> source /opt/software/Init_quartz_mysql_innodb.sql
mysql> show tables;
2.1.6 初始化 MySQL 数据库
1)上传 Init_quartz_mysql_innodb.sql 到 hadoop102 的/opt/software 目录
2)使用 mysql 创建 quartz 库,执行脚本初始化表信息
[atguigu@hadoop102 ~]$ mysql -uroot -p123456
mysql> create database quartz;
mysql> use quartz;
mysql> source /opt/software/Init_quartz_mysql_innodb.sql
mysql> show tables;
2.2 编译 Griffin(不选择)
2.2.1 安装 Maven
1)Maven 下载:https://maven.apache.org/download.cgi
2)把 apache-maven-3.6.1-bin.tar.gz 上传到 linux 的/opt/software 目录下
3)解压 apache-maven-3.6.1-bin.tar.gz 到/opt/module/目录下面
[atguigu@hadoop102 software]$ tar -zxvf apache-maven-3.6.1-bin.tar.gz -C /opt/module/
4)修改 apache-maven-3.6.1 的名称为 maven
[atguigu@hadoop102 module]$ mv apache-maven-3.6.1/ maven
5)添加环境变量到/etc/profile 中
[atguigu@hadoop102 module]$ sudo vim /etc/profile #MAVEN_HOME
export MAVEN_HOME=/opt/module/maven
export PATH=$PATH:$MAVEN_HOME/bin
6)测试安装结果
[atguigu@hadoop102 module]$ source /etc/profile
[atguigu@hadoop102 module]$ mvn -v
7)修改 setting.xml,指定为阿里云
[atguigu@hadoop102 maven]$ cd conf
[atguigu@hadoop102 maven]$ vim settings.xml
<!-- 添加阿里云镜像-->
<mirror>
     <id>nexus-aliyun</id>
     <mirrorOf>central</mirrorOf>
      <name>Nexus aliyun</name>
      <url>http://maven.aliyun.com/nexus/content/groups/public</ur l>
</mirror>
<mirror>
      <id>UK</id>
      <name>UK Central</name>
       <url>http://uk.maven.org/maven2</url>
       <mirrorOf>central</mirrorOf>
</mirror>
<mirror>
        <id>repo1</id>
        <mirrorOf>central</mirrorOf>
        <name>Human Readable Name for this Mirror.</name>
        <url>http://repo1.maven.org/maven2/</url>
</mirror>
<mirror>
        <id>repo2</id>
        <mirrorOf>central</mirrorOf>
        <name>Human Readable Name for this Mirror.</name>
        <url>http://repo2.maven.org/maven2/</url>
</mirror>
8)在/home/atguigu 目录下创建.m2 文件夹
[atguigu@hadoop102 ~]$ mkdir .m2
2.2.2 修改配置文件:
1)上传 griffin-master.zip 到 hadoop102 的/opt/software 目录,并解压 tar.gz 包到/opt/module
[atguigu@hadoop102 software]$ unzip griffin-master.zip -d /opt/module/
2)修改/opt/module/griffin-master/ui/pom.xml 文件,添加 node 和 npm 源。
[atguigu@hadoop102 ui]$ vim pom.xml
<!-- It will install nodejs and npm -->
<execution>
          <id>install node and npm</id>
          <goals>
                  <goal>install-node-and-npm</goal>
           </goals>
<configuration>
           <nodeVersion>${node.version}</nodeVersion>
            <npmVersion>${npm.version}</npmVersion>
            <nodeDownloadRoot>http://nodejs.org/dist/</nodeDownloadRoot>
            <npmDownloadRoot>http://registry.npmjs.org/npm/-/</npmDownloadRoot>
     </configuration>
</execution>
2)修改/opt/module/griffin-master/service/pom.xml 文件,注释掉 org.postgresql,添加 mysql依赖。
[atguigu@hadoop102 service]$ vim pom.xml
<!--
<dependency>
       <groupId>org.postgresql</groupId>
      <artifactId>postgresql</artifactId>
        <version>${postgresql.version}</version>
</dependency>
 -->
<dependency>
        <groupId>mysql</groupId>
         <artifactId>mysql-connector-java</artifactId>
</dependency>
注意:版本号删除掉
3)修改/opt/module/griffin-master/service/src/main/resources/application.properties 文件
[atguigu@hadoop102 service]$ vim /opt/module/griffin-master/service/src/main/resources/applicat ion.properties
# Apache Griffin 应用名称
spring.application.name=griffin_service
# MySQL 数据库配置信息 spring.datasource.url=jdbc:mysql://hadoop102:3306/quartz?autoR
econnect=true&useSSL=false
spring.datasource.username=root
spring.datasource.password=000000
spring.jpa.generate-ddl=true
spring.datasource.driver-class-name=com.mysql.jdbc.Driver spring.jpa.show-sql=true
# Hive metastore 配置信息 hive.metastore.uris=thrift://hadoop102:9083
hive.metastore.dbname=default
hive.hmshandler.retry.attempts=15
hive.hmshandler.retry.interval=2000ms
# Hive cache time
cache.evict.hive.fixedRate.in.milliseconds=900000
# Kafka schema registry 按需配置 kafka.schema.registry.url=http://hadoop102:8081
# Update job instance state at regular intervals jobInstance.fixedDelay.in.milliseconds=60000
# Expired time of job instance which is 7 days that is 604800000 milliseconds.Time unit only supports milliseconds
jobInstance.expired.milliseconds=604800000
# schedule predicate job every 5 minutes and repeat 12 times at most
#interval time unit s:second m:minute h:hour d:day,only support these four units
predicate.job.interval=5m
predicate.job.repeat.count=12
# external properties directory location
external.config.location=
# external BATCH or STREAMING env external.env.location=
# login strategy ("default" or "ldap") login.strategy=default
# ldap
ldap.url=ldap://hostname:port
ldap.email=@example.com ldap.searchBase=DC=org,DC=example
ldap.searchPattern=(sAMAccountName={0})
# hdfs default name
fs.defaultFS=
# elasticsearch
elasticsearch.host=hadoop102
elasticsearch.port=9200
elasticsearch.scheme=http
# elasticsearch.user = user
# elasticsearch.password = password
# livy
livy.uri=http://hadoop102:8998/batches
# yarn url
yarn.uri=http://hadoop103:8088
# griffin event listener
internal.event.listeners=GriffinJobEventHook
4)修改/opt/module/griffin-master/service/src/main/resources/sparkProperties.json 文件
[atguigu@hadoop102
service]$
vim
/opt/module/griffin-master/service/src/main/resources/sparkPro
perties.json
{
"file": "hdfs://hadoop102:9000/griffin/griffin-measure.jar",
"className": "org.apache.griffin.measure.Application",
"name": "griffin",
"queue": "default",
"numExecutors": 2,
"executorCores": 1,
"driverMemory": "1g",
"executorMemory": "1g",
"conf": {
"spark.yarn.dist.files":
"hdfs://hadoop102:9000/home/spark_conf/hive-site.xml"
},
"files": [
]
}
5)修改/opt/module/griffin-master/service/src/main/resources/env/env_batch.json 文件
[atguigu@hadoop102 service]$ vim /opt/module/griffin-master/service/src/main/resources/env/env_ batch.json
{
"spark": { "log.level": "INFO" },
"sinks": [
      { "type": "CONSOLE",
        "config": { "max.log.lines": 10 } },
      { "type": "HDFS", "config": { "path":"hdfs://hadoop102:9000/griffin/persist", "max.persist.lines": 10000, "max.lines.per.file": 10000 } },
          { "type": "ELASTICSEARCH", "config": {
        "method": "post", "api": "http://hadoop102:9200/griffin/accuracy", "connection.timeout": "1m", "retry": 10 } } ],
"griffin.checkpoint": [] }
6)修改/opt/module/griffin-master/service/src/main/resources/env/env_streaming.json 文件
[atguigu@hadoop102 service]$ vim /opt/module/griffin-master/service/src/main/resources/env/env_ streaming.json

{
"spark": { "log.level": "WARN", "checkpoint.dir": "hdfs:///griffin/checkpoint/${JOB_NAME}", "init.clear": true, "batch.interval": "1m", "process.interval": "5m", "config": { "spark.default.parallelism": 4, "spark.task.maxFailures": 5, "spark.streaming.kafkaMaxRatePerPartition": 1000, "spark.streaming.concurrentJobs": 4, "spark.yarn.maxAppAttempts": 5, "spark.yarn.am.attemptFailuresValidityInterval": "1h", "spark.yarn.max.executor.failures": 120, "spark.yarn.executor.failuresValidityInterval": "1h", "spark.hadoop.fs.hdfs.impl.disable.cache": true } },
"sinks": [
    { "type": "CONSOLE", "config": { "max.log.lines": 100 } },
    { "type": "HDFS", "config": { "path": "hdfs://hadoop102:9000/griffin/persist", "max.persist.lines": 10000, "max.lines.per.file": 10000 } },
    { "type": "ELASTICSEARCH", "config": { "method": "post", "api": "http://hadoop102:9200/griffin/accuracy" } } ],
"griffin.checkpoint": [{ "type": "zk", "config": { "hosts": "zk:2181", "namespace": "griffin/infocache", "lock.path": "lock", "mode": "persist", "init.clear": true, "close.clear": false } } ] }
7)修改/opt/module/griffin-master/service/src/main/resources/quartz.properties 文件
[atguigu@hadoop102 service]$ vim /opt/module/griffin-master/service/src/main/resources/quartz.p roperties
org.quartz.scheduler.instanceName=spring-boot-quartz
org.quartz.scheduler.instanceId=AUTO
org.quartz.threadPool.threadCount=5
org.quartz.jobStore.class=org.quartz.impl.jdbcjobstore.JobStor eTX
# If you use postgresql as your database,set this property value to org.quartz.impl.jdbcjobstore.PostgreSQLDelegate
# If you use mysql as your database,set this property value to org.quartz.impl.jdbcjobstore.StdJDBCDelegate
# If you use h2 as your database, it's ok to set this property value to StdJDBCDelegate, PostgreSQLDelegate or others org.quartz.jobStore.driverDelegateClass=org.quartz.impl.jdbcjo bstore.StdJDBCDelegate
org.quartz.jobStore.useProperties=true
org.quartz.jobStore.misfireThreshold=60000
org.quartz.jobStore.tablePrefix=QRTZ_
org.quartz.jobStore.isClustered=true
org.quartz.jobStore.clusterCheckinInterval=20000
2.2.3 执行编译
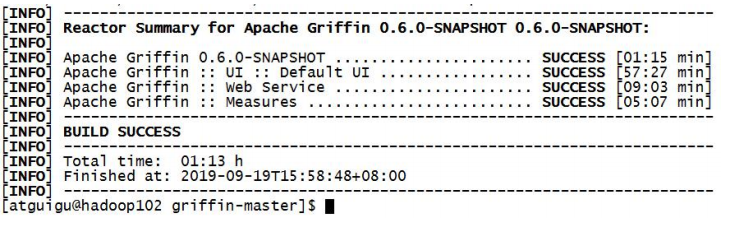
1)在/opt/module/griffin-master 路径执行 maven 命令,开始编译 Griffin 源码
[atguigu@hadoop102 griffin-master]$ mvn -Dmaven.test.skip=true clean install
2)见到如下页面,表示编译成功。(大约需要 1 个小时左右)