微信小程序
注册
- 由于发文限制,请自行到微信公众平台注册
项目结构
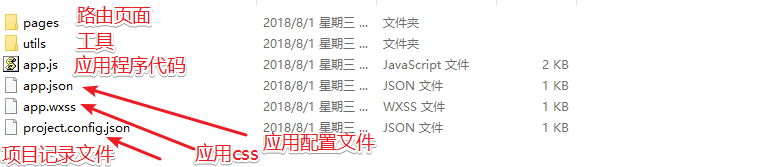

- project.config.json 配置文件(不需要动)
- app.json(用户配置)
- 路由pages
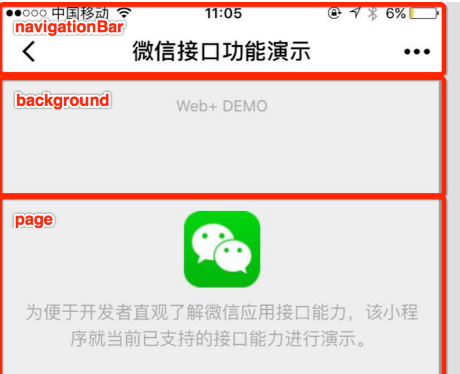
- window 整个程序样式
- tabar底部设置
- .....
- app.js 入口程序
xxx.js
- app.js是入口程序,代表应用要做的事
- 通过路由切换到了index.js中
- Page(options)
- data 属于页面的数据
- this.data.xxx
- onLoad: 获取路由参数 , onLoad(options.xxx)
- onReady: 更改页面数据,比如改title
- onShow: 多次触发,切换页面的时候
- onHide: 多次触发
- data 属于页面的数据
- data初始化数据
- onReady 修改数据
this.setData({ msg:'xxx'})- 修改并更新视图
常用组件
-
view视图
-
text文本框
-
picker 选择列表
-
input组件(无法使用font-family)
- 通过bind事件(全小写),来绑定对应js中声明的函数,赋值赋函数引用
input bindblur="函数名"- 在函数内部,接受e这个对象
- e.detail.value 获取value值
- e.target.id 元素id
- e.target.dataset 获取元素上的属性
data-xxx
wx指令
- 在页面中 wx-xxx
- wx:if="" 是否显示
- wx:for=""
- wx:for="{{数组}}"
- 元素:{{item}} 索引 {{index}}
- 条件 wx:if="{{布尔值}}" 相邻 wx:elif="{{布尔值}}" 相邻 wx:else
事件
- change 改变事件
- tap 点击事件
- bindblur 离焦
- bindconfirm 回车
- bindinput 键入
- checkbox-group 包裹checkbox 获取的detail.value是一个数组
- 表单
- button的formType
- submit
- reset
- button的formType
发请求
- wx.request( options)
- url
- success
- fail
- complete
引入资源
html导入
<include src=""/>
js导入
<wxs src="./../test/test.wxs" module="test"/> 相对路径

<view>

  {{test.name}}

</view>
css导入 @import "common.wxss";
路由参数 :
onLoad: function(option){
    console.log(option.query)
  }
- 图片预览wx.preview
- 本地存储 wx.setStorageSync
上拉下拉
- 上拉和下拉的操作需要触发,必须js文件中,声明其对应的回调函数
- 下拉函数 onPullDownRefresh -> 需要配置xxx.json
enablePullDownRefresh:true
- 上拉触底 onReachBottom
- 停止下拉的函数 wx.stopPullDownRefresh()
- 下拉函数 onPullDownRefresh -> 需要配置xxx.json
- 以上函数可以通过Page构造编辑器自动输出,单页面属性参考配置window
导航
url=page - open-type:
- 默认: navigateTo :非tabBar页面。
- switchTab tabBar 页面。
- navigateBack 返回
- reLaunch 再运行
- 编程导航: wx这个全局对象提供了一套 open-type对应值的api
- wx.switchTab||navigateTo 注意区分非tabbar
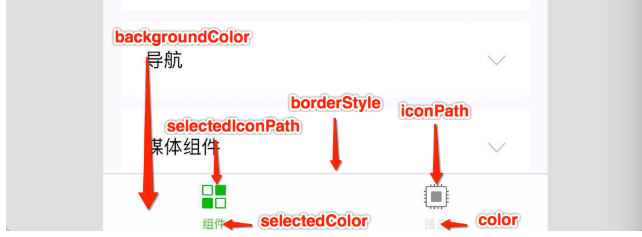
tabbar
-
color selectedColor 对于整个tabbar的设置
-
iconPath selectedIconPath 每个不同的单独设置
-
有趣的功能
-
播放下载音乐
-
const innerAudioContext = wx.createInnerAudioContext()
      innerAudioContext.autoplay = true
      innerAudioContext.src = res.tempFilePath
      innerAudioContext.onPlay(() => {
        console.log('开始播放')
      })
      innerAudioContext.onError((res) => {
        console.log(res.errMsg)
        console.log(res.errCode)
      })
-
-
弹幕
-
<view class="section tc"> <video id="myVideo" src="http://wxsnsdy.tc.qq.com/105/20210/snsdyvideodownload?filekey=30280201010421301f0201690402534804102ca905ce620b1241b726bc41dcff44e00204012882540400&bizid=1023&hy=SH&fileparam=302c020101042530230204136ffd93020457e3c4ff02024ef202031e8d7f02030f42400204045a320a0201000400" enable-danmu danmu-btn controls></video> <view class="btn-area"> <button bindtap="bindSendDanmu">发送弹幕</button> </view> </view> -
bindSendDanmu() {
    this.data.videoContext.sendDanmu({
      text: '6666',
      color:'#00b26a'
    })
  },
 onReady: function () {
    this.data.videoContext = wx.createVideoContext('myVideo')
  },
-
-
查找元素
-
const query = wx.createSelectorQuery();
     //        定义选择器,查找元素位置
query.select('#bottom').boundingClientRect()
query.exec(ele=>ele);
-
引入资源
html导入
<include src=""/>js导入
<wxs src="./../test/test.wxs" module="test"/> 相对路径

<view>

  {{test.name}}

</view>
css导入 @import "common.wxss";
路由参数 :
onLoad: function(option){ console.log(option.query) }- 图片预览wx.preview
- 本地存储 wx.setStorageSync
上拉下拉
- 上拉和下拉的操作需要触发,必须js文件中,声明其对应的回调函数
- 下拉函数 onPullDownRefresh -> 需要配置xxx.json
enablePullDownRefresh:true
- 上拉触底 onReachBottom
- 停止下拉的函数 wx.stopPullDownRefresh()
- 下拉函数 onPullDownRefresh -> 需要配置xxx.json
- __以上函数可以通过Page构造编辑器自动输出,单页面属性参考配置window
-
组件
- 创建一个compoment
- 配置其.json文件 component:true
- 在使用组件的.json文件中定义
- usingComponents:{ 名:路径}
- 在使用组件的页面使用 名
接收数据
-
properties: {
    text:{
      type:Number,
      value:888
    }
  }
组件wxml的slot
在组件的wxml中可以包含 slot 节点,用于承载组件使用者提供的wxml结构。
默认情况下,一个组件的wxml中只能有一个slot。需要使用多slot时,可以在组件js中声明启用。
Component({
  options: {
    multipleSlots: true // 在组件定义时的选项中启用多slot支持
  },
  properties: { /* ... */ },
  methods: { /* ... */ }
})
此时,可以在这个组件的wxml中使用多个slot,以不同的 name 来区分。
<!-- 组件模板 -->
<view class="wrapper">
  <slot name="before"></slot>
  <view>这里是组件的内部细节</view>
  <slot name="after"></slot>
</view>
使用时,用 slot 属性来将节点插入到不同的slot上。
<!-- 引用组件的页面模板 -->
<view>
  <component-tag-name>
    <!-- 这部分内容将被放置在组件 <slot name="before"> 的位置上 -->
    <view slot="before">这里是插入到组件slot name="before"中的内容</view>
    <!-- 这部分内容将被放置在组件 <slot name="after"> 的位置上 -->
    <view slot="after">这里是插入到组件slot name="after"中的内容</view>
  </component-tag-name>
</view>
样式
- 尽可能使用class,组件可以指定它所在节点的默认样式,使用
:host选择器
使用插件
- 进入官方后台添加插件,获取appid等信息
- 进入app.json文件中配置plugins:{ "名":{ 相关信息 } }
- 根据插件文档使用插件(有可能是组件) 需配置usingComponent
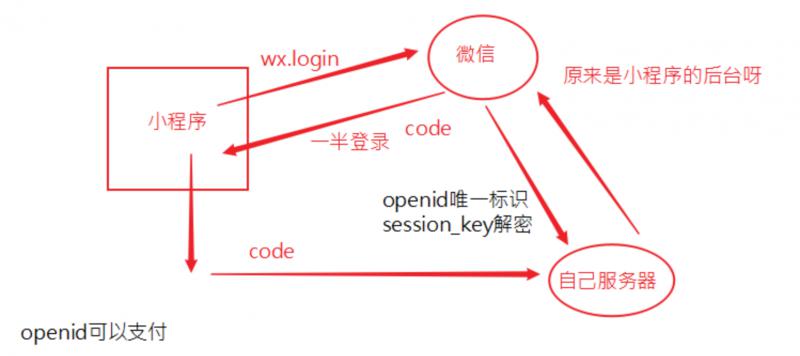
登录