安装一些依赖包,不同情况缺的包不同
yum install mysql-devel curl curl-devel net-snmp net-snmp-devel perl-DBI php-gd php-xml php-bcmath
下载源码文件,我下载的是2.4的版本zabbix
wget http://iweb.dl.sourceforge.net/project/zabbix/ZABBIX%20Latest%20Stable/2.4.3/zabbix-2.4.3.tar.gz

tar zxvf zabbix-2.4.3.tar.gz

cd zabbix-2.4.3

./configure --prefix=/usr/local/zabbix --enable-server --enable-agent --enable-proxy --with-mysql --with-net-snmp --with-libcurl

make && make install
创建zabbix数据库及其相关账号
create database zabbix default charset = utf8;

grant all on zabbix.* to 'zabbix'@'%' identified by 'zabbix';

flush privileges;

q
然后导入原始数据库
cd /home/zabbix-2.4.3/database/mysql
mysql -uroot -p zabbix<schema.sql
mysql -uroot -p zabbix<images.sql
mysql -uroot -p zabbix<data.sql
添加zabbix服务端口号
cat >>/etc/services <<EOF
zabbix-agent    10050/tcp    #Zabbix Agent
zabbix-agent    10050/tcp    #Zabbix Agent
zabbix-agent    10050/tcp    #Zabbix Agent
zabbix-server    10051/udp    #Zabbix server
EOF
拷贝启动脚本
cp /home/zabbix-2.4.3/misc/init.d/fedora/core5/zabbix_* /etc/init.d/
chmod +x /etc/init.d/zabbix_*
修改启动命令脚本
vim /etc/init.d/zabbix_server
ZABBIX_BIN="/usr/local/zabbix/sbin/zabbix_server"
vim /etc/init.d/zabbix_agentd
ZABBIX_BIN="/usr/local/zabbix/sbin/zabbix_agentd"
修改连接数据库的用户名和密码
vi /usr/local/zabbix/etc/zabbix_server.conf
DBName=zabbix
DBUser=zabbix
DBPassword=zabbix
复制网站程序
cp frontends/php/ /var/www/html/ -r
useradd zabbix -M -s /sbin/nologin
service zabbix_server start
service zabbix_agentd start
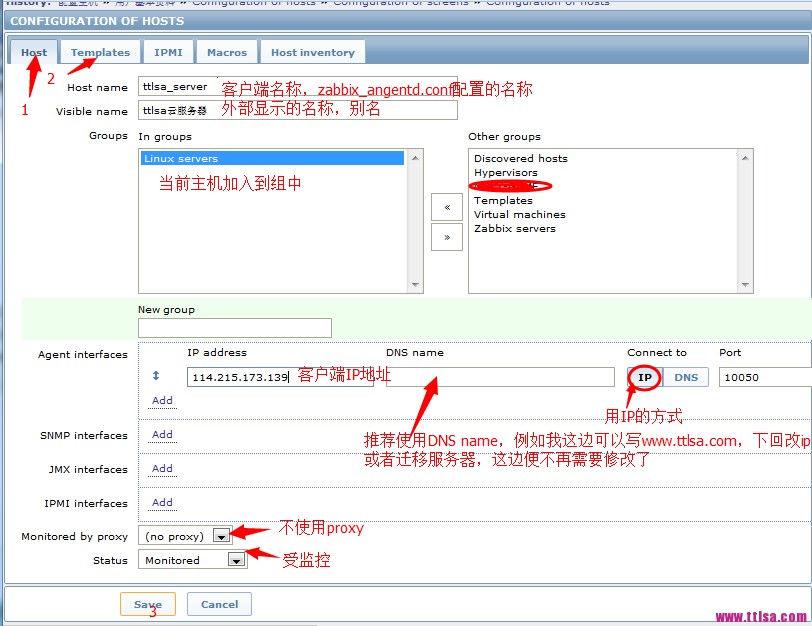
配置zabbix
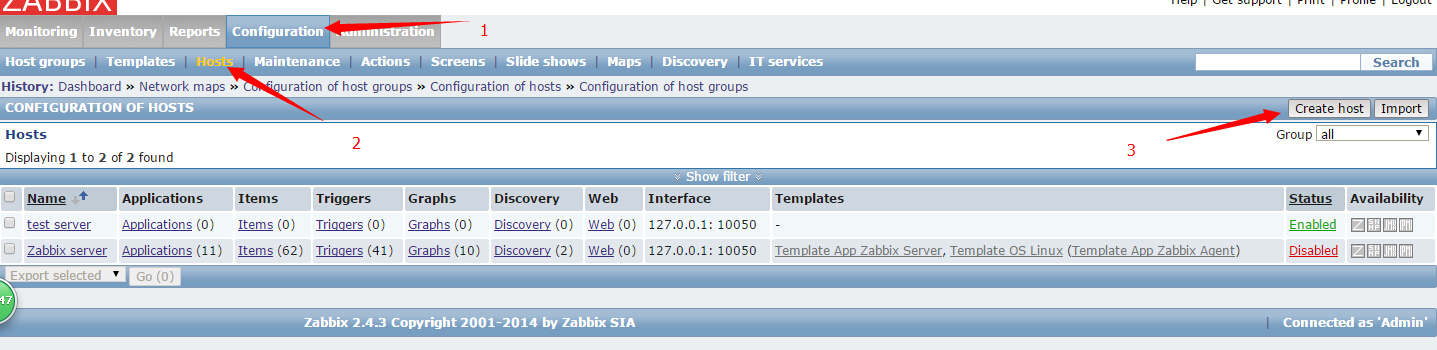
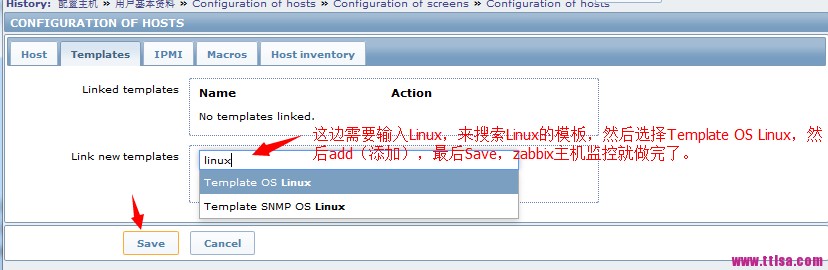
选择模板
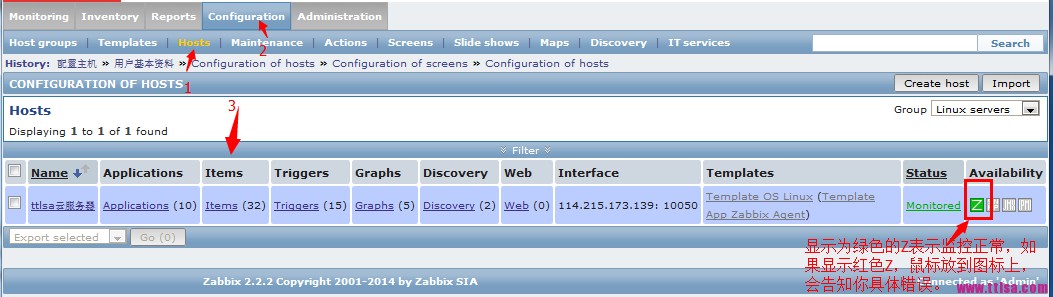
查看主机列表(绿色的Z表示成功的监控了这台客户端,如果是红色Z表示失败,此时将鼠标移动到红色Z上,会有具体的提示)
查看监控数据
最新数据:第一台主机添加完成之后,我们便可以查到最新的数据,例如cpu、内存、硬盘等情况

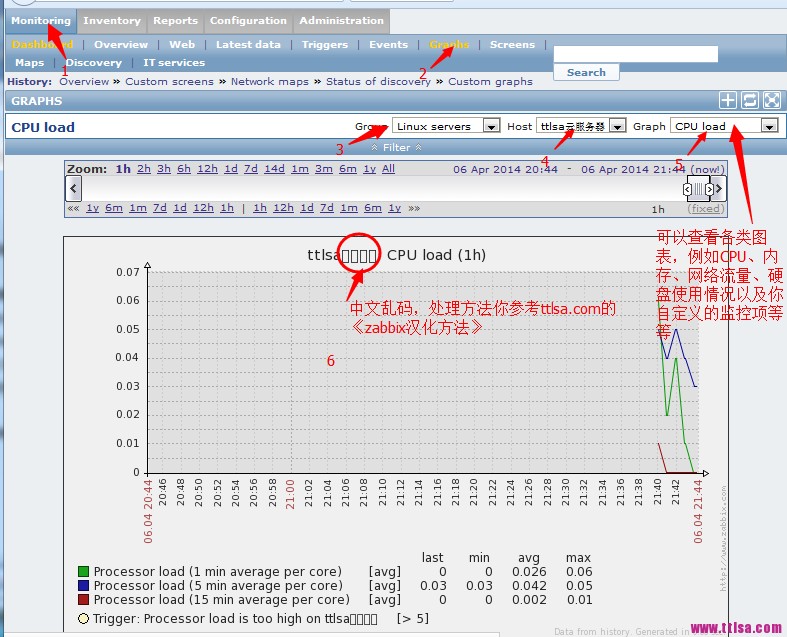
图表数据
模板Template OS Linux一共包含图表,查看方法如下图
监控MySQL性能
在/usr/local/zabbix创建一个文件夹scripts,并且创建一个脚本文件chk_mysql.sh,在该文件里写入以下code,将此文件给权限chmod +x chk_mysql.sh,chown zabbix:zabbix chk_mysql.sh
#!/bin/bash
# -------------------------------------------------------------------------------
# FileName:    check_mysql.sh
# Description:
# Notes:       ~
# -------------------------------------------------------------------------------

# 用户名
MYSQL_USER='zabbix'

# 密码
MYSQL_PWD='zabbix'

# 主机地址/IP
MYSQL_HOST='127.0.0.1'

# 端口
MYSQL_PORT='3306'

# 数据连接
MYSQL_CONN="/usr/bin/mysqladmin -u${MYSQL_USER} -p${MYSQL_PWD} -h${MYSQL_HOST} -P${MYSQL_PORT}"

# 参数是否正确
if [ $# -ne "1" ];then
    echo "arg error!"
fi

# 获取数据
case $1 in
    Uptime)
        result=`${MYSQL_CONN} status|cut -f2 -d":"|cut -f1 -d"T"`
        echo $result
        ;;
    Com_update)
        result=`${MYSQL_CONN} extended-status |grep -w "Com_update"|cut -d"|" -f3`
        echo $result
        ;;
    Slow_queries)
        result=`${MYSQL_CONN} status |cut -f5 -d":"|cut -f1 -d"O"`
        echo $result
        ;;
    Com_select)
        result=`${MYSQL_CONN} extended-status |grep -w "Com_select"|cut -d"|" -f3`
        echo $result
                ;;
    Com_rollback)
        result=`${MYSQL_CONN} extended-status |grep -w "Com_rollback"|cut -d"|" -f3`
                echo $result
                ;;
    Questions)
        result=`${MYSQL_CONN} status|cut -f4 -d":"|cut -f1 -d"S"`
                echo $result
                ;;
    Com_insert)
        result=`${MYSQL_CONN} extended-status |grep -w "Com_insert"|cut -d"|" -f3`
                echo $result
                ;;
    Com_delete)
        result=`${MYSQL_CONN} extended-status |grep -w "Com_delete"|cut -d"|" -f3`
                echo $result
                ;;
    Com_commit)
        result=`${MYSQL_CONN} extended-status |grep -w "Com_commit"|cut -d"|" -f3`
                echo $result
                ;;
    Bytes_sent)
        result=`${MYSQL_CONN} extended-status |grep -w "Bytes_sent" |cut -d"|" -f3`
                echo $result
                ;;
    Bytes_received)
        result=`${MYSQL_CONN} extended-status |grep -w "Bytes_received" |cut -d"|" -f3`
                echo $result
                ;;
    Com_begin)
        result=`${MYSQL_CONN} extended-status |grep -w "Com_begin"|cut -d"|" -f3`
                echo $result
                ;;

        *)
        echo "Usage:$0(Uptime|Com_update|Slow_queries|Com_select|Com_rollback|Questions|Com_insert|Com_delete|Com_commit|Bytes_sent|Bytes_received|Com_begin)"
        ;;
esac
修改zabbix_agentd.conf
增加自定义key,在最后一行增加如下:
# 获取mysql版本
UserParameter=mysql.version,mysql -V
# 获取mysql性能指标,这个是上面定义好的脚本
UserParameter=mysql.status[*],/usr/local/zabbix/scripts/chk_mysql.sh $1
# 获取mysql运行状态
UserParameter=mysql.ping,mysqladmin -uzabbix -pzabbix -P3306 -h127.0.0.1  ping | grep -c alive
# killall zabbix-agentd

# /usr/local/zabbix/bin/zabbix_agentd

或# service zabbix_agentd restart
模板是zabbix系统提供的,进入zabbix web后台,configuration-->hosts-->点击你的主机name-->选择template选项卡,选择模板"Template App MySQL",最后点击update即可
去监控图查看mysql显示 【no data】,然后去日志查看错误状态
tail /var/log/zabbix/zabbix_agentd.log
1266:20140523:063554.157 no active checks on server [127.0.0.1:10051]: host [zabbix.linuxidc.com] not found
cat /etc/zabbix/zabbix_agentd.conf | grep Hostname
### Option: Hostname
# Value is acquired from HostnameItem if undefined.
# Hostname=
Hostname=Zabbix server
### Option: HostnameItem
# Item used for generating Hostname if it is undefined. Ignored if Hostname is defined.
# HostnameItem=system.hostname
# Aliases can be used in HostMetadataItem but not in HostnameItem parameters.

在zabbix web页面Monitoring->Configuration->Hosts 页面更改Host name和zabbix_agentd.conf里面的Hostname一样。 然后重启,发现mysql有数据显示了
在主界面发现还有一个错误Lack of free swap space on Zabbix server
swap好像没有被监控
这种情况下,如果开启Zabbix监控,Zabbix将会报告系统缺少交换分区空间(“Lack of free swap space”)。这完全可以理解,因为按照正常的逻辑,一台物理服务器不可能不设置交换分区。显然,这样的设计没有考虑到云主机用户,但需要适当调整监控文件配置即可解决问题。
选择Configuration->Templates(模板),在模板界面中选择Template OS Linux右侧的Triggers(触发器),在触发器页面中打开Lack of free swap space on {HOST.NAME}项目,在新打开的触发器编辑页面中修改Expression(表达式)的内容,由原先的
{Template OS Linux:system.swap.size[,pfree].last(0)}<50
|
修改为
{Template OS Linux:system.swap.size[,pfree].last(0)}<50 and {Template OS Linux:system.swap.size[,free].last(0)}<>0
|
此处修改增加了“ and {Template OS Linux:system.swap.size[,free].last(0)}<>0”判断系统有交换空间,当系统无交换空间即{Template OS Linux:system.swap.size[,free].last(0)}的值为0时将不会时表达式不成立就不会触发错误提示。保存之后在下一个更新周期内Zabbix之前报告的“Lack of free swap space”问题就会被自动标记为Resolved(已解决)。
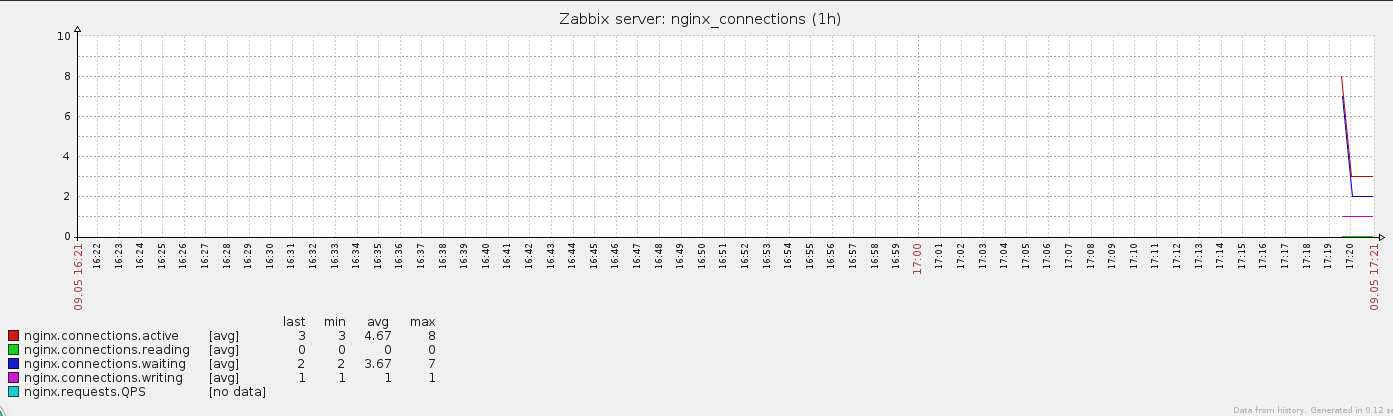
Zabbix监控nginx性能
nginx status信息
curl http://127.0.0.1/nginx_status
Active connections: 2
server accepts handled requests
 183 183 2471
Reading: 0 Writing: 1 Waiting: 1
编写客户端脚本nginx_status.sh
#!/bin/bash

source /etc/bashrc >/dev/null 2>&1
source /etc/profile  >/dev/null 2>&1
nginxstatus=http://127.0.0.1/nginx_status

# Functions to return nginx stats
function checkavailable {
    code=$(curl -o /dev/null -s -w %{http_code} ${nginxstatus})
    if [ "${code}" == "200" ]
    then
        return 1
    else
        echo  0
    fi
}
function active {
    checkavailable|| curl -s "${nginxstatus}" | grep 'Active' | awk '{print $3}'
}
function reading {
    checkavailable|| curl -s "${nginxstatus}" | grep 'Reading' | awk '{print $2}'
}
function writing {
    checkavailable|| curl -s "${nginxstatus}" | grep 'Writing' | awk '{print $4}'
}
function waiting {
    checkavailable|| curl -s "${nginxstatus}" | grep 'Waiting' | awk '{print $6}'
}
function accepts {
    checkavailable|| curl -s "${nginxstatus}" | awk NR==3 | awk '{print $1}'
}
function handled {
    checkavailable|| curl -s "${nginxstatus}" | awk NR==3 | awk '{print $2}'
}
function requests {
    checkavailable|| curl -s "${nginxstatus}" | awk NR==3 | awk '{print $3}'
}

case "$1" in
    active)
        active
        ;;
    reading)
        reading
        ;;
    writing)
        writing
        ;;
    waiting)
        waiting
        ;;
    accepts)
        accepts
        ;;
    handled)
        handled
        ;;
    requests)
        requests
        ;;
    *)
        echo "Usage: $0 {active |reading |writing |waiting |accepts |handled |requests }"
esac
将自定义的UserParameter加入配置文件,然后重启agentd
UserParameter=nginx.accepts,/usr/local/zabbix/scripts/nginx_status.sh accepts
UserParameter=nginx.handled,/usr/local/zabbix/scripts/nginx_status.sh handled
UserParameter=nginx.requests,/usr/local/zabbix/scripts/nginx_status.sh requests
UserParameter=nginx.connections.active,/usr/local/zabbix/scripts/nginx_status.sh active
UserParameter=nginx.connections.reading,/usr/local/zabbix/scripts/nginx_status.sh reading
UserParameter=nginx.connections.writing,/usr/local/zabbix/scripts/nginx_status.sh writing
UserParameter=nginx.connections.waiting,/usr/local/zabbix/scripts/nginx_status.sh waiting
导入Template App NGINX模板
https://github.com/itnihao/zabbix-templates-Prod/blob/master/templates/zbx_templates_App_Nginx.xml
监控php-fpm
添加用户参数,添加在zabbix_agentd.conf最后面即可!!!
UserParameter=phpfpm.status.pool,/usr/local/zabbix/scripts/check_phpfpm.sh pool
UserParameter=phpfpm.status.process.manager,/usr/local/zabbix/scripts/check_phpfpm.sh process_manager
UserParameter=phpfpm.status.start.since,/usr/local/zabbix/scripts/check_phpfpm.sh start_since
UserParameter=phpfpm.status.accepted.conn,/usr/local/zabbix/scripts/check_phpfpm.sh accepted_conn
UserParameter=phpfpm.status.listen.queue,/usr/local/zabbix/scripts/check_phpfpm.sh listen_queue
UserParameter=phpfpm.status.max.listen.queue,/usr/local/zabbix/scripts/check_phpfpm.sh max_listen_queue
UserParameter=phpfpm.status.listen.queue.len,/usr/local/zabbix/scripts/check_phpfpm.sh listen_queue_len
UserParameter=phpfpm.status.idle.processes,/usr/local/zabbix/scripts/check_phpfpm.sh idle_processes
UserParameter=phpfpm.status.active.processes,/usr/local/zabbix/scripts/check_phpfpm.sh active_processes
UserParameter=phpfpm.status.total.processes,/usr/local/zabbix/scripts/check_phpfpm.sh total_processes
UserParameter=phpfpm.status.max.active.processes,/usr/local/zabbix/scripts/check_phpfpm.sh max_active_processes
UserParameter=phpfpm.status.max.children.reached,/usr/local/zabbix/scripts/check_phpfpm.sh max_children_reached
然后编写脚本check_phpfpm.sh,给权限,改属主
#!/bin/bash

source /etc/bashrc >/dev/null 2>&1
source /etc/profile  >/dev/null 2>&1

LOG_FILE=/var/log/zabbix/phpfpmstatus.log
curl http://127.0.0.1/fpm_status.php >${LOG_FILE} 2>&1

pool(){
     awk '/pool/ {print $NF}' ${LOG_FILE}
}
process_manager() {
     awk '/process manager/ {print $NF}' ${LOG_FILE}
}

start_since(){
    awk '/^start since:/ {print $NF}' ${LOG_FILE}
}
accepted_conn(){
    awk '/^accepted conn:/ {print $NF}' ${LOG_FILE}
}
listen_queue(){
    awk '/^listen queue:/ {print $NF}' ${LOG_FILE}
}
max_listen_queue(){
    awk '/^max listen queue:/ {print $NF}' ${LOG_FILE}
}
listen_queue_len(){
    awk '/^listen queue len:/ {print $NF}' ${LOG_FILE}
}
idle_processes(){
    awk '/^idle processes:/ {print $NF}' ${LOG_FILE}
}
active_processes(){
    awk '/^active processes:/ {print $NF}' ${LOG_FILE}
}
total_processes(){
    awk '/^total processes:/ {print $NF}' ${LOG_FILE}
}
max_active_processes(){
    awk '/^max active processes:/ {print $NF}' ${LOG_FILE}
}
max_children_reached(){
    awk '/^max children reached:/ {print $NF}' ${LOG_FILE}
}


case "$1" in
pool)
    pool
    ;;
process_manager)
    process_manager
    ;;
start_since)
    start_since
    ;;
accepted_conn)
    accepted_conn
    ;;
listen_queue)
    listen_queue
    ;;
max_listen_queue)
    max_listen_queue
    ;;
listen_queue_len)
    listen_queue_len
    ;;
idle_processes)
    idle_processes
    ;;
active_processes)
    active_processes
    ;;
total_processes)
    total_processes
    ;;
max_active_processes)
    max_active_processes
    ;;
max_children_reached)
    max_children_reached
    ;;
*)
    echo "Usage: $0 {pool|process_manager|start_since|accepted_conn|listen_queue|max_listen_queue|listen_queue_len|idle_processes|active_processes|total_processes|max_active_processes|max_children_reached}"
esac
导入模板文件
https://github.com/itnihao/zabbix/blob/master/templates/zbx_templates_App_PHP_FPM.xml
发现错误,监控图显示php-fpm并没有数据显示