在iOS中,可以使用剪贴板实现应用程序之中以及应用程序之间实现数据的共享。比如你可以从iPhone QQ复制一个url,然后粘贴到safari浏览器中查看这个链接的内容。
概述
在iOS中下面三个控件,自身就有复制-粘贴的功能:
1、UITextView
2、UITextField
3、UIWebView
UIKit framework提供了几个类和协议方便我们在自己的应用程序中实现剪贴板的功能。
1、UIPasteboard:我们可以向其中写入数据,也可以读取数据
2、UIMenuController:显示一个快捷菜单,用来复制、剪贴、粘贴选择的项。
3、UIResponder中的 canPerformAction:withSender:用于控制哪些命令显示在快捷菜单中。
4、当快捷菜单上的命令点击的时候,UIResponderStandardEditActions将会被调用。
下面这些项能被放置到剪贴板中
1、UIPasteboardTypeListString — 字符串数组, 包含kUTTypeUTF8PlainText
2、UIPasteboardTypeListURL — URL数组,包含kUTTypeURL
3、UIPasteboardTypeListImage — 图形数组, 包含kUTTypePNG 和kUTTypeJPEG
4、UIPasteboardTypeListColor — 颜色数组
剪贴板的类型分为两种:
系统级:使用UIPasteboardNameGeneral和UIPasteboardNameFind,系统级应用程序关闭,或者卸载的数据不会丢失。
应用程序级:通过设置,可以让数据在应用程序关闭之后仍然保存在剪贴板中,但是应用程序卸载之后数据就会失去。我们可用通过pasteboardWithName:create:来创建。
了解这些之后,下面通过一系列的例子来说明如何在应用程序中使用剪贴板。
例子:
一、复制剪贴文本。
下面通过一个例子,可以在tableview上显示一个快捷菜单,上面只有复制按钮,复制tableview上的数据之后,然后粘贴到title上。
定义一个单元格类CopyTableViewCell,在这个类的上显示快捷菜单,实现复制功能。


1  @interface CopyTableViewCell : UITableViewCell {
2     id delegate;
3 }
4 @property (nonatomic, retain) id delegate;
5 @end
实现CopyTableViewCell ,实现粘贴:
 1 #import "CopyTableViewCell.h"
 2
 3 @implementation CopyTableViewCell
 4
 5 @synthesize delegate;
 6
 7 - (id)initWithStyle:(UITableViewCellStyle)style reuseIdentifier:(NSString *)reuseIdentifier {
 8     if ((self = [super initWithStyle:style reuseIdentifier:reuseIdentifier])) {
 9     }
10     return self;
11 }
12 - (void)setSelected:(BOOL)selected animated:(BOOL)animated {
13     [super setSelected:selected animated:animated];
14 }
15 - (void)setHighlighted:(BOOL)highlighted animated:(BOOL)animated {
16     [[self delegate] performSelector:@selector(showMenu:)
17                           withObject:self afterDelay:0.9f];
18
19     [super setHighlighted:highlighted animated:animated];
20
21 }
22 - (BOOL)canBecomeFirstResponder
23 {
24     return YES;
25 }
26 - (BOOL)canPerformAction:(SEL)action withSender:(id)sender{
27     if (action == @selector(cut:)){
28         return NO;
29     }
30     else if(action == @selector(copy:)){
31         return YES;
32     }
33     else if(action == @selector(paste:)){
34         return NO;
35     }
36     else if(action == @selector(select:)){
37         return NO;
38     }
39     else if(action == @selector(selectAll:)){
40         return NO;
41     }
42     else
43     {
44         return [super canPerformAction:action withSender:sender];
45     }
46 }
47 - (void)copy:(id)sender {
48     UIPasteboard *pasteboard = [UIPasteboard generalPasteboard];
49     [pasteboard setString:[[self textLabel]text]];
50 }
51 - (void)dealloc {
52     [super dealloc];
53 }
54 @end
定义CopyPasteTextController
 1     @interface CopyPasteTextController : UIViewController<UITableViewDelegate> {
 2         //用来标识是否显示快捷菜单
 3         BOOL menuVisible;
 4         UITableView *tableView;
 5     }
 6
 7     @property (nonatomic, getter=isMenuVisible) BOOL menuVisible;
 8
 9     @property (nonatomic, retain) IBOutlet UITableView *tableView;
10     @end
实现CopyPasteTextController :
 1 #import "CopyPasteTextController.h"
 2 #import "CopyTableViewCell.h"
 3
 4 @implementation CopyPasteTextController
 5 @synthesize menuVisible,tableView;
 6 - (void)viewDidLoad {
 7     [super viewDidLoad];
 8     [self setTitle:@"文字复制粘贴"];
 9     //点击这个按钮将剪贴板的内容粘贴到title上
10     UIBarButtonItem *addButton = [[[UIBarButtonItem alloc]
11                                       initWithBarButtonSystemItem:UIBarButtonSystemItemRefresh
12                                       target:self
13                                       action:@selector(readFromPasteboard:)]
14                                      autorelease];
15     [[self navigationItem] setRightBarButtonItem:addButton];
16 }
17
18
19 // Customize the number of sections in the table view.
20 - (NSInteger)numberOfSectionsInTableView:(UITableView *)tableView
21 {
22     return 1;
23 }
24
25 - (NSInteger)tableView:(UITableView *)tableView numberOfRowsInSection:(NSInteger)section
26 {
27     return 9;
28 }
29
30 // Customize the appearance of table view cells.
31 - (UITableViewCell *)tableView:(UITableView *)tableView cellForRowAtIndexPath:(NSIndexPath *)indexPath
32 {
33     static NSString *CellIdentifier =@"Cell";
34     CopyTableViewCell *cell = (CopyTableViewCell *)[tableView
35                                                            dequeueReusableCellWithIdentifier:CellIdentifier];
36     if (cell == nil)
37     {
38         cell = [[[CopyTableViewCell alloc] initWithStyle:UITableViewCellStyleDefault reuseIdentifier:CellIdentifier] autorelease];
39         [cell setDelegate:self];
40     }
41
42     // Configure the cell.
43     NSString *text = [NSString stringWithFormat:@"Row %d", [indexPath row]];
44     [[cell textLabel] setText:text];
45     return cell;
46 }
47
48 - (void)tableView:(UITableView *)tableView didSelectRowAtIndexPath:(NSIndexPath *)indexPath
49 {
50     if([self isMenuVisible])
51     {
52         return;
53     }
54     [[[self tableView] cellForRowAtIndexPath:indexPath] setSelected:YES
55                                                            animated:YES];
56 }
57 //显示菜单
58 - (void)showMenu:(id)cell {
59     if ([cell isHighlighted]) {
60         [cell becomeFirstResponder];
61
62         UIMenuController * menu = [UIMenuController sharedMenuController];
63         [menu setTargetRect: [cell frame] inView: [self view]];
64         [menu setMenuVisible: YES animated: YES];
65     }
66 }
67 - (void)readFromPasteboard:(id)sender {
68     [self setTitle:[NSString stringWithFormat:@"Pasteboard = %@",
69                       [[UIPasteboard generalPasteboard] string]]];
70 }
71
72 - (void)didReceiveMemoryWarning
73 {
74     // Releases the view if it doesn't have a superview.
75     [super didReceiveMemoryWarning];
76
77     // Relinquish ownership any cached data, images, etc that aren't in use.
78 }
79
80 - (void)viewDidUnload
81 {
82     [super viewDidUnload];
83     [self.tableView release];
84
85     // Relinquish ownership of anything that can be recreated in viewDidLoad or on demand.
86     // For example: self.myOutlet = nil;
87 }
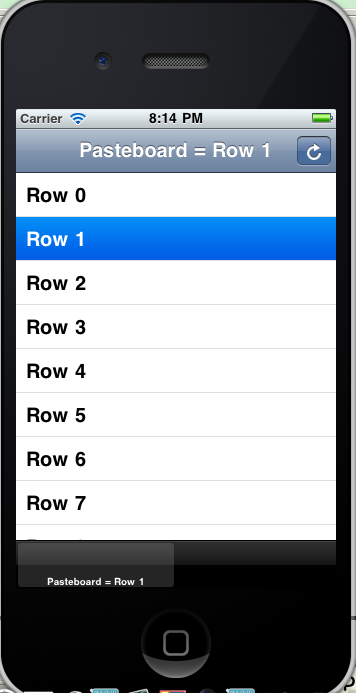
效果:
复制一行数据:
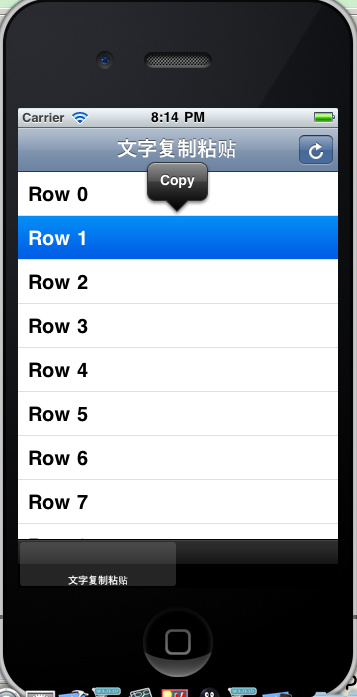
点击右上角的按钮粘贴,将数据显示在title上:
二、图片复制粘贴
下面通过一个例子,将图片复制和剪贴到另外一个UIImageView中间。
1、在界面上放置两个uiimageview,一个是图片的数据源,一个是将图片粘贴到的地方。CopyPasteImageViewController 代码如下:
 1 @interface CopyPasteImageViewController : UIViewController {
 2     UIImageView *imageView;
 3     UIImageView *pasteView;
 4     UIImageView *selectedView;
 5 }
 6 @property (nonatomic, retain) IBOutlet UIImageView *imageView;
 7 @property (nonatomic, retain) IBOutlet UIImageView *pasteView;
 8 @property (nonatomic, retain) UIImageView *selectedView;
 9 - (void)placeImageOnPasteboard:(id)view;
10 @end
2、当触摸图片的时候我们显示快捷菜单:
 1 - (void)touchesBegan:(NSSet*)touches withEvent:(UIEvent*)event {
 2     NSSet *copyTouches = [event touchesForView:imageView];
 3     NSSet *pasteTouches = [event touchesForView:pasteView];
 4
 5     [self becomeFirstResponder];
 6     if ([copyTouches count] > 0) {
 7         [self performSelector:@selector(showMenu:)
 8                    withObject:imageView afterDelay:0.9f];
 9     }
10     else  if([pasteTouches count] > 0) {
11         [self performSelector:@selector(showMenu:)
12                    withObject:pasteView afterDelay:0.9f];
13     }
14     [super touchesBegan:touches withEvent:event];
15 }
16
17 - (void)showMenu:(id)view {
18     [self setSelectedView:view];
19
20     UIMenuController * menu = [UIMenuController sharedMenuController];
21     [menu setTargetRect: CGRectMake(5, 10, 1, 1) inView: view];
22     [menu setMenuVisible: YES animated: YES];
23 }
这里的快捷菜单,显示三个菜单项:剪贴、粘贴、复制:
 1     - (BOOL)canPerformAction:(SEL)action withSender:(id)sender{
 2         if (action == @selector(cut:)) {
 3             return ([self selectedView] == imageView) ? YES : NO;
 4         } else if (action == @selector(copy:)) {
 5             return ([self selectedView] == imageView) ? YES : NO;
 6         } else if (action == @selector(paste:)) {
 7             return ([self selectedView] == pasteView) ? YES : NO;
 8         } else if (action == @selector(select:)) {
 9             return NO;
10         } else if (action == @selector(selectAll:)) {
11             return NO;
12         } else {
13             return [super canPerformAction:action withSender:sender];
14         }
15     }
16     - (void)cut:(id)sender {
17         [self copy:sender];
18         [imageView setHidden:YES];
19     }
20     - (void)copy:(id)sender {
21         [self placeImageOnPasteboard:[self imageView]];
22     }
23     - (void)paste:(id)sender {
24         UIPasteboard *appPasteBoard =
25         [UIPasteboard pasteboardWithName:@"CopyPasteImage" create:YES];
26         NSData *data =[appPasteBoard dataForPasteboardType:@"com.marizack.CopyPasteImage.imageView"];
27         pasteView.image = [UIImage imageWithData:data];
28     }
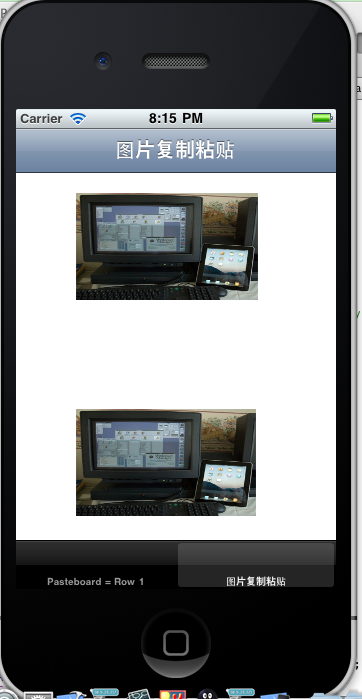
效果:
1、点击图片,显示菜单按钮。

2、点击复制,将数据复制到剪贴板上:

3、点击粘贴,将数据粘贴到uiimageview上。
总结:
本文详解了iOS系统应用程序中如何使用剪贴板。
转自:http://blog.csdn.net/zhuqilin0/article/details/6661044