ImageAI是一个python库,旨在使开发人员能够使用简单的几行代码构建具有包含深度学习和计算机视觉功能的应用程序和系统。 这个 AI Commons 项目https://commons.specpal.science 由 Moses Olafenwa 和 John Olafenwa 开发和维护。为了更好的使用 ImageAI,我将其 Fork 到 CodeXZone/ImageAI。同时,ImageAI 也提供了中文手册:imageai。下面我将借助该教程一步一步的学习目标检测。
利用 cocoz 载入 COCO 数据集
首先,利用 cocoz 载入 COCOZ:
import sys
# 将 cocoapi 添加进入环境变量
sys.path.append(r'D:APIcocoapiPythonAPI')
from pycocotools.cocoz import AnnZ, ImageZ, COCOZ
# ------------------

import numpy as np
from matplotlib import pyplot as plt
from IPython import display


def use_svg_display():
    # 用矢量图显示, 效果更好
    display.set_matplotlib_formats('svg')


def show_imgs(imgs, k=4):
    '''
    展示 多张图片
    '''
    n = len(imgs)
    h, w = k, n // k
    assert n == h * w, "图片数量不匹配"
    use_svg_display()
    _, ax = plt.subplots(h, w, figsize=(5, 5))  # 设置图的尺寸
    K = np.arange(n).reshape((h, w))
    for i in range(h):
        for j in range(w):
            img = imgs[K[i, j]]
            ax[i][j].imshow(img)
            ax[i][j].axes.get_yaxis().set_visible(False)
            ax[i][j].set_xticks([])
    plt.show()
dataDir = r'E:Datacocoimages'   # COCO 数据根目录
dataType = 'train2017'
imgZ = ImageZ(dataDir, dataType)

show_imgs(imgZ[300:316])

物体检测,提取和微调
import sys
sys.path.append('D:/API/ImageAI')

from imageai.Detection import ObjectDetection
import os

execution_path = os.getcwd()

detector = ObjectDetection()  # 创建目标检测实例
detector.setModelTypeAsRetinaNet()
detector.setModelPath(
    os.path.join(execution_path, "resnet50_coco_best_v2.0.1.h5"))
detector.loadModel()  # 载入预训练模型
由于 detector.detectObjectsFromImage 比较容易支持解压后的图片,所以我们可以提取出一张图片来做测试:
input_image = imgZ.Z.extract(imgZ.names[0]) # 输入文件的路径
output_image = os.path.join(execution_path, "image2new.jpg")  # 输出文件的路径

detections = detector.detectObjectsFromImage(
    input_image=input_image, output_image_path=output_image)

for eachObject in detections:
    print(eachObject["name"] + " : ", eachObject["percentage_probability"])
    print("--------------------------------")
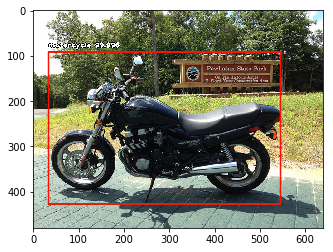
motorcycle :  99.99607801437378
--------------------------------
detectObjectsFromImage() 函数返回一个字典列表,每个字典包含图像中检测到的对象信息,字典中的对象信息有 name(对象类名)和 percentage_probability(概率)以及 box_points(图片的左上角与右下角的坐标)。
detections
[{'name': 'motorcycle',
  'percentage_probability': 99.99607801437378,
  'box_points': array([ 34,  92, 546, 427])}]
下面我们看看其标注框:
img = plt.imread(output_image)
plt.imshow(img)
plt.show()
为了直接使用压缩文件,我们可以修改 detectObjectsFromImage 的默认参数 input_type='file' 为 input_type='array':
input_image = imgZ[202]  # 输入文件的路径
output_image = os.path.join(execution_path, "image2.jpg")  # 输出文件的路径

detections = detector.detectObjectsFromImage(
    input_image=input_image, output_image_path=output_image, input_type='array')

for eachObject in detections:
    print(eachObject["name"] + " : ", eachObject["percentage_probability"])
    print("--------------------------------")

img = plt.imread(output_image)
plt.imshow(img)
plt.show()
tennis racket :  54.25310730934143
--------------------------------
person :  99.85058307647705
--------------------------------

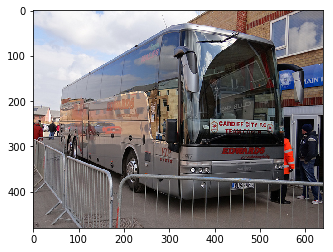
detections, objects_path = detector.detectObjectsFromImage(
    input_image=imgZ[900], input_type = 'array',
    output_image_path=os.path.join(execution_path, "image3new.jpg"),
    extract_detected_objects=True)

for eachObject, eachObjectPath in zip(detections, objects_path):
    print(eachObject["name"] + " : ", eachObject["percentage_probability"])
    print("Object's image saved in ", eachObjectPath)
    print("--------------------------------")
person :  56.35678172111511
Object's image saved in  D:APICVXdraftimage3new.jpg-objectsperson-1.jpg
--------------------------------
person :  75.83483457565308
Object's image saved in  D:APICVXdraftimage3new.jpg-objectsperson-2.jpg
--------------------------------
person :  60.49004793167114
Object's image saved in  D:APICVXdraftimage3new.jpg-objectsperson-3.jpg
--------------------------------
person :  85.2730393409729
Object's image saved in  D:APICVXdraftimage3new.jpg-objectsperson-4.jpg
--------------------------------
person :  83.12703967094421
Object's image saved in  D:APICVXdraftimage3new.jpg-objectsperson-5.jpg
--------------------------------
bus :  99.7751772403717
Object's image saved in  D:APICVXdraftimage3new.jpg-objectsus-6.jpg
--------------------------------
extract_detected_objects=True 将会把检测到的对象提取并保存为单独的图像;这将使函数返回 2 个值,第一个是字典数组,每个字典对应一个检测到的对象信息,第二个是所有提取出对象的图像保存路径,并且它们按照对象在第一个数组中的顺序排列。我们先看看原图:
plt.imshow(imgZ[900])
plt.show()
显示识别出来的对象:
show_imgs([plt.imread(fname) for fname in objects_path], 2)

还有一个十分重要的参数 minimum_percentage_probability 用于设定预测概率的阈值,其默认值为 50(范围在 (0-100)之间)。如果保持默认值,这意味着只有当百分比概率大于等于 50 时,该函数才会返回检测到的对象。使用默认值可以确保检测结果的完整性,但是在检测过程中可能会跳过许多对象。下面我们看看修改后的效果:
detections = detector.detectObjectsFromImage(
    input_image=imgZ[900],
    input_type='array',
    output_image_path=os.path.join(execution_path, "image3new.jpg"),
    minimum_percentage_probability=70)

for eachObject in detections:
    print(eachObject["name"] + " : ", eachObject["percentage_probability"])
    print("--------------------------------")
person :  75.83483457565308
--------------------------------
person :  85.2730393409729
--------------------------------
person :  83.12703967094421
--------------------------------
bus :  99.7751772403717
--------------------------------
我们将 minimum_percentage_probability 设置为 70,此时仅仅只能检测到 4 个。