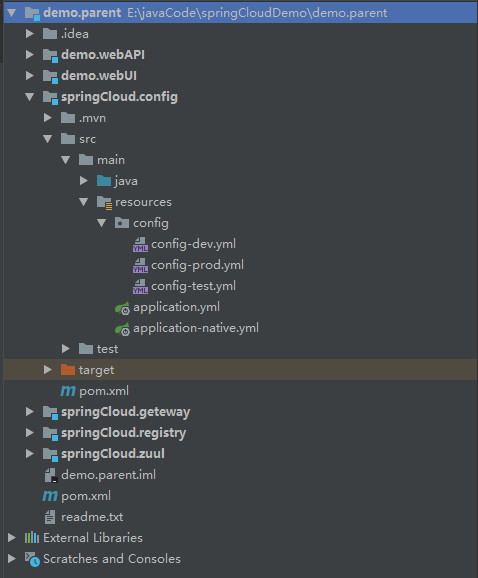
首先来说明本教程中使用二种网关(zuul与getway,选其中一种即可) 项目结构如下 ,最后会附上整个教程代码提供下载
demo.parent
    springCloud.registry    808 注册中心        http://localhost:808/
    springCloud.config      809 配置中心
    springCloud.zuul        800 路由网关(zuul)   直接访问zuul网关 http://localhost:800/test/page2
    springCloud.geteway 801 路由网关(getway)     直接访问geteway网关 http://localhost:801/test/page2
    demo.webUI              805 系统webUI        http://localhost:805/testUI/page2
                                                通过zuul: http://localhost:800/webui/testUI/page2
                                                通过geteway: http://localhost:801/webui/testUI/page2
    demo.webAPI             806 系统WebAPI       http://localhost:806/testAPI/page2
                                                通过zuul: http://localhost:800/webapi/testAPI/page2
                                                通过geteway: http://localhost:801/webapi/testAPI/page2
    ...........             可以添加更多的微服务
先来一张整个项目架构截图
一.创建父项目
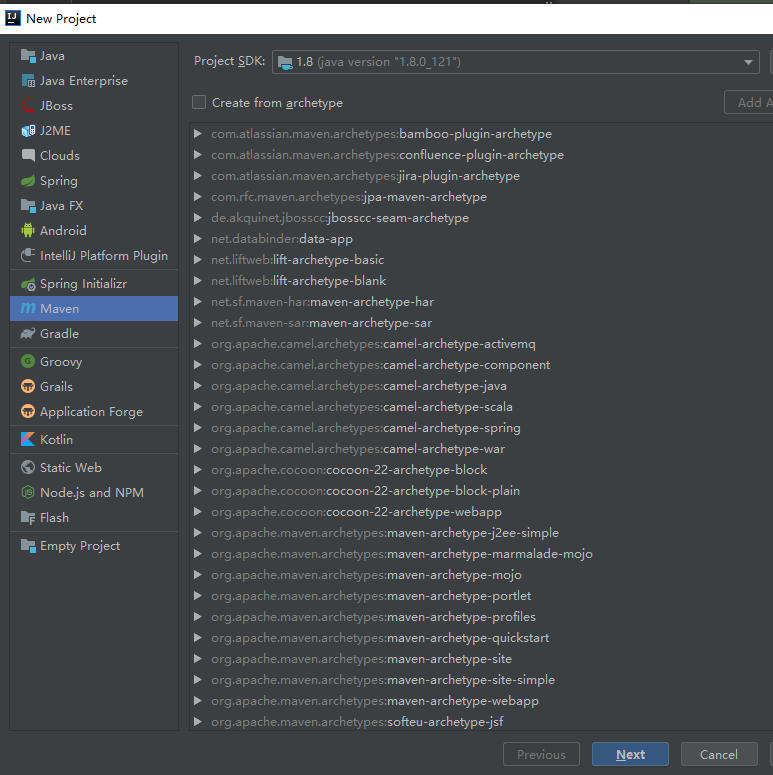
1。点菜单file->new Project 选Maven ,直接点Next
2.输入GroupId和artifactid,点Next

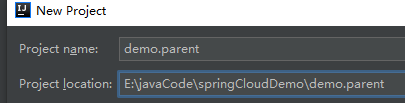
3.输入项目名称,和存放目录点Finish
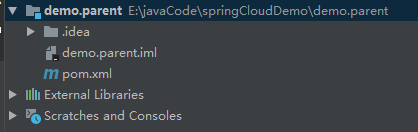
4.新建完成后删除src目录和其他无关文件,只保留pom.xml与.iml文件,如下图
6.修改父项目pom.xml文件:
说明:springboot2.4以上不支持zuul,这里用了spring boot2.3.6,后面所有项目都需要使用Module, 如果你用getway的话可以用最新版本(2.4及以上)
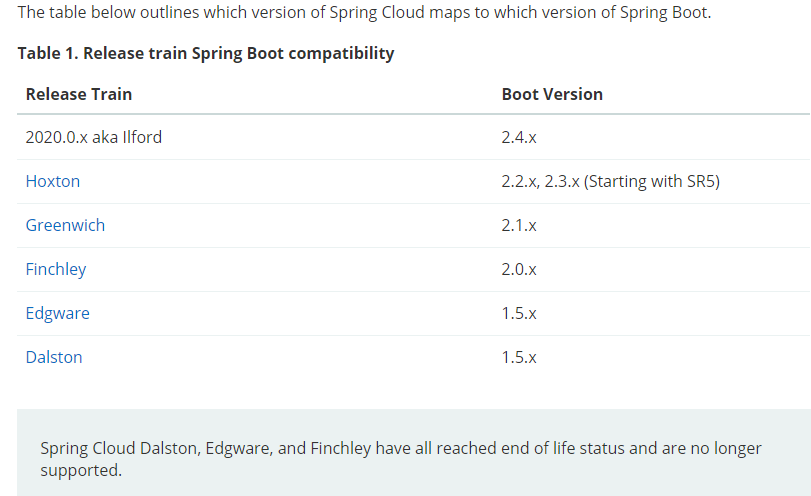
再次说明:Spring Boot版本与Spring Cloud版本有对应关系,否则你的项目会启动不了,对应参考:https://spring.io/projects/spring-cloud
修改pom.xml文件内容如下(注意修改springboot与spring cloud版本对应,注意把version改为1.0)
<?xml version="1.0" encoding="UTF-8"?>
<project xmlns="http://maven.apache.org/POM/4.0.0"
         xmlns:xsi="http://www.w3.org/2001/XMLSchema-instance"
         xsi:schemaLocation="http://maven.apache.org/POM/4.0.0 http://maven.apache.org/xsd/maven-4.0.0.xsd">
    <modelVersion>4.0.0</modelVersion>
    <parent>
        <groupId>org.springframework.boot</groupId>
        <artifactId>spring-boot-starter-parent</artifactId>
        <version>2.3.6.RELEASE</version>
        <relativePath/> <!-- lookup parent from repository -->
    </parent>
    <groupId>com.example</groupId>
    <artifactId>demo</artifactId>
    <version>1.0</version>
    <packaging>pom</packaging>

    <properties>
        <java.version>1.8</java.version>
        <spring-cloud.version>Hoxton.SR9</spring-cloud.version>
    </properties>

    <dependencyManagement>
        <dependencies>
            <dependency>
                <groupId>org.springframework.cloud</groupId>
                <artifactId>spring-cloud-dependencies</artifactId>
                <version>${spring-cloud.version}</version>
                <type>pom</type>
                <scope>import</scope>
            </dependency>
        </dependencies>
    </dependencyManagement>

</project>
二.注册中心 springCloud.registry (eureka)
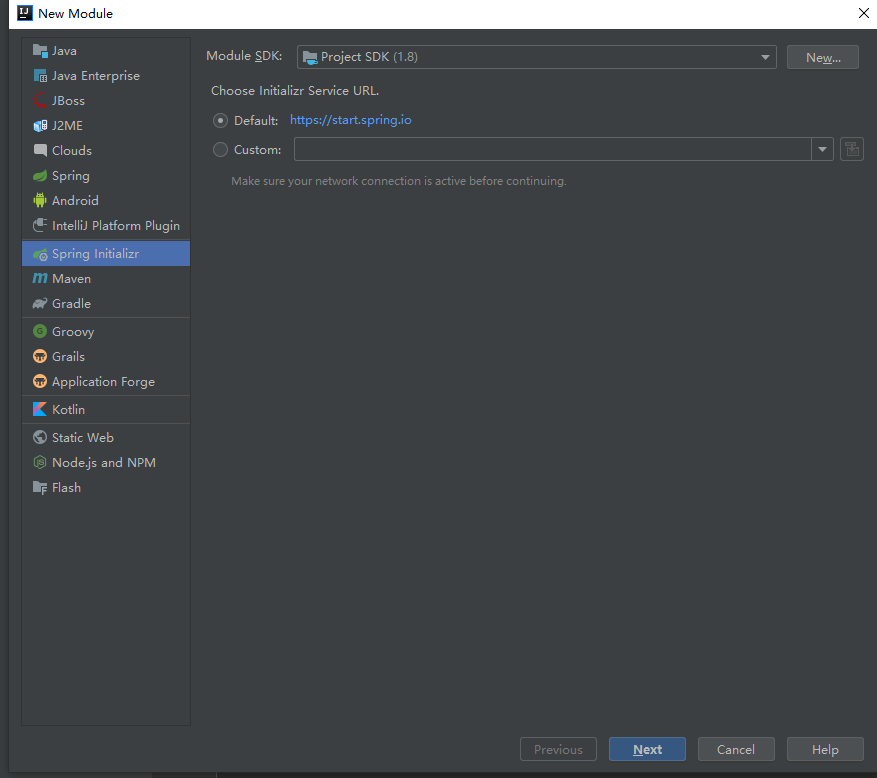
1.右击项目名称-new->Module

2.选“Spring Initializr" 点Next
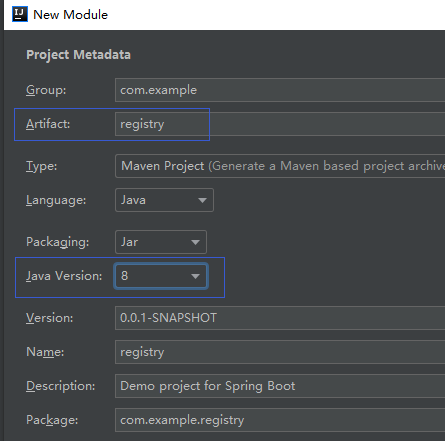
3.输入Module名称,注意把java版本改为1.8
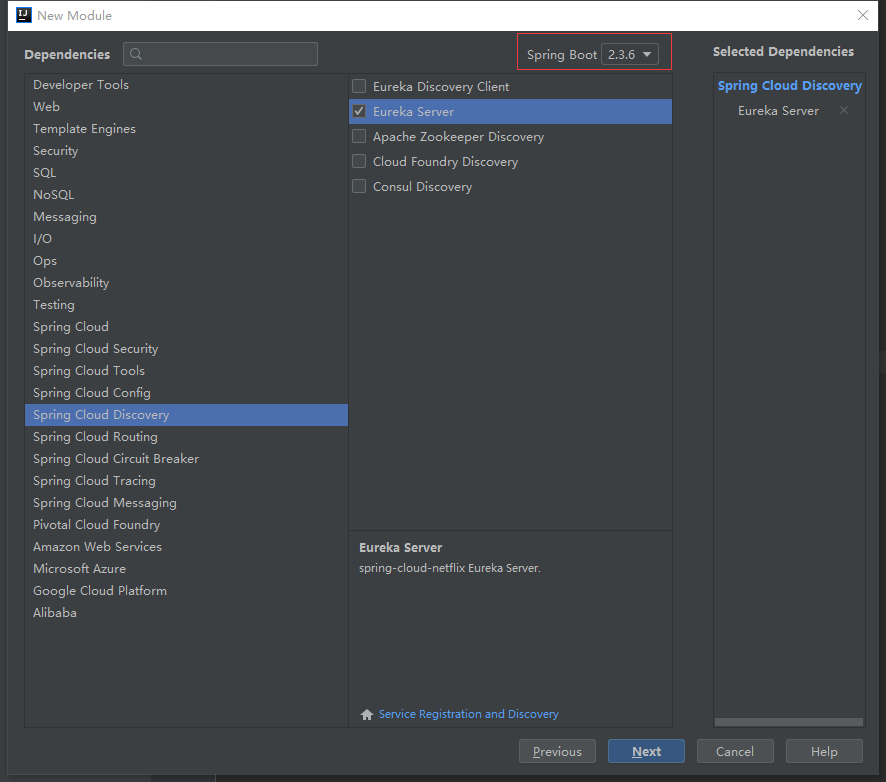
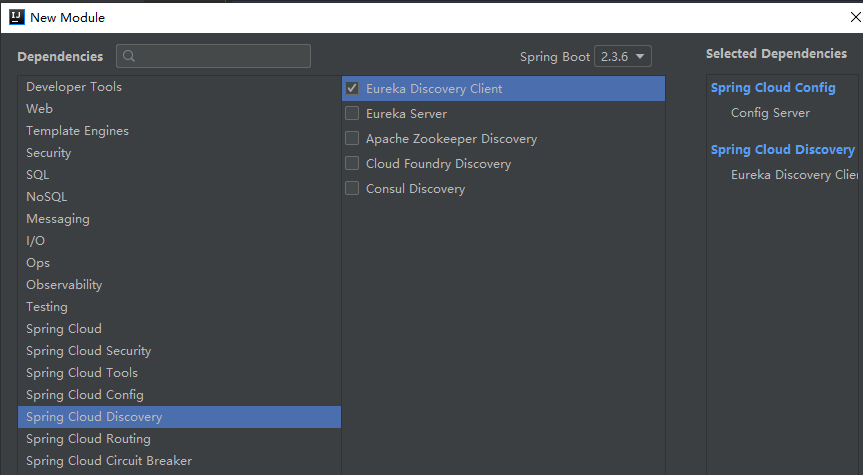
3.选中Spring Cloud Discovery-> 勾选Eureka Server (这是注册服务发现的框架) ,Spring Boot注意改为2.3.6 点Next
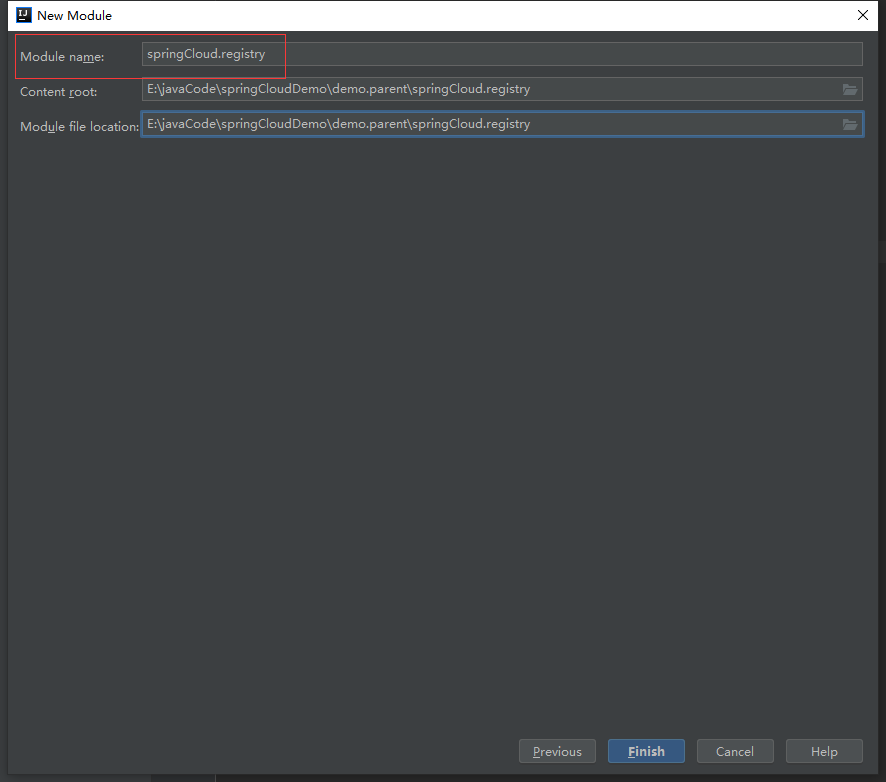
4.输入Module name:
4.给注册中心的sringboot启动类添加注解 @EnableEurekaServer

修改项目编码格式 File->setting->editor 中全改为UTF-8,否则后面新建yml文件格式可能会有问题

5.注册中心 删除resources/application.properties 新建application.yml 内容如下
server:
  port: 808 #注册中心端口
eureka:
  server:
    enable-self-preservation: false  # 设为false,关闭自我保护,会清理无效节点
    eviction-interval-timer-in-ms: 30000  # 清理无效节点间隔时间(单位毫秒,默认是60*1000)
  instance:
    hostname: 127.0.0.1
    preferIpAddress: true
  client:
    registerWithEureka: false
    fetchRegistry: false
    serviceUrl:
      defaultZone: http://${eureka.instance.hostname}:${server.port}/eureka/
6.修改注册中心的的pom文件(修改parent结点为父项目,删除properties结点,删除dependencyManagement结点(因为父项目已经引用))内容如下:
<?xml version="1.0" encoding="UTF-8"?>
<project xmlns="http://maven.apache.org/POM/4.0.0" xmlns:xsi="http://www.w3.org/2001/XMLSchema-instance"
         xsi:schemaLocation="http://maven.apache.org/POM/4.0.0 https://maven.apache.org/xsd/maven-4.0.0.xsd">
    <modelVersion>4.0.0</modelVersion>
    <parent>
        <groupId>com.example</groupId>
        <artifactId>demo</artifactId>
        <version>1.0</version>
    </parent>
    <groupId>com.example</groupId>
    <artifactId>registry</artifactId>
    <version>0.0.1-SNAPSHOT</version>
    <name>registry</name>
    <description>Demo project for Spring Boot</description>

    <dependencies>
        <dependency>
            <groupId>org.springframework.cloud</groupId>
            <artifactId>spring-cloud-starter-netflix-eureka-server</artifactId>
        </dependency>

        <dependency>
            <groupId>org.springframework.boot</groupId>
            <artifactId>spring-boot-starter-test</artifactId>
            <scope>test</scope>
            <exclusions>
                <exclusion>
                    <groupId>org.junit.vintage</groupId>
                    <artifactId>junit-vintage-engine</artifactId>
                </exclusion>
            </exclusions>
        </dependency>
    </dependencies>


    <build>
        <plugins>
            <plugin>
                <groupId>org.springframework.boot</groupId>
                <artifactId>spring-boot-maven-plugin</artifactId>
            </plugin>
        </plugins>
    </build>

</project>
注册中心项目结构如下:

7。启动注册中心是否成功

启动日志如下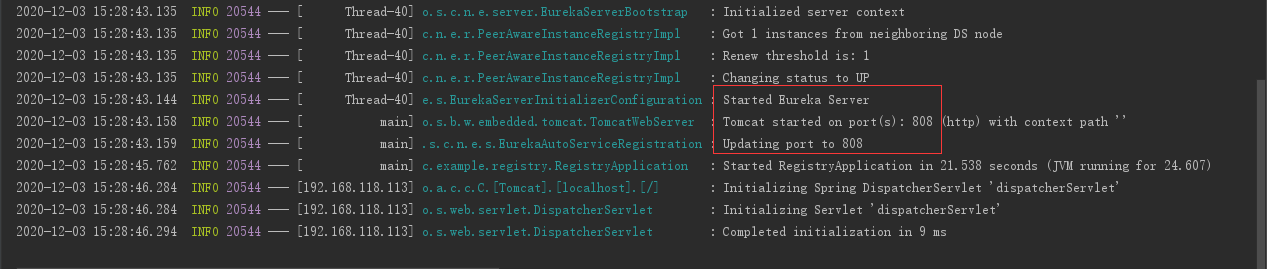
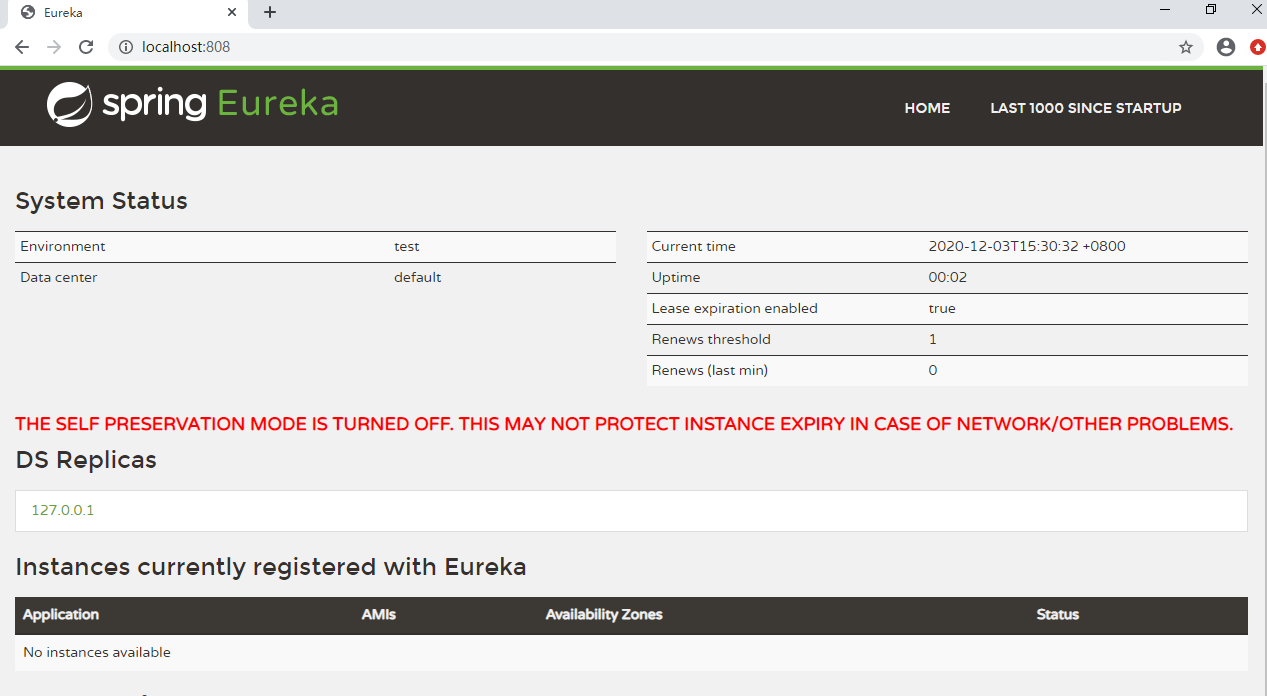
在浏览器访问:http://localhost:808/ 得到如下图 表示注册中心启动成功
三.配置中心 springCloud.config
1.前面过程与第二步一样,在选模块需要
勾选 Spring Cloud Cofnig 中的 Config Server
勾选 Spring Cloud Discovery 中的 Eureka Discovery Client
记得Spring Boot版本为2.3.6

2.给配置中心的spring boot启动类添加二个注解如下图
@EnableConfigServer
@EnableEurekaClient
3. 删除resources/application.properties 新建application.yml 内容如下
spring:
  profiles:
    active: native
  application:
    name: springCloud.config

server:
  port: 809 #配置中心端口

eureka:
  client:
    serviceUrl:
      defaultZone: http://${host:localhost}:808/eureka/
    registry-fetch-interval-seconds: 5 # 拉取服务注册信息间隔时间 (默认为30秒)
  instance:
    lease-expiration-duration-in-seconds: 60  # 注册中心超过这个时间没收到心跳,会视为无效节点(默认为90秒)
    lease-renewal-interval-in-seconds: 30  # 发送心跳间隔时间(默认30秒)
    preferIpAddress: true
    instanceId: ${spring.cloud.client.ip-address}:${server.port}
4.在resources目录下添加application-native.yml文件,内容如下:
spring:
  cloud:
    config:
      server:
        native:
          searchLocations: classpath:/config/
5.配置中心目录结构如下,添加config目录,依次添加
config-dev.yml 开发环境的配置文件
config-prod.yml 生产环境的配置文件
config-test.yml 测试环境的配置文件

以下是config-dev.yml文件内容,其他几个文件内容完全一样,可根据要求修改参数即可
############开发环境配置文件###################

registry:
   url: http://${host:localhost}:808/eureka/  #注册中心的地址与端口,方便给其他微服务的配置使用

## spring配置
spring:
    datasource: #数据库配置
        url: jdbc:mysql://127.0.0.1:3306/testdb?useUnicode=true&characterEncoding=utf-8&autoReconnect=true&autoReconnectForPools=true&noAccessToProcedureBodies=true&testOnBorrow=true&validationQuery=select 1
        username: root
        password: password
    jpa:
       generate-ddl: false
       hibernate:
          ddl-auto: none
          naming:
            physical-strategy: org.hibernate.boot.model.naming.PhysicalNamingStrategyStandardImpl
       database: mysql
       show-sql: false
    resources:
       chain:
          strategy:
             content:
                enabled: true
                paths: /**
    redis: ## Redis配置
       host: 127.0.0.1
       port: 6379
       password: password
       database: 15
       pool:
          max-active: 100
          min-idle: 2
          max-idle: 2
          max-wait: 500

#druid connect pool
db:
  druid:
     url: ${spring.datasource.url}
     username: ${spring.datasource.username}
     password: ${spring.datasource.password}
     filters: stat,wall
     max-active: 60
     initial-size: 10
     max-wait: 60000
     min-idle: 10
     time-between-eviction-runs-millis: 600000
     min-evictable-idle-time-millis: 300000
     test-while-idle: true
     test-on-borrow: false
     test-on-return: false
     pool-prepared-statements: false
     max-open-prepared-statements: 20

# 自定义配置
sysconfig:
  isDebug: true  #是否Debug
  swagger: true  #开启swagger
6.修改pom文件(修改parent结点为父项目,删除dependencyManagement结点(因为父项目已经引用))内容如下:
<?xml version="1.0" encoding="UTF-8"?>
<project xmlns="http://maven.apache.org/POM/4.0.0" xmlns:xsi="http://www.w3.org/2001/XMLSchema-instance"
         xsi:schemaLocation="http://maven.apache.org/POM/4.0.0 https://maven.apache.org/xsd/maven-4.0.0.xsd">
    <modelVersion>4.0.0</modelVersion>
    <parent>
        <groupId>com.example</groupId>
        <artifactId>demo</artifactId>
        <version>1.0</version>
    </parent>
    <groupId>com.example</groupId>
    <artifactId>config</artifactId>
    <version>0.0.1-SNAPSHOT</version>
    <name>config</name>
    <description>Demo project for Spring Boot</description>

    <dependencies>
        <dependency>
            <groupId>org.springframework.cloud</groupId>
            <artifactId>spring-cloud-config-server</artifactId>
        </dependency>
        <dependency>
            <groupId>org.springframework.cloud</groupId>
            <artifactId>spring-cloud-starter-netflix-eureka-client</artifactId>
        </dependency>

        <dependency>
            <groupId>org.springframework.boot</groupId>
            <artifactId>spring-boot-starter-test</artifactId>
            <scope>test</scope>
            <exclusions>
                <exclusion>
                    <groupId>org.junit.vintage</groupId>
                    <artifactId>junit-vintage-engine</artifactId>
                </exclusion>
            </exclusions>
        </dependency>
    </dependencies>

    <build>
        <plugins>
            <plugin>
                <groupId>org.springframework.boot</groupId>
                <artifactId>spring-boot-maven-plugin</artifactId>
            </plugin>
        </plugins>
    </build>

</project>
配置中心项目结构如下:

7.启动配置中心微服务Config,再打开 http://localhost:808/ 会发现配置中心已经注册成功了。
如果启动时报错:Caused by: org.yaml.snakeyaml.error.YAMLException: java.nio.charset.MalformedInputException: Input length = 1
请把所有yml文件格式改为UTF-8再次启动即可解决

四.(A方案用zuul框架).路由网关 springCloud.zuul (spring boot2.4以上不支持该框架)
1.过程与第二步一样,(记得Spring Boot版本为2.3.6)
在选模块需要勾选 Spring Cloud Routing 中的 Zuul
勾选Spring Cloud Discovery 中的 Eureka Discovery Client
勾选Spring Cloud Config 中的 Config Client

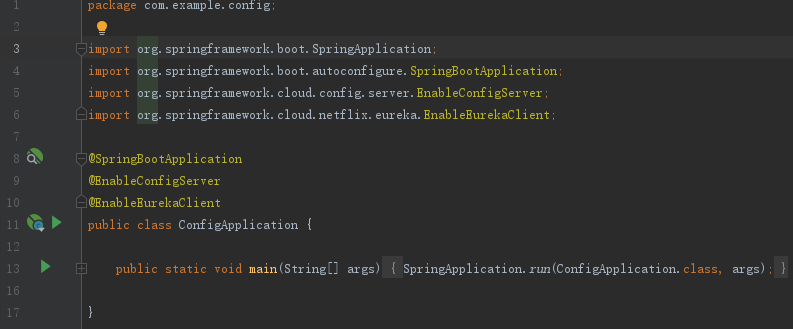
2.给网关路由的spring boot启动类添加注解 @EnableZuulProxy

3.删除resources/application.properties 新建application.yml 注意端口设置为800(可以自行修改)内容如下
spring:
   profiles:
      active: ${active:dev}
   application:
      name: springCloud.zuul

server:
   port: 800
#   context-path: /zuul

#配置注册中心的参数
eureka:
   client:
      serviceUrl:
            defaultZone: ${registry.url}
      registry-fetch-interval-seconds: 5 # 拉取服务注册信息间隔时间 (默认为30秒)
   instance:
          lease-expiration-duration-in-seconds: 60  # 注册中心超过这个时间没收到心跳,会视为无效节点(默认为90秒)
          lease-renewal-interval-in-seconds: 30  # 发送心跳间隔时间(默认30秒)
          preferIpAddress: true
          instanceId: ${spring.cloud.client.ip-address}:${server.port}


zuul:
  add-host-header: true #webui重定向  请求头host显示为网关的(eg:localhost:9090)而非webui的
  ignoredServices: '*' #禁用服务名路游
  sensitive-headers:   #传递头信息
  retryable: true  #负载均衡时,路游的服务重启时,可通过重试到其他相同服务
#  host:
#     socket-timeout-millis: 60000
#     connect-timeout-millis: 60000
#zuul中网路由一定要在这里配置,不然发访问不到微服务,getway不配置也可以访问
  routes:
    webui:
      path: /webui/**
      serviceId: webui
    webapi:
      path: /webapi/**
      serviceId: webapi
4.再新建 application-dev.yml , application-pro.yml , application-test.yml ,三个文件一样,当然可以根据需要修改,代码如下:
#超时重试
ribbon:
    ReadTimeout: 300000 # 单位ms 调试时间5分钟
    ConnectTimeout: 60000 # 单位ms
    MaxAutoRetries: 1
    MaxAutoRetriesNextServer: 1

#超时熔断回调
hystrix:
   command:
       default:
          execution:
             timeout:
                  enabled: true
             isolation:
                 thread:
                    timeoutInMilliseconds: 900000(300000*3) #(默认是1秒)
5.新建bootstrap.yml 代码如下:
spring:
    http:
        encoding:
            charset: UTF-8
            enabled: true
            force: true
    cloud:
        config:
            uri: http://${host:localhost}:809   #配置中心的地址端口
            name: config
            profile: ${active:dev}
完成以后如下图:
6.修改注册中心的的pom文件(修改parent结点为父项目,删除dependencyManagement结点(因为父项目已经引用))内容如下:
<?xml version="1.0" encoding="UTF-8"?>
<project xmlns="http://maven.apache.org/POM/4.0.0" xmlns:xsi="http://www.w3.org/2001/XMLSchema-instance"
         xsi:schemaLocation="http://maven.apache.org/POM/4.0.0 https://maven.apache.org/xsd/maven-4.0.0.xsd">
    <modelVersion>4.0.0</modelVersion>
    <parent>
        <groupId>com.example</groupId>
        <artifactId>demo</artifactId>
        <version>1.0</version>
    </parent>
    <groupId>com.example</groupId>
    <artifactId>zuul</artifactId>
    <version>0.0.1-SNAPSHOT</version>
    <name>zuul</name>
    <description>Demo project for Spring Boot</description>

    <dependencies>
        <dependency>
            <groupId>org.springframework.cloud</groupId>
            <artifactId>spring-cloud-starter-config</artifactId>
        </dependency>
        <dependency>
            <groupId>org.springframework.cloud</groupId>
            <artifactId>spring-cloud-starter-netflix-eureka-client</artifactId>
        </dependency>
        <dependency>
            <groupId>org.springframework.cloud</groupId>
            <artifactId>spring-cloud-starter-netflix-zuul</artifactId>
        </dependency>

        <dependency>
            <groupId>org.springframework.boot</groupId>
            <artifactId>spring-boot-starter-test</artifactId>
            <scope>test</scope>
            <exclusions>
                <exclusion>
                    <groupId>org.junit.vintage</groupId>
                    <artifactId>junit-vintage-engine</artifactId>
                </exclusion>
            </exclusions>
        </dependency>
    </dependencies>

    <build>
        <plugins>
            <plugin>
                <groupId>org.springframework.boot</groupId>
                <artifactId>spring-boot-maven-plugin</artifactId>
            </plugin>
        </plugins>
    </build>

</project>
8.新建一个controller/testController.java代码如下:
package com.example.zuul.controller;

import org.springframework.beans.factory.annotation.Value;
import org.springframework.web.bind.annotation.RequestMapping;
import org.springframework.web.bind.annotation.RestController;

import java.util.Date;

@RestController
public class testController {

    //读取配置中心的参数
    @Value("${sysconfig.isDebug}")
    private Boolean isDebug;

    @RequestMapping("test/page1")
    public String page1(){
        return "zuul page1. current time:"+(new Date()).toString();
    }

    @RequestMapping("test/page2")
    public String page2(){return "zuul page2.sysconfig.isDebug="+isDebug.toString();}
}
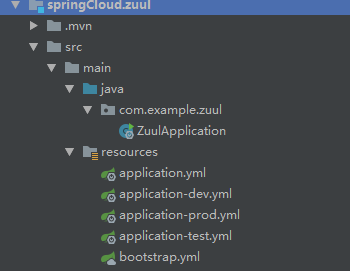
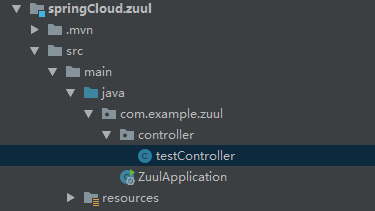
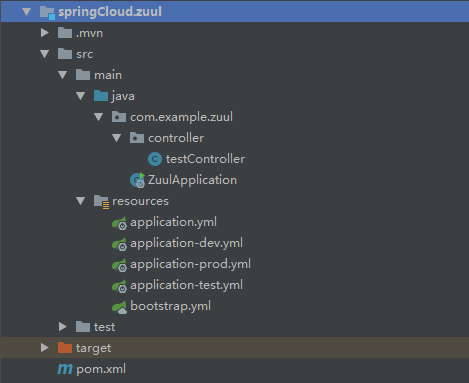
zuul项目结构:
9.启动微服务zuul 打开 http://localhost:800/test/page1 与 http://localhost:800/test/page2 (显示配置中心的参数)

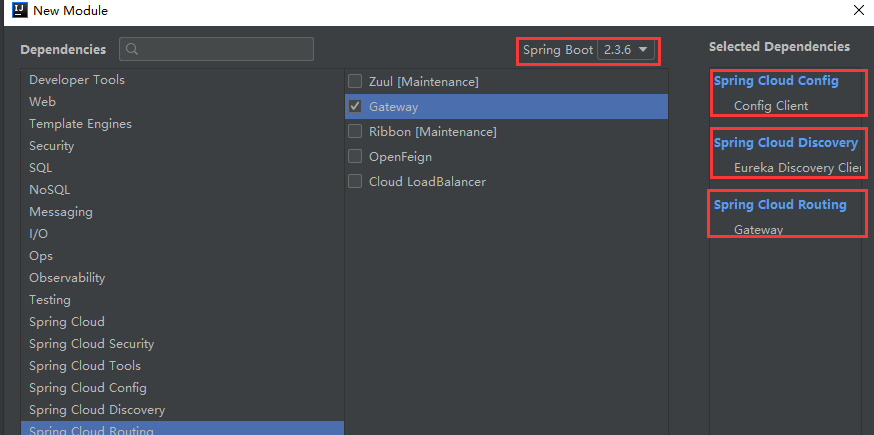
四.(B方案getway框架).路由网关 springCloud.theGetway (推荐该方案)
1.过程与第二步一样,选择模块有
勾选 Spring Cloud Cofnig 中的 Config Server
勾选 Spring Cloud Discovery 中的 Eureka Discovery Client
勾选 Spring Cloud Routing 中的 Geteway
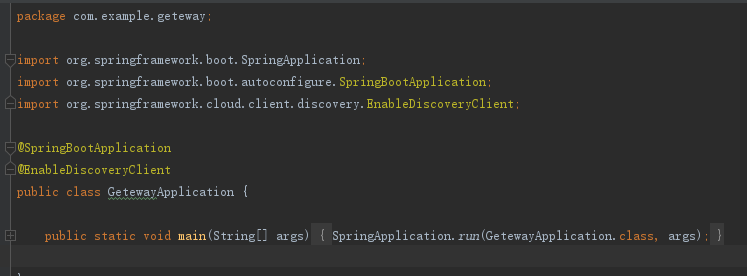
2.给spring boot启动类添加注解 @EnableDiscoveryClient
3.删除resources/application.properties 新建application.yml 注意端口设置为801(可以自行修改)
在routes下面可以配置路由的微服务,默认不配置可以直接用微服务名称也可以访问。
内容如下
server:
  port: 801  #getway网关端口

spring:
  application:
    name: springCloud.geteway
  cloud:
    gateway:
      discovery:
        locator:
          enabled: true
          lower-case-service-id: true
# 不配置routes,则默认使用服务名 ,getway不配置也可以使用spring.application.name访问  ,zuul中网路由一定配置否则访问不了
      routes:
        - id: webui
          uri: lb://webui
          predicates:
          - Path=/getwayWebui/**
          filters:
          - StripPrefix=1
        #以下测试用的:
        - id: service2
          uri: https://www.www.com/
          predicates:
          - Path=/baidu/**
          filters:
          - StripPrefix=1

eureka:
  client:
    service-url:
      defaultZone: ${registry.url}
4.添加resources/boostrap.yml文件内容如下
spring:
  http:
    encoding:
      charset: UTF-8
      enabled: true
      force: true
  cloud:
    config:
      uri: http://${host:localhost}:809 #配置中心地址
      name: config
      profile: ${active:dev}
5.修改pom文件,修改parent结点,删除Properties结点,删除dependencyManagement结点,内容如下:
<?xml version="1.0" encoding="UTF-8"?>
<project xmlns="http://maven.apache.org/POM/4.0.0" xmlns:xsi="http://www.w3.org/2001/XMLSchema-instance"
         xsi:schemaLocation="http://maven.apache.org/POM/4.0.0 https://maven.apache.org/xsd/maven-4.0.0.xsd">
    <modelVersion>4.0.0</modelVersion>
    <parent>
        <groupId>com.example</groupId>
        <artifactId>demo</artifactId>
        <version>1.0</version>
    </parent>
    <groupId>com.example</groupId>
    <artifactId>geteway</artifactId>
    <version>0.0.1-SNAPSHOT</version>
    <name>geteway</name>
    <description>Demo project for Spring Boot</description>

    <properties>
        <java.version>1.8</java.version>
        <spring-cloud.version>Hoxton.SR9</spring-cloud.version>
    </properties>

    <dependencies>
        <dependency>
            <groupId>org.springframework.cloud</groupId>
            <artifactId>spring-cloud-starter-config</artifactId>
        </dependency>
        <dependency>
            <groupId>org.springframework.cloud</groupId>
            <artifactId>spring-cloud-starter-gateway</artifactId>
        </dependency>
        <dependency>
            <groupId>org.springframework.cloud</groupId>
            <artifactId>spring-cloud-starter-netflix-eureka-client</artifactId>
        </dependency>

        <dependency>
            <groupId>org.springframework.boot</groupId>
            <artifactId>spring-boot-starter-test</artifactId>
            <scope>test</scope>
            <exclusions>
                <exclusion>
                    <groupId>org.junit.vintage</groupId>
                    <artifactId>junit-vintage-engine</artifactId>
                </exclusion>
            </exclusions>
        </dependency>
    </dependencies>

    <dependencyManagement>
        <dependencies>
            <dependency>
                <groupId>org.springframework.cloud</groupId>
                <artifactId>spring-cloud-dependencies</artifactId>
                <version>${spring-cloud.version}</version>
                <type>pom</type>
                <scope>import</scope>
            </dependency>
        </dependencies>
    </dependencyManagement>

    <build>
        <plugins>
            <plugin>
                <groupId>org.springframework.boot</groupId>
                <artifactId>spring-boot-maven-plugin</artifactId>
            </plugin>
        </plugins>
    </build>

</project>
6.新建controller/testController.java文件内容如下:
package com.example.geteway.controller;

import org.springframework.beans.factory.annotation.Value;
import org.springframework.web.bind.annotation.RequestMapping;
import org.springframework.web.bind.annotation.RestController;

import java.util.Date;


@RestController
public class testController {

    //读取配置中心的参数
    @Value("${sysconfig.isDebug}")
    private Boolean isDebug;

    @RequestMapping("test/page1")
    public String page1(){
        return "getway page1. current time:"+(new Date()).toString();
    }

    @RequestMapping("test/page2")
    public String page2(){return "getway page2.sysconfig.isDebug="+isDebug.toString();}
}
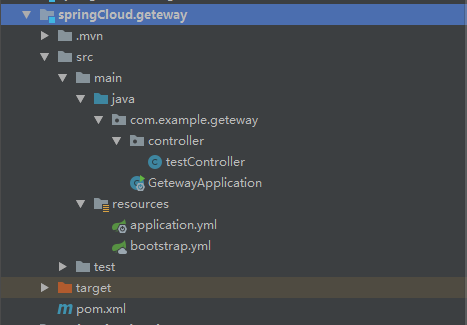
完成以后项目结构如下:
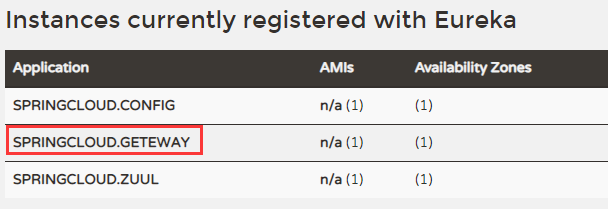
启动geteway网关服务,打开 http://localhost:808/ 发现getway启动并注册成功
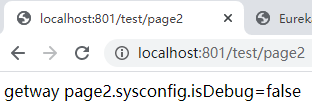
打开http://localhost:801/test/page2 发现geteway下的路径可以访问了。
五.微服务WebUI界面
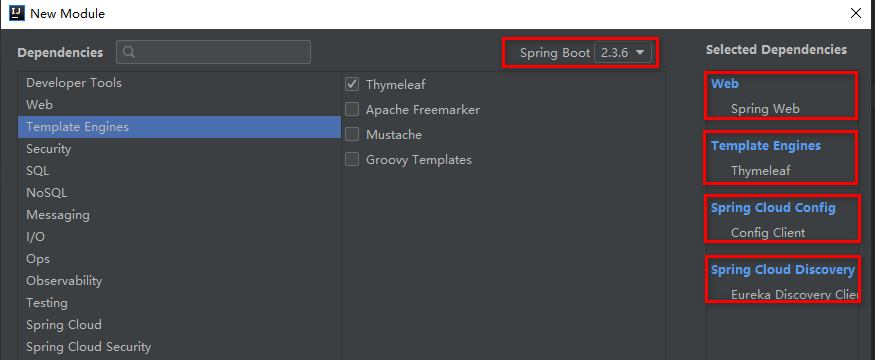
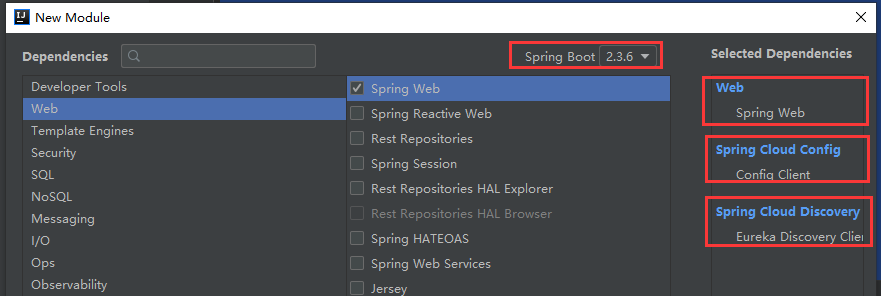
1.过程与第二步一样,选择模块有
勾选Spring Cloud Discovery 中的 Eureka Discovery Client
勾选Spring Cloud Config 中的 Config Client
勾选Web 中的 Spring Web
勾选Template Engines 中的 Thymeleaf(如果有需要就勾选)
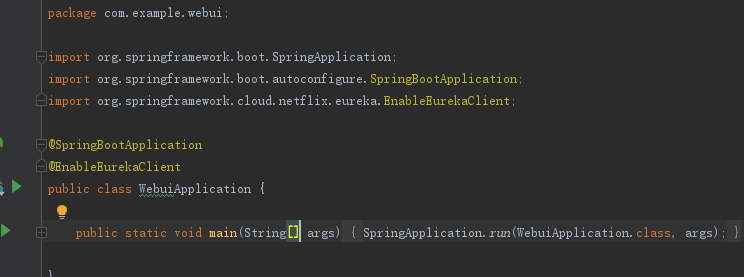
2.给webUI的spring boot启动类添加注解 @EnableEurekaClient
3.删除resources/application.properties 新建application.yml 注意端口为805 内容如下
spring:
   profiles:
      active: ${active:dev}
   application:
       name: webui
   thymeleaf:
           prefix: classpath:/templates/
           suffix: .html
           mode: LEGACYHTML5
           encoding: UTF-8
           content-type: text/html
           cache: false

server:
   port: 805  #微服务webui的端口

eureka:
    client:
       serviceUrl:
            defaultZone: ${registry.url}  #从配置中心读取配置
       registry-fetch-interval-seconds: 5 # 拉取服务注册信息间隔时间 (默认为30秒)
    instance:
          lease-expiration-duration-in-seconds: 60
          lease-renewal-interval-in-seconds: 30
          preferIpAddress: true
          instanceId: ${spring.cloud.client.ip-address}:${server.port}
4.新建bootstrap.yml代码如下
spring:
    http:
        encoding:
            charset: UTF-8
            enabled: true
            force: true
    cloud:
        config:
            uri: http://${host:localhost}:809   #配置中心的地址
            name: config
            profile: ${active:dev}
5.修改pom文件(修改parent结点为父项目,删除dependencyManagement结点(因为父项目已经引用))内容如下:
<?xml version="1.0" encoding="UTF-8"?>
<project xmlns="http://maven.apache.org/POM/4.0.0" xmlns:xsi="http://www.w3.org/2001/XMLSchema-instance"
         xsi:schemaLocation="http://maven.apache.org/POM/4.0.0 https://maven.apache.org/xsd/maven-4.0.0.xsd">
    <modelVersion>4.0.0</modelVersion>
    <parent>
        <groupId>com.example</groupId>
        <artifactId>demo</artifactId>
        <version>1.0</version>
    </parent>
    <groupId>com.example</groupId>
    <artifactId>webui</artifactId>
    <version>0.0.1-SNAPSHOT</version>
    <name>webui</name>
    <description>Demo project for Spring Boot</description>

    <dependencies>
        <dependency>
            <groupId>org.springframework.boot</groupId>
            <artifactId>spring-boot-starter-web</artifactId>
        </dependency>
        <dependency>
            <groupId>org.springframework.boot</groupId>
            <artifactId>spring-boot-starter-thymeleaf</artifactId>
        </dependency>
        <dependency>
            <groupId>org.springframework.cloud</groupId>
            <artifactId>spring-cloud-starter-config</artifactId>
        </dependency>
        <dependency>
            <groupId>org.springframework.cloud</groupId>
            <artifactId>spring-cloud-starter-netflix-eureka-client</artifactId>
        </dependency>

        <dependency>
            <groupId>org.springframework.boot</groupId>
            <artifactId>spring-boot-starter-test</artifactId>
            <scope>test</scope>
            <exclusions>
                <exclusion>
                    <groupId>org.junit.vintage</groupId>
                    <artifactId>junit-vintage-engine</artifactId>
                </exclusion>
            </exclusions>
        </dependency>
    </dependencies>

    <build>
        <plugins>
            <plugin>
                <groupId>org.springframework.boot</groupId>
                <artifactId>spring-boot-maven-plugin</artifactId>
            </plugin>
        </plugins>
    </build>

</project>
6.新建controller/TestUIController.java代码如下:
package com.example.webui.controller;

import org.springframework.beans.factory.annotation.Value;
import org.springframework.web.bind.annotation.RequestMapping;
import org.springframework.web.bind.annotation.RestController;

import java.util.Date;

/**
 * Created by zhouwei on 2020-12-02
 */
@RestController
public class TestUIController {

        //读取配置中心的参数
        @Value("${sysconfig.isDebug}")
        private Boolean isDebug;

        @RequestMapping("testUI/page1")
        public String page1(){
                return "webUI page1. current time:"+(new Date()).toString();
        }

        @RequestMapping("testUI/page2")
        public String page2(){return "webUI page2.sysconfig.isDebug="+isDebug.toString();}
}
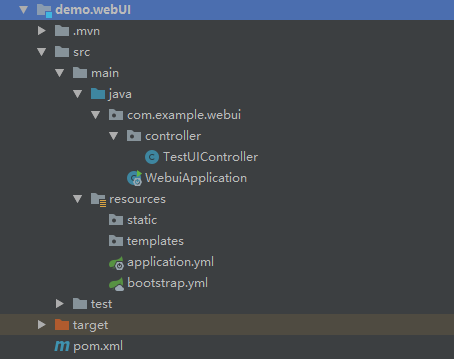
完成以后项目结构如下图
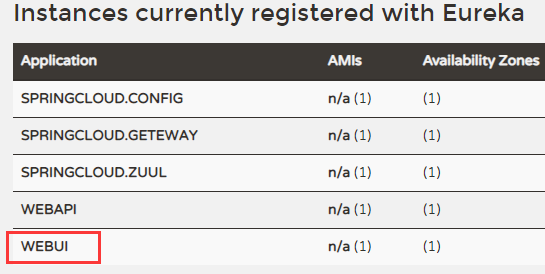
7.启动微服务webUI ,打开http://localhost:808/ 发现webui注册成功
8.直接访问spring boot :http://localhost:805/testUI/page2 如下图

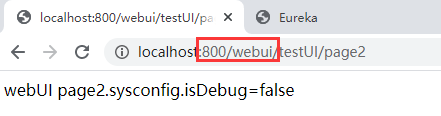
9。zuul网关800端口路由访问,因为在zuul中的application.yml文件中的zuul.routes中配置了weui的路由。所以直接通过网关路由打开 http://localhost:800/webui/testUI/page2 会发现内容与上面一样,这就是网关路由的作用。
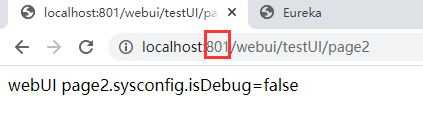
geteway网关801端口下访问,http://localhost:801/webui/testUI/page2
六.微服务WebAPI接口
与第五步完全一样,(记得spring boot版本先2.3.6)只是 微服务名称 与 端口 不一样。
在选模块需要勾选 Spring Cloud Routing 中的 Zuul
勾选Spring Cloud Discovery 中的 Eureka Discovery Client
勾选Web 中的 Spring Web
yml配置文件与pom文件内容都一样,再新建TestAPIController 内容与前面的一样
package com.example.webapi.controller;

import org.springframework.beans.factory.annotation.Value;
import org.springframework.web.bind.annotation.RequestMapping;
import org.springframework.web.bind.annotation.RestController;

import java.util.Date;

@RestController
public class TestAPIController {

        //读取配置中心的参数
        @Value("${sysconfig.isDebug}")
        private Boolean isDebug;

        @RequestMapping("testAPI/page1")
        public String page1(){
                return "webAPI page1. current time:"+(new Date()).toString();
        }

        @RequestMapping("testAPI/page2")
        public String page2(){return "webAPI page2.sysconfig.isDebug="+isDebug.toString();}
}
所有配置完成以后项目结构如下:

启动微服务webAPI,打开http://localhost:808/ 会发现webui注册成功

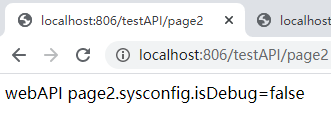
通过spring boot直接访问,打开http://localhost:806/testAPI/page2
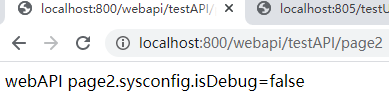
通过zuul网关访问,打开 http://localhost:800/webapi/testAPI/page2
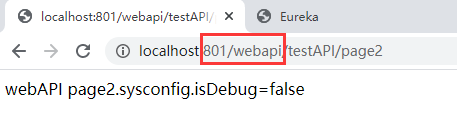
getway网关访问 打开http://localhost:801/webapi/testAPI/page2
------ 完 ------------