Redis 集群介绍:
(1) 为什么要使用集群:如果数据量很大,单台机器会存在存储空间不够用 、查询速度慢 、负载高等问题,部署集群就是为了解决这些问题
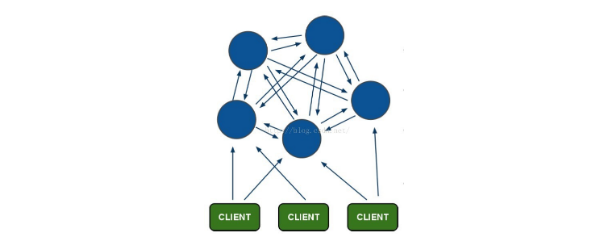
(2) Redis 集群架构如下,采用无中心结构,每个节点保存数据和整个集群状态,每个节点都和其他所有节点连接,我们可以在线增加/删除节点
(3) 所有的节点彼此互联,内部使用二进制协议优化传输速度和带宽,客户端连接集群中任何一个可用节点即可
(4) 为了增加冗余性,所有节点(一台机器被称为一个节点)都可以部署一主一从,也可以是多个从,从库不提供服务,只作为备用
集群环境:
A机器(192.168.216.135)上开三个 Redis 服务,端口分别为 7000,7002,7004
B机器(192.168.216.136)上开三个 Redis 服务,端口分别为 7001,7003,7005
当我们创建集群的时候,会自动选择其中三个 Redis 服务作为主库,其他三个作为从库
注意:这里我们实验的时候在一台机器上模拟三个节点,在实际中应该一台机器一个节点
前提准备:
① 两台机器都关闭防火墙和SELinux,方便实验
② 需要在集群中的一台机器上安装 Ruby 2.2 版本及以上,Redis 集群需 Ruby 支持
[root@localhost ~]# iptables -F
[root@localhost ~]# setenforce 0
yum -y groupinstall "Development Tools"
yum -y install gdbm-devel libdb4-devel libffi-devel libyaml libyaml-devel ncurses-devel openssl-devel readline-devel tcl-deve
cd /root/
mkdir -p rpmbuild/{BUILD,BUILDROOT,RPMS,SOURCES,SPECS,SRPMS}
wget http://cache.ruby-lang.org/pub/ruby/2.2/ruby-2.2.3.tar.gz -P rpmbuild/SOURCES
wget https://raw.githubusercontent.com/tjinjin/automate-ruby-rpm/master/ruby22x.spec -P rpmbuild/SPECS
rpmbuild -bb rpmbuild/SPECS/ruby22x.spec
yum -y localinstall rpmbuild/RPMS/x86_64/ruby-2.2.3-1.el7.centos.x86_64.rpm
gem install redis
cp /usr/local/src/redis-4.0.1/src/redis-trib.rb  /usr/bin/
A机器(192.168.216.135)配置:
[root@localhost ~]# cat /etc/redis_7000.conf
port 7000
bind 192.168.216.135    <--- 这里设置为本机IP地址
daemonize yes
pidfile /var/run/redis_7000.pid
dir /data/redis_data/7000
cluster-enabled yes
cluster-config-file nodes_7000.conf
cluster-node-timeout 10100
appendonly yes
[root@localhost ~]# cp /etc/redis_7000.conf /etc/redis_7002.conf && sed -i 's/7000/7002/g' /etc/redis_7002.conf
[root@localhost ~]# cp /etc/redis_7000.conf /etc/redis_7004.conf && sed -i 's/7000/7004/g' /etc/redis_7004.conf
[root@localhost ~]# mkdir -p /data/redis_data/{7000,7002,7004}    //创建数据存放目录
[root@localhost ~]# redis-server /etc/redis_7000.conf    //启动三个Redis服务
[root@localhost ~]# redis-server /etc/redis_7002.conf
[root@localhost ~]# redis-server /etc/redis_7004.conf
B机器(192.168.216.136)配置:
[root@localhost ~]# cat /etc/redis_7001.conf
port 7001
bind 192.168.216.136    <--- 这里设置为本机IP地址
daemonize yes
pidfile /var/run/redis_7001.pid
dir /data/redis_data/7001
cluster-enabled yes
cluster-config-file nodes_7001.conf
cluster-node-timeout 10100
appendonly yes
[root@localhost ~]# cp /etc/redis_7001.conf /etc/redis_7003.conf && sed -i 's/7001/7003/g' /etc/redis_7003.conf
[root@localhost ~]# cp /etc/redis_7001.conf /etc/redis_7005.conf && sed -i 's/7001/7005/g' /etc/redis_7005.conf
[root@localhost ~]# mkdir -p /data/redis_data/{7001,7003,7005}    //创建数据存放目录
[root@localhost ~]# redis-server /etc/redis_7001.conf    //启动三个Redis服务
[root@localhost ~]# redis-server /etc/redis_7003.conf
[root@localhost ~]# redis-server /etc/redis_7005.conf
创建集群:
[root@localhost ~]# redis-trib.rb create --replicas 1 192.168.216.135:7000 192.168.216.135:7002 192.168.216.135:7004
192.168.216.136:7001 192.168.216.136:7003 192.168.216.136:7005    //需要在安装 Ruby 的那台机器上操作,会自动选择其中三个为主库
[root@localhost ~]# redis-trib.rb check 192.168.216.135:7000      //查看集群状态,可以查看到哪些节点是主库,哪些节点是从库,以及集群是否运行正常
操作集群:
[root@localhost ~]# redis-cli -c -h 192.168.216.135 -p 7000    //登录任意一台集群节点,需要使用 -c 参数,指定使用集群的方式登录
192.168.216.135:7000> set name "Tom"
-> Redirected to slot [5798] located at 192.168.216.136:7001   //添加一条数据,可以看到被存储到集群的 192.168.216.136:7001 节点上
OK
192.168.216.136:7001> set name2 "John"
-> Redirected to slot [742] located at 192.168.216.135:7000    //添加一条数据,可以看到被存储到集群的 192.168.216.135:7000 节点上
OK
192.168.216.135:7000> set name3 "Jeny"                         //添加一条数据,如果没有集群输出,则表明被存储到本机的集群节点上
OK
192.168.216.135:7000> cluster nodes                //查看集群的所有节点
192.168.216.135:7000> cluster info                 //查看集群的状态信息
192.168.216.135:7000> cluster meet <ip> <port>     //添加集群节点,需要先提前配置好Redis服务,添加的节点都会被设置为主库
192.168.216.135:7000> cluster replicate <node_id>  //将当前节点设置为指定节点的从库
192.168.216.135:7000> cluster forget <node_id>     //移除某个集群节点