一、装饰器
1.什么是装饰器
装饰器即函数
装饰即修饰,意指为其他函数添加新功能
装饰器定义:本质就是函数,功能是为其他函数添加新功能
2. 装饰器需要遵循的原则
1.不修改被装饰函数的源代码(开放封闭原则:对源代码的修改保持关闭,对原功能的拓展保持开放原则!)
2.为被装饰函数添加新功能后,不修改被修饰函数的调用方式
3. 实现装饰器知识储备
装饰器=高阶函数+函数嵌套+闭包
4. 高阶函数
高阶函数定义:
1.函数接收的参数是一个函数名
2.函数的返回值是一个函数名
3.满足上述条件任意一个,都可称之为高阶函数


def foo():
    print('我的函数名作为参数传给高阶函数')
def gao_jie1(func):
    print('我就是高阶函数1,我接收的参数名是%s' %func)
    func()

def gao_jie2(func):
    print('我就是高阶函数2,我的返回值是%s' %func)
    return func

gao_jie1(foo)
gao_jie2(foo)
#高阶函数应用1:把函数当做参数传给高阶函数
import time
def foo():
    print('from the foo')

def timmer(func):
    start_time=time.time()
    func()
    stop_time=time.time()
    print('函数%s 运行时间是%s' %(func,stop_time-start_time))
timmer(foo)
#总结:我们确实为函数foo增加了foo运行时间的功能,但是foo原来的执行方式是foo(),现在我们需要调用高阶函数timmer(foo),改变了函数的调用方式
#高阶函数应用2:把函数名当做参数传给高阶函数,高阶函数直接返回函数名
import time
def foo():
    print('from the foo')

def timmer(func):
    start_time=time.time()
    return func
    stop_time=time.time()
    print('函数%s 运行时间是%s' %(func,stop_time-start_time))
foo=timmer(foo)
foo()
#总结:我们确实没有改变foo的调用方式,但是我们也没有为foo增加任何新功能
高阶函数总结
1.函数接收的参数是一个函数名
作用:在不修改函数源代码的前提下,为函数添加新功能,
不足:会改变函数的调用方式
2.函数的返回值是一个函数名
作用:不修改函数的调用方式
不足:不能添加新功能
5. 函数嵌套
def father(name):
    print('from father %s' %name)
    def son():
        print('from son')
        def grandson():
            print('from grandson')
        grandson()
    son()

father('刘辉')
6.闭包
'''
闭包:在一个作用域里放入定义变量,相当于打了一个包
'''
def father(name):
    def son():
        # name='alex'
        print('我爸爸是 [%s]' %name)
        def grandson():
            # name='wupeiqi'
            print('我爷爷是 [%s]' %name)
        grandson()
    son()

father('刘辉')
7.无参装饰器
无参装饰器=高级函数+函数嵌套
基本框架
#这就是一个实现一个装饰器最基本的架子
def timer(func):
    def wrapper():
        func()
    return wrapper
加上参数
def timer(func):
     def wrapper(*args,**kwargs):
           func(*args,**kwargs)
     return wrapper
加上功能
import time
def timer(func):
    def wrapper(*args,**kwargs):
        start_time=time.time()
        func(*args,**kwargs)
        stop_time=time.time()
        print('函数[%s],运行时间是[%s]' %(func,stop_time-start_time))
    return wrapper
加上返回值
import time
def timer(func):
    def wrapper(*args,**kwargs):
        start_time=time.time()
        res=func(*args,**kwargs)
        stop_time=time.time()
        print('函数[%s],运行时间是[%s]' %(func,stop_time-start_time))
        return res
    return wrapper
使用装饰器
def cal(array):
    res=0
    for i in array:
        res+=i
    return res

cal=timer(cal)
cal(range(10))
语法糖@
@timer  #@timer就等同于cal=timer(cal)
def cal(array):
    res=0
    for i in array:
        res+=i
    return res

cal(range(10))
8. 装饰器应用示例
user_list=[
    {'name':'alex','passwd':'123'},
    {'name':'linhaifeng','passwd':'123'},
    {'name':'wupeiqi','passwd':'123'},
    {'name':'yuanhao','passwd':'123'},
]

current_user={'username':None,'login':False}

def auth_deco(func):
    def wrapper(*args,**kwargs):
        if current_user['username'] and current_user['login']:
            res=func(*args,**kwargs)
            return res
        username=input('用户名: ').strip()
        passwd=input('密码: ').strip()

        for index,user_dic in enumerate(user_list):
            if username == user_dic['name'] and passwd == user_dic['passwd']:
                current_user['username']=username

                current_user['login']=True
                res=func(*args,**kwargs)
                return res
                break
        else:
            print('用户名或者密码错误,重新登录')

    return wrapper

@auth_deco
def index():
    print('欢迎来到主页面')

@auth_deco
def home():
    print('这里是你家')

def shopping_car():
    print('查看购物车啊亲')

def order():
    print('查看订单啊亲')

print(user_list)
# index()
print(user_list)
home()
user_list=[
    {'name':'alex','passwd':'123'},
    {'name':'linhaifeng','passwd':'123'},
    {'name':'wupeiqi','passwd':'123'},
    {'name':'yuanhao','passwd':'123'},
]

current_user={'username':None,'login':False}
def auth(auth_type='file'):
    def auth_deco(func):
        def wrapper(*args,**kwargs):
            if auth_type == 'file':
                if current_user['username'] and current_user['login']:
                    res=func(*args,**kwargs)
                    return res
                username=input('用户名: ').strip()
                passwd=input('密码: ').strip()

                for index,user_dic in enumerate(user_list):
                    if username == user_dic['name'] and passwd == user_dic['passwd']:
                        current_user['username']=username
                        current_user['login']=True
                        res=func(*args,**kwargs)
                        return res
                        break
                else:
                    print('用户名或者密码错误,重新登录')
            elif auth_type == 'ldap':
                print('巴拉巴拉小魔仙')
                res=func(*args,**kwargs)
                return res
        return wrapper
    return auth_deco


#auth(auth_type='file')就是在运行一个函数,然后返回auth_deco,所以@auth(auth_type='file')
#就相当于@auth_deco,只不过现在,我们的auth_deco作为一个闭包的应用,外层的包auth给它留了一个auth_type='file'参数
@auth(auth_type='ldap')
def index():
    print('欢迎来到主页面')

@auth(auth_type='ldap')
def home():
    print('这里是你家')

def shopping_car():
    print('查看购物车啊亲')

def order():
    print('查看订单啊亲')

# print(user_list)
index()
# print(user_list)
home()
9. 超时装饰器
import sys,threading,time


class KThread(threading.Thread):

    """A subclass of threading.Thread, with a kill()

    method.


    Come from:

    Kill a thread in Python:

    http://mail.python.org/pipermail/python-list/2004-May/260937.html

    """

    def __init__(self, *args, **kwargs):

        threading.Thread.__init__(self, *args, **kwargs)

        self.killed = False


    def start(self):

        """Start the thread."""

        self.__run_backup = self.run

        self.run = self.__run      # Force the Thread to install our trace.

        threading.Thread.start(self)


    def __run(self):

        """Hacked run function, which installs the

        trace."""

        sys.settrace(self.globaltrace)

        self.__run_backup()

        self.run = self.__run_backup


    def globaltrace(self, frame, why, arg):

        if why == 'call':

          return self.localtrace

        else:

          return None


    def localtrace(self, frame, why, arg):

        if self.killed:

          if why == 'line':

            raise SystemExit()

        return self.localtrace


    def kill(self):

        self.killed = True


class Timeout(Exception):

    """function run timeout"""


def timeout(seconds):

    """超时装饰器,指定超时时间

    若被装饰的方法在指定的时间内未返回,则抛出Timeout异常"""

    def timeout_decorator(func):

        """真正的装饰器"""


        def _new_func(oldfunc, result, oldfunc_args, oldfunc_kwargs):

            result.append(oldfunc(*oldfunc_args, **oldfunc_kwargs))


        def _(*args, **kwargs):

            result = []

            new_kwargs = { # create new args for _new_func, because we want to get the func return val to result list

                'oldfunc': func,

                'result': result,

                'oldfunc_args': args,

                'oldfunc_kwargs': kwargs

            }

            thd = KThread(target=_new_func, args=(), kwargs=new_kwargs)

            thd.start()

            thd.join(seconds)

            alive = thd.isAlive()

            thd.kill() # kill the child thread

            if alive:

                raise Timeout(u'function run too long, timeout %d seconds.' % seconds)

            else:

                return result[0]

        _.__name__ = func.__name__

        _.__doc__ = func.__doc__

        return _

    return timeout_decorator


@timeout(5)

def method_timeout(seconds, text):

    print('start', seconds, text)

    time.sleep(seconds)

    print('finish', seconds, text)

    return seconds


method_timeout(6,'asdfasdfasdfas')
二、文件操作
1.文件处理
文件处理步骤:打开文件 -> 操作文件 -> 关闭文件
切记:最后要关闭文件(否则可能会有意想不到的结果)
文件操作流程初探
代码演示文件编码:

此刻错误的打开方式
#不指定打开编码,即python解释器默认编码,python2.*为ascii,python3.*为utf-8
f=open('chenli.txt')
f.read()

正确的打开方式
f=open('chenli.txt',encoding='gbk')
f.read()
2.小结
由上可看出,文件打开模式为:文件句柄 = open('文件路径', '模式') 或指定编码: 文件句柄= open('文件路径','模式',encoding='utf-8')
打开文件时,需要指定文件路径和以何等方式打开文件,打开后,即可获取该文件句柄,日后通过此文件句柄对该文件操作。
打开文件的模式有:
- r ,只读模式【默认模式,文件必须存在,不存在则抛出异常】
- w,只写模式【不可读;不存在则创建;存在则清空内容】
- x, 只写模式【不可读;不存在则创建,存在则报错】
- a, 追加模式【可读; 不存在则创建;存在则只追加内容】
"+" 表示可以同时读写某个文件
- r+, 读写【可读,可写】
- w+,写读【可读,可写】
- x+ ,写读【可读,可写】
- a+, 写读【可读,可写】
"b"表示以字节的方式操作
- rb 或 r+b
- wb 或 w+b
- xb 或 w+b
- ab 或 a+b
注:以b方式打开时,读取到的内容是字节类型,写入时也需要提供字节类型,不能指定编码


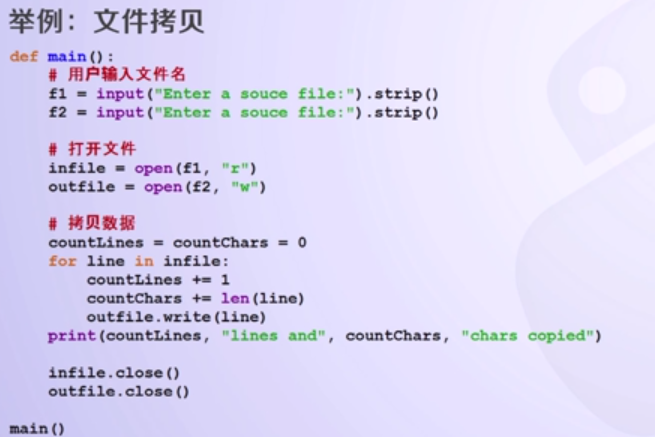
上面需要注意的是:1.打开文件之后就可以用infile指针对文件进行操作了
2.对于图片,音频,视频类的文件要用二进制的格式打开,当文本文件中出现中文字符,防止乱码的时候也可以使用二进制的格式读写,编码是针对二进制的!
3.文件名是字符串格式的!


注意:当写入的文件不存在时,就自动创建一个文件写入,当写入的文件存在时,python会先删除该文件,然后创建一个空文件!


上面file.readlines()会将文件中的所有内容都加载到内存中,当数据很大的时候,会出问题!而简化的代码框架是将文件本身作为文件序列,这样简化的代码框架就比较好!


3.文件内置函数
1.flush
flush原理:
- 文件操作是通过软件将文件从硬盘读到内存
- 写入文件的操作也都是存入内存缓冲区buffer(内存速度快于硬盘,如果写入文件的数据都从内存刷到硬盘,内存与硬盘的速度延迟会被无限放大,效率变低,所以要刷到硬盘的数据我们统一往内存的一小块空间即buffer中放,一段时间后操作系统会将buffer中数据一次性刷到硬盘)
- flush刷新缓冲区,将缓冲区中的数据立刻写入文件
滚动条:
import sys,time

for i in  range(10):
    sys.stdout.write('#')
    sys.stdout.flush()
    time.sleep(0.2)
2.文件内光标移动:
注意:read(3)代表读取3个字符,其余的文件内光标移动都是以字节为单位如seek,truncate等!
3.文件操作的方法总结:
文件句柄.read() #读取整个文件
文件句柄.read(10) #读取文件前10个字符
readline(每次最多读取一行数据,每行的最后包含换行符' ')
print(文件句柄.readline()) #读取第一行数据
print(文件句柄.readline(3)) #读取第二行前3个字符
print(文件句柄.readline()) #读取第二行剩余字符
print(文件句柄.readline()) #读取第三行
文件句柄.write('字符串'):把字符串写入文件,并返回字符数
文件句柄.flush() #刷新缓冲区,将缓冲区中的数据立刻写入文件
seek(移动文件读取的指针,如果文件中包含中文,移动指针必须是3的倍数,不然会报错,因为一个中文字符等于3个字节)
文件句柄.truncate():截断,把指针后面的内容删除,并写入文件,要在可写模式下操作
eg:
f = open('text.txt','r+',encoding='utf-8')
f.seek(9)   #把指针移动到第9个字节后面(即第3个中文后面)
f.truncate()  #把第3个中文后面的字符删除,并写入文件
f.close()
4.上下文管理器
在使用Python编程中,可以会经常碰到这种情况:有一个特殊的语句块,在执行这个语句块之前需要先执行一些准备动作;当语句块执行完成后,需要继续执行一些收尾动作。
例如:当需要操作文件或数据库的时候,首先需要获取文件句柄或者数据库连接对象,当执行完相应的操作后,需要执行释放文件句柄或者关闭数据库连接的动作。
又如,当多线程程序需要访问临界资源的时候,线程首先需要获取互斥锁,当执行完成并准备退出临界区的时候,需要释放互斥锁。
对于这些情况,Python中提供了上下文管理器(Context Manager)的概念,可以通过上下文管理器来定义/控制代码块执行前的准备动作,以及执行后的收尾动作。
5.with语句
在Python中,可以通过with语句来方便的使用上下文管理器,with语句可以在代码块运行前进入一个运行时上下文(执行__enter__方法),并在代码块结束后退出该上下文(执行__exit__方法)。
with语句的语法如下:
with context_expr [as var]:
    with_suite
- context_expr是支持上下文管理协议的对象,也就是上下文管理器对象,负责维护上下文环境
- as var是一个可选部分,通过变量方式保存上下文管理器对象
- with_suite就是需要放在上下文环境中执行的语句块
在Python的内置类型中,很多类型都是支持上下文管理协议的,例如file,thread.LockType,threading.Lock等等。这里我们就以file类型为例,看看with语句的使用。
with语句简化文件操作
当需要写一个文件的时候,一般都会通过下面的方式。代码中使用了try-finally语句块,即使出现异常,也能保证关闭文件句柄。
logger = open("log.txt", "w")
try:
    logger.write('Hello ')
    logger.write('World')
finally:
    logger.close()

print logger.closed
其实,Python的内置file类型是支持上下文管理协议的,可以直接通过内建函数dir()来查看file支持的方法和属性:
>>> print dir(file)
['__class__', '__delattr__', '__doc__', '__enter__', '__exit__', '__format__', '
__getattribute__', '__hash__', '__init__', '__iter__', '__new__', '__reduce__',
'__reduce_ex__', '__repr__', '__setattr__', '__sizeof__', '__str__', '__subclass
hook__', 'close', 'closed', 'encoding', 'errors', 'fileno', 'flush', 'isatty', '
mode', 'name', 'newlines', 'next', 'read', 'readinto', 'readline', 'readlines',
'seek', 'softspace', 'tell', 'truncate', 'write', 'writelines', 'xreadlines']
所以,可以通过with语句来简化上面的代码,代码的效果是一样的,但是使用with语句的代码更加的简洁:
with open("log.txt", "w") as logger:
    logger.write('Hello ')
    logger.write('World')

print logger.closed
上面我们讲解了结合with语句来使用上下文管理器!【这里还可以来一个自定义的上下文管理器:参考 http://python.jobbole.com/82289/ 】
为了防止忘记关闭文件,可以使用上下文管理器来打开文件
with open('文件路径','模式') [as target(s)]:
with-body
with open('/etc/passwd') as f:
    for line in f:
        print(line)
文件操作补充??????