Spring Cloud Bus提供了批量刷新配置的机制,它使用轻量级的消息代理(例如RabbitMQ、Kafka等)连接分布式系统的节点,这样就可以通过Spring Cloud Bus广播配置的变化或者其他的管理指令。使用Spring Cloud Bus后的架构如图9-2所示。
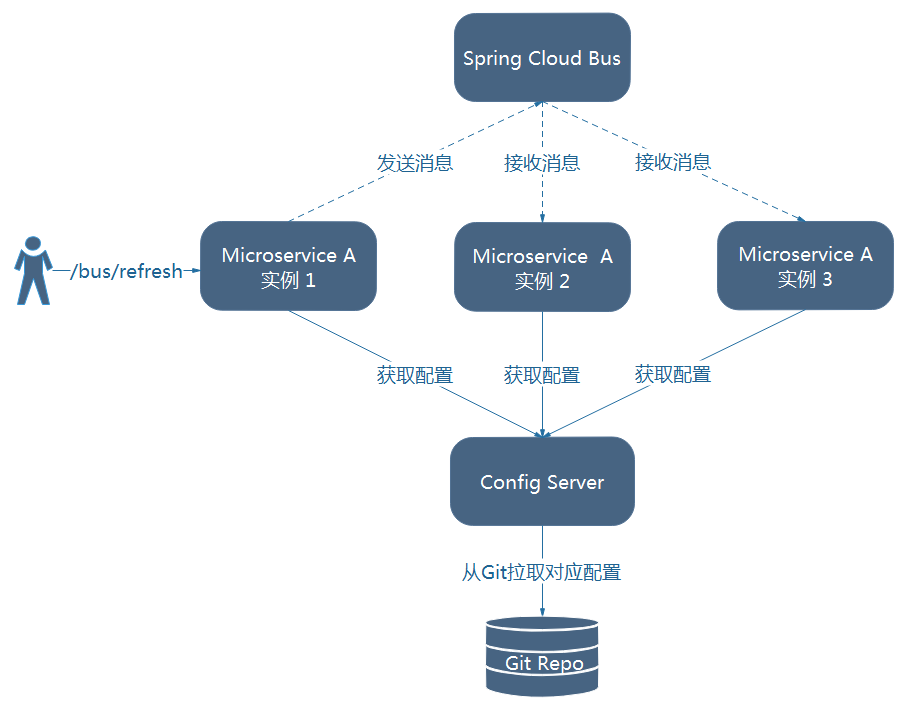
图9-2 使用Spring Cloud Bus的架构图
由图可知,微服务A的所有实例通过消息总线连接到了一起,每个实例都会订阅配置更新事件。当其中一个微服务节点的/bus/refresh端点被请求时,该实例就会向消息总线发送一个配置更新事件,其他实例获得该事件后也会更新配置。
下面我们以RabbitMQ为例,为大家讲解如何使用Spring Cloud Bus实现配置的自动刷新。
(1) 安装RabbitMQ。RabbitMQ的安装非常简单,本书不再赘述。
(2) 创建项目microservice-config-client-refresh-cloud-bus
(3) 为项目添加spring-cloud-starter-bus-amqp 的依赖。
<dependency>
    <groupId>org.springframework.cloud</groupId>
    <artifactId>spring-cloud-starter-bus-amqp</artifactId>
</dependency>
(4) 在bootstrap.yml中添加以下内容:
spring:
  rabbitmq:
    host: localhost
    port: 5672
    username: guest
    password: guest
management:
security:
enabled: false #是否开启actuator安全认证
测试
(1) 启动microservice-config-server
(2) 启动microservice-config-client-refresh-cloud-bus,可发现此时控制台打印类似于以下的内容:
[ main] o.s.b.a.e.mvc.EndpointHandlerMapping : Mapped "{[/bus/refresh],methods=[POST]}" onto public void org.springframework.cloud.bus.endpoint.RefreshBusEndpoint.refresh(java.lang.String)
说明此时有一个/bus/refresh 端点
(3) 将microservice-config-client-refresh-cloud-bus的端口改成8082,再启动一个节点。
(4) 访问http://localhost:8081/profile ,可获得结果:dev-1.0。
(4) 将git仓库中的microservice-foo-dev.properties文件内容改为profile=dev-1.0-bus
(5) 发送POST请求到其中一个Config Client节点的的/bus/refresh端点,例如:
curl -X POST http://localhost:8081/bus/refresh
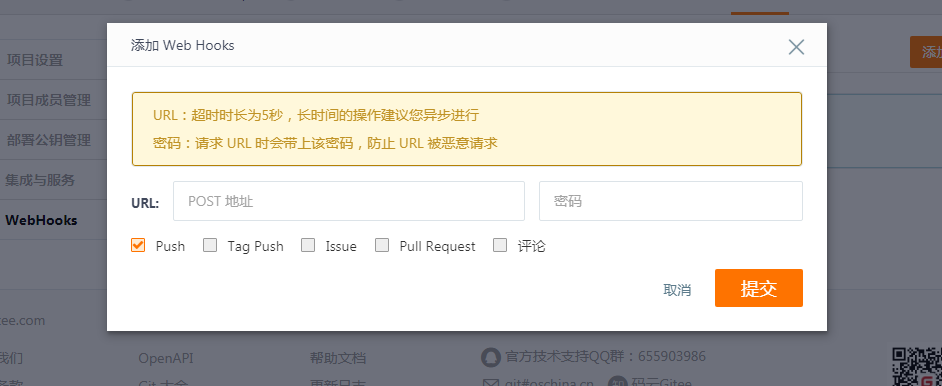
借助Git仓库的WebHook,我们就可轻松实现配置的自动刷新。如图9-3所示。
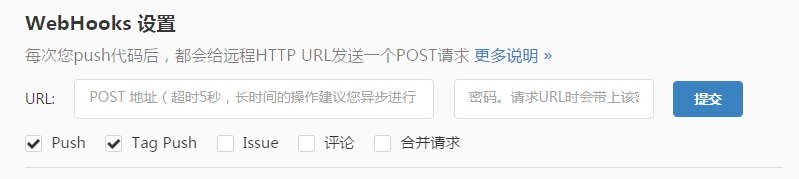
图9-3 Git WebHooks设置
借助Git仓库的WebHook,我们就可轻松实现配置的自动刷新。如图9-3所示。(6) 访问两个Config Client节点的/profile端点,会发现两个节点都会返回dev-1.0-bus ,说明配置内容已被刷新。
局部刷新
某些场景下(例如灰度发布),我们可能只想刷新部分微服务的配置,此时可通过/bus/refresh端点的destination参数来定位要刷新的应用程序。
例如:/bus/refresh?destination=customers:9000 ,这样消息总线上的微服务实例就会根据destination参数的值来判断是否需要要刷新。其中,customers:9000 指的是各个微服务的ApplicationContext ID。
destination参数也可以用来定位特定的微服务。例如:/bus/refresh?destination=customers:**,这样就可以触发customers微服务所有实例的配置刷新。
扩展阅读:关于ApplicationContext ID
默认情况下,ApplicationContext ID是spring.application.name:server.port,详见org.springframework.boot.context.ContextIdApplicationContextInitializer.getApplicationId(ConfigurableEnvironment)方法。
http://www.itmuch.com/spring-cloud-code-read/spring-cloud-code-read-spring-cloud-bus/
架构改进
在前面的示例中,我们通过请求某个微服务的/bus/refresh端点的方式来实现配置刷新,但这种方式并不优雅。原因如下:
(1) 打破了微服务的职责单一性。微服务本身是业务模块,它本不应该承担配置刷新的职责。
(2) 破坏了微服务各节点的对等性。
(3) 有一定的局限性。例如,微服务在迁移时,它的网络地址常常会发生变化,此时如果想要做到自动刷新,那就不得不修改WebHook的配置。
我们不妨改进一下我们的架构。
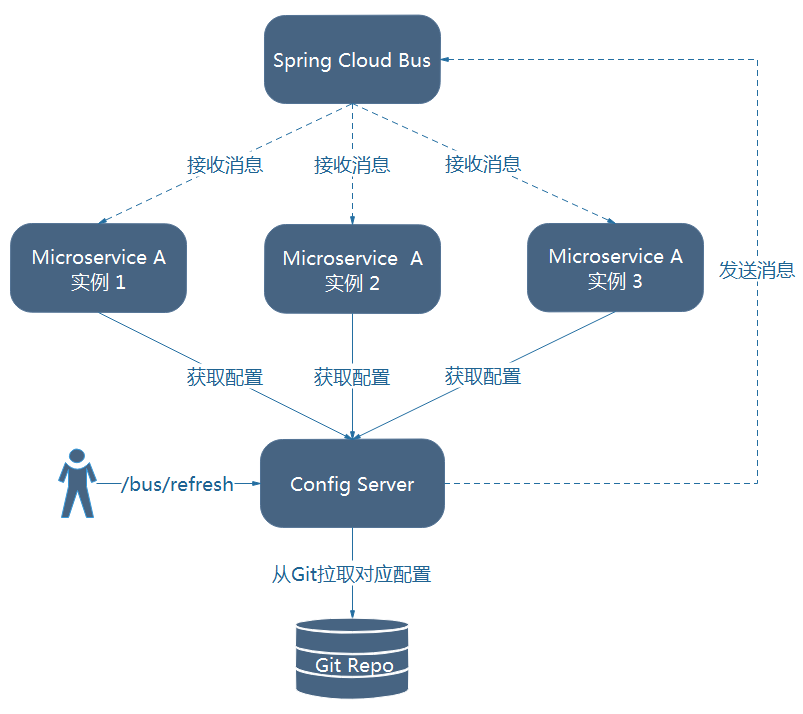
图9-4 使用Spring Cloud Bus的架构图
如图9-4,我们将Config Server也加入到消息总线中,并使用Config Server的/bus/refresh端点来实现配置的刷新。这样,各个微服务只需要关注自身的业务,而不再承担配置刷新的职责。
1.在springcloud-configServer中配置bus,加入pom依赖
<dependency>
  <groupId>org.springframework.cloud</groupId>
  <artifactId>spring-cloud-starter-bus-amqp</artifactId>
</dependency>
2.springcloud-configServer中配置bus ym文件
spring:
  rabbitmq:
    host: localhost
    port: 5672
    username: guest
    password: guest
  management:
    security:
      enabled: false #是否开启actuator安全认证
3.在微服务端springcloud-ssmServer配置bus接收
pom.xml
<dependency>
            <groupId>org.springframework.boot</groupId>
            <artifactId>spring-boot-starter-actuator</artifactId>
        </dependency>
        <dependency>
            <groupId>org.springframework.cloud</groupId>
            <artifactId>spring-cloud-starter-bus-amqp</artifactId>
        </dependency>
application.properties
#mq
spring.rabbitmq.host=localhost
spring.rabbitmq.port=5672
spring.rabbitmq.username=guest
spring.rabbitmq.password=guest

management.security.enabled=false
在需要自动刷新的位置加入@RefreshScope 例如
package com.pupeiyuan.controller;

import org.springframework.beans.factory.annotation.Value;
import org.springframework.cloud.context.config.annotation.RefreshScope;
import org.springframework.web.bind.annotation.GetMapping;
import org.springframework.web.bind.annotation.RestController;

@RestController
@RefreshScope
public class ConfigClientController {

    @Value("${multiple.datasource.master.InitialSize}")
      private String profile;

      @GetMapping("/profile")
      public String getProfile() {
        return this.profile;
      }
}
利用webhook自动请求,配置/bus/refresh到springcloud-configServer项目,springcloud-configServer在利用bus传播特性,通过mq传播到指定客户端进行更新
跟踪总线事件
一些场景下,我们可能希望知道Spring Cloud Bus事件传播的细节。此时,我们可以跟踪总线事件(RemoteApplicationEvent的子类都是总线事件)。
跟踪总线事件非常简单,只需设置spring.cloud.bus.trace.enabled=true ,这样在/bus/refresh端点被请求后,访问/trace端点就可获得类似如下的结果:
{
  "timestamp": 1481098786017,
  "info": {
    "signal": "spring.cloud.bus.ack",
    "event": "RefreshRemoteApplicationEvent",
    "id": "66d172e0-e770-4349-baf7-0210af62ea8d",
    "origin": "microservice-foo:8081",
    "destination": "**"
  }
},{
  "timestamp": 1481098779073,
  "info": {
    "signal": "spring.cloud.bus.sent",
    "type": "RefreshRemoteApplicationEvent",
    "id": "66d172e0-e770-4349-baf7-0210af62ea8d",
    "origin": "microservice-config-server:8080",
    "destination": "**:**"
  }
}...
这样,我们就可清晰地知道事件的传播细节。