HBase提示已创建表,但是list查询时,却显示表不存在。
https://blog.csdn.net/liu16659/article/details/80216085
下载网址
http://archive.apache.org/dist/hbase/
下载1.2.6bin.tar.gz
安装查看网址
https://www.cnblogs.com/lzxlfly/p/7221890.html
Hbase安装部署基本步骤:
1、在Hadoop配置的基础上,配置环境变量HBASE_HOME、hbase-env.sh
编辑 vim /etc/profile 加入
export HBASE_HOME=/home/hadoop/hadoop_home/hbase-1.2.6
export PATH=$PATH:$HBASE_HOME/bin
source ~/.profile
复制一下需要修改的内容
cp /home/hadoop/hadoop_home/hbase-1.2.6/conf/hbase-env.sh /home/hadoop/hadoop_home/hbase-1.2.6/conf/hbase-env.sh.bak
cp /home/hadoop/hadoop_home/hbase-1.2.6/conf/hbase-site.xml /home/hadoop/hadoop_home/hbase-1.2.6/conf/hbase-site.xml.bak
cp /home/hadoop/hadoop_home/hbase-1.2.6/conf/regionservers /home/hadoop/hadoop_home/hbase-1.2.6/conf/regionservers.bak
编辑vim /home/hadoop/hadoop_home/hbase-1.2.6/conf/hbase-env.sh 加入
export JAVA_HOME=/home/hadoop/hadoop_home/jdk1.8.0_181(jdk安装路径)
去掉注释 # export HBASE_MANAGES_ZK=true,不使用hbase自带zookeeper。
去掉注释 # export HBASE_MANAGES_ZK=true,。这里我们注释
或者改成false
HBase 需要依赖的 Jar 包
由于 HBase 需要依赖Hadoop,所以替换 HBase 的 lib 目录下的 jar 包,以解决兼容问题:
1) 删除原有的 jar:
$ rm -rf /home/admin/modules/hbase-1.2.6/lib/hadoop-*
$ rm -rf /home/admin/modules/hbase-1.2.6/lib/zookeeper-3.4.6.jar
2) 拷贝新 jar,涉及的 jar 有:
hadoop-annotations-2.7.2.jar
hadoop-auth-2.7.2.jar
hadoop-client-2.7.2.jar
hadoop-common-2.7.2.jar
hadoop-hdfs-2.7.2.jar
hadoop-mapreduce-client-app-2.7.2.jar
hadoop-mapreduce-client-common-2.7.2.jar
hadoop-mapreduce-client-core-2.7.2.jar
hadoop-mapreduce-client-hs-2.7.2.jar
hadoop-mapreduce-client-hs-plugins-2.7.2.jar
hadoop-mapreduce-client-jobclient-2.7.2.jar
hadoop-mapreduce-client-jobclient-2.7.2-tests.jar
hadoop-mapreduce-client-shuffle-2.7.2.jar
hadoop-yarn-api-2.7.2.jar
hadoop-yarn-applications-distributedshell-2.7.2.jar
hadoop-yarn-applications-unmanaged-am-launcher-2.7.2.jar
hadoop-yarn-client-2.7.2.jar
hadoop-yarn-common-2.7.2.jar
hadoop-yarn-server-applicationhistoryservice-2.7.2.jar
hadoop-yarn-server-common-2.7.2.jar
hadoop-yarn-server-nodemanager-2.7.2.jar
hadoop-yarn-server-resourcemanager-2.7.2.jar
hadoop-yarn-server-tests-2.7.2.jar
hadoop-yarn-server-web-proxy-2.7.2.jar
zookeeper-3.4.9.jar
尖叫提示:这些 jar 包的对应版本应替换成你目前使用的 hadoop 版本,具体情况具体分析。
查找 jar 包举例
$ find /home/admin/modules/hadoop-2.7.2/ -name hadoop-annotations*
然后将找到的 jar 包复制到 HBase 的 lib 目录下即可。
HBase 软连接 Hadoop 配置
$ ln -s ~/hadoop_home/etc/hadoop/core-site.xml ~/hadoop_home/hbase-1.2.6/conf/core-site.xml
$ ln -s ~/hadoop_home/etc/hadoop/hdfs-site.xml ~/hadoop_home/hbase-1.2.6/conf/hdfs-site.xml
2、配置hbase-site.xml文件
<configuration>
<property>
<name>hbase.rootdir</name> <!-- hbase存放数据目录 -->
<value>hdfs://master:9000/user/hadoop/hbase/hbase_db</value>
<!-- 端口要和Hadoop的fs.defaultFS端口一致-->
</property>
<property>
<name>hbase.cluster.distributed</name> <!-- 是否分布式部署 -->
<value>true</value>
</property>
<!-- 0.98 后的新变动,之前版本没有.port,默认端口为 60000 -->
<property>
<name>hbase.master.port</name>
<value>16000</value>
</property>
<property>
<name>hbase.zookeeper.quorum</name> <!-- list of zookooper -->
<value>master:2181,node1:2181,node2:2181</value>
</property>
<property><!--zookooper配置、日志等的存储位置 -->
<name>hbase.zookeeper.property.dataDir</name>
<value>/home/hadoop/hadoop_home/hbase-1.2.6/hbase/zookeeper</value>
</property>
</configuration>
3、配置regionservers
编辑 vim /opt/hbase-1.2.6/conf/regionservers 去掉默认的localhost,
加入node1、node2,(换行)保存退出
然后把在master上配置好的hbase,通过远程复制命令
scp -r /home/hadoop/hadoop_home/hbase-1.2.6/ node1:/home/hadoop/hadoop_home/
scp -r ~/.profile node1:/home/hadoop/.profile
然后在node1下
source ~/.profile
scp -r /home/hadoop/hadoop_home/hbase-1.2.6/ node2:/home/hadoop/hadoop_home/
scp -r ~/.profile node2:/home/hadoop/.profile
然后在node2下
source ~/.profile
复制到node1、node对应的位置
4、启动与停止Hbase
(1)在Hadoop已经启动成功的基础上,输入start-hbase.sh,过几秒钟便启动完成,
输入jps命令查看进程是否启动成功,若 master上出现HMaster、HQuormPeer,
slave上出现HRegionServer、HQuorumPeer,就是启动成功了。
(2)输入hbase shell 命令 进入hbase命令模式
输入status命令可以看到如下内容,1个master,2 servers,3机器全部成功启动。
1 active master, 0 backup masters, 2 servers, 0 dead, 2.0000 average load
(3)接下来配置本地hosts,(前边配置过的无需再配置了)
编辑 C:WindowsSystem32driversetc的hosts文件,加入
192.168.0.235 master
192.168.0.225 node1
192.168.0.215 node2
在浏览器中输入http://master:16010就可以在界面上看到hbase的配置了
(4)当要停止hbase时输入stop-hbase.sh,过几秒后hbase就会被停止了。
输入
hbase shell
进入hbase界面
尖叫提示: 如果集群之间的节点时间不同步,会导致 regionserver 无法启动,抛出
ClockOutOfSyncException 异常。
修复提示:
a、同步时间服务 请参看帮助文档:《大数据帮助文档 1.0》重启即可
b、属性:hbase.master.maxclockskew 设置更大的值
<property>
<name>hbase.master.maxclockskew</name>
<value>180000</value>
<description>Time difference of regionserver from master</description>
</property>
创建表的例子
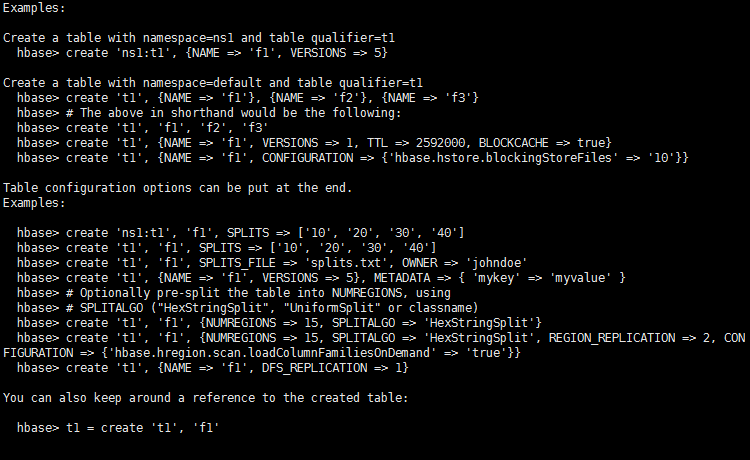
例如
create 'test','data' 建表
list 查看表
put 'test','row1','data:1','value1' 插入数据
put 'test','row2','data:2','value2'
put 'test','row3','data:3','value3'
然后查看表内容
scan 'test'

disable 'test' 移除表之前要设为禁用
drop 'test' 移除表
2.4、JavaAPI(或者新建空java工程,把hbase/lib下面所有包全部导出去放到java工程下lib包里,不需要maven)
2.4.1、安装 Maven 并配置环境变量
$ tar -zxf ~/softwares/installations/apache-maven-3.5.0-bin.tar.gz -C ~/modules/
在环境变量中添加:
MAVEN_HOME=/home/admin/modules/apache-maven-3.5.0
export PATH=$PATH:$MAVEN_HOME/bin
2.4.2、新建 Maven Project
新建项目后在 pom.xml 中添加依赖:
<dependency>
<groupId>org.apache.hbase</groupId>
<artifactId>hbase-server</artifactId>
<version>1.2.6</version>
</dependency>
<dependency>
<groupId>org.apache.hbase</groupId>
<artifactId>hbase-client</artifactId>
<version>1.2.6</version>
</dependency>
<dependency>
<groupId>jdk.tools</groupId>
<artifactId>jdk.tools</artifactId>
<version>1.8</version>
<scope>system</scope>
<systemPath>${JAVA_HOME}/lib/tools.jar</systemPath>
</dependency>

import org.apache.hadoop.conf.Configuration;
import org.apache.hadoop.hbase.*;
import org.apache.hadoop.hbase.client.*;
import org.apache.hadoop.hbase.util.Bytes;
import java.io.File;
import java.io.IOException;
import java.util.ArrayList;
import java.util.List;
public class Main {
//1) 首先需要获取 Configuration 对象:
public static Configuration conf;
static {
//使用 HBaseConfiguration 的单例方法实例化
conf = HBaseConfiguration.create();
conf.set("hbase.zookeeper.quorum", "master,node1,node2");
conf.set("hbase.zookeeper.property.clientPort", "2181");
conf.set("hbase.master", "master:60000");
}
public static void dropTable(String tableName) throws MasterNotRunningException, ZooKeeperConnectionException, IOException {
HBaseAdmin admin = new HBaseAdmin(conf);
if (isTableExist(tableName)) {
admin.disableTable(tableName);
admin.deleteTable(tableName);
System.out.println("表" + tableName + "删除成功!");
} else {
System.out.println("表" + tableName + "不存在!");
}
}
//向表中插入数据
public static void addRowData(String tableName, String rowKey, String columnFamily, String column, String value) throws IOException {
//创建 HTable 对象
HTable hTable = new HTable(conf, tableName);
//向表中插入数据
Put put = new Put(Bytes.toBytes(rowKey));
//向 Put 对象中组装数据
put.add(Bytes.toBytes(columnFamily), Bytes.toBytes(column), Bytes.toBytes(value));
hTable.put(put);
hTable.close();
System.out.println("插入数据成功");
}
//删除多行数据
public static void deleteMultiRow(String tableName, String... rows) throws IOException {
HTable hTable = new HTable(conf, tableName);
List<Delete> deleteList = new ArrayList<Delete>();
for (String row : rows) {
Delete delete = new Delete(Bytes.toBytes(row));
deleteList.add(delete);
}
hTable.delete(deleteList);
hTable.close();
}
//得到所有数据
public static void getAllRows(String tableName) throws IOException {
HTable hTable = new HTable(conf, tableName);
//得到用于扫描 region 的对象
Scan scan = new Scan();
//使用 HTable 得到 resultcanner 实现类的对象
ResultScanner resultScanner = hTable.getScanner(scan);
for (Result result : resultScanner) {
Cell[] cells = result.rawCells();
for (Cell cell : cells) {
//得到 rowkey
System.out.println("行键:" + Bytes.toString(CellUtil.cloneRow(cell)));
//得到列族
System.out.println("列族" + Bytes.toString(CellUtil.cloneFamily(cell)));
System.out.println("列:" + Bytes.toString(CellUtil.cloneQualifier(cell)));
System.out.println("值:" + Bytes.toString(CellUtil.cloneValue(cell)));
}
}
}
//得到某一行
public static void getRow(String tableName, String rowKey) throws IOException {
HTable table = new HTable(conf, tableName);
Get get = new Get(Bytes.toBytes(rowKey));
//get.setMaxVersions();显示所有版本
//get.setTimeStamp();显示指定时间戳的版本
Result result = table.get(get);
for (Cell cell : result.rawCells()) {
System.out.println("行键:" + Bytes.toString(result.getRow()));
System.out.println("列族" + Bytes.toString(CellUtil.cloneFamily(cell)));
System.out.println("列:" + Bytes.toString(CellUtil.cloneQualifier(cell)));
System.out.println("值:" + Bytes.toString(CellUtil.cloneValue(cell)));
System.out.println("时间戳:" + cell.getTimestamp());
}
}
//获取某一行指定“列族:列”的数据
public static void getRowQualifier(String tableName, String rowKey, String family, String qualifier) throws IOException {
HTable table = new HTable(conf, tableName);
Get get = new Get(Bytes.toBytes(rowKey));
get.addColumn(Bytes.toBytes(family), Bytes.toBytes(qualifier));
Result result = table.get(get);
for (Cell cell : result.rawCells()) {
System.out.println("行键:" + Bytes.toString(result.getRow()));
System.out.println("列族" + Bytes.toString(CellUtil.cloneFamily(cell)));
System.out.println("列:" + Bytes.toString(CellUtil.cloneQualifier(cell)));
System.out.println("值:" + Bytes.toString(CellUtil.cloneValue(cell)));
}
}
//主程序入口
public static void main(String args[]) throws IOException {
//System.out.println(isTableExist("student"));
//createTable("student2",new String[]{"info1","info2"});
//dropTable("student2");
//addRowData("student","1003","info","name","zhangy");
//deleteMultiRow("student",new String[]{"1002","1003"});
//getAllRows("student");
//getRow("student","1002");
getRowQualifier("student","1001","info","name");
}
//判断表是否存在
public static boolean isTableExist(String tableName) throws MasterNotRunningException, ZooKeeperConnectionException, IOException {
//在 HBase 中管理、访问表需要先创建 HBaseAdmin 对象
Connection connection = ConnectionFactory.createConnection(conf);
//HBaseAdmin admin = (HBaseAdmin) connection.getAdmin();
HBaseAdmin admin = new HBaseAdmin(conf);
return admin.tableExists(tableName);
}
//创建表
public static void createTable(String tableName, String... columnFamily) throws MasterNotRunningException, ZooKeeperConnectionException, IOException {
HBaseAdmin admin;
admin = new HBaseAdmin(conf);
//判断表是否存在
if (isTableExist(tableName)) {
System.out.println("表" + tableName + "已存在");
System.exit(0);
} else {
//创建表属性对象,表名需要转字节
HTableDescriptor descriptor = new HTableDescriptor(TableName.valueOf(tableName));
//创建多个列族
for (String cf : columnFamily) {
descriptor.addFamily(new HColumnDescriptor(cf));
}
//根据对表的配置,创建表
admin.createTable(descriptor);
System.out.println("表" + tableName + "创建成功!");
}
}
}
配置SSH所有机器之间免密码登录
(1)CentOS默认没有启动ssh无密登录,编辑 vim /etc/ssh/sshd_config,
去掉以下两行注释,开启Authentication免登陆。
#RSAAuthentication yes
#PubkeyAuthentication yes
如果是root用户下进行操作,还要去掉 #PermitRootLogin yes注释,允许root用户登录。
(2)输入命令,ssh-keygen -t rsa,生成key,一直按回车,
就会在/root/.ssh生成:authorized_keys id_rsa.pub id_rsa 三个文件,
这里要说的是,为了各个机器之间的免登陆,在每一台机器上都要进行此操作。
(3) 接下来,在master服务器,合并公钥到authorized_keys文件,
进入/root/.ssh目录,输入以下命令
cat id_rsa.pub>> authorized_keys 把master公钥合并到authorized_keys 中
ssh root@192.168.172.72 cat ~/.ssh/id_rsa.pub>> authorized_keys
ssh root@192.168.172.73 cat ~/.ssh/id_rsa.pub>> authorized_keys
把slave1、slave2公钥合并到authorized_keys 中
完成之后输入命令,把authorized_keys远程copy到slave1和slave2之中
scp authorized_keys 192.168.172.72:/root/.ssh/
scp authorized_keys 192.168.172.73:/root/.ssh/
最好在每台机器上进行chmod 600 authorized_keys操作,
使当前用户具有 authorized_keys的读写权限。
拷贝完成后,在每台机器上进行 service sshd restart 操作, 重新启动ssh服务。
之后在每台机器输入 ssh 192.168.172.xx,测试能否无需输入密码连接另外两台机器。