python3.6hdfs的使用
https://blog.csdn.net/qq_29863961/article/details/80291654
https://pypi.org/ 官网直接搜索hdfs就好

flume官网http://flume.apache.org/releases/content/1.9.0/FlumeUserGuide.html
最下方
一、Flume 简介
1) Flume 提供一个分布式的,可靠的,对大数据量的日志进行高效收集、聚集、移动的服务,
Flume 只能在 Unix 环境下运行。
2) Flume 基于流式架构,容错性强,也很灵活简单。
3) Flume、Kafka 用来实时进行数据收集,Spark、Storm 用来实时处理数据,impala 用来实
时查询
二flume角色

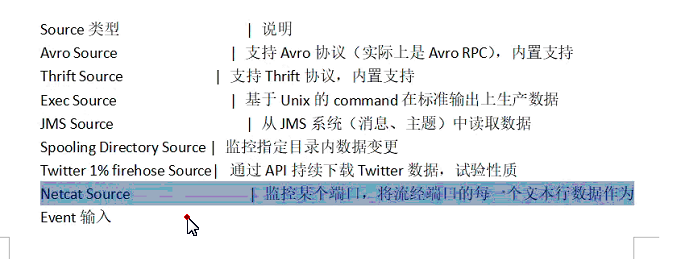
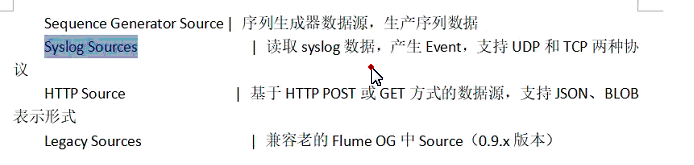
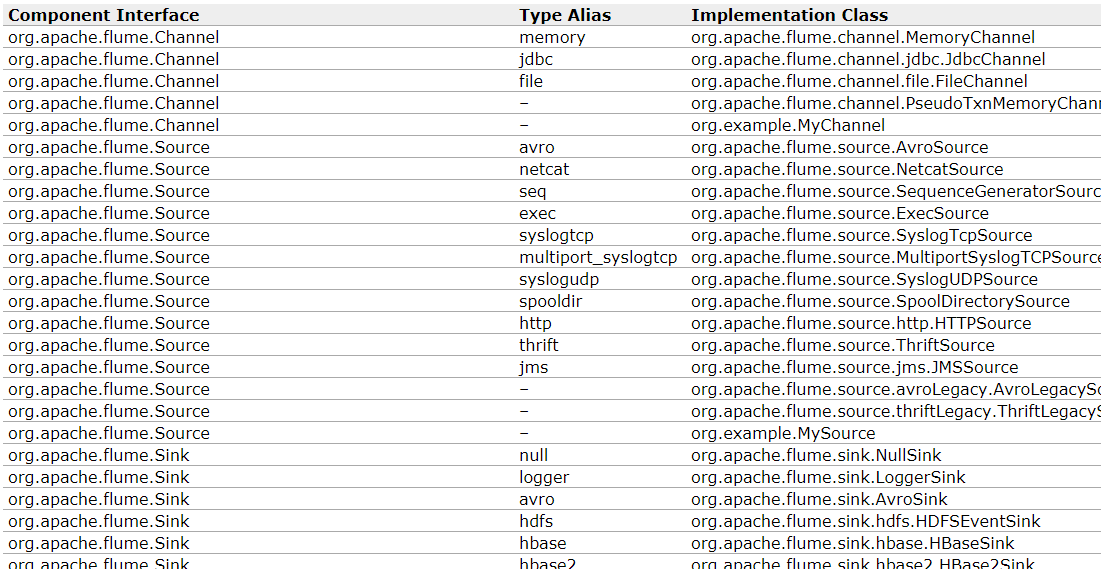
2.1、Source
用于采集数据,Source 是产生数据流的地方,同时 Source 会将产生的数据流传输到 Channel,
这个有点类似于 Java IO 部分的 Channel。
2.2、Channel
用于桥接 Sources 和 Sinks,类似于一个队列。
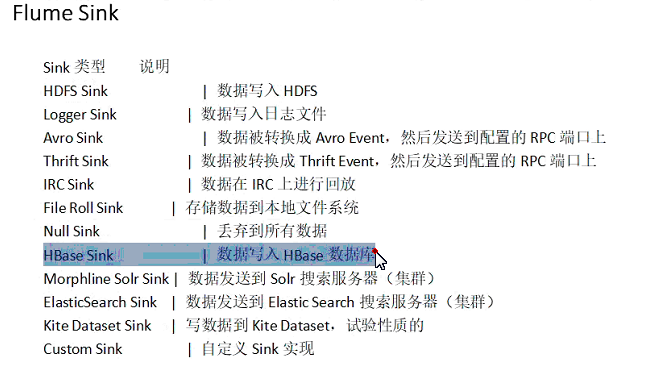
2.3、Sink
从 Channel 收集数据,将数据写到目标源(可以是下一个 Source,也可以是 HDFS 或者 HBase)。
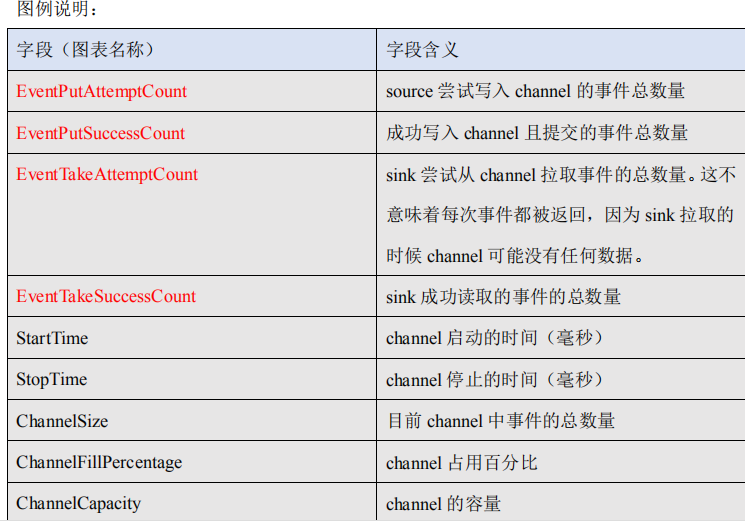
2.4、Event
传输单元,Flume 数据传输的基本单元,以事件的形式将数据从源头送至目的地。
三、Flume 传输过程
source 监控某个文件或数据流,数据源产生新的数据,拿到该数据后,将数据封装在一个
Event 中,并 put 到 channel 后 commit 提交,channel 队列先进先出,sink 去 channel 队列中
拉取数据,然后写入到 HDFS 中。
学习flume,下载地址
http://archive.apache.org/dist/flume/1.7.0/
170-bin.tar.gz版本
然后解压配置到hadoop_home目录下
之后在~/.profile文件配置环境变量,bin
export PATH=$PATH:$FLUME_HOME/bin
export FLUME_HOME=/home/hadoop/hadoop_home/apache-flume-1.7.0-bin
source ~/.profile
之后在解压后的包下的conf(即配置里找env.sh(没有就找类似的那个cp一个flume-env.sh文件))把javajdk的环境变量路径加进去即
export JAVA_HOME=/home/hadoop/hadoop_home/jdk1.8.0_181
然后输入flume-ng即可运行(在bin下)
下面是cmd里没有Telnet解决,在程序和功能里找,打开就好
把telnet客户端选中即可
案例一:监控端口数据
在conf/配置目录下,新建文件telnet.conf
内容如下(注释不需要加)
#Name the components on this agent
a1.sources = r1
a1.sinks = k1
a1.channels = c1
#Describe/configure the source
a1.sources.r1.type = netcat
a1.sources.r1.bind = localhost
a1.sources.r1.port = 44444
#Use a channel which buffers events in memory
a1.channels.c1.type = memory
a1.channels.c1.capacity = 1000
a1.channels.c1.transactionCapacity = 100
#Describe the sink
a1.sinks.k1.type = logger
#Bind the source and sink to the channel
a1.sources.r1.channels = c1
a1.sinks.k1.channel = c1
开启44444(即flume所在端口)
flume-ng agent --conf conf/ --name a1 --conf-file telnet.conf -Dflume.root.logger==INFO,console
若想要开启日志,则把-Dflume.root.logger==INFO,console去掉,这时候会将产生文件放在日志下面(即自带的log4j.properties)
记住,要么是在conf/目录下运行,要么加上所在目录,默认在当时所在目录下,相对路径
然后新打开一个shell窗口,判断44444端口是否打开
netstat -anpt |grep 44444
之后打开44444端口发送内容
telnet localhost 44444
python执行telnet代码连接(python3)
https://www.cnblogs.com/lsdb/p/9258964.html
https://docs.python.org/3/library/telnetlib.html
案例二:实时读取本地文件到 HDFS
目标:实时监控 hive 日志,并上传到 HDFS 中
1) 拷贝 Hadoop 相关 jar 到 Flume 的 lib 目录下(要学会根据自己的目录和版本查找 jar 包)
$ cp ./share/hadoop/hdfs/lib/htrace-core-3.1.0-incubating.jar ./lib/
$ cp ./share/hadoop/hdfs/lib/commons-io-2.4.jar ./lib/
尖叫提示:标红的 jar 为 1.99 版本 flume 必须引用的 jar
/home/hadoop/hadoop_home/apache-hive-2.3.4-bin/conf/hive-site.xml(hive日志所在地,只是查看和本利操作无关)

在home/hadoop/下面创建一个run_job.sh文件内容如下
#!/usr/bin/env bash
#source /home/hadoop/.profile
#pig -x mapreduce test.pig >> run.log (本注释内容,为之前用crontab定时器所用)
while : ;
do starttime=$(date +%Y-%m-%d %H:%M:%S);
echo $starttime + "Hello world!." >> /home/hadoop/test.log;sleep 1;
#(注意shell的格式,上面是输出时间加单词,追加到目录下的文件内(文件此时可以并没有))
done;
然后授权
chmod +x /home/hadoop/run_job.sh
粘贴复制的最好dos2unix run_job.sh一下
然后后台执行
nohup ./run_job.sh &
若想停止,则先用
ps -aux |grep run_job
然后kill即可
创建 flume-hdfs.conf 文件,在flume目录下的conf/文件夹下创建(本身在哪创建都可以只是要写到此次路径,才可以)
更改log日志文件位置
更改ip为master:9000
# Name the components on this agent
a2.sources = r2
a2.sinks = k2
a2.channels = c2
# Describe/configure the source
a2.sources.r2.type = exec
a2.sources.r2.command = tail -F /home/hadoop/test.log #(追踪生成的日志文件test.log,放在/home/hadoop/下面)
#用tail -F 而不用tail -f是因为,前者根据文件名进行追踪,并保持重试,即文件被删除或者改名后,如果再次创建该文件名,即可继续追踪,而后者根据文件描述符追踪,文件丢失之后不会继续追踪
a2.sources.r2.shell = /bin/bash -c
# Describe the sink
a2.sinks.k2.type = hdfs
a2.sinks.k2.hdfs.path = hdfs://master:90000/flume/%Y%m%d/%H#(master:9000为namenode端口号)
#上传文件的前缀
a2.sinks.k2.hdfs.filePrefix = logs-
#是否按照时间滚动文件夹
a2.sinks.k2.hdfs.round = true
#多少时间单位创建一个新的文件夹
a2.sinks.k2.hdfs.roundValue = 1
#重新定义时间单位
a2.sinks.k2.hdfs.roundUnit = minute
#是否使用本地时间戳
a2.sinks.k2.hdfs.useLocalTimeStamp = true
#积攒多少个 Event 才 flush 到 HDFS 一次
a2.sinks.k2.hdfs.batchSize = 1000
#设置文件类型,可支持压缩
a2.sinks.k2.hdfs.fileType = DataStream
#多久生成一个新的文件
a2.sinks.k2.hdfs.rollInterval = 600
#设置每个文件的滚动大小
a2.sinks.k2.hdfs.rollSize = 134217700
#文件的滚动与 Event 数量无关
a2.sinks.k2.hdfs.rollCount = 0
#最小冗余数
a2.sinks.k2.hdfs.minBlockReplicas = 1
# Use a channel which buffers events in memory
a2.channels.c2.type = memory
a2.channels.c2.capacity = 1000
a2.channels.c2.transactionCapacity = 100
# Bind the source and sink to the channel
a2.sources.r2.channels = c2
a2.sinks.k2.channel = c2
最后执行(下面句子是在flume目录下的conf/文件下运行的)
flume-ng agent --conf conf/ --name a2 --conf-file flume-hdfs.conf
失败的话
jps查看application 进程号
kill 9 进程号,杀进程强制
案例三:实时读取目录文件到 HDFS
在flume文件下创建文件夹
mkdir upload
编写run_job_dir.sh文件内容如下
#!/usr/bin/env bash
#source /home/hadoop/.profile
#pig -x mapreduce test.pig >> run.log
while : ;
do starttime=$(date +%Y-%m-%d\_%H:%M:%S);
file_time=$(date +%Y-%m-%d\_%H:%M:00);
echo $starttime + "Hello world!." >> /home/hadoop/hadoop_home/apache-flume-1.7.0-bin/upload/+$file_time+_test.log;
sleep 1;
done;
授权
chmod +x run_job_dir.sh
然后后台执行
nohup ./run_job_dir.sh &
若想停止,则先用
ps -aux |grep run_job_dir
然后kill即可
1) 创建配置文件 flume-dir.conf
内容如下(同样在conf/下面)
a3.sources = r3
a3.sinks = k3
a3.channels = c3
# Describe/configure the source
a3.sources.r3.type = spooldir
a3.sources.r3.spoolDir = /home/hadoop/hadoop_home/apache-flume-1.7.0-bin/upload #追踪目录所在地
a3.sources.r3.fileSuffix = .COMPLETED #结尾文件
a3.sources.r3.fileHeader = true
#忽略所有以.tmp 结尾的文件,不上传
a3.sources.r3.ignorePattern = ([^ ]*.tmp)
# Describe the sink
a3.sinks.k3.type = hdfs
a3.sinks.k3.hdfs.path = hdfs://master:9000/flume/upload/%Y%m%d/%H
#上传文件的前缀
a3.sinks.k3.hdfs.filePrefix = upload-
#是否按照时间滚动文件夹
a3.sinks.k3.hdfs.round = true
#多少时间单位创建一个新的文件夹
a3.sinks.k3.hdfs.roundValue = 1
#重新定义时间单位
a3.sinks.k3.hdfs.roundUnit = minute
#是否使用本地时间戳
a3.sinks.k3.hdfs.useLocalTimeStamp = true
#积攒多少个 Event 才 flush 到 HDFS 一次
a3.sinks.k3.hdfs.batchSize = 100
#设置文件类型,可支持压缩
a3.sinks.k3.hdfs.fileType = DataStream
#多久生成一个新的文件
a3.sinks.k3.hdfs.rollInterval = 600
#设置每个文件的滚动大小大概是 128M
a3.sinks.k3.hdfs.rollSize = 134217700
#文件的滚动与 Event 数量无关
a3.sinks.k3.hdfs.rollCount = 0
#最小冗余数
a3.sinks.k3.hdfs.minBlockReplicas = 1
# Use a channel which buffers events in memory
a3.channels.c3.type = memory
a3.channels.c3.capacity = 1000
a3.channels.c3.transactionCapacity = 100
# Bind the source and sink to the channel
a3.sources.r3.channels = c3
a3.sinks.k3.channel = c3
同样在conf/文件下运行
flume-ng agent --conf conf/ --name a3 --conf-file flume-dir.conf
如果出现问题,记得节点也打开
案例四:Flume 与 Flume 之间数据传递:单 Flume 多 Channel、
Sink,
目标:使用 flume-1 监控文件变动,flume-1 将变动内容传递给 flume-2,flume-2 负责存储到
HDFS。同时 flume-1 将变动内容传递给 flume-3,flume-3 负责输出到。
local filesystem。
在conf/job 文件夹下面创三个flumeconf
flume-1.conf
创建 flume-1.conf,用于监控 hive.log 文件的变动,同时产生两个 channel 和两个 sink 分
别输送给 flume-2 和 flume3:
# Name the components on this agent
a1.sources = r1
a1.sinks = k1 k2
a1.channels = c1 c2
# 将数据流复制给多个 channel
a1.sources.r1.selector.type = replicating
# Describe/configure the source
a1.sources.r1.type = exec
a1.sources.r1.command = tail -F /home/hadoop/test.log
#或者/tmp/hadoop/hive.log
a1.sources.r1.shell = /bin/bash -c
# Describe the sink
a1.sinks.k1.type = avro
a1.sinks.k1.hostname = master
a1.sinks.k1.port = 4141
a1.sinks.k2.type = avro
a1.sinks.k2.hostname = master
a1.sinks.k2.port = 4142
# Describe the channel
a1.channels.c1.type = memory
a1.channels.c1.capacity = 1000
a1.channels.c1.transactionCapacity = 100
a1.channels.c2.type = memory
a1.channels.c2.capacity = 1000
a1.channels.c2.transactionCapacity = 100
# Bind the source and sink to the channel
a1.sources.r1.channels = c1 c2
a1.sinks.k1.channel = c1
a1.sinks.k2.channel = c2
flume-2.conf
创建 flume-2.conf,用于接收 flume-1 的 event,同时产生 1 个 channel 和 1 个 sink,将数
据输送给 hdfs:
# Name the components on this agent
a2.sources = r1
a2.sinks = k1
a2.channels = c1
# Describe/configure the source
a2.sources.r1.type = avro
a2.sources.r1.bind = master
a2.sources.r1.port = 4141
# Describe the sink
a2.sinks.k1.type = hdfs
a2.sinks.k1.hdfs.path = hdfs://master:9000/flume2/%Y%m%d/%H
#上传文件的前缀
a2.sinks.k1.hdfs.filePrefix = flume2-
#是否按照时间滚动文件夹
a2.sinks.k1.hdfs.round = true
#多少时间单位创建一个新的文件夹
a2.sinks.k1.hdfs.roundValue = 1
#重新定义时间单位
a2.sinks.k1.hdfs.roundUnit = hour
#是否使用本地时间戳
a2.sinks.k1.hdfs.useLocalTimeStamp = true
#积攒多少个 Event 才 flush 到 HDFS 一次
a2.sinks.k1.hdfs.batchSize = 100
#设置文件类型,可支持压缩
a2.sinks.k1.hdfs.fileType = DataStream
#多久生成一个新的文件
a2.sinks.k1.hdfs.rollInterval = 600
#设置每个文件的滚动大小大概是 128M
a2.sinks.k1.hdfs.rollSize = 134217700
#文件的滚动与 Event 数量无关
a2.sinks.k1.hdfs.rollCount = 0
#最小冗余数
a2.sinks.k1.hdfs.minBlockReplicas = 1
# Describe the channel
a2.channels.c1.type = memory
a2.channels.c1.capacity = 1000
a2.channels.c1.transactionCapacity = 100
# Bind the source and sink to the channel
a2.sources.r1.channels = c1
a2.sinks.k1.channel = c1
flume-3.conf
3) 创建 flume-3.conf,用于接收 flume-1 的 event,同时产生 1 个 channel 和 1 个 sink,将数
据输送给本地目录:
# Name the components on this agent
a3.sources = r1
a3.sinks = k1
a3.channels = c1
# Describe/configure the source
a3.sources.r1.type = avro
a3.sources.r1.bind = master
a3.sources.r1.port = 4142
# Describe the sink
a3.sinks.k1.type = file_roll
a3.sinks.k1.sink.directory = /home/hadoop/flume3
# Describe the channel
a3.channels.c1.type = memory
a3.channels.c1.capacity = 1000
a3.channels.c1.transactionCapacity = 100
# Bind the source and sink to the channel
a3.sources.r1.channels = c1
a3.sinks.k1.channel = c1
尖叫提示:输出的本地目录必须是已经存在的目录,如果该目录不存在,并不会创建新的目
录。
即在/home/hadoop/下面创建文件夹
mkdir flume3/
运行的前提,打开集群和节点
start-all.sh
4) 执行测试:分别开启对应 flume-job(依次启动 flume-3,flume-2,flume-1),同时产生
文件变动并观察结果:
flume-ng agent --conf conf/ --name a3 --conf-file job/flume-3.conf
flume-ng agent --conf conf/ --name a2 --conf-file job/flume-2.conf
flume-ng agent --conf conf/ --name a1 --conf-file job/flume-1.conf
4.2.5、案例五:Flume 与 Flume 之间数据传递,多 Flume 汇总数据
到单 Flume
目标:flume-1 监控文件 hive.log,flume-2 监控某一个端口的数据流,flume-1 与 flume-2 将
数据发送给 flume-3,flume3 将最终数据写入到 HDFS。
分步实现:
1) 创建 flume-1.conf,用于监控 hive.log 文件,同时 sink 数据到 flume-3:
flume-5-1.conf
# Name the components on this agent
a1.sources = r1
a1.sinks = k1
a1.channels = c1
# Describe/configure the source
a1.sources.r1.type = exec
a1.sources.r1.command = tail -F /home/hadoop/test.log
#或者用/tmp/hadoop/hive.log
a1.sources.r1.shell = /bin/bash -c
# Describe the sink
a1.sinks.k1.type = avro
a1.sinks.k1.hostname = master
a1.sinks.k1.port = 4141
# Describe the channel
a1.channels.c1.type = memory
a1.channels.c1.capacity = 1000
a1.channels.c1.transactionCapacity = 100
# Bind the source and sink to the channel
a1.sources.r1.channels = c1
a1.sinks.k1.channel = c1
2) 创建 flume-2.conf,用于监控端口 44444 数据流,同时 sink 数据到 flume-3:
flume-5-2.conf
# Name the components on this agent
a2.sources = r1
a2.sinks = k1
a2.channels = c1
# Describe/configure the source
a2.sources.r1.type = netcat
a2.sources.r1.bind = master
a2.sources.r1.port = 44444
# Describe the sink
a2.sinks.k1.type = avro
a2.sinks.k1.hostname = master
a2.sinks.k1.port = 4141
# Use a channel which buffers events in memory
a2.channels.c1.type = memory
a2.channels.c1.capacity = 1000
a2.channels.c1.transactionCapacity = 100
# Bind the source and sink to the channel
a2.sources.r1.channels = c1
a2.sinks.k1.channel = c1
3) 创建 flume-3.conf,用于接收 flume-1 与 flume-2 发送过来的数据流,最终合并后 sink 到
HDFS:
flume-5-3.conf
# Name the components on this agent
a3.sources = r1
a3.sinks = k1
a3.channels = c1
# Describe/configure the source
a3.sources.r1.type = avro
a3.sources.r1.bind = master
a3.sources.r1.port = 4141
# Describe the sink
a3.sinks.k1.type = hdfs
a3.sinks.k1.hdfs.path = hdfs://master:9000/flume3/%Y%m%d/%H
#上传文件的前缀
a3.sinks.k1.hdfs.filePrefix = flume3-
#是否按照时间滚动文件夹
a3.sinks.k1.hdfs.round = true
#多少时间单位创建一个新的文件夹
a3.sinks.k1.hdfs.roundValue = 1
#重新定义时间单位
a3.sinks.k1.hdfs.roundUnit = hour
#是否使用本地时间戳
a3.sinks.k1.hdfs.useLocalTimeStamp = true
#积攒多少个 Event 才 flush 到 HDFS 一次
a3.sinks.k1.hdfs.batchSize = 100
#设置文件类型,可支持压缩
a3.sinks.k1.hdfs.fileType = DataStream
#多久生成一个新的文件
a3.sinks.k1.hdfs.rollInterval = 600
#设置每个文件的滚动大小大概是 128M
a3.sinks.k1.hdfs.rollSize = 134217700
#文件的滚动与 Event 数量无关
a3.sinks.k1.hdfs.rollCount = 0
#最小冗余数
a3.sinks.k1.hdfs.minBlockReplicas = 1
# Describe the channel
a3.channels.c1.type = memory
a3.channels.c1.capacity = 1000
a3.channels.c1.transactionCapacity = 100
# Bind the source and sink to the channel
a3.sources.r1.channels = c1
a3.sinks.k1.channel = c1
编写针对第二个flume的44444端口的自动写入脚本python,(在/home/hadoop/下即可)
#!/usr/bin/python3
import socket
import time
def get_ip_status(ip,port):
server = socket.socket(socket.AF_INET, socket.SOCK_STREAM)
try:
server.connect((ip,port))
print('{0} port {1} is open'.format(ip, port))
str_buf = "Hello world!."
while True:
server.sendall(bytes("Hello World!.",encoding="utf-8"))
time.sleep(1)
#print(server.recv(1024))
except Exception as err:
print(err)
finally:
server.close()
if __name__ == '__main__':
host = '192.168.0.235'
#for port in range(20,100):记得上面修改为自己的ip
get_ip_status(host,44444)
chmod +x test_telnet.py
后台运行即可
nohup ./test_telnet.py &
4) 执行测试:分别开启对应 flume-job(依次启动 flume-3,flume-2,flume-1),同时产生
文件变动并观察结果:
flume-ng agent --conf conf/ --name a3 --conf-file job/flume-5-3.conf
flume-ng agent --conf conf/ --name a2 --conf-file job/flume-5-2.conf
flume-ng agent --conf conf/ --name a1 --conf-file job/flume-5-1.conf
五、Flume 监控之 Ganglia
Ubuntu 1604安装ganglia
https://my.oschina.net/jiaoyanli/blog/823407(有错误,根据情况而定,最好用下面的)
Ganglia 监控实战!
https://blog.csdn.net/u014743697/article/details/54999356/
Ganglia的安装、配置、运行
https://blog.csdn.net/xhb306286215/article/details/72673114
技术架构
Ganglia系统主要分为以下三个模块:
Gmond: Gmond运行于每个被监控节点上,主要负责收集和发送监控数据
Gmetad: Gmetad运行与每个集群的一台主机上,用于汇总每个节点收集的数据,并将其存储在RDD 存储引擎中
Gweb: Gweb用于图表化显示gmetad收集的数据,运行于apache服务器上,一般与集群中gmetad部署 在同一机器上
机器配置:
控制结点主机:192.168.0.235
被监控结点:192.168.0.235, 192.168.0.225
安装步骤
或者切换到root用户,不需要sudo
然后下载阿里云,搜索Ubuntu1604 apt-get 源即可
1.sudo apt-get update
2.sudo apt-get install rrdtool apache2 php ganglia-monitor gmetad ganglia-webfrontend
apt-get install libapache2-mod-php7.0 php7.0-xml ; sudo /etc/init.d/apache2 restart
过程中出现apache2重启的对话框,选择yes即可
3.复制 Ganglia webfrontend Apache 配置:
sudo cp /etc/ganglia-webfrontend/apache.conf /etc/apache2/sites-enabled/ganglia.conf
4.编辑gmetad配置文件 sudo vi /etc/ganglia/gmetad.conf
更改数据源 data_source “my cluster” localhost
修改为:
data_source “test_ganglia” 192.168.0.235
gridname “mygird”
5.编辑gmond配置文件
sudo vi /etc/ganglia/gmond.conf
将
cluster { name = “unspecified” owner = “unspecified” latlong = “unspecified” url = “unspecified” }
修改为
cluster { name = “test_ganglia” owner = “unspecified” latlong = “unspecified” url = “unspecified” }
使用单播模式
相应修改如下
udp_send_channel { # mcast_join = 239.2.11.71 host=172.18.215.138 port = 8649 ttl = 1 }
udp_recv_channel { # mcast_join = 239.2.11.71 port = 8649 # bind = 239.2.11.71 }
本人未进行此项操作,可以出来ganglia页面
6.sudo ln -s /usr/share/ganglia-webfrontend/ /var/www/ganglia
7.重启服务
sudo /etc/init.d/ganglia-monitor restart
sudo /etc/init.d/gmetad restart
sudo /etc/init.d/apache2 restart
8.如果出现
Sorry, you do not have access to this resource. “); } try { dwoo=newDwoo(dwoo=newDwoo(conf[‘dwoo_compiled_dir’], conf['dwoo_cache_dir']); } catch (Exceptionconf['dwoo_cache_dir']); } catch (Exceptione) { print “
是因为缺少mod-php和php7.0-xml模块:
sudo apt-get install libapache2-mod-php7.0 php7.0-xml ; sudo /etc/init.d/apache2 restart
9.主机192.168.0.235
只需要安装ganglia-monitor模块,同时将209上的gmond.conf文件复制过来,重启服务ganglia-monitor,登陆http://192.168.0.235/ganglia查看监控效果
网址报错
<?PHP
include_once“./ eval_conf.php”;
#ATD  - 必须在get_context.php之前包含function.php。它定义了一些所需的功能。
include_once“./ functions.php”;
include_once“./ get_context.php”;
include_once“./ ganglia.php”;
include_once“./ get_ganglia.php”;
include_once“./ dwoo / dwooAutoload.php”;

$ resource = GangliaAcl :: ALL_CLUSTERS;
if($ context ==“grid”){
  $ resource = $ grid;
} else if($ context ==“cluster”|| $ context ==“host”){
  $ resource = $ clustername;
}
if(!checkAccess($ resource,GangliaAcl :: VIEW,$ conf)){
  header(“HTTP / 1.1 403 Access Denied”);
  die(“<html> <head> <title>访问被拒绝</ title> <body> <h4>抱歉,您无权访问此资源。</ h4> </ body> </ html>”);
}


尝试
   {
      $ dwoo = new Dwoo($ conf ['dwoo_compiled_dir'],$ conf ['dwoo_cache_dir']);
   }
catch(例外$ e)
   {
   print“<H4>初始化Dwoo PHP模板引擎时出错:”。
      $ e-> getMessage()。“<br> <br>编译目录应该由apache用户拥有和写入。</ H4>”;
      出口;
   }

#对插件很有用。
$ GHOME =“。”;

if($ context ==“meta”或$ context ==“control”){
      $ title =“$ self $ {conf ['meta_designator']}报告”;
      include_once“./ header.php”;
      include_once“./ meta_view.php”;
} else if($ context ==“tree”){
      $ title =“$ self $ {conf ['meta_designator']}树”;
      include_once“./ header.php”;
      include_once“./ grid_tree.php”;
} else if($ context ==“cluster”或$ context ==“cluster-summary”){
      if(preg_match('/ cluster / i',$ clustername))
         $ title =“$ clustername Report”;
      其他
         $ title =“$ clustername Cluster Report”;

      include_once“./ header.php”;
      include_once“./cluster_view.php”;
} else if($ context ==“physical”){
      $ title =“$ clustername物理视图”;
      include_once“./ header.php”;
      include_once“./ physical_view.php”;
} else if($ context ==“node”){
      $ title =“$ hostname节点视图”;
      include_once“./ header.php”;
      include_once“./ show_node.php”;
} else if($ context ==“host”){
      $ title =“$ hostname Host Report”;
      include_once“./ header.php”;
      include_once“./ host_view.php”;
} else if($ context ==“views”){
      $ title =“$ viewname view”;
      include_once“./ header.php”;
      include_once“./ views_view.php”;
} else if($ context ==“compare_hosts”){
      $ title =“比较主机”;
      include_once“./ header.php”;
      include_once“./ compare_hosts.php”;
} else if($ context ==“decompose_graph”){
      $ title =“分解图”;
      include_once“./ header.php”;
      include_once“./ decompose_graph.php”;
} else {
      $ title =“未知的上下文”;
      打印“未知的上下文错误:您是否指定了主机但未指定群集?”;
}
include_once“./ footer.php”;

?>


centos配置ganglia
1) 安装 httpd 服务与 php
# yum -y install httpd php
2) 安装其他依赖
# yum -y install rrdtool perl-rrdtool rrdtool-devel
# yum -y install apr-devel
3) 安装 ganglia
# rpm -Uvh http://dl.fedoraproject.org/pub/epel/6/x86_64/epel-release-6-8.noarch.rpm
# yum -y install ganglia-gmetad
# yum -y install ganglia-web
# yum install -y ganglia-gmond
4) 修改配置文件
文件 ganglia.conf:
# vi /etc/httpd/conf.d/ganglia.conf
修改为:
#
# Ganglia monitoring system php web frontend
#
Alias /ganglia /usr/share/ganglia
<Location /ganglia>
Order deny,allow
Deny from all
Allow from all
# Allow from 127.0.0.1
# Allow from ::1
# Allow from .example.com
</Location>
文件 gmetad.conf:
# vi /etc/ganglia/gmetad.conf
修改为:
data_source "linux" 192.168.0.235
文件 gmond.conf:
# vi /etc/ganglia/gmond.conf
修改为:
cluster {
name = "linux"
owner = "unspecified"
latlong = "unspecified"
url = "unspecified"
}
udp_send_channel {
#bind_hostname = yes # Highly recommended, soon to be default.
# This option tells gmond to use a source address
# that resolves to the machine's hostname. Without
# this, the metrics may appear to come from any
# interface and the DNS names associated with
# those IPs will be used to create the RRDs.
# mcast_join = 239.2.11.71
host = 192.168.0.235
port = 8649
ttl = 1
}
udp_recv_channel {
# mcast_join = 239.2.11.71
port = 8649
bind = 192.168.0.235
retry_bind = true
# Size of the UDP buffer. If you are handling lots of metrics you really
# should bump it up to e.g. 10MB or even higher.
# buffer = 10485760
}
文件 config:
# vi /etc/selinux/config
修改为:
# This file controls the state of SELinux on the system.
# SELINUX= can take one of these three values:
# enforcing - SELinux security policy is enforced.
# permissive - SELinux prints warnings instead of enforcing.
# disabled - No SELinux policy is loaded.
SELINUX=disabled
# SELINUXTYPE= can take one of these two values:
# targeted - Targeted processes are protected,
# mls - Multi Level Security protection.
SELINUXTYPE=targeted
尖叫提示:selinux 本次生效关闭必须重启,如果此时不想重启,可以临时生效之:
$ sudo setenforce 0
5) 启动 ganglia
$ sudo service httpd start
$ sudo service gmetad start
$ sudo service gmond start
6) 打开网页浏览 ganglia 页面
http://192.168.0.235/ganglia
尖叫提示:如果完成以上操作依然出现权限不足错误,请修改/var/lib/ganglia 目录的权限:
$ sudo chmod -R 777 /var/lib/ganglia
5.2 操作 Flume 测试监控
1) 修改 flume-env.sh 配置:
JAVA_OPTS="-Dflume.monitoring.type=ganglia
-Dflume.monitoring.hosts=192.168.216.20:8649
-Xms100m
-Xmx200m"
2) 启动 flume 任务
$ bin/flume-ng agent
--conf conf/
--name a1
--conf-file job/group-job0/flume-telnet.conf
-Dflume.root.logger==INFO,console
-Dflume.monitoring.type=ganglia
-Dflume.monitoring.hosts=192.168.216.20:8649
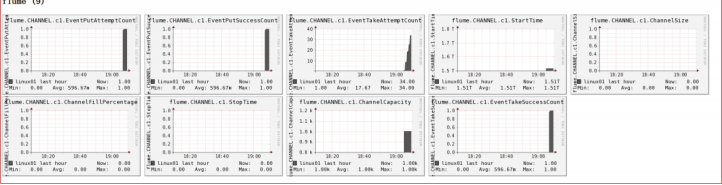
3) 发送数据观察 ganglia 监测图
$ telnet localhost 44444
样式如图