地址簿示例展示了如何使用代理模型在单个模型的数据上显示不同的视图。
本例提供了一个地址簿,允许按字母顺序将联系人分组为9组:ABC、DEF、GHI、…,VW,…XYZ。这是通过在同一个模型上使用多个视图实现的,每个视图都使用QSortFilterProxyModel类的一个实例进行过滤。
综述
地址簿包含5个类:MainWindow、AddressWidget、TableModel、NewAddressTab和AddDialog。MainWindow类使用AddressWidget作为其中心小部件,并提供文件和工具菜单。
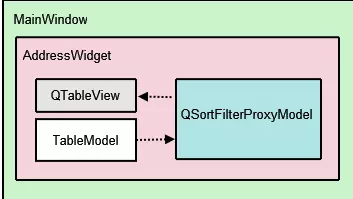
AddressWidget类是一个QTabWidget子类,用于操作示例中显示的10个选项卡:9个字母组选项卡和NewAddressTab的一个实例。NewAddressTab类是QWidget的一个子类,它只在地址簿为空时使用,提示用户添加一些联系人。AddressWidget还与TableModel实例交互,以添加、编辑和删除地址簿中的条目。
TableModel是QAbstractTableModel的子类,它提供了访问数据的标准模型/视图API。它包含一个已添加的联系人列表。然而,这些数据并不是都显示在单个选项卡中。相反,根据字母表组,QTableView被用来提供相同数据的9个不同视图。
QSortFilterProxyModel是负责从所有联系人中过滤每组联系人的类。每个代理模型都使用一个QRegExp来过滤不属于相应字母组的联系人。AddDialog类用于从用户获取地址簿的信息。这个QDialog子类由NewAddressTab实例化来添加联系人,并由AddressWidget实例化来添加和编辑联系人。
我们从TableModel实现开始。0
TableModel Class Definition
TableModel类通过子类化QAbstractTableModel提供标准API来访问联系人列表中的数据。为此必须实现的基本函数是:rowCount()、columnCount()、data()、headerData()。要使TableModel可编辑,它必须提供insertRows()、removeRows()、setData()和flags()函数的实现。
  struct Contact
  {
      QString name;
      QString address;

      bool operator==(const Contact &other) const
      {
          return name == other.name && address == other.address;
      }
  };

  inline QDataStream &operator<<(QDataStream &stream, const Contact &contact)
  {
      return stream << contact.name << contact.address;
  }

  inline QDataStream &operator>>(QDataStream &stream, Contact &contact)
  {
      return stream >> contact.name >> contact.address;
  }

  class TableModel : public QAbstractTableModel
  {
      Q_OBJECT

  public:
      TableModel(QObject *parent = 0);
      TableModel(QList<Contact> contacts, QObject *parent = 0);

      int rowCount(const QModelIndex &parent) const override;
      int columnCount(const QModelIndex &parent) const override;
      QVariant data(const QModelIndex &index, int role) const override;
      QVariant headerData(int section, Qt::Orientation orientation, int role) const override;
      Qt::ItemFlags flags(const QModelIndex &index) const override;
      bool setData(const QModelIndex &index, const QVariant &value, int role = Qt::EditRole) override;
      bool insertRows(int position, int rows, const QModelIndex &index = QModelIndex()) override;
      bool removeRows(int position, int rows, const QModelIndex &index = QModelIndex()) override;
      QList<Contact> getContacts() const;

  private:
      QList<Contact> contacts;
  };
使用了两个构造函数,一个默认构造函数使用TableModel自己的QList<Contact>,另一个构造函数使用QList<Contact>作为参数,以方便使用。
TableModel Class Implementation
我们实现头文件中定义的两个构造函数。第二个构造函数使用参数值初始化模型中的联系人列表。
  TableModel::TableModel(QObject *parent)
      : QAbstractTableModel(parent)
  {
  }

  TableModel::TableModel(QList<Contact> contacts, QObject *parent)
      : QAbstractTableModel(parent)
      , contacts(contacts)
  {
  }
The rowCount() and columnCount()返回模型的维数。然而,rowCount()的值将根据添加到地址簿的联系人数量而变化,columnCount()的值总是2,因为我们只需要名称和地址列的空间。
注意:q_unavailable()宏防止编译器生成关于未使用参数的警告。
  int TableModel::rowCount(const QModelIndex &parent) const
  {
      Q_UNUSED(parent);
      return contacts.size();
  }

  int TableModel::columnCount(const QModelIndex &parent) const
  {
      Q_UNUSED(parent);
      return 2;
  }
data()函数的作用是:根据提供的模型索引的内容返回名称或地址。模型索引中存储的行号用于引用联系人列表中的项。选择操作由QItemSelectionModel处理,该模型将用AddressWidget解释。
  QVariant TableModel::data(const QModelIndex &index, int role) const
  {
      if (!index.isValid())
          return QVariant();

      if (index.row() >= contacts.size() || index.row() < 0)
          return QVariant();

      if (role == Qt::DisplayRole) {
          const auto &contact = contacts.at(index.row());

          if (index.column() == 0)
              return contact.name;
          else if (index.column() == 1)
              return contact.address;
      }
      return QVariant();
  }
headerData()函数的作用是:显示表的标题、名称和地址。如果您的地址簿需要编号的条目,可以使用我们在本例中隐藏的垂直标题(请参阅AddressWidget实现)。
  QVariant TableModel::headerData(int section, Qt::Orientation orientation, int role) const
  {
      if (role != Qt::DisplayRole)
          return QVariant();

      if (orientation == Qt::Horizontal) {
          switch (section) {
              case 0:
                  return tr("Name");

              case 1:
                  return tr("Address");

              default:
                  return QVariant();
          }
      }
      return QVariant();
  }
在添加新数据之前调用insertRows()函数,否则将不会显示数据。调用beginInsertRows()和endInsertRows()函数,以确保所有连接的视图都知道这些更改。
  bool TableModel::insertRows(int position, int rows, const QModelIndex &index)
  {
      Q_UNUSED(index);
      beginInsertRows(QModelIndex(), position, position + rows - 1);

      for (int row = 0; row < rows; ++row)
          contacts.insert(position, { QString(), QString() });

      endInsertRows();
      return true;
  }
removeRows()函数的作用是:删除数据。再次调用beginRemoveRows()和endRemoveRows(),以确保所有连接的视图都知道这些更改。
  bool TableModel::removeRows(int position, int rows, const QModelIndex &index)
  {
      Q_UNUSED(index);
      beginRemoveRows(QModelIndex(), position, position + rows - 1);

      for (int row = 0; row < rows; ++row)
          contacts.removeAt(position);

      endRemoveRows();
      return true;
  }
setData()函数的作用是将数据逐项而不是逐行插入表中。这意味着要填充地址簿中的一行,必须调用两次setData(),因为每一行有两列。发出dataChanged()信号很重要,因为它告诉所有连接的视图更新其显示。
  bool TableModel::setData(const QModelIndex &index, const QVariant &value, int role)
  {
      if (index.isValid() && role == Qt::EditRole) {
          int row = index.row();

          auto contact = contacts.value(row);

          if (index.column() == 0)
              contact.name = value.toString();
          else if (index.column() == 1)
              contact.address = value.toString();
          else
              return false;

          contacts.replace(row, contact);
          emit dataChanged(index, index, {role});

          return true;
      }

      return false;
  }
flag()函数的作用是:返回给定索引的项标志。
  Qt::ItemFlags TableModel::flags(const QModelIndex &index) const
  {
      if (!index.isValid())
          return Qt::ItemIsEnabled;

      return QAbstractTableModel::flags(index) | Qt::ItemIsEditable;
  }
我们设置Qt::ItemIsEditable标志,因为我们希望允许编辑TableModel。虽然在这个例子中我们没有使用QTableView对象的编辑特性,但是我们在这里启用了它们,这样我们就可以在其他程序中重用这个模型。
TableModel中的最后一个函数getContacts()返回QList<Contact>对象,该对象保存通讯录中的所有联系人。稍后,我们将使用此函数获取联系人列表,以检查现有条目,将联系人写入文件并将其读取回来。AddressWidget给出了进一步的解释。
AddressWidget Class Definition
AddressWidget类在技术上是本例中涉及的主要类,因为它提供了添加、编辑和删除联系人、将联系人保存到文件中以及从文件中加载联系人的功能。
  class AddressWidget : public QTabWidget
  {
      Q_OBJECT

  public:
      AddressWidget(QWidget *parent = 0);
      void readFromFile(const QString &fileName);
      void writeToFile(const QString &fileName);

  public slots:
      void showAddEntryDialog();
      void addEntry(QString name, QString address);
      void editEntry();
      void removeEntry();

  signals:
      void selectionChanged (const QItemSelection &selected);

  private:
      void setupTabs();

      TableModel *table;
      NewAddressTab *newAddressTab;
      QSortFilterProxyModel *proxyModel;
  };
AddressWidget扩展了QTabWidget,以便容纳10个标签(NewAddressTab和9个字母组标签),并操作标签、TableModel对象、proxyModel、QSortFilterProxyModel对象(我们用来过滤条目)和tableView、QTableView对象。
AddressWidget Class Implementation
AddressWidget构造函数接受父小部件并实例化NewAddressTab、TableModel和QSortFilterProxyModel。添加NewAddressTab对象(用于指示地址簿为空),其余9个选项卡使用setupTabs()设置。
  AddressWidget::AddressWidget(QWidget *parent)
      : QTabWidget(parent)
  {
      table = new TableModel(this);
      newAddressTab = new NewAddressTab(this);
      connect(newAddressTab, &NewAddressTab::sendDetails,
          this, &AddressWidget::addEntry);

      addTab(newAddressTab, "Address Book");

      setupTabs();
  }
setupTabs()函数的作用是:在AddressWidget中设置9个字母组选项卡、表视图和代理模型。每个代理模型依次设置为使用不区分大小写的QRegExp对象根据相关字母表组过滤联系人名称。表视图也使用相应代理模型的sort()函数按升序排序。
将每个表视图的selectionMode设置为QAbstractItemView::SingleSelection,将selectionBehavior设置为QAbstractItemView::SelectRows,允许用户同时选择一行中的所有项。每个QTableView对象都会自动被赋予一个QItemSelectionModel来跟踪所选索引。
  void AddressWidget::setupTabs()
  {
      QStringList groups;
      groups << "ABC" << "DEF" << "GHI" << "JKL" << "MNO" << "PQR" << "STU" << "VW" << "XYZ";

      for (int i = 0; i < groups.size(); ++i) {
          QString str = groups.at(i);
          QString regExp = QString("^[%1].*").arg(str);

          proxyModel = new QSortFilterProxyModel(this);
          proxyModel->setSourceModel(table);
          proxyModel->setFilterRegExp(QRegExp(regExp, Qt::CaseInsensitive));
          proxyModel->setFilterKeyColumn(0);

          QTableView *tableView = new QTableView;
          tableView->setModel(proxyModel);

          tableView->setSelectionBehavior(QAbstractItemView::SelectRows);
          tableView->horizontalHeader()->setStretchLastSection(true);
          tableView->verticalHeader()->hide();
          tableView->setEditTriggers(QAbstractItemView::NoEditTriggers);
          tableView->setSelectionMode(QAbstractItemView::SingleSelection);

          tableView->setSortingEnabled(true);

          connect(tableView->selectionModel(),
              &QItemSelectionModel::selectionChanged,
              this, &AddressWidget::selectionChanged);

          connect(this, &QTabWidget::currentChanged, this, [this](int tabIndex) {
              auto *tableView = qobject_cast<QTableView *>(widget(tabIndex));
              if (tableView)
                  emit selectionChanged(tableView->selectionModel()->selection());
          });

          addTab(tableView, str);
      }
  }
QItemSelectionModel类提供了一个selectionChanged信号,该信号连接到AddressWidget的selectionChanged()信号。我们还将QTabWidget::currentChanged()信号连接到发出AddressWidget的selectionChanged()的lambda表达式。这些连接对于启用编辑条目是必要的…并删除主窗口“工具”菜单中的输入操作。在MainWindow的实现中有进一步的解释。
地址簿中的每个表视图都作为一个选项卡添加到QTabWidget,并带有从组的QStringList中获得的相关标签。

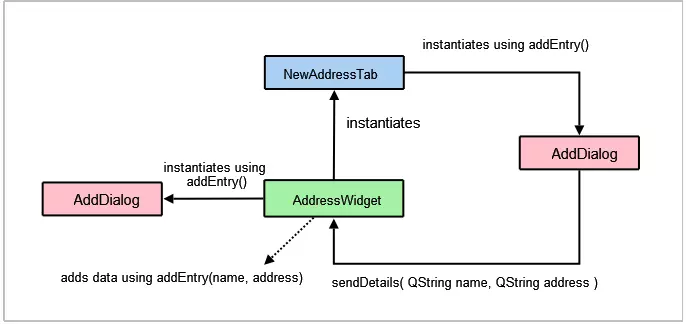
我们提供了2个addEntry()函数:1是用来接受用户输入的,另一个函数执行向地址簿添加新条目的实际任务。我们将添加条目的职责划分为两部分,以允许newAddressTab无需弹出对话框即可插入数据。
第一个addEntry()函数是一个插槽,连接到主窗口的Add条目…行动。这个函数创建一个AddDialog对象,然后调用第二个addEntry()函数来实际将联系人添加到表中。
  void AddressWidget::showAddEntryDialog()
  {
      AddDialog aDialog;

      if (aDialog.exec()) {
          QString name = aDialog.nameText->text();
          QString address = aDialog.addressText->toPlainText();

          addEntry(name, address);
      }
  }
基本验证在第二个addEntry()函数中完成,以防止地址簿中的重复条目。正如在TableModel中提到的,这是我们需要getter方法getContacts()的部分原因。
  void AddressWidget::addEntry(QString name, QString address)
  {
      if (!table->getContacts().contains({ name, address })) {
          table->insertRows(0, 1, QModelIndex());

          QModelIndex index = table->index(0, 0, QModelIndex());
          table->setData(index, name, Qt::EditRole);
          index = table->index(0, 1, QModelIndex());
          table->setData(index, address, Qt::EditRole);
          removeTab(indexOf(newAddressTab));
      } else {
          QMessageBox::information(this, tr("Duplicate Name"),
              tr("The name "%1" already exists.").arg(name));
      }
  }
如果模型还没有包含具有相同名称的条目,则调用setData()将名称和地址插入第一列和第二列。否则,我们将显示一个QMessageBox来通知用户。
注意:一旦添加了联系人,newAddressTab将被删除,因为地址簿不再为空。
编辑条目只是更新联系人地址的一种方法,因为示例不允许用户更改现有联系人的名称。
首先,我们使用QTabWidget::currentWidget()获取活动选项卡的QTableView对象。然后我们从tableView中提取selectionModel来获得所选的索引。
  void AddressWidget::editEntry()
  {
      QTableView *temp = static_cast<QTableView*>(currentWidget());
      QSortFilterProxyModel *proxy = static_cast<QSortFilterProxyModel*>(temp->model());
      QItemSelectionModel *selectionModel = temp->selectionModel();

      QModelIndexList indexes = selectionModel->selectedRows();
      QString name;
      QString address;
      int row = -1;

      foreach (QModelIndex index, indexes) {
          row = proxy->mapToSource(index).row();
          QModelIndex nameIndex = table->index(row, 0, QModelIndex());
          QVariant varName = table->data(nameIndex, Qt::DisplayRole);
          name = varName.toString();

          QModelIndex addressIndex = table->index(row, 1, QModelIndex());
          QVariant varAddr = table->data(addressIndex, Qt::DisplayRole);
          address = varAddr.toString();
      }
接下来,我们从用户打算编辑的行中提取数据。此数据显示在具有不同窗口标题的AddDialog实例中。只有对aDialog中的数据进行了更改,才会更新该表。
      AddDialog aDialog;
      aDialog.setWindowTitle(tr("Edit a Contact"));

      aDialog.nameText->setReadOnly(true);
      aDialog.nameText->setText(name);
      aDialog.addressText->setText(address);

      if (aDialog.exec()) {
          QString newAddress = aDialog.addressText->toPlainText();
          if (newAddress != address) {
              QModelIndex index = table->index(row, 1, QModelIndex());
              table->setData(index, newAddress, Qt::EditRole);
          }
      }
  }

使用removeEntry()函数删除条目。通过QItemSelectionModel对象selectionModel访问所选行,可以删除所选行。只有当用户删除通讯录中的所有联系人时,才会将newAddressTab重新添加到AddressWidget。
  void AddressWidget::removeEntry()
  {
      QTableView *temp = static_cast<QTableView*>(currentWidget());
      QSortFilterProxyModel *proxy = static_cast<QSortFilterProxyModel*>(temp->model());
      QItemSelectionModel *selectionModel = temp->selectionModel();

      QModelIndexList indexes = selectionModel->selectedRows();

      foreach (QModelIndex index, indexes) {
          int row = proxy->mapToSource(index).row();
          table->removeRows(row, 1, QModelIndex());
      }

      if (table->rowCount(QModelIndex()) == 0) {
          insertTab(0, newAddressTab, "Address Book");
      }
  }
writeToFile()函数的作用是:保存一个包含通讯录中所有联系人的文件。该文件以自定义.dat格式保存。联系人列表的内容使用QDataStream写入文件。如果文件无法打开,则会显示一个QMessageBox,并显示相关的错误消息。
  void AddressWidget::writeToFile(const QString &fileName)
  {
      QFile file(fileName);

      if (!file.open(QIODevice::WriteOnly)) {
          QMessageBox::information(this, tr("Unable to open file"), file.errorString());
          return;
      }

      QDataStream out(&file);
      out << table->getContacts();
  }
readFromFile()函数的作用是:加载一个包含地址簿中所有联系人的文件,该文件以前使用writeToFile()保存。QDataStream用于将.dat文件的内容读入联系人列表,每个联系人都使用addEntry()添加。
  void AddressWidget::readFromFile(const QString &fileName)
  {
      QFile file(fileName);

      if (!file.open(QIODevice::ReadOnly)) {
          QMessageBox::information(this, tr("Unable to open file"),
              file.errorString());
          return;
      }

      QList<Contact> contacts;
      QDataStream in(&file);
      in >> contacts;

      if (contacts.isEmpty()) {
          QMessageBox::information(this, tr("No contacts in file"),
                                   tr("The file you are attempting to open contains no contacts."));
      } else {
          for (const auto &contact: qAsConst(contacts))
              addEntry(contact.name, contact.address);
      }
  }
NewAddressTab Class Definition
NewAddressTab类提供一个提供信息的选项卡,告诉用户地址簿是空的。它根据地址簿的内容出现和消失,如AddressWidget实现中所述。

NewAddressTab类扩展了QWidget,并包含QLabel和QPushButton。
  class NewAddressTab : public QWidget
  {
      Q_OBJECT

  public:
      NewAddressTab(QWidget *parent = 0);

  public slots:
      void addEntry();

  signals:
      void sendDetails(QString name, QString address);

  private:
      QLabel *descriptionLabel;
      QPushButton *addButton;
      QVBoxLayout *mainLayout;

  };
NewAddressTab Class Implementation
构造函数实例化addButton、descriptionLabel并将addButton的信号连接到addEntry()插槽。
  NewAddressTab::NewAddressTab(QWidget *parent)
  {
      Q_UNUSED(parent);

      descriptionLabel = new QLabel(tr("There are currently no contacts in your address book. "
                                        "
Click Add to add new contacts."));

      addButton = new QPushButton(tr("Add"));

      connect(addButton, &QAbstractButton::clicked, this, &NewAddressTab::addEntry);

      mainLayout = new QVBoxLayout;
      mainLayout->addWidget(descriptionLabel);
      mainLayout->addWidget(addButton, 0, Qt::AlignCenter);

      setLayout(mainLayout);
  }
addEntry()函数与AddressWidget的addEntry()类似,这两个函数都实例化了一个AddDialog对象。通过发出sendDetails()信号,从对话框中提取数据并发送到AddressWidget的addEntry()插槽。
  void NewAddressTab::addEntry()
  {
      AddDialog aDialog;

      if (aDialog.exec()) {
          QString name = aDialog.nameText->text();
          QString address = aDialog.addressText->toPlainText();

          emit sendDetails(name, address);
      }
  }
AddDialog Class Definition
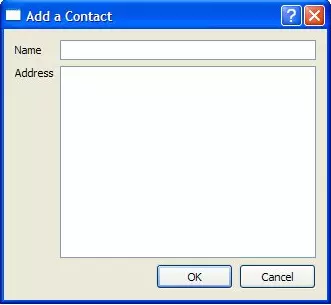
AddDialog类扩展了QDialog,并向用户提供一个QLineEdit和一个QTextEdit来将数据输入地址簿。
  class AddDialog : public QDialog
  {
      Q_OBJECT

  public:
      AddDialog(QWidget *parent = 0);
      QLineEdit *nameText;
      QTextEdit *addressText;

  private:
      QLabel *nameLabel;
      QLabel *addressLabel;
      QPushButton *okButton;
      QPushButton *cancelButton;
  };
AddDialog Class Implementation
AddDialog的构造函数设置用户界面,创建必要的小部件并将它们放置到布局中。
  AddDialog::AddDialog(QWidget *parent)
      : QDialog(parent)
  {
      nameLabel = new QLabel("Name");
      addressLabel = new QLabel("Address");
      okButton = new QPushButton("OK");
      cancelButton = new QPushButton("Cancel");

      nameText = new QLineEdit;
      addressText = new QTextEdit;

      QGridLayout *gLayout = new QGridLayout;
      gLayout->setColumnStretch(1, 2);
      gLayout->addWidget(nameLabel, 0, 0);
      gLayout->addWidget(nameText, 0, 1);

      gLayout->addWidget(addressLabel, 1, 0, Qt::AlignLeft|Qt::AlignTop);
      gLayout->addWidget(addressText, 1, 1, Qt::AlignLeft);

      QHBoxLayout *buttonLayout = new QHBoxLayout;
      buttonLayout->addWidget(okButton);
      buttonLayout->addWidget(cancelButton);

      gLayout->addLayout(buttonLayout, 2, 1, Qt::AlignRight);

      QVBoxLayout *mainLayout = new QVBoxLayout;
      mainLayout->addLayout(gLayout);
      setLayout(mainLayout);

      connect(okButton, &QAbstractButton::clicked, this, &QDialog::accept);
      connect(cancelButton, &QAbstractButton::clicked, this, &QDialog::reject);

      setWindowTitle(tr("Add a Contact"));
  }
为了给对话框提供所需的行为,我们将OK和Cancel按钮连接到对话框的accept()和reject()插槽。由于对话框只充当名称和地址信息的容器,因此我们不需要为它实现任何其他功能。
MainWindow Class Definition
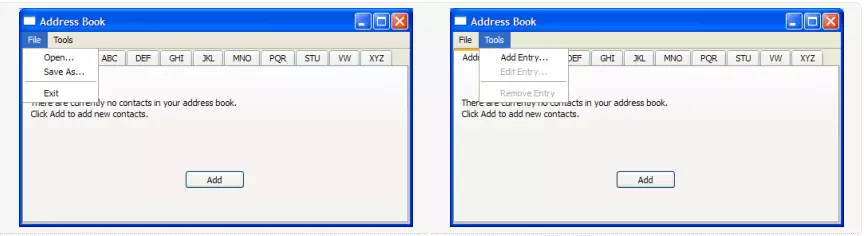
MainWindow类扩展了QMainWindow,并实现了操作地址簿所需的菜单和操作。
  class MainWindow : public QMainWindow
  {
      Q_OBJECT

  public:
      MainWindow();

  private slots:
      void updateActions(const QItemSelection &selection);
      void openFile();
      void saveFile();

  private:
      void createMenus();

      AddressWidget *addressWidget;
      QMenu *fileMenu;
      QMenu *toolMenu;
      QAction *openAct;
      QAction *saveAct;
      QAction *exitAct;
      QAction *addAct;
      QAction *editAct;
      QAction *removeAct;
  };
MainWindow类使用AddressWidget作为其中心小部件,并提供具有打开、关闭和退出操作的文件菜单,以及具有添加条目的工具菜单……、编辑条目…并删除输入操作。
MainWindow Class Implementation
MainWindow的构造函数实例化AddressWidget,将其设置为其中心小部件,并调用createMenus()函数。
  MainWindow::MainWindow()
  {
      addressWidget = new AddressWidget;
      setCentralWidget(addressWidget);
      createMenus();
      setWindowTitle(tr("Address Book"));
  }
createMenus() 函数的作用是:设置文件和工具菜单,将操作连接到它们各自的槽。两个编辑条目…删除条目操作在默认情况下是禁用的,因为此类操作不能在空地址簿上执行。只有在添加一个或多个联系人时才启用它们。
  void MainWindow::createMenus()
  {
      fileMenu = menuBar()->addMenu(tr("&File"));

      openAct = new QAction(tr("&Open..."), this);
      fileMenu->addAction(openAct);
      connect(openAct, &QAction::triggered, this, &MainWindow::openFile);
      ...

      editAct = new QAction(tr("&Edit Entry..."), this);
      editAct->setEnabled(false);
      toolMenu->addAction(editAct);
      connect(editAct, &QAction::triggered, addressWidget, &AddressWidget::editEntry);

      toolMenu->addSeparator();

      removeAct = new QAction(tr("&Remove Entry"), this);
      removeAct->setEnabled(false);
      toolMenu->addAction(removeAct);
      connect(removeAct, &QAction::triggered, addressWidget, &AddressWidget::removeEntry);

      connect(addressWidget, &AddressWidget::selectionChanged,
          this, &MainWindow::updateActions);
  }
除了将所有操作的信号连接到它们各自的插槽之外,我们还将AddressWidget的selectionChanged()信号连接到它的updateActions()插槽。
openFile()函数的作用是:允许用户在打开文件对话框中选择一个文件。所选文件必须是包含地址簿联系人的自定义.dat文件。此函数是文件菜单中连接到openAct的插槽。
  void MainWindow::openFile()
  {
      QString fileName = QFileDialog::getOpenFileName(this);
      if (!fileName.isEmpty())
          addressWidget->readFromFile(fileName);
  }
The saveFile() function allows the user to save a file with the save file dialog. This function is a slot connected to saveAct in the File menu.
  void MainWindow::saveFile()
  {
      QString fileName = QFileDialog::getSaveFileName(this);
      if (!fileName.isEmpty())
          addressWidget->writeToFile(fileName);
  }
updateActions()函数的作用是:启用和禁用编辑条目…并根据地址簿的内容删除条目。如果地址簿为空,则禁用这些操作;否则,将启用它们。这个函数是一个插槽连接到AddressWidget的selectionChanged()信号。
  void MainWindow::updateActions(const QItemSelection &selection)
  {
      QModelIndexList indexes = selection.indexes();

      if (!indexes.isEmpty()) {
          removeAct->setEnabled(true);
          editAct->setEnabled(true);
      } else {
          removeAct->setEnabled(false);
          editAct->setEnabled(false);
      }
  }
main() Function
The main function for the address book instantiates QApplication and opens a MainWindow before running the event loop.
  int main(int argc, char *argv[])
  {
      QApplication app(argc, argv);
      MainWindow mw;
      mw.show();
      return app.exec();
  }