总结
文档
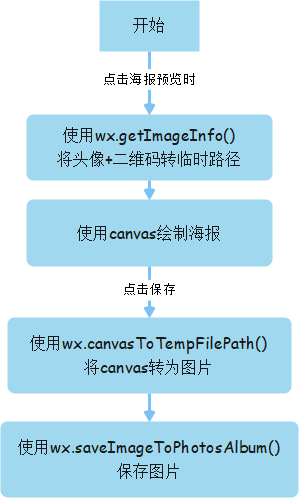
1. 使用wx.getImageInfo()将头像+二维码转临时路径
  beforCreateImage() {
    let that = this
    wx.getImageInfo({
      src: that.data.avatarUrl,
      success: res => {
        const avatarUrl = res.path
        wx.getImageInfo({
          src: that.data.userInfo.showPic,
          success: res2 => {
            const qrUrl = res2.path
            const text = that.data.userInfo.name + that.data.userInfo.phone
            that.createImage(avatarUrl, qrUrl, text)
          },
          fail: err => console.log(33, err)
        })
      },
      fail: err => console.log(22, err)
    })
  }
2. 绘制海报 -- 用到的路径都是本地路径
<!-- 页面中不需要展示海报 -->
<canvas canvas-id="myCanvas" style=" 300px;height: 400px;position: fixed;top: -10000px;"></canvas>
  createImage(avatarUrl, qrUrl, text) {
    let that = this
    // 创建canvas的绘图上下文 CanvasContext 对象
    const ctx = wx.createCanvasContext('myCanvas')

    // 绘制背景 (图片地址, x, y, width, height)
    ctx.drawImage('/img/qr_code_bg.png', 0, 0, 300, 400)

    // 绘制头像:注意裁剪区域与绘制图片时的定位+大小关系
    ctx.save() // 保存当前绘图上下文
    ctx.beginPath() // 开始创建一个路径
    // ctx.arc(x, y, r, sAngle, eAngle, 弧度方向是否逆时针)
    ctx.arc(80/2+110, 80/2+50, 40, 0, 2 * Math.PI, false)// 画一个圆形裁剪区域
    ctx.clip() // 裁剪
    ctx.drawImage(avatarUrl, 110, 50, 80, 80); // 绘制图片
    ctx.restore() // 恢复之前保存的绘图上下文

    // 绘制文本
    ctx.setFillStyle('#000') // 文字颜色:默认黑色
    ctx.font = 'normal bold 18px sans-serif';
    // ctx.setFontSize(18)
    ctx.fillText(text, 70, 160) // 绘制文本

    // 绘制二维码
    ctx.save() // 保存当前绘图上下文
    ctx.beginPath() // 开始创建一个路径
    ctx.arc(120/2+90, 120/2+186, 60, 0, 2 * Math.PI, false) // 画一个圆形裁剪区域
    ctx.clip() // 裁剪
    ctx.drawImage(qrUrl, 90, 186, 120, 120); // 绘制图片
    ctx.restore() // 恢复之前保存的绘图上下文

    // 绘制文本
    ctx.setFillStyle('#000')//文字颜色:默认黑色
    ctx.font = 'normal normal 14px sans-serif';
    ctx.fillText('找工作  职业培训一站式服务平台', 50, 350)//绘制文本

    ctx.draw()
  }
3. 点击保存,使用wx.canvasToTempFilePath()将canvas转为图片
  saveHaiBaoImage() {
    let that = this
    //将生成好的图片保存到本地,需要延迟一会,绘制期间耗时
    setTimeout(() => {
      wx.canvasToTempFilePath({
        canvasId: 'myCanvas',
        success: res => {
          var tempFilePath = res.tempFilePath;
          that.shareImage(tempFilePath) // 保存图片
        },
        fail:res => {
          console.log(res);
        }
      });
    }, 100);
  }
4. 使用wx.saveImageToPhotosAlbum()保存图片
  async shareImage(url) {
    let that = this
    // 验证用户是否拥有保存到相册的权限
    wx.getSetting({
      success: res => {
        if (res.authSetting['scope.writePhotosAlbum']) {
          // 用户已授权
          that.saveImage(url);
        } else if (res.authSetting['scope.writePhotosAlbum'] !== undefined){
          // 用户首次进入还未调起权限相关接口
          that.openSetting();
        } else {
          // 用户首次进入
          that.saveImage(url);
        }
      },
      fail: () => {
        that.toastComponent.showToastComponent('获取授权信息失败')
      }
    })
  },
  // 需要授权
  openSetting() {
    wx.showModal({
      title: '提示',
      content: '请先授权同意保存图片到相册',
      confirmText: '确定授权',
      success: res => {
        if (res.confirm) {
          wx.openSetting({
            fail: () => {
              that.toastComponent.showToastComponent('打开授权设置页面失败')
            }
          });
        }
      }
    })
  },
  // 保存图片
  saveImage(url) {
    let that = this
    wx.saveImageToPhotosAlbum({
      filePath: url,
      success: () => {
        this.setData({
          isShow: false
        })
        that.toastComponent.showToastComponent('保存成功')
      },
      fail: () => {
        that.toastComponent.showToastComponent('保存失败')
      }
    })
  },