Cocos引擎开发者指南
英文原版:http://www.cocos2d-x.org/docs/programmers-guide/1/
中午翻译:http://www.cocos.com/doc/tutorial/show?id=2047
https://github.com/chukong/programmers-guide-samples
一、什么是Cocos2d-x
Cocos2d-x创始于2010年,它是一个开源跨平台的游戏引擎。它包含了很多强大的特性可以让游戏开发者轻松的创建出伟大的游戏作品。
Cocos2d-x的优势
- Cocos2d-x使用的为最新C++ API
- 跨平台-桌面和手机平台
- 支持在桌面开发环境对游戏进行测试或者调试,然后就可在手机,桌面或者目标平台中运行该游戏。
- 一个巨大的API集合,包括精灵,动作,动画,粒子特效,场景切换,计时器,事件处理(触摸,按键,加速,鼠标移动),声音,文件输入输出,持久化,骨骼,3D等。
二、基础概念
引擎
一个游戏引擎就是一个可以提供大多游戏常用功能的软件作品。你之前也许听到过将它称之为API或者框架。但在本书中我们会使用游戏引擎这个比较正式的术语。游戏引擎包括了许多组件,将它们组合使用有利于游戏性能提升和开发周期的缩短。通常游戏引擎中都包含这些组件,比如:渲染器,2d/3d图形,碰撞检测,物理引擎,声音,控制器,动画等。通过内置的封装且易于使用的API,你可以专注于开发游戏,不用去关心内部技术的实现。。游戏引擎通常支持多平台,所以会比较容易对游戏进行移植,将游戏移部署到其它平台只需要一小部分的工作量。Cocos2d-x提供了Scene,Node, Transition, Sprite, Menu, Action, Sprite3D, Audio等许多对象。你创建游戏所需要的内容都在这了。
导演 Director
Director类控制着游戏整体并通知游戏接下来需要做什么。Director导演的一个通常作用是控制Scene 切换和切换效果。导演(Director)是一个共享的单例对象,你可以从代码的任何地方调用。导演 (Director)通过流程图来对游戏进行调度,决定了游戏中将会发生什么,什么时候发生,如何发生。
场景 Scene
不管是电影还是游戏都可以把内容拆分成一个个独立的场景,再简单的游戏也可以有主界面、关卡和结束场景,在场景中组合各个组件节点。场景都由Renderer进行绘制。Renderer可以用来绘制精灵或者其它对象到场景中。
场景图 _Scene Graph_
_scene graph_是一个用来存储场景图形的数据结构。_scene graph_由树节点构成。由于_Scene Graph_是树形结构;你可以对它进行遍历。Cocos2d-x使用了_in-order walk_算法。_in-order walk算法的流程如图所示,从根节点开始,然后到右边的树。由于右边的节点是最后绘制的,所以它会首先被显示到场景中。_z-order_Z轴为负数的元素会出现在树的左侧,而_z-order_Z轴为正数的会出现在树的右侧。你可以在任意的地方添加节点元素它们会被按钮Z轴的大小自动排序。
// Adds a child with the z-order of -2, that means
// it goes to the "left" side of the tree (because it is negative)
scene->addChild(title_node, -2);

// When you don't specify the z-order, it will use 0
scene->addChild(label_node);

// Adds a child with the z-order of 1, that means
// it goes to the "right" side of the tree (because it is positive)
scene->addChild(sprite_node, 1);
精灵
精灵就是游戏中在场景里进行移动的对象。你可以操纵它们。精灵可能是游戏中最主要的角色。当你操纵一个精灵的时候,它就是一个精灵。如果你不对它进行操作,那它就是一个节点Node。精灵是每一个游戏的关键所在。编写一个游戏,你可能需要使用一些带有共同特性的图像。这就是一个Sprite精灵。_Sprites_精灵很容易创建,它具有很多属性,比如:坐标position,翻转rotation,缩放scale,透明度opacity,颜色color等。
锚点
所有的节点Node对象(注意Sprite精灵类是Node节点类的子类)都有一个称为锚点的值。我们之前还没有提过这个概念,现在时机正好。你可以将锚点想象为在对精灵进行坐标点设定的时候精灵所自身使用的坐标点。通过代码mySprite->setAchorVec2(0, 0);将游戏中的精灵锚点设定为(0,0)坐标,那么所有使用代码setPosition()进行坐标设定的精灵都会以自身的左下角来进行对齐。
// This is how to create an sprite
auto mySprite = Sprite::create("mysprite.png");

// this is how to change the properties of the sprite
mySprite->setPosition(Vec2(500, 0));

mySprite->setRotation(40);

mySprite->setScale(2.0); // sets scale X and Y uniformly

mySprite->setAchorVec2(0, 0);
动作
游戏之所以称为游戏就是我们需要让精灵运动起来!Action动作游戏中的一部分。_Actions_动作类可以让Node节点对象按时间进行运动。你可以创建一个Actions动作序列Sequence并且按顺序播放。你可以通过改变Node节点属,坐标,角度,缩放。比如说这些动作:MoveBy,Rotate, Scale。所有的游戏都使用动作类Actions。
auto mySprite = Sprite::create("Blue_Front1.png");

// Move a sprite 50 pixels to the right, and 10 pixels to the top over 2 seconds.
auto moveBy = MoveBy::create(2, Vec2(50,10));
mySprite->runAction(moveBy);

// Move a sprite to a specific location over 2 seconds.
auto moveTo = MoveTo::create(2, Vec2(50,10));
mySprite->runAction(moveTo);
序列和Spawns
一个序列Sequence就是多个动作按钮一定顺序进行排列。
auto mySprite = Node::create()

// move to point 50,10 over 2 seconds
auto moveTo1 = MoveTo::create(2, Vec2(50,10));

// move from current postion by 100,10 over 2 seconds
auto moveBy1 = MoveBy::create(2, Vec2(100,10));

// move to point 150,10 over 2 seconds
auto moveTo2 = MoveTo::create(2, Vec2(150,10));

// create a delay
auto delay = DelayTime::create(1);

mySprite->runAction(Sequence::create(moveTo1, delay, moveBy1, delay->clone(), moveTo2, nullptr));
Spawn会在同一时间播放所有指定的动作。有一些可能比别的稍长一些,所以出现这种情况动作的播放不会在同一时间完成。
auto myNode = Node::create()

auto moveTo1 = MoveTo::create(2, Vec2(50,10));
auto moveBy1 = MoveTo::create(2, Vec2(100,10));
auto moveTo2 = MoveTo::create(2, Vec2(150,10));

myNode->runAction(Spawn::create(moveTo1, moveBy1, moveTo2, nullptr));
父类和子类之间的继承关系
Cocos2d-x使用Parent and Child继承。也就是说父类中的属性也适用于他们的子类。考虑一个Sprite对象和它的子类对象Sprite:当改变父类中的精灵角度时,子类的角度也会随之进行变化
auto myNode = Node::create();

// rotating by setting
myNode->setRotation(50);
三、精灵
精灵是一个2D图像,通过改变它的旋转角度、位置、尺寸、颜色等属性可以使其运动或者变换。
创建一个精灵
使用指定图片创建一个Sprite。该方法所创建的Sprite使用了整张图片。Sprite与“mysprite.png”图片的尺寸相同。也就是说,如果“mysprite.png”图片的尺寸是200200,那么所创建的Sprite也是200200。
auto mySprite = Sprite::create("mysprite.png");
你想要创建一个只显示一张图片特定部分的Sprite,那么你可以使用Rect。Rect从左上角开始创建,这与从左下角开始布局的屏幕坐标相反。所以,这个Sprite只是图像的一部分。在这个例子中,Sprite的尺寸是左上角40*40的部分。
auto mySprite = Sprite::create("mysprite.png", Rect(0,0,40,40));

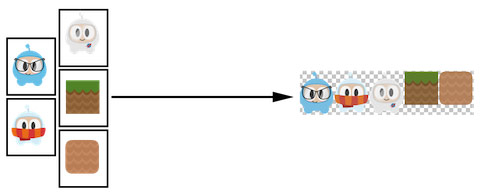
Sprite Sheet
Sprite Sheet是一个将多个精灵合并到一个文件的方法。相对于把每个精灵放在单独的文件夹中,这种方式减小了整个文件的大小。这意味着你将很大程度地减少内存的使用、文件大小和加载时间。
另外,为了通过批处理来实现更好的性能,我们必须使用Sprite Sheet。更多内容请查看高级篇中的内容。
当使用Sprite Sheet时,首先将其加载到SpriteFrameCache中。SpriteFrameCache是一个保存SpriteFrame,以便我们能很快访问到SpriteFrame的缓存类。SpriteFrame是一个包含了图像名和特定精灵尺寸(Rect)的对象。
SpriteFrameCache可以避免多次加载SpriteFrame。SPriteFrame只加载一次,并被保存到SpriteFrameCache中。
// load the Sprite Sheet
auto spritecache = SpriteFrameCache::getInstance();

// the .plist file can be generated with any of the tools mentioned below
spritecache->addSpriteFramesWithFile("sprites.plist");

//从SpriteFrameCache中创建一个精灵
auto mysprite = Sprite::createWithSpriteFrameName("mysprite.png");
另一种创建精灵的方式是从SpriteFrameCache中获取SpriteFrame,然后使用SpriteFrame创建精灵
// this is equivalent to the previous example,
// but it is created by retrieving the spriteframe from the cache.
auto newspriteFrame = SpriteFrameCache::getInstance()->getSpriteFrameByName("mysprite.png");
auto newSprite = Sprite::createWithSpriteFrame(newspriteFrame);
创建Sprite Sheet是一个复杂的过程。幸运的是可以使用一些工具自动创建它们。这些工具还可以提供更多的参数,通过调整参数你可以优化Sprite Sheet。这里提供几个工具:
控制精灵
锚点
锚点是一个定点,设置精灵位置的时候可以通过锚点来指定使用精灵的哪个部分。 锚点只影响可以修改的属性,包括scale、rotation和skew,不包含color和opacity。锚点作为起始点时就会影响精灵的位置。锚点使用左下角坐标系统。这意味着当设置X、Y坐标值时你需要确保是从左下角开始计算。默认情况下,所有节点对象的锚点都是(0.5,0.5)。
// DEFAULT anchor point for all Sprites
mySprite->setAnchorPoint(0.5, 0.5);

// bottom left
mySprite->setAnchorPoint(0, 0);

// top left
mySprite->setAnchorPoint(0, 1);

// bottom right
mySprite->setAnchorPoint(1, 0);

// top right
mySprite->setAnchorPoint(1, 1);
被锚点影响的精灵属性
位置
// position a sprite to a specific position of x = 100, y = 200.
mySprite->setPosition(Vec2(100, 200);
角度
通过增加或减少角度来使精灵旋转。增加角度值使精灵顺时针旋转,减少角度值使精灵逆时针旋转。默认值为0。
// rotates sprite by +20
mySprite->setRotation(20.0f);

// rotates sprite by -20
mySprite->setRotation(-20.0f);

// rotates sprite by +60
mySprite->setRotation(60.0f);

// rotates sprite by -60
mySprite->setRotation(-60.0f);

缩放(Scale)
改变X值、Y值或者同时改变X、Y值可以缩放精灵。X、Y的默认值都为1.0。
// increases X and Y size by 2.0 uniformly
mySprite->setScale(2.0);

// increases just X scale by 2.0
mySprite->setScaleX(2.0);

// increases just Y scale by 2.0
mySprite->setScaleY(2.0);

倾斜(Skew)
改变X值、Y值或者同时改变X、Y值可以使精灵倾斜。X、Y的默认值都为1.0。
// adjusts the X skew by 20.0
mySprite->setSkewX(20.0f);

// adjusts the Y skew by 20.0
mySprite->setSkewY(20.0f);

不被锚点影响的精灵属性
颜色
向Color3B对象中传递相应的值即可改变精灵的颜色。Color3B对象代表RGB颜色值。我们目前还没有用到过Color3B,但这很简单,Color3B就是一个定义RGB颜色的对象。RGB颜色值即0-255之间的值。Cocos2d-x还提供预定义颜色供开发者选择。由于这些颜色是预定义所以用起来会快一点,如下为Color3B::White和Color3B::Red的例子:
// set the color by passing in a Color3B object.
mySprite->setColor(Color3B(255, 255, 255));

// set the color by passing in a pre-defined Color3B object.
mySprite->setColor(Color3B::White);

透明度
通过特定的值来改变精灵的透明度。取值范围为(2~255),默认值为255(不透明)
// set the opacity by passing in a value
mySprite->serOpacity(30);

四、动作
Action类如其名,它可以改变Node对象的属性,Action对象是随着时间改变Node的属性。任何一个以Node为基类的对象都有可执行的动作对象。例如,你可以在一个时间段内将Sprite精灵从一个位置移动到另一个位置。
By相当于这个节点是相对的。To是绝对的,意思是它并不考虑到这个节点的当前状态。
    // Move sprite to position 50,10 in 2 seconds.
    auto moveTo = MoveTo::create(2, Vec2(50, 10));
    mySprite1->runAction(moveTo);

    // Move sprite 20 points to right in 2 seconds
    auto moveBy = MoveBy::create(2, Vec2(20,0));
    mySprite2->runAction(moveTo);
基本动作以及如何执行动作
移动(Move)
auto mySprite = Sprite::create("mysprite.png");

// Move a sprite to a specific location over 2 seconds.
auto moveTo = MoveTo::create(2, Vec2(50, 0));

mySprite->runAction(moveTo);

// Move a sprite 50 pixels to the right, and 0 pixels to the top over 2 seconds.
auto moveBy = MoveBy::create(2, Vec2(50, 0));

mySprite->runAction(moveBy);
旋转(Rotate)
auto mySprite = Sprite::create("mysprite.png");

// Rotates a Node to the specific angle over 2 seconds
auto rotateTo = RotateTo::create(2.0f, 40.0f);
mySprite->runAction(rotateTo);

// Rotates a Node clockwise by 40 degree over 2 seconds
auto rotateBy = RotateBy::create(2.0f, 40.0f);
mySprite->runAction(rotateBy);
缩放(Scale)
auto mySprite = Sprite::create("mysprite.png");

// Scale uniformly by 3x over 2 seconds
auto scaleBy = ScaleBy::create(2.0f, 3.0f);
mySprite->runAction(scaleBy);

// Scale X by 5 and Y by 3x over 2 seconds
auto scaleBy = ScaleBy::create(2.0f, 3.0f, 3.0f);
mySprite->runAction(scaleBy);

// Scale to uniformly to 3x over 2 seconds
auto scaleTo = ScaleTo::create(2.0f, 3.0f);
mySprite->runAction(scaleTo);

// Scale X to 5 and Y to 3x over 2 seconds
auto scaleTo = ScaleTo::create(2.0f, 3.0f, 3.0f);
mySprite->runAction(scaleTo);
淡入淡出
FadeIn修改透明度的值(0~255之间)。与之相反的动作是“淡出”
auto mySprite = Sprite::create("mysprite.png");

// fades in the sprite in 1 seconds
auto fadeIn = FadeIn::create(1.0f);
mySprite->runAction(fadeIn);

// fades out the sprite in 2 seconds
auto fadeOut = FadeOut::create(2.0f);
mySprite->runAction(fadeOut);
色调(Tint)
Tint使节点的NodeRGB从当前值改变到用户设置值。
auto mySprite = Sprite::create("mysprite.png");

// Tints a node to the specified RGB values
auto tintTo = TintTo::create(2.0f, 120.0f, 232.0f, 254.0f);
mySprite->runAction(tintTo);

// Tints a node BY the delta of the specified RGB values.
auto tintBy = TintBy::create(2.0f, 120.0f, 232.0f, 254.0f);
mySprite->runAction(tintBy);
动画(Animate)
通过Animate可以很容易地实现精灵的帧动画效果。只要简单的每隔一段时间替换_display frame_即可。
auto mySprite = Sprite::create("mysprite.png");

// now lets animate the sprite we moved

Vector<SpriteFrame*> animFrames;
animFrames.reserve(12);
animFrames.pushBack(SpriteFrame::create("Blue_Front1.png", Rect(0,0,65,81)));
animFrames.pushBack(SpriteFrame::create("Blue_Front2.png", Rect(0,0,65,81)));
animFrames.pushBack(SpriteFrame::create("Blue_Front3.png", Rect(0,0,65,81)));
animFrames.pushBack(SpriteFrame::create("Blue_Left1.png", Rect(0,0,65,81)));
animFrames.pushBack(SpriteFrame::create("Blue_Left2.png", Rect(0,0,65,81)));
animFrames.pushBack(SpriteFrame::create("Blue_Left3.png", Rect(0,0,65,81)));
animFrames.pushBack(SpriteFrame::create("Blue_Back1.png", Rect(0,0,65,81)));
animFrames.pushBack(SpriteFrame::create("Blue_Back2.png", Rect(0,0,65,81)));
animFrames.pushBack(SpriteFrame::create("Blue_Back3.png", Rect(0,0,65,81)));
animFrames.pushBack(SpriteFrame::create("Blue_Right1.png", Rect(0,0,65,81)));
animFrames.pushBack(SpriteFrame::create("Blue_Right2.png", Rect(0,0,65,81)));
animFrames.pushBack(SpriteFrame::create("Blue_Right3.png", Rect(0,0,65,81)));

// create the animation out of the frames
Animation* animation = Animation::createWithSpriteFrames(animFrames, 0.1f);
Animate* animate = Animate::create(animation);

// run it and repeat it forever
mySprite->runAction(RepeatForever::create(animate));
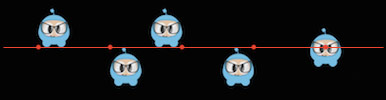
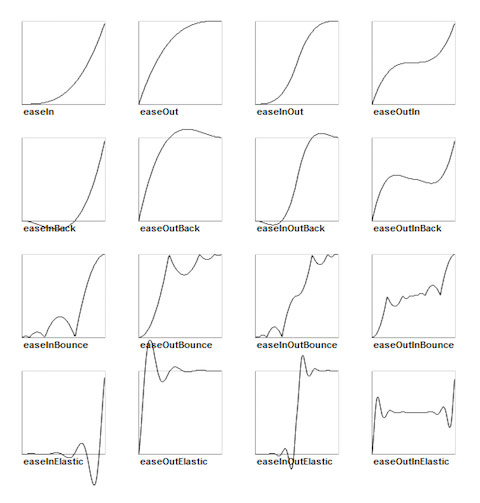
减速(Easing)
Easing用一个给定的加速度来使动画更加顺畅。需要记住的是,无论速度快慢,ease动作总是同时开始和结束。在游戏中如果你想模拟一些物理特效,但又不想过度且麻烦地使用多个非常基本的动作,那么此时Ease动作将是模拟物理特效的一个很好的方法。这里有另一个给菜单和按钮添加动画的很好的例子。
// create a sprite
auto mySprite = Sprite::create("mysprite.png");

// create a MoveBy Action to where we want the sprite to drop from.
auto move = MoveBy::create(2, Vec2(200, dirs->getVisibleSize().height - newSprite2->getContentSize().height));
auto move_back = move->reverse();

// create a BounceIn Ease Action
auto move_ease_in = EaseBounceIn::create(move->clone() );

// create a delay that is run in between sequence events
auto delay = DelayTime::create(0.25f);

// create the sequence of actions, in the order we want to run them
auto seq1 = Sequence::create(move_ease_in, delay, move_ease_in_back,
    delay->clone(), nullptr);

// run the sequence and repeat forever.
mySprite->runAction(RepeatForever::create(seq1));
序列动作以及如何执行它
Sequence可以使一系列的动作对象按顺序执行。这一系列对象可以是任何数量的动作对象、函数,甚至是另外一个序列动作。函数?是的!Cocos2d-x中有一个CallFunc对象,它允许你创建一个function()函数并可以传递到Sequence中执行。这就允许你在序列动作对象中添加自己的函数功能,而不是仅仅局限于Cocos2d-x中提供的动作对象。
auto mySprite = Sprite::create("mysprite.png");

// create a few actions.
auto jump = JumpBy::create(0.5, Vec2(0, 0), 100, 1);

auto rotate = RotateTo::create(2.0f, 10);

// create a few callbacks
auto callbackJump = CallFunc::create([](){
log("Jumped!");
});

auto callbackRotate = CallFunc::create([](){
log("Rotated!");
});

// create a sequence with the actions and callbacks
auto seq = Sequence::create(jump, callbackJump, rotate, callbackRotate, nullptr);

// run it
mySprite->runAction(seq);
Spawn
Spawn与Sequence类似,不同的是使用Spawn时所有动作是同时执行的。你可以有很多动作对象,甚至其他Spawn对象。
Spawn的作用与运行多个连续的runAction()语句所产生的结果是相同的。
// running the above Actions with consecutive runAction() statements.
mySprite->runAction(moveBy);
mySprite->runAction(fadeTo);
然而,使用Spawn的优点在于你可以将其放到一个序列中,从而实现特定的效果。而runAction()是不可以的。将Spawn和Sequence结合使用讲会实现很多强大的功能。
// create a Sprite
auto mySprite = Sprite::create("mysprite.png");

// create a few Actions
auto moveBy = MoveBy::create(10, Vec2(400,100));
auto fadeTo = FadeTo::create(2.0f, 120.0f);
auto scaleBy = ScaleBy::create(2.0f, 3.0f);

// create a Spawn to use
auto mySpawn = Spawn::createWithTwoActions(scaleBy, fadeTo);

// tie everything together in a sequence
auto seq = Sequence::create(moveBy, mySpawn, moveBy, nullptr);

// run it
mySprite->runAction(seq);
Reverse(逆序)
Reverse的作用完全像它的名字一样,例如运行一系列动作时,你完全可以调用reserve()函数使动作逆序执行。然而,这并不只是简单的逆序运行,实际上还将原始的Sequence和Spawn的属性也转换为逆序。
mySprite->runAction(mySpawn->reverse());
大部分Action和Sequence对象都是可逆的!
// create a Sprite
auto mySprite = Sprite::create("mysprite.png");
mySprite->setPosition(50, 56);

// create a few Actions
auto moveBy = MoveBy::create(2.0f, Vec2(500,0));
auto scaleBy = ScaleBy::create(2.0f, 2.0f);
auto delay = DelayTime::create(2.0f);

// create a sequence
auto delaySequence = Sequence::create(delay, delay->clone(), delay->clone(),
delay->clone(), nullptr);

auto sequence = Sequence::create(moveBy, delay, scaleBy, delaySequence, nullptr);

// run it
newSprite2->runAction(sequence);

// reverse it
newSprite2->runAction(sequence->reverse());
五、创建和转换场景
什么是场景?
场景是包含精灵(Sprites),标签(Labels),节点(Nodes)和其他游戏所需对象的容器。场景负责游戏逻辑的运行和游戏内容的逐帧渲染。每个游戏至少需要一个场景,你可以将场景想象成一部电影,场景就是其中正在运行并且用户可以实时看到的电影画面。游戏中可以拥有多个场景,并且可以在多个不同的场景之间自然的切换。Cocos2d-x提供了多种场景切换效果,你甚至可以使用超酷的切换效果。
最重要的是一定要记住定义好GUI元素的绘制顺序以及z-order。
创建场景
auto myScene = Scene::create();
场景使用范例
下面让我们创建一个简单的场景。cocos2d-x使用右手坐标系系统,也就是屏幕和显示位置的原点(0,0)在左下角,我们的游戏元素给出的坐标是相对于原点计算出来的相对坐标。如下我们创建一个简单的场景,然后加入几个元素:
Size visibleSize = dirs->getVisibleSize();
auto scene1 = Scene::create();
auto label1 = Label::createWithTTF("My Game", "Marker Felt.ttf", 36);
label1->setPosition(Vec2(visibleSize.width / 2, visibleSize.height / 2));
scene->addChild(label1);
auto sprite1 = Sprite::create("mysprite.png");
sprite1->setPosition(Vec2(100, 100));
scene->addChild(sprite1);
多个场景的切换
在游戏中肯定需要在不同的场景之间切换,比如开始一个新游戏、游戏进入下一章以及退出游戏的时候都需要用到,Cocos2d-x提供了多种形式的切换方式。
Ways to transition between Scenes 几种场景切换的方式
runWithScene -只能用于第一个场景的运行,这也是启动游戏第一个场景的方式。
Director::getInstance()->runWithScene(myScene);
replaceScene -直接替换一个场景。
Director::getInstance()->replaceScene(myScene);
pushScene -暂停执行当前正在运行的场景,把它放入暂停场景的堆栈之中,使用该方法必须要求当前有正在运行的场景。
Director::getInstance()->pushScene(myScene);
popScene - 用堆栈中的场景替换正在运行的场景,正在运行的场景会被移除,该方法也要求当前有正在运行的场景。
Director::getInstance()->popScene(myScene);
场景切换特效
auto myScene = Scene::create();
Transition FadeDirector::getInstance()->replaceScene(TransitionFade::create(0.5, myScene, Color3B(0,255,255)));
FlipXDirector::getInstance()->replaceScene(TransitionFlipX::create(2, myScene));
Transition Slide InDirector::getInstance()->replaceScene(TransitionSlideInT::create(1, myScene) );