1 ,属性
        String str = "qazwsxed";

        byte[] bytes = str.getBytes();

        System.out.println(bytes.length);

        ByteBuffer buf1 = ByteBuffer.allocate(20);

        System.out.println(buf1);

        buf1.put(bytes);

        System.out.println(buf1);

        buf1.flip();//变的可读

        System.out.println(buf1);
java.nio.HeapByteBuffer[pos=0 lim=20 cap=20]
java.nio.HeapByteBuffer[pos=8 lim=20 cap=20]
java.nio.HeapByteBuffer[pos=0 lim=8 cap=20]
ByteBuffer 对象 是一内存空间,属性如下:
pos:表示读写的位置,下表从0开始。写的时候,往里面添加数据,pos 随着数据大小的增加而增加。读的时候,从可读的位置开始
lim:在读模式下,表示缓存的内数据大小;写模式下,表示最多可以存入数据大小,此时和capacity值相等,可以通过flip() 方法将ByteBuffer 变成可读模式
cap:分配好的内存块大小,分配好后大小不可修改
2,方法
   public static ByteBuffer allocateDirect(int capacity) {
        return new DirectByteBuffer(capacity);
    }

    public static ByteBuffer allocate(int capacity) {
        if (capacity < 0)
            throw new IllegalArgumentException();
        return new HeapByteBuffer(capacity, capacity);
    }
ByteBuffer 类提供了几个静态方法可以实例化对象,分别如下:
ByteBuffer buf1 = ByteBuffer.allocate(20);

ByteBuffer buf2 = ByteBuffer.allocateDirect(20);
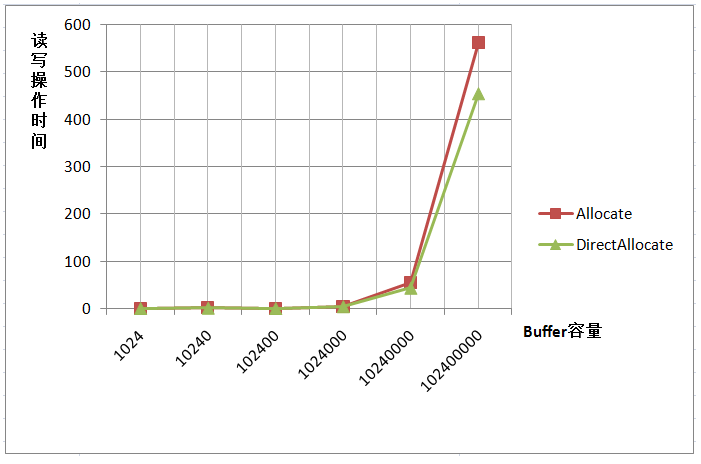
2种方法分别代表两种不同的内存使用机制,allocate 使用的内存开销是JVM上的,allocateDirect 的内存开销是在系统内存上的。
java 程序接收数据首先是系统内存获取,系统内存再复制到JVM 上供程序使用。allocateDirect 就不用复制,效率会高一点。
缺点是系统内存分配耗时比较多。
3,分析 DirectByteBuffer HeapByteBuffer
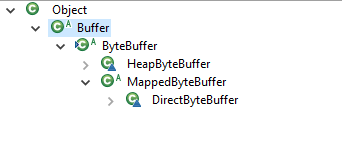
ByteBuffer中 allocate 方法返回的是一个HeadByteBuffer 对象,allocateDirect() 返回的是一个DirectByteBuffer对象
class DirectByteBuffer 和 class HeapByteBuffer 的访问修饰符是Default,所以只能同一个包下才能调用(所在的包是package java.nio),所以无法在程序中直接实例化这两个对象。
HeapByteBuffer extends ByteBuffer
ByteBuffer extends Buffer
调用allocate() 方法,返回HeadByteBuffer 对象,HeadByteBuffer 的构造方法,则调用父类的构造方法,所以又回到ByteBuffer本身的构造方法上来。
   HeapByteBuffer(int cap, int lim) {            // package-private

        super(-1, 0, lim, cap, new byte[cap], 0);
        /*
        hb = new byte[cap];
        offset = 0;
        */
      }
还有:
        String str = "qazwsxed";

        byte[] bytes = str.getBytes();

        ByteBuffer buf1 = ByteBuffer.wrap(bytes);

        ByteBuffer buf2 = ByteBuffer.wrap(bytes, 3, 2);

        //buf1 buf2 分别如下
        java.nio.HeapByteBuffer[pos=0 lim=8 cap=8]
        java.nio.HeapByteBuffer[pos=3 lim=5 cap=8]
源码如下:
   //是将目标数组复制到一个新生成的ByteBuffer 对象中,同时新ByteByffer的内存大小就是数组的长度

    public static ByteBuffer wrap(byte[] array) {
        return wrap(array, 0, array.length);
    }

   //是将目标数组(offset 代表截取的位置的下标,length 代表截取的长度)复制到一个新生成的ByteBuffer 对象中,同时新ByteByffer的内存大小就是数组的长度
   //例如目标数组为“qazwsxed”.getBytes(),目标数组的长度为8,offset为3,length为2,则会将ws复制到新生成的ByteBuffer对象中,同时lim为3,只能往新的ByteBuffer对象中再添加3个长度,尽管capacity为8
   public static ByteBuffer wrap(byte[] array, //
                                    int offset, int length)
    {
        try {
            return new HeapByteBuffer(array, offset, length);
        } catch (IllegalArgumentException x) {
            throw new IndexOutOfBoundsException();
        }
    }
warp 方法可以释放内存,一个ByteBuffer 对象用wrap 再次包装下之后,内存会释放。
4,构造方法
    ByteBuffer(int mark, int pos, int lim, int cap,   // package-private
                 byte[] hb, int offset)
    {
        super(mark, pos, lim, cap);
        this.hb = hb;
        this.offset = offset;
    }

    // Creates a new buffer with the given mark, position, limit, and capacity
    //
    ByteBuffer(int mark, int pos, int lim, int cap) { // package-private
        this(mark, pos, lim, cap, null, 0);
    }
ByteBuffer 有两个带参数的构造方法,因为ByteBuffer 是虚拟类,无法通过实例化
5,flip()
flip(),可以将ByteBuffer 的状态从可写变成可读可写
同时,pos的值变为0,lim的变成可写状态时候的pos值,意味着(就算可写,写入的长度最多只能和读的长度相等),cap 没有变化
例:
        ByteBuffer buf1 = ByteBuffer.allocateDirect(20);

        buf1.put(bytes);

        System.out.println(buf1);//java.nio.DirectByteBuffer[pos=8 lim=20 cap=20]

        buf1.flip();

        System.out.println(buf1);//java.nio.DirectByteBuffer[pos=0 lim=8 cap=20]
flip() 之后,lim = 8,最多写入8个长度的字节
6,rewind()
rewind(),可以将ByteBuffer 的状态从可写变成可读可写
同时,pos的值变为0,lim的变成可写状态时候的cap值,cap 没有变化
        ByteBuffer buf1 = ByteBuffer.allocateDirect(20);

        buf1.put(bytes);

        System.out.println(buf1);//java.nio.DirectByteBuffer[pos=8 lim=20 cap=20]

        buf1.rewind();

        System.out.println(buf1);//java.nio.DirectByteBuffer[pos=0 lim=20 cap=20]
7,,clear();
clear(),可以重置读写位置,position 变为 0
        ByteBuffer buf1 = ByteBuffer.allocateDirect(20);

        buf1.put(bytes);

        buf1.flip();

        System.out.println(buf1);// java.nio.DirectByteBuffer[pos=8 lim=20 cap=20]

        buf1.clear();

        System.out.println(Utils.getString(buf1));// 缓存的值还是存在

        System.out.println(buf1););// java.nio.DirectByteBuffer[pos=0 lim=20 cap=20]
clear()之后,缓存的值还是存在的,只是可读写的pos 被重置为0了,只有当重写写入的时候,ByteBuffer缓存区的值才会被真正清除。