Python中xlrd和xlwt模块使用方法
xlrd模块实现对excel文件内容读取,xlwt模块实现对excel文件的写入。
安装
|
1
2
|
pip install xlrdpip install xlwt |
xlrd模块使用
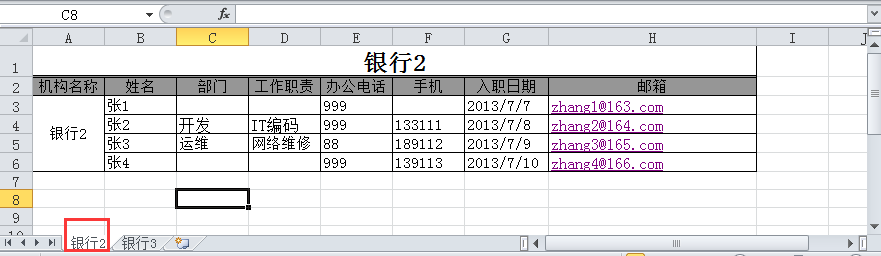
excel文档名称为联系人.xls,内容如下:

(1) 打开excel文件并获取所有sheet
|
1
2
3
4
5
6
7
|
import xlrd# 打开Excel文件读取数据data = xlrd.open_workbook('联系人.xls')sheet_name = data.sheet_names() # 获取所有sheet名称print(sheet_name) # ['银行2', '银行3'] |
(2) 根据下标获取sheet名称
|
1
2
3
|
# 根据下标获取sheet名称sheet2_name = data.sheet_names()[1]print(sheet2_name) # '银行3' |
(3) 根据sheet索引或者名称获取sheet内容,同时获取sheet名称、行数、列数
|
1
2
3
4
5
6
7
8
9
10
11
12
13
|
# 根据sheet索引或者名称获取sheet内容,同时获取sheet名称、列数、行数sheet2 = data.sheet_by_index(1)print('sheet2名称:{}
sheet2列数: {}
sheet2行数: {}'.format(sheet2.name, sheet2.ncols, sheet2.nrows))# sheet2名称:银行3# sheet2列数: 7# sheet2行数: 5sheet1 = data.sheet_by_name('银行2')print('sheet1名称:{}
sheet1列数: {}
sheet1行数: {}'.format(sheet1.name, sheet1.ncols, sheet1.nrows))# sheet1名称:银行2# sheet1列数: 8# sheet1行数: 6 |
(4) 根据sheet名称获取整行和整列的值
|
1
2
3
4
5
6
|
# 根据sheet名称获取整行和整列的值sheet1 = data.sheet_by_name('银行2')print(sheet1.row_values(3)) # ['', '张2', '开发', 'IT编码', 999.0, 133111.0, 41463.0, 'zhang2@164.com'] 日期2013/7/7,实际却显示为浮点数41463.0print(sheet1.col_values(3)) # ['', '工作职责', '', 'IT编码', '网络维修', ''] |
(5)获取指定单元格的内容
|
1
2
3
4
|
# 获取指定单元格的内容print(sheet1.cell(1,0).value) # 第2 行1列内容:机构名称print(sheet1.cell_value(1,0)) # 第2 行1列内容:机构名称print(sheet1.row(1)[0].value) # 第2 行1列内容:机构名称 |
(6)获取单元格内容的数据类型
|
1
2
3
4
5
|
# 获取单元格内容的数据类型print(sheet1.cell(1,0).ctype) # 第2 行1列内容 :机构名称为string类型print(sheet1.cell(3,4).ctype) # 第4行5列内容:999 为number类型print(sheet1.cell(3,6).ctype) # 第4 行7列内容:2013/7/8 为date类型# 说明:ctype : 0 empty,1 string, 2 number, 3 date, 4 boolean, 5 error |
(7)获取单元内容为日期类型的方式
使用xlrd的xldate_as_tuple处理为date格式
|
1
2
3
4
5
6
7
8
|
from datetime import datetime,dateif sheet1.cell(3,6).ctype == 3 : print(sheet1.cell(3, 6).value) # 41463.0 date_value = xlrd.xldate_as_tuple(sheet1.cell(3, 6).value, data.datemode) print(date_value) # (2013, 7, 8, 0, 0, 0) print(date(*date_value[:3])) # 2013-07-08 print(date(*date_value[:3]).strftime('%Y/%m/%d')) # 2013/07/08 |
(8)获取单元内容为number的方式(转为整型)
|
1
2
3
4
|
if sheet1.cell(3, 5).ctype == 2: print(sheet1.cell(3, 5).value) # 133111.0 num_value = int(sheet1.cell(3, 5).value) print(num_value) # 133111 |
(9) 获取合并单元格的内容
需要merged_cells属性
|
1
2
3
4
5
6
7
8
9
10
11
|
# 这里,需要在读取文件的时候添加个参数,将formatting_info参数设置为True,默认是False,否# 则可能调用merged_cells属性获取到的是空值。<br>data = xlrd.open_workbook('联系人.xls',formatting_info=True)sheet1 = data.sheet_by_name('银行2')print(sheet1.merged_cells) # [(0, 1, 0, 8), (2, 6, 0, 1)]<br># merged_cells返回的这四个参数的含义是:(row,row_range,col,col_range),其中[row,row_range)包括row,# 不包括row_range,col也是一样,下标从0开始。#(0, 1, 0, 8) 表示1列-8列合并 (2, 6, 0, 1)表示3行-6行合并<br># 分别获取合并2个单元格的内容:print(sheet1.cell(0,0).value) # 银行2print(sheet1.cell_value(2, 0)) # 银行2 |
规律 : 获取merge_cells返回的row和col低位的索引即可!
使用以下方法更加方便
|
1
2
3
4
5
6
7
8
9
|
merge_value = []for (row,row_range,col,col_range) in sheet1.merged_cells: merge_value.append((row,col))print(merge_value) # [(0, 0), (2, 0)]for v in merge_value: print(sheet1.cell(v[0], v[1]).value)# 银行2# 银行2 |
xlwt模块
|
1
2
3
4
5
6
7
8
9
10
11
12
13
14
15
16
17
18
19
20
21
22
23
24
25
26
27
28
29
30
31
32
33
34
35
36
37
38
39
40
41
42
43
44
45
|
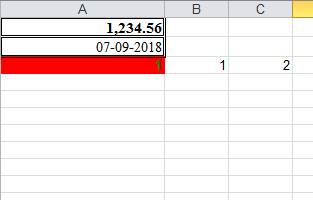
import xlwtfrom datetime import datetime,datedef set_style(name, height, bold=False, format_str=''): style = xlwt.XFStyle() # 初始化样式 font = xlwt.Font() # 为样式创建字体 font.name = name # 'Times New Roman' font.bold = bold font.height = height borders= xlwt.Borders() # 为样式创建边框 borders.left= 6 borders.right= 6 borders.top= 6 borders.bottom= 6 style.font = font style.borders = borders style.num_format_str= format_str return stylewb = xlwt.Workbook()ws = wb.add_sheet('A Test Sheet') # 增加sheetws.col(0).width = 200*30 # 设置第一列列宽ws.write(0, 0, 1234.56,set_style('Times New Roman',220,bold=True,format_str='#,##0.00'))ws.write(1, 0, datetime.now(), set_style('Times New Roman',220,bold=False, format_str='DD-MM-YYYY'))styleOK = xlwt.easyxf('pattern: fore_colour light_blue;' 'font: colour green, bold True;')pattern = xlwt.Pattern()#一个实例化的样式类pattern.pattern = xlwt.Pattern.SOLID_PATTERN # 固定的样式pattern.pattern_fore_colour = xlwt.Style.colour_map['red']#背景颜色styleOK.pattern = patternws.write(2, 0, 1,style=styleOK)ws.write(2, 1, 1)ws.write(2, 2, xlwt.Formula("A3+B3"))wb.save('example.xls') # 保存xls |
联系人表

|
1
2
3
4
5
6
7
8
9
10
11
12
13
14
15
16
17
18
19
20
21
22
23
24
25
26
27
28
29
30
31
32
33
34
35
36
37
38
39
40
41
42
43
44
45
46
47
48
49
50
51
52
53
54
55
56
57
58
59
60
61
62
63
64
65
66
67
68
69
70
71
72
73
74
75
76
77
78
79
80
81
82
83
84
85
86
87
88
89
90
91
92
93
94
95
96
97
98
99
100
101
102
103
104
105
106
107
108
109
110
111
112
113
114
115
116
117
118
119
120
121
|
import xlwtfrom datetime import datetime, datedef set_style(name, height, bold=False, format_str='',align='center'): style = xlwt.XFStyle() # 初始化样式 font = xlwt.Font() # 为样式创建字体 font.name = name # 'Times New Roman' font.bold = bold font.height = height borders = xlwt.Borders() # 为样式创建边框 borders.left = 2 borders.right = 2 borders.top = 0 borders.bottom = 2 alignment = xlwt.Alignment() # 设置排列 if align== 'center': alignment.horz = xlwt.Alignment.HORZ_CENTER alignment.vert = xlwt.Alignment.VERT_CENTER else: alignment.horz = xlwt.Alignment.HORZ_LEFT alignment.vert = xlwt.Alignment.VERT_BOTTOM style.font = font style.borders = borders style.num_format_str = format_str style.alignment = alignment return stylewb = xlwt.Workbook()ws = wb.add_sheet('联系人',cell_overwrite_ok=True) # 增加sheetrows = ['机构名称', '姓名', '部门', '电话', '入职日期', '手机', '邮箱']col1 = ['王1', '王2', '王3']col2 = ['666', '777','888']col3 = ['2014-08-09','2014-08-11','2015-08-09']# 写第一行数据ws.write_merge( 0, 0, 0, 6, '联系人表', set_style( 'Times New Roman', 320, bold=True, format_str='')) # 合并单元格styleOK = xlwt.easyxf()pattern = xlwt.Pattern() # 一个实例化的样式类pattern.pattern = xlwt.Pattern.SOLID_PATTERN # 固定的样式pattern.pattern_fore_colour = xlwt.Style.colour_map['yellow'] # 背景颜色borders = xlwt.Borders() # 为样式创建边框borders.left = 2borders.right = 2borders.top = 6borders.bottom = 2font = xlwt.Font() # 为样式创建字体font.name = 'Times New Roman'font.bold = Truefont.height = 220styleOK.pattern = patternstyleOK.borders = bordersstyleOK.font = font# 写第二行数据for index, val in enumerate(rows): ws.col(index).width = 150 * 30 # 定义列宽 ws.write(1, index, val, style=styleOK)# 写第3行-6行第一列数据ws.write_merge( 2, 2 + len(col1)-1, 0, 0, 'x机构', set_style( 'Times New Roman', 320, bold=True, format_str='')) # 合并单元格# 从第3行开始写1列数据for index, val in enumerate(col1): ws.col(1).width = 150 * 30 # 定义列宽 ws.write(index+2, 1, val, style=set_style('Times New Roman', 200, bold=False, format_str='',align=''))# 从第3行开始写4列数据for index, val in enumerate(col2): ws.col(3).width = 150 * 30 # 定义列宽 ws.write(index+2, 3, val, style=set_style('Times New Roman', 200, bold=False, format_str='',align=''))# 从第3行开始写5列数据for index, val in enumerate(col3): ws.col(4).width = 150 * 30 # 定义列宽 ws.write(index+2, 4, val, style=set_style('Times New Roman', 200, bold=False, format_str='',align=''))ws.write(4, 2,'技术部', style=styleOK)ws.write(4, 5,'186777233', style=styleOK)ws.write(4, 6,'wang@166.com', style=styleOK)wb.save('test.xls') # 保存xls |