本文对uniapp框架兼容微信和支付宝小程序一些整改点对比介绍。
一、登录授权
微信:wx.login 返回 code 换取用户登录态信息 openid、unionid、session_key
wx.login({
  success (res) {
    if (res.code) {
    } else {
    }
  }
})
文档: https://developers.weixin.qq.com/miniprogram/dev/api/open-api/login/wx.login.html
支付宝:my.getAuthCode 返回 authCode 换取支付宝会员标识 user_id,换取用户其他信息需用户授权
my.getAuthCode({
  scopes: 'auth_base',  // auth_base(静默授权)/ auth_user(主动授权)/ auth_zhima (获取用户芝麻信息)
  success: (res) => {
    my.alert({
      content: res.authCode,
    });
  },
});
文档: https://opendocs.alipay.com/mini/api/openapi-authorize
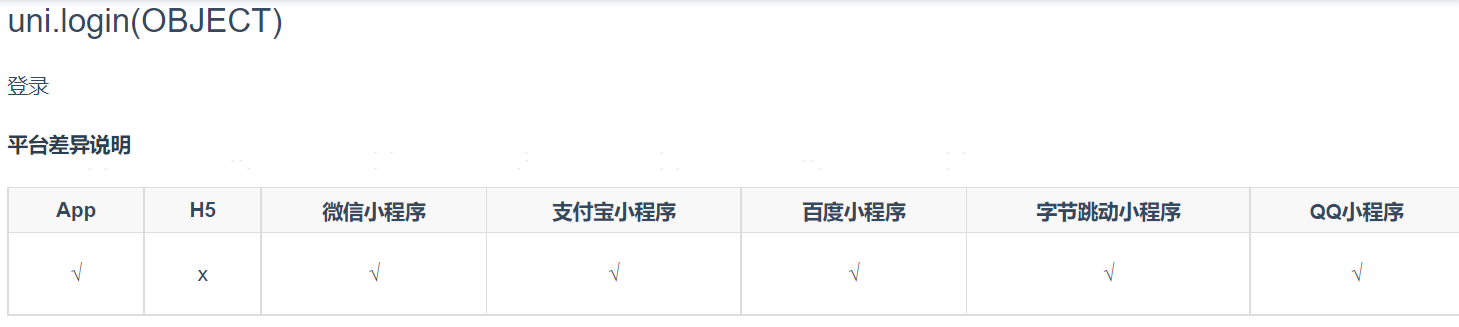
uni-app: uni.login 兼容全部平台的小程序,统一返回 code 字段
uni.login({
  provider: 'weixin',
  success: function (loginRes) {
    console.log(loginRes.authResult);
  }
});
文档: https://uniapp.dcloud.io/api/plugins/login?id=login
二、获取用户信息
微信:wx.getUserProfile 返回 userInfo
wx.getUserProfile({
    desc: '用于完善会员资料', // 声明获取用户个人信息后的用途,后续会展示在弹窗中,请谨慎填写
    success: (res) => {
        this.setData({
            userInfo: res.userInfo
        })
    }
})
文档: https://developers.weixin.qq.com/miniprogram/dev/api/open-api/user-info/wx.getUserProfile.html
支付宝:用 button 组件唤起授权
<!-- .axml -->
<button a:if="{{canIUseAuthButton}}" open-type="getAuthorize" onGetAuthorize="onGetAuthorize" onError="onAuthError" scope='userInfo'> 会员基础信息授权 </button>
// .js
onGetAuthorize(res) {
    my.getOpenUserInfo({
        fail: (res) => { },
        success: (res) => {
            let userInfo = JSON.parse(res.response).response; // 以下方的报文格式解析两层 response
        }
    });
},
文档: https://opendocs.alipay.com/mini/api/ch8chh
uni-app: 需使用 条件编译 兼容两个平台不同的写法
<!-- template -->
<!-- #ifdef  MP-WEIXIN -->
<button @tap="getUserProfile"></button>
<!-- #endif -->

<!-- #ifdef  MP-ALIPAY -->
<button open-type="getAuthorize" @getAuthorize="getAuthorize" @error="authError" ascope="userInfo"></button>
<!-- #endif -->

// js
// MP-WEIXIN
getUserProfile() {
    uni.getUserProfile({
        desc: '获取你的公开信息',
        success: res => {
            console.log(res.userInfo);
        },
        fail: err => {}
    });
}

// MP-ALIPAY
getAuthorize() {
    uni.getUserInfo({
        success: res => {
            console.log(res.userInfo);
        },
        fail: err => {}
    });
}
文档: https://uniapp.dcloud.io/api/plugins/login?id=getuserprofile
三、获取用户手机号
微信:用 button 组件唤起授权
<!-- wxml -->
<button open-type="getPhoneNumber" @getphonenumber="getPhoneNumber">授权手机号</button>

// js
getPhoneNumber(res) {
    console.log(res);
}
文档: https://developers.weixin.qq.com/miniprogram/dev/component/button.html
支付宝:用 button 组件唤起授权
<!-- axml -->
<button a:if="{{canIUseAuthButton}}" open-type="getAuthorize" onGetAuthorize="onGetAuthorize" onError="onAuthError" scope="phoneNumber">授权手机号</button>

// js
onGetAuthorize() {
    my.getPhoneNumber({
        success: (res) => {
            let encryptedData = res.response;
            my.request({
                url: '你的后端服务端',
                data: encryptedData,
            });
        },
        fail: (res) => {
            console.log(res);
            console.log('getPhoneNumber_fail');
        },
    });
}
文档: https://opendocs.alipay.com/mini/api/getphonenumber
uni-app: 需使用 条件编译 兼容两个平台不同的写法
<!-- template -->
<!-- #ifdef  MP-WEIXIN -->
<button open-type="getPhoneNumber" @getphonenumber="getPhoneNumber">授权手机号</button>
<!-- #endif -->

<!-- #ifdef  MP-ALIPAY -->
<button open-type="getAuthorize" @getAuthorize="getAuthorize" @error="authError" ascope="phoneNumber"></button>
<!-- #endif -->

// js
// MP-WEIXIN
getPhoneNumber(res) {
    console.log(res);
}

// MP-ALIPAY
getAuthorize() {
    my.getPhoneNumber({
        success: (res) => {
            let encryptedData = res.response;
            my.request({
                url: '你的后端服务端',
                data: encryptedData,
            });
        },
        fail: (res) => {
            console.log(res);
            console.log('getPhoneNumber_fail');
        },
    });
}
文档: https://uniapp.dcloud.io/component/button?id=button
四、订阅模板消息
微信:
wx.requestSubscribeMessage({
    tmplIds: [''],
    success (res) { },
    fail (err) {}
})
支付宝:
1、支付宝服务市场 订购支付宝小程序消息订阅插件
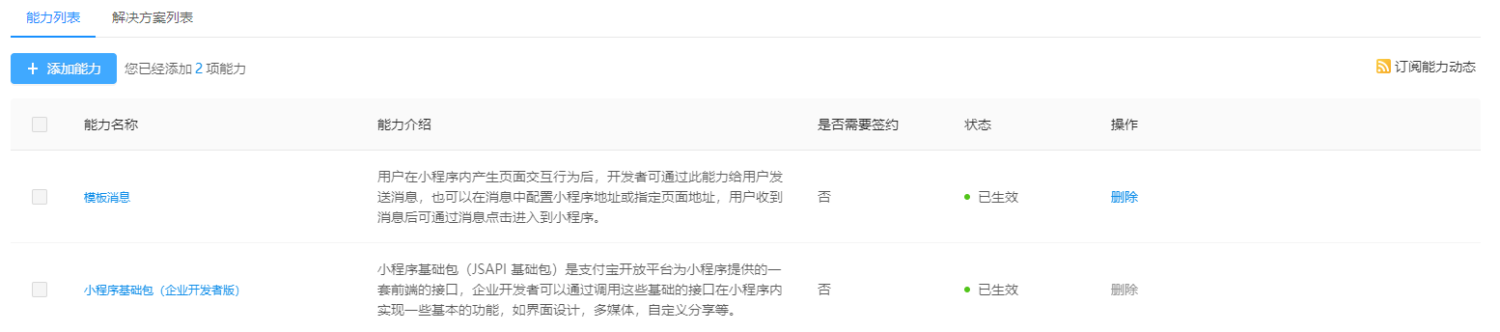
2、开发者登录 开放平台控制台 > 找到已创建的小程序 > 点击进入小程序管理后台 > 在版本管理页面的 能力列表 部分点击 添加能力 > 勾选** 模板消息** 能力并点击 确定 完成能力添加。
3、使用:
// app.json 引入消息模板插件
{
  "pages": [
    "pages/index/index"
  ],
  "plugins": {
    "subscribeMsg": {
      "version": "*",
      "provider": "2021001155639035"
    }
  }
}

// index.json
{
  "usingComponents": {
    "subscribe-msg": "plugin://subscribeMsg/subscribe-msg"
  }
}

<!-- index.axml -->
<!-- 引入组件 -->
 <subscribe-msg />

// index.js
const { requestSubscribeMessage } = requirePlugin('subscribeMsg');

// 调用方法,唤起订阅组件
requestSubscribeMessage({
    // 模板id列表,最多3个
    entityIds: templateList,
    // 接收结果的回调方法
    callback(res) {
        console.log('订阅回调', res);
        if (res.success) {
        } else {
        }
    },
});
文档:
https://opendocs.alipay.com/mini/introduce/message
https://opendocs.alipay.com/mini/01rqd3
https://opendocs.alipay.com/mini/01rnqx
uni-app: 需使用 条件编译 兼容两个平台不同的写法
// manifest.json 引入消息模板插件
{
    "mp-alipay" : {
        "usingComponents" : true,
        "appid" : "",
        "plugins": {
            "subscribeMsg": {
                "version": "*",
                "provider": "2021001155639035"
            }
        }
    },
}

// pages.json 这里是全局引入,可以单独页面组件引入
{
    "globalStyle": {
        "usingComponents": {
            // #ifdef MP-ALIPAY
            "subscribe-msg": "plugin://subscribeMsg/subscribe-msg"
            // #endif
        }
    },
}

<!-- template -->
<!-- #ifdef  MP-WEIXIN-->
<button @tap="requestSubscribeMessage"></button>
<!-- #endif -->

<!-- #ifdef  MP-ALIPAY -->
<!-- 引入消息订阅组件 -->
<subscribe-msg />
<!-- #endif -->

// js
requestSubscribeMessage() {
    // #ifdef MP-WEIXIN
    uni.requestSubscribeMessage({
        tmplIds: [tmplId],
        success: res => { },
        fail: res => { },
        complete: res => {}
    });
    // #endif

    // #ifdef MP-ALIPAY
    const { requestSubscribeMessage } = requirePlugin('subscribeMsg');
    requestSubscribeMessage({
        entityIds: [tmplId],
        callback(res) {
            console.log('订阅回调', res);
        },
    });
    // #endif
}
文档:https://uniapp.dcloud.io/api/other/requestSubscribeMessage?id=requestsubscribemessage
五、获取用户收货地址
微信:
wx.chooseAddress({
  success: (res) => {
  }
})
文档: https://developers.weixin.qq.com/miniprogram/dev/api/open-api/address/wx.chooseAddress.html
支付宝:
my.getAddress({
  success: (res) => {
  }
});
文档: https://opendocs.alipay.com/mini/api/lymgfk
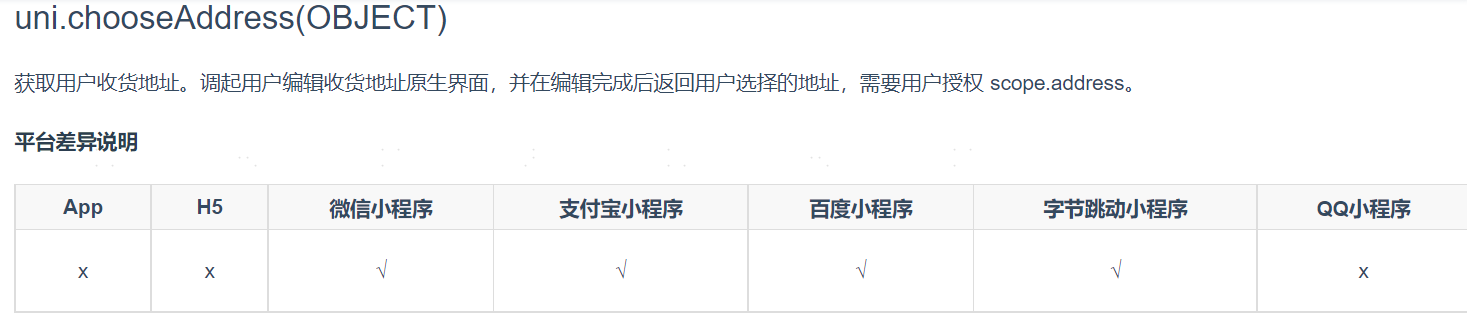
uni-app: 统一使用 uni.chooseAddress
uni.chooseAddress({
  success(res) {
  }
})
文档: https://uniapp.dcloud.io/api/other/choose-address?id=chooseaddress
六、发起支付
微信:
wx.requestPayment({
  timeStamp: '',
  nonceStr: '',
  package: '',
  signType: 'MD5',
  paySign: '',
  success (res) { },
  fail (res) { }
})
文档: https://developers.weixin.qq.com/miniprogram/dev/api/open-api/payment/wx.requestPayment.html
支付宝:
my.tradePay({
  // 调用统一收单交易创建接口(alipay.trade.create),获得返回字段支付宝交易号trade_no
  tradeNO: "trade_no",
  success: (res) => {
    my.alert({
      content: JSON.stringify(res),
    });
  },
  fail: (res) => {
    my.alert({
      content: JSON.stringify(res),
    });
  }
});
文档: https://opendocs.alipay.com/mini/api/openapi-pay
uni-app: 统一使用 uni.requestPayment

let payParams = {};

// #ifdef MP-WEIXIN
payParams = {
    provider: "wxpay",
    timeStamp: timeStamp,
    nonceStr: nonceStr,
    package: package,
    signType: signType,
    paySign: paySign,
};
// #endif

// #ifdef MP-ALIPAY
payParams = {
    provider: "alipay",
    orderInfo: 'tradeNO',
};
 // #endif

uni.requestPayment({
   ...payParams,
   success: (res) => {
   },
   fail: (err) => {
   },
   complete: () => {
   },
});
文档: https://uniapp.dcloud.io/api/plugins/payment?id=requestpayment
七、样式和组件兼容
1、在普通 css 写法里,upx 会被编译器编译。但动态绑定时,upx 无法被准确编译。官方也修改了 uni-app 文档中关于尺寸单位的介绍,不再推荐 upx 的使用,而推荐 rpx。
文档: https://ask.dcloud.net.cn/article/36130
2、class 类写法兼容
// 支付宝内不能使用,运行页面会报错
:class="[boolean && 'orange']"

// 可以使用写法
:class="['orange', className]"
:class="{'orange': boolean}"
:class="[{'orange': boolean}, className]"
3、不能直接在自定义组件上添加 class ,class 不生效,需在引入自定义组件时套一层 view 兼容,class 放在 view 层
// 无效使用
<icon class="iconicon_guanbi" color="#CCCCCC" size="22rpx" icon="iconicon_guanbi" />

// 兼容写法
<view class="iconicon_guanbi" >
    <iconcolor="#CCCCCC" size="22rpx" icon="iconicon_guanbi" />
</view>
4、支付宝小程序内 picker-view 组件不能用 v-show ,显示隐藏使用 v-if
5、支付宝小程序内 span 、 label、 自定义组件 绑定事件不生效,建议事件绑定使用 div 或者 view
6、控制显示隐藏组件使用 v-if,支付宝小程序内v-show 不起作用
7、支付宝 uni.showLoading 和 uni.showModal 方法无 mask 属性,需兼容,不然会有一堆警告
uni.showLoading({
    title: "正在加载...",
    // #ifdef MP-WEIXIN
    mask: true,
    // #endif

});
uni.showModal({
    title: "提示",
    content: "是否删除",
    // #ifdef MP-WEIXIN
    mask: true,
    // #endif
});
8、支付宝默认全部页面开启下拉加载 allowsBounceVertical:true,微信默认是关闭的 enablePullDownRefresh:false ,把支付默认值也设置不开启
page.json
"globalStyle": {
    // #ifdef MP-ALIPAY
    "allowsBounceVertical": "NO",
    // #endif
 }
八、关联普通二维码
微信流程:https://developers.weixin.qq.com/miniprogram/introduction/qrcode.html#测试调试
支付宝流程:https://opendocs.alipay.com/mini/operation/vzd5v0
九、支付宝获取扫码进入参数
当前页面的 onLoad 方法获取不到扫码的 options
可以使用 my.getLaunchOptionsSync 方法从 onLaunch 获取
onLoad(options) {
    // #ifdef MP-ALIPAY
    let launchOptions = my.getLaunchOptionsSync();
    console.log('launchOptions:', launchOptions);
    // 兼容支付宝扫码进入小程序只能从onLaunch获取参数
    if(!options && launchOptions.scene == '1011' && launchOptions.query) {
        options = launchOptions.query;
    }
    // #endif
}
文档: https://opendocs.alipay.com/mini/api/getLaunchOptionsSync
十、支付宝真机开发调试
1、可以打开调试查看打印输出;
2、打开联调设置=>联调扫码版本,扫线上小程序码或跳转时,默认跳转到当前扫码开发版本;

十一、通用管理小程序更新
使用 uni.getUpdateManager 的 onCheckForUpdate 判断是否有更新

const getUpdateManager = () => {
    // 获取小程序更新机制兼容
    if (uni.canIUse("getUpdateManager")) {
        const updateManager = uni.getUpdateManager();
        updateManager.onCheckForUpdate((res) => {
            // 请求完新版本信息的回调
            if (res.hasUpdate) {
                updateManager.onUpdateReady(() => {
                    // 新的版本已经下载好,调用 applyUpdate 应用新版本并重启
                    updateManager.applyUpdate();
                });
                updateManager.onUpdateFailed(() => {
                    // 新的版本下载失败
                    uni.showModal({
                        title: "已经有新版本了哟~",
                        content: "新版本已经上线啦~,请您删除当前小程序,重新搜索打开哟~"
                    });
                });
            }
        });
    } else {
        // 如果希望用户在最新版本的客户端上体验您的小程序,可以这样子提示
        uni.showModal({
            title: "提示",
            content:
                "当前微信版本过低,无法使用该功能,请升级到最新微信版本后重试。"
        });
    }
};
文档: https://uniapp.dcloud.io/api/other/update?id=getupdatemanager
十二、uni-app接入友盟
1.注册友盟+账号
2.友盟官网申请小程序appkey
3.配置域名白名单等
4.安装sdk
npm install umtrack-alipay --save
npm install umtrack-wx --save
5.利用条件编译集成sdk
main.js
import Vue from 'vue';
import App from './App';
// #ifdef MP-WEIXIN
import uma from 'umtrack-wx';
// #endif
// #ifdef MP-ALIPAY
import uma from 'umtrack-alipay';
// #endif

if(monitorSwitch) { // 监控开关
    uma.init({
        // #ifdef MP-WEIXIN
        appKey:'appKey', // 微信小程序appKey
        // #endif
        // #ifdef MP-ALIPAY
        appKey:'appKey', // 支付宝小程序appKey
        // #endif
        // #ifdef MP-WEIXIN
        useOpenid: true, // 是否使用openid进行统计,此项为false时将使用友盟+随机ID进行用户统计。使用openid来统计微信小程序的用户,会使统计的指标更为准确,对系统准确性要求高的应用推荐使用OpenID。
        autoGetOpenid: false, // 是否需要通过友盟后台获取openid,如若需要,请到友盟后台设置appId及secret
        // #endif
        debug: false, // 是否打开调试模式
        uploadUserInfo: true, // 上传用户信息,上传后可以查看有头像的用户分享信息,同时在查看用户画像时,公域画像的准确性会提升。
        enableVerify: true // 剪切板功能是用于埋点验证获取测试设备信息的;当开启为true时,用户侧可能会被提示获取剪切板信息;请确认线上发布版本设置为false;在进行发版前埋点验证工作时,可以参数设置为true
    });
    uma.install = function (Vue) {
        Vue.prototype.$uma = uma;
    };
    Vue.use(uma);
}

Vue.config.productionTip = false;
App.mpType = 'app';

const app = new Vue({
	...App
});
app.$mount();
6.自定义事件
onLoad(){
  this.$uma.trackEvent('eventID',{pa:'fff'});
},