Python数据可视化——使用Matplotlib创建散点图
2017-12-27
作者:淡水化合物
Matplotlib简述:
Matplotlib是一个用于创建出高质量图表的桌面绘图包(主要是2D方面)。该项目是由John Hunter于2002年启动的,其目的是为Python构建一个MATLAB式的绘图接口。如果结合Python IDE使用比如PyCharm,matplotlib还具有诸如缩放和平移等交互功能。它不仅支持各种操作系统上许多不同的GUI后端,而且还能将图片导出为各种常见的矢量(vector)和光栅(raster)图:PDF、SVG、JPG、PNG、BMP、GIF等。 此外,Matplotlib还有许多插件工具集,如用于3D图形的mplot3d以及用于地图和投影的basemap。
准备数据:从文本文件中解析数据(数据来源于《机器学习实战》第二章 k邻近算法)
datingTestSet2.txt文件下载地址:https://pan.baidu.com/s/1v2aINNptUHGgvMps2a_9Zg 提取码:yuef
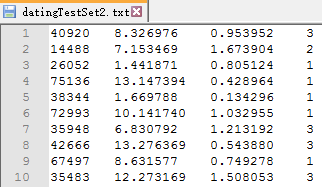
本文使用的数据主要包含以下三种特征:每年获得的飞行常客里程数,玩视频游戏所耗时间百分比,每周消费的冰淇淋公升数。其中分类结果作为文件的第四列,并且只有3、2、1三种分类值。datingTestSet2.csv文件格式如下所示:
| 飞行里程数 | 游戏耗时百分比 | 冰淇淋公升数 | 分类结果 |
| 40920 | 8.326976 | 0.953952 | 3 |
| 14488 | 7.153469 | 1.673904 | 2 |
| 26052 | 1.441871 | 0.805124 | 1 |
| ...... | ...... | ...... | ...... |
数据在datingTestSet2.txt文件中的格式如下所示:
上述特征数据的格式经过file2matrix函数解析处理之后,可输出为矩阵和类标签向量。将文本记录转换为Numpy的解析程序,将以下代码保存在kNN.py中:
from numpy import *
def file2matrix(filename):
    fr = open(filename)
    numberOfLines = len(fr.readlines()) # get the number of lines in the file
    returnMat = zeros((numberOfLines, 3)) # prepare matrix to return
    classLabelVector = []  # prepare labels return
    fr = open(filename)
    index = 0
    for line in fr.readlines():
        line = line.strip()
        listFromLine = line.split('	')
        returnMat[index, :] = listFromLine[0:3]
        classLabelVector.append(int(listFromLine[-1]))
        index += 1
    return returnMat, classLabelVector
使用file2matrix读取文件数据,必须确保待解析文件存储在当前的工作目录中。导入数据之后,简单检查一下数据格式:
>>>import kNN
>>>datingDataMat,datingLabels = kNN.file2matrix('datingTestSet2.txt')
>>>datingDataMat[0:6]
array([[  4.09200000e+04,   8.32697600e+00,   9.53952000e-01],
       [  1.44880000e+04,   7.15346900e+00,   1.67390400e+00],
       [  2.60520000e+04,   1.44187100e+00,   8.05124000e-01],
       [  7.51360000e+04,   1.31473940e+01,   4.28964000e-01],
       [  3.83440000e+04,   1.66978800e+00,   1.34296000e-01],
       [  7.29930000e+04,   1.01417400e+01,   1.03295500e+00]])
>>> datingLabels[0:6]
[3, 2, 1, 1, 1, 1]
分析数据:使用Matplotlib创建散点图
编辑kNN.py文件,引入matplotlib,调用matplotlib的scatter绘制散点图。
>>> import matplotlib
>>> import matplotlib.pyplot as plt
>>> fig = plt.figure()
>>> ax = fig.add_subplot(111)
>>> ax.scatter(datingDataMat[:,1],datingDataMat[:,2])
<matplotlib.collections.PathCollection object at 0x0000019E14C9A470>
>>> plt.show()
>>>
生成的散点图如下:
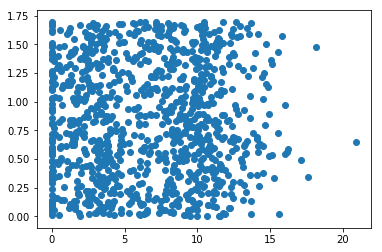
散点图使用datingDataMat矩阵的第二、第三列数据,分别表示特征值“玩视频游戏所耗时间百分比”和“每周消费的冰淇淋公升数”。kNN.py完整代码如下:
import matplotlib
import numpy as np
from numpy import *
from matplotlib import pyplot as plt

def file2matrix(filename):
    fr = open(filename)
    numberOfLines = len(fr.readlines())  # get the number of lines in the file
    returnMat = zeros((numberOfLines, 3))  # prepare matrix to return
    classLabelVector = []  # prepare labels return
    fr = open(filename)
    index = 0
    for line in fr.readlines():
        line = line.strip()
        listFromLine = line.split('	')
        returnMat[index, :] = listFromLine[0:3]
        classLabelVector.append(int(listFromLine[-1]))
        index += 1
    return returnMat, classLabelVector

datingDataMat,datingLabels = file2matrix('datingTestSet2.txt')
fig = plt.figure()
ax = plt.subplot(111)
ax.scatter(datingDataMat[:,1],datingDataMat[:,2])
plt.show()
上图由于没有使用样本分类的特征值,很难看到任何有用的数据模式信息。为了更好理解数据信息,Matplotlib库提供的scatter函数支持个性化标记散点图上的点。调用scatter函数使用下列参数:
ax.scatter(datingDataMat[:,1],datingDataMat[:,2],15.0*array(datingLabels),15.0*array(datingLabels))
生成的散点图如下:
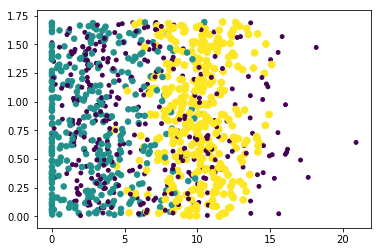
上图利用datingLabels存储的类标签属性,在散点图上绘制了色彩不等、尺寸不同的点。因而基本上可以从图中看到数据点所属三个样本分类的区域轮廓。为了得到更好的效果,采用datingDataMat矩阵的属性列1和2展示数据,并以红色的'*'表示类标签1、蓝色的'o'表示表示类标签2、绿色的'+'表示类标签3,修改参数如下:
import matplotlib
import numpy as np
from numpy import *
from matplotlib import pyplot as plt
from matplotlib.font_manager import FontProperties

def file2matrix(filename):
    fr = open(filename)
    numberOfLines = len(fr.readlines())  # get the number of lines in the file
    returnMat = zeros((numberOfLines, 3))  # prepare matrix to return
    classLabelVector = []  # prepare labels return
    fr = open(filename)
    index = 0
    for line in fr.readlines():
        line = line.strip()
        listFromLine = line.split('	')
        returnMat[index, :] = listFromLine[0:3]
        classLabelVector.append(int(listFromLine[-1]))
        index += 1
    return returnMat, classLabelVector
zhfont = FontProperties(fname='C:/Windows/Fonts/simsun.ttc',size=12)

datingDataMat,datingLabels = file2matrix('datingTestSet2.txt')
fig = plt.figure()

plt.figure(figsize=(8, 5), dpi=80)
ax = plt.subplot(111)

datingLabels = np.array(datingLabels)
idx_1 = np.where(datingLabels==1)
p1 = ax.scatter(datingDataMat[idx_1,0],datingDataMat[idx_1,1],marker = '*',color = 'r',label='1',s=10)
idx_2 = np.where(datingLabels==2)
p2 = ax.scatter(datingDataMat[idx_2,0],datingDataMat[idx_2,1],marker = 'o',color ='g',label='2',s=20)
idx_3 = np.where(datingLabels==3)
p3 = ax.scatter(datingDataMat[idx_3,0],datingDataMat[idx_3,1],marker = '+',color ='b',label='3',s=30)

plt.xlabel(u'每年获取的飞行里程数', fontproperties=zhfont)
plt.ylabel(u'玩视频游戏所消耗的事件百分比', fontproperties=zhfont)
ax.legend((p1, p2, p3), (u'不喜欢', u'魅力一般', u'极具魅力'), loc=2, prop=zhfont)
plt.show()
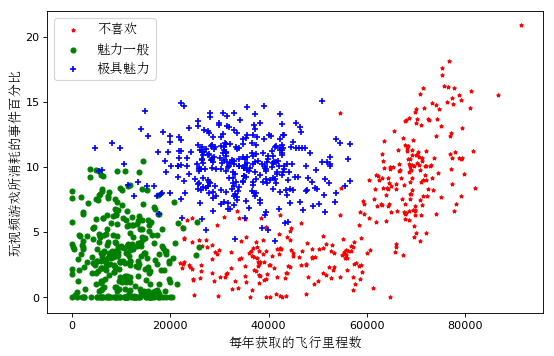
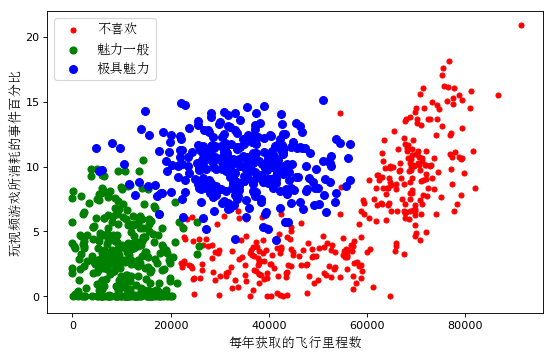
生成的散点图如下:
第二种方法:
import matplotlib
from matplotlib import pyplot as plt
from matplotlib import font_manager

def file2matrix(filename):
    fr = open(filename)
    numberOfLines = len(fr.readlines())  # get the number of lines in the file
    returnMat = zeros((numberOfLines, 3))  # prepare matrix to return
    classLabelVector = []  # prepare labels return
    fr = open(filename)
    index = 0
    for line in fr.readlines():
        line = line.strip()
        listFromLine = line.split('	')
        returnMat[index, :] = listFromLine[0:3]
        classLabelVector.append(int(listFromLine[-1]))
        index += 1
    return returnMat, classLabelVector

matrix, labels = file2matrix('datingTestSet2.txt')
zhfont = matplotlib.font_manager.FontProperties(fname='C:/Windows/Fonts/simsun.ttc',size=12)

plt.figure(figsize=(8, 5), dpi=80)
axes = plt.subplot(111)

# 将三类数据分别取出来
# x轴代表飞行的里程数
# y轴代表玩视频游戏的百分比
type1_x = []
type1_y = []
type2_x = []
type2_y = []
type3_x = []
type3_y = []

for i in range(len(labels)):
    if labels[i] == 1:  # 不喜欢
        type1_x.append(matrix[i][0])
        type1_y.append(matrix[i][1])

    if labels[i] == 2:  # 魅力一般
        type2_x.append(matrix[i][0])
        type2_y.append(matrix[i][1])

    if labels[i] == 3:  # 极具魅力
        #print (i, ':', labels[i], ':', type(labels[i]))
        type3_x.append(matrix[i][0])
        type3_y.append(matrix[i][1])

type1 = axes.scatter(type1_x, type1_y, s=20, c='red')
type2 = axes.scatter(type2_x, type2_y, s=40, c='green')
type3 = axes.scatter(type3_x, type3_y, s=50, c='blue')

plt.xlabel(u'每年获取的飞行里程数', fontproperties=zhfont)
plt.ylabel(u'玩视频游戏所消耗的事件百分比', fontproperties=zhfont)
axes.legend((type1, type2, type3), (u'不喜欢', u'魅力一般', u'极具魅力'), loc=2, prop=zhfont)
plt.show()
生成的散点图如下:
总结:
本文简单介绍了Matplotlib,并以实例分析了如何使用Matplotlib库图形化展示数据,最后通过修改matplotlib的scatter函数参数使得散点图的分类区域更加清晰。
附加知识点:
1、在使用Matplotlib生成图表时,默认不支持汉字,所有汉字都会显示成框框。
解决方法:代码中指定中文字体
# -*- coding: utf-8 -*-
import matplotlib.pyplot as plt
import matplotlib
zhfont1 = matplotlib.font_manager.FontProperties(fname='C:/Windows/Fonts/simsun.ttc')
plt.xlabel(u"横坐标xlabel",fontproperties=zhfont1)
到C:WindowsFonts中找到新宋体对应的字体文件simsun.ttf(Window 8和Windows10系统是simsun.ttc,也可以使用其他字体)
2、ax = fig.add_subplot(111)
返回Axes实例
参数一, 子图总行数
参数二, 子图总列数
参数三, 子图位置
在Figure上添加Axes的常用方法
创作不易, 觉得不错就鼓励一下吧!Creation is not easy to feel good, just encourage it.