工作准备:开发环境myeclipse
freemarker.jar(需要下载)
首先引入freemarker.jar包。然后,,,,直接贴代码:
1.创建一个FreemarkerUtil类:
 1 package com;
 2
 3 import java.io.File;
 4 import java.io.FileWriter;
 5 import java.io.IOException;
 6 import java.io.PrintWriter;
 7 import java.util.Map;
 8
 9 import freemarker.template.Configuration;
10 import freemarker.template.Template;
11 import freemarker.template.TemplateException;
12
13 public class FreemarkerUtil {
14
15     /*
16      * 获取ftl模版
17      */
18     public Template getTemplate(String name) {
19         try {
20             // 通过Freemarker的Configuration读相应的flt
21             Configuration cfg = new Configuration();
22             // 设定去哪里读flt模板文件
23             cfg.setClassForTemplateLoading(this.getClass(), "/ftl");
24             // 在模板文件目录中找到名称为name的文件
25             Template template = cfg.getTemplate(name);
26             return template;
27
28         } catch (IOException e) {
29             // TODO: handle exception
30             e.printStackTrace();
31         }
32         return null;
33     }
34
35     /*
36      * 控制后台输出
37      */
38     public void print(String name, Map<String, Object> root) {
39         try {
40             // 通过template可以将模版文件输入到相应的流
41             Template template = this.getTemplate(name);
42             template.process(root, new PrintWriter(System.out));
43         } catch (TemplateException e) {
44             e.printStackTrace();
45         } catch (IOException e) {
46             e.printStackTrace();
47         }
48     }
49
50     /*
51      * 输出HTML name 是ftl模版的名称 root 页面对象。 outFile是输出文件名称。
52      */
53     public void fpring(String name, Map<String, Object> root, String outFile) {
54         FileWriter out = null;
55         try {
56             // 通过一个文件输出流,就可以写到相应的文件中,此处是绝对路径
57             out = new FileWriter(new File(
58                     "D:/workspace/FreeMarker/WebRoot/WEB-INF/jsp/html/"
59                             + outFile));
60             Template template = this.getTemplate(name);
61             template.process(root, out);
62         } catch (IOException e) {
63             // TODO: handle exception
64             e.printStackTrace();
65         } catch (TemplateException e) {
66             // TODO: handle exception
67             e.printStackTrace();
68         } finally {
69             try {
70                 if (out != null) {
71                     out.close();
72                 }
73             } catch (IOException e) {
74                 // TODO: handle exception
75                 e.printStackTrace();
76             }
77         }
78     }
79
80 }
2.创建Group类
 1 package com;
 2
 3 public class Group {
 4
 5     private String name;
 6
 7     public String getName() {
 8         return name;
 9     }
10
11     public void setName(String name) {
12         this.name = name;
13     }
14
15 }
3.创建User类
 1 package com;
 2
 3 import java.io.Serializable;
 4
 5 public class User implements Serializable {
 6     private int id;
 7     private String name;
 8     private int age;
 9     private Group group;
10
11     public User() {
12     }
13
14     public User(int id, String name, int age, Group group) {
15         this.id = id;
16         this.name = name;
17         this.age = age;
18         this.group = group;
19     }
20
21     public int getId() {
22         return id;
23     }
24
25     public void setId(int id) {
26         this.id = id;
27     }
28
29     public String getName() {
30         return name;
31     }
32
33     public void setName(String name) {
34         this.name = name;
35     }
36
37     public int getAge() {
38         return age;
39     }
40
41     public void setAge(int age) {
42         this.age = age;
43     }
44
45     public Group getGroup() {
46         return group;
47     }
48
49     public void setGroup(Group group) {
50         this.group = group;
51     }
52
53 }
4.创建ftl文件。具体步骤new->file->01.ftl
<html>
<head>
<meta http-equiv="Content-Type" content="text/html; charset=UTF-8">
<title>测试</title>
</head>

<body>
<h1>你好${user.name}</h1>
</body>
</html>
5.JUnit测试,我们需要选择的是测试用例。
package com;

import java.util.HashMap;
import java.util.Map;

import org.junit.Test;

public class FreemarkerUtilTest {

    @Test
    public void test() {
        FreemarkerUtil util = new FreemarkerUtil();
        Map<String, Object> map = new HashMap<String, Object>();

        Group group = new Group();
        group.setName("IT");

        User user = new User();
        user.setId(001);
        user.setName("张三");
        user.setAge(12);
        user.setGroup(group);
        /*
         * List<User> users = new ArrayList<User>(); users.add(user);
         * users.add(user); users.add(user);
         */
        map.put("user", user);
        util.print("01.ftl", map);
        util.fpring("01.ftl", map, "01.html");
    }
}
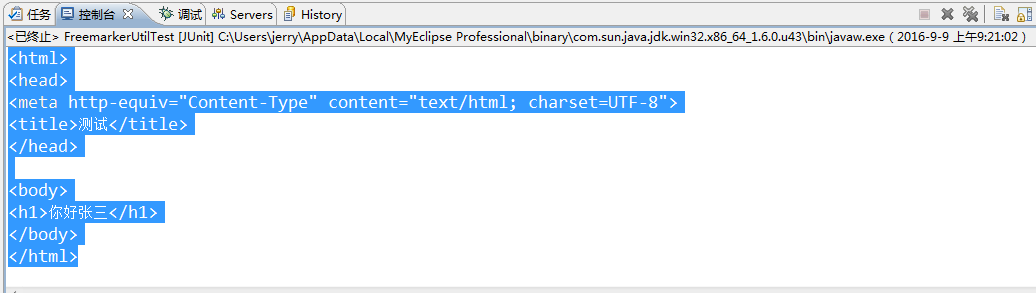
控制台输出:
网页生成:

最后贴上我的项目布局。。。

经验来自:http://www.cnblogs.com/linjiqin/p/3387972.html