订阅模式
公众号-->订阅之后才会收到相应的文章。
解读:
1.一个生产者,多个消费者
2.每个消费者都有自己的队列
3.生产者没有将消息直接发送到队列里,而是发送给了交换机(转发器)exchange
4.每个队列都要绑定到交换机(转发器)上
5.生产者发送的消息记过交换机然后到达队列,然后就能实现被多个消费者消费
图例:
|-------------|-----Q-----C3
P------------X-------------|-----Q-----C3
|-------------|-----Q-----C3
注册--->发邮件--->发短信
MQ工厂类Connection


 1 package com.mmr.rabbitmq.util;
 2
 3 import java.io.IOException;
 4
 5 import com.rabbitmq.client.Connection;
 6 import com.rabbitmq.client.ConnectionFactory;
 7
 8 public class ConnectionUtils {
 9     /**
10      * @desc 获取Mq 的链接
11      * @author zp
12      * @throws IOException
13      * @date 2018-7-19
14      */
15     public static  Connection getConnection() throws IOException {
16         // 1.定义一个链接工厂
17         ConnectionFactory factroy = new ConnectionFactory();
18
19         // 2.设置服务地址
20         factroy.setHost("127.0.0.1");
21
22         // 3.设置端口号
23         factroy.setPort(5672);
24
25         // 4.vhost  设置数据库
26         factroy.setVirtualHost("vhtest");
27
28         // 5.设置用户名
29         factroy.setUsername("jerry");
30
31         // 6. 设置密码
32         factroy.setPassword("123456");
33
34         // 7.返回链接
35         return factroy.newConnection();
36     }
37 }
消息生产者类Send,这个时候,运行代码再到控制台去查看,并没有发现我们的消息,因为在MQ中只有队列可以存储消息,而交换机不可以存储消息,下面这段代码并没有将交换机和队列进行绑定,所以数据就丢失了。
 1 package com.mmr.rabbitmq.ps;
 2
 3 import java.io.IOException;
 4
 5 import com.mmr.rabbitmq.util.ConnectionUtils;
 6 import com.rabbitmq.client.Channel;
 7 import com.rabbitmq.client.Connection;
 8
 9 public class Send {
10     private static final String EXCHANGE_NAME="test_exchange_fanout";
11     public static void main(String[] args) throws IOException {
12         // 创建连接
13         Connection connection = ConnectionUtils.getConnection();
14
15         // 获取通道
16         Channel channel = connection.createChannel();
17
18         // 声明交换机
19         channel.exchangeDeclare(EXCHANGE_NAME, "fanout");// fanout 分发
20
21         // 发送消息
22         String msg = "hello ps";
23
24         channel.basicPublish(EXCHANGE_NAME, "", null, msg.getBytes());
25         System.out.println("send:"+msg);
26         channel.close();
27         connection.close();
28
29
30     }
31 }
代码运行后的控制台:

由于交换机不能存储数据,那么我们就需要考虑如何将交换机和队列进行绑定。因为只要将两者进行绑定之后,那么数据存储问题就迎刃而解。
消费者Recv1 Recv2
 1 package com.mmr.rabbitmq.ps;
 2
 3 import java.io.IOException;
 4
 5 import com.mmr.rabbitmq.util.ConnectionUtils;
 6 import com.rabbitmq.client.Channel;
 7 import com.rabbitmq.client.Connection;
 8 import com.rabbitmq.client.Consumer;
 9 import com.rabbitmq.client.DefaultConsumer;
10 import com.rabbitmq.client.Envelope;
11 import com.rabbitmq.client.AMQP.BasicProperties;
12
13 public class Recv1 {
14     private static final String QUEUE_NAME_STRING="test_queue_fanout_email";
15     private static final String EXCHANGE_NAME="test_exchange_fanout";
16     public static void main(String[] args) throws IOException {
17         // 创建连接
18         Connection connection = ConnectionUtils.getConnection();
19
20         // 创建通道
21         final Channel channel = connection.createChannel();
22
23         // 声明队列
24         channel.queueDeclare(QUEUE_NAME_STRING, false, false, false, null);
25
26         // 绑定队列,绑定到交换机/转发器
27         channel.queueBind(QUEUE_NAME_STRING, EXCHANGE_NAME, "");
28
29         // 保证每次只分发一个
30         channel.basicQos(1);
31
32         // 定义一个消费者
33         Consumer consumer = new DefaultConsumer(channel){
34             @Override
35             public void handleDelivery(String consumerTag, Envelope envelope,
36                     BasicProperties properties, byte[] body) throws IOException {
37                 // TODO Auto-generated method stub
38                 String msg = new String(body,"utf-8");
39                 System.out.println("[1]Recv msg:"+msg);
40                 try {
41                     // 每次休息一会儿
42                     Thread.sleep(2000);
43                 } catch (Exception e) {
44                     // TODO: handle exception
45                     e.printStackTrace();
46                 }finally{
47                     System.out.println("recv1 done");
48                     //回执
49                     channel.basicAck(envelope.getDeliveryTag(), false);
50                 }
51             }
52         };
53         boolean autoAck = false;// 不自动应答
54         channel.basicConsume(QUEUE_NAME_STRING, autoAck,consumer);
55
56     }
57 }
 1 package com.mmr.rabbitmq.ps;
 2
 3 import java.io.IOException;
 4
 5 import com.mmr.rabbitmq.util.ConnectionUtils;
 6 import com.rabbitmq.client.Channel;
 7 import com.rabbitmq.client.Connection;
 8 import com.rabbitmq.client.Consumer;
 9 import com.rabbitmq.client.DefaultConsumer;
10 import com.rabbitmq.client.Envelope;
11 import com.rabbitmq.client.AMQP.BasicProperties;
12
13 public class Recv2 {
14     private static final String QUEUE_NAME_STRING="test_queue_fanout_sms";
15     private static final String EXCHANGE_NAME="test_exchange_fanout";
16     public static void main(String[] args) throws IOException {
17         // 创建连接
18         Connection connection = ConnectionUtils.getConnection();
19
20         // 创建通道
21         final Channel channel = connection.createChannel();
22
23         // 声明队列
24         channel.queueDeclare(QUEUE_NAME_STRING, false, false, false, null);
25
26         // 绑定队列,绑定到交换机/转发器
27         channel.queueBind(QUEUE_NAME_STRING, EXCHANGE_NAME, "");
28
29         // 保证每次只分发一个
30         channel.basicQos(1);
31
32         // 定义一个消费者
33         Consumer consumer = new DefaultConsumer(channel){
34             @Override
35             public void handleDelivery(String consumerTag, Envelope envelope,
36                     BasicProperties properties, byte[] body) throws IOException {
37                 // TODO Auto-generated method stub
38                 String msg = new String(body,"utf-8");
39                 System.out.println("[2]Recv msg:"+msg);
40                 try {
41                     // 每次休息一会儿
42                     Thread.sleep(2000);
43                 } catch (Exception e) {
44                     // TODO: handle exception
45                     e.printStackTrace();
46                 }finally{
47                     System.out.println("recv2 done");
48                     //回执
49                     channel.basicAck(envelope.getDeliveryTag(), false);
50                 }
51             }
52         };
53         boolean autoAck = false;// 不自动应答
54         channel.basicConsume(QUEUE_NAME_STRING, autoAck,consumer);
55
56     }
57 }
运行上述代码进行监听,再通过运行Send发送消息,我们可以在MQ-管理平台上看到:
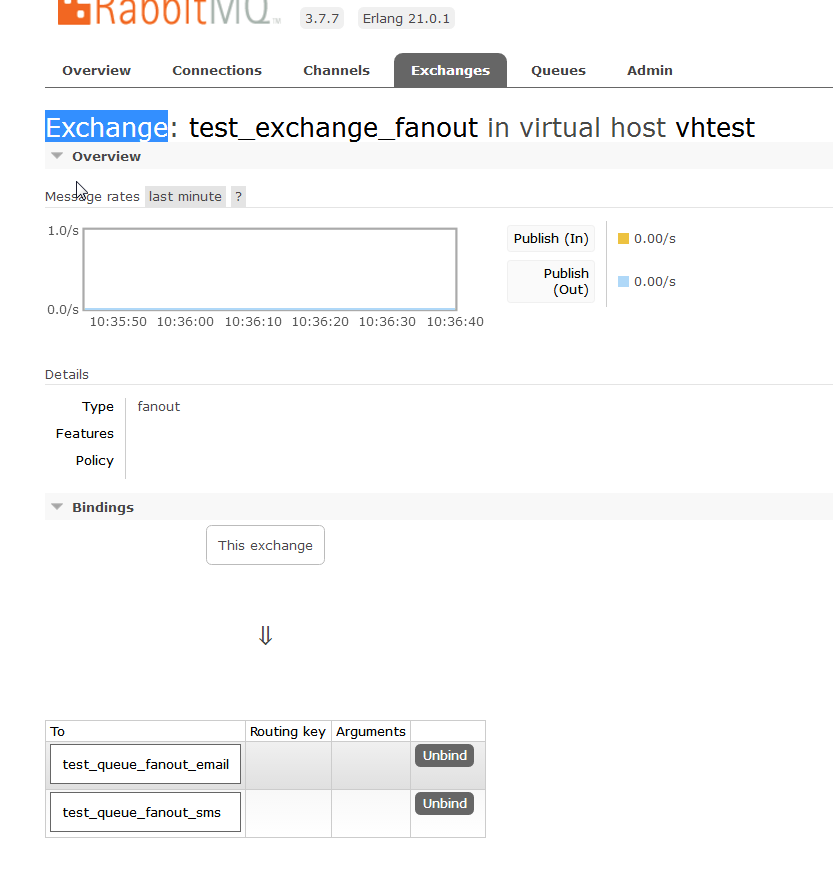
进过这样的使用,我们的消息订阅就完成了。