背景信息
Vim是从vi发展而来的文本编辑器,可以用颜色或底线等方式来显示一些特殊的信息。Vim是Linux中必不可少的工具,搭建网站修改配置文件时经常用到。本教程介绍Vim的模式和常用操作。
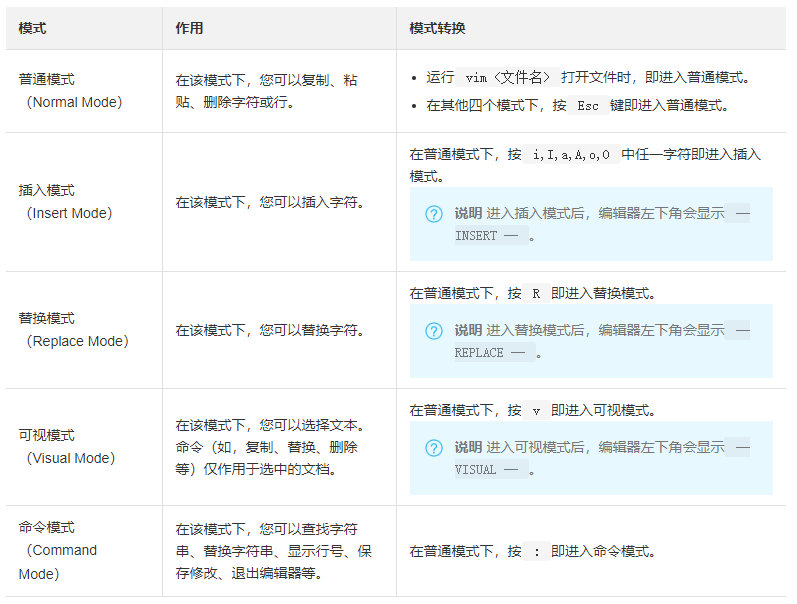
Vim的各个模式介绍如下表所示:
Vim的常用操作包括以下三种:
- 插入
- 替换
- 删除
插入
基本命令
- i:在当前字符的左边插入。
- I:在当前行的行首插入 。
- a:在当前字符的右边插入。
- A:在当前行的行尾插入。
- o:在当前行下面插入一个新行。
- O:在当前行上面插入一个新行。
示例
本示例中使用的example.conf文件,如下所示:
# To be able to use the functionality of a module which was built as a DSO you
# have to place corresponding `LoadModule' lines at this location so the
# directives contained in it are actually available _before_ they are used.
# Statically compiled modules (those listed by `httpd -l') do not need
# to be loaded here.
#
# Example:
# LoadModule foo_module modules/mod_foo.so
#
Include conf.modules.d/*.conf
例1:在配置文件example.conf的第一行,插入Location。步骤如下:
-
运行
vim example.conf命令打开文件,进入普通模式。 -
按
i进入插入模式。 -
输入
Location。 -
按回车键换行。
-
按
Esc键退出插入模式。 -
按
:wq保存文件并退出。插入完成后,example.conf文件如下所示:
Location
# To be able to use the functionality of a module which was built as a DSO you
# have to place corresponding `LoadModule' lines at this location so the
# directives contained in it are actually available _before_ they are used.
# Statically compiled modules (those listed by `httpd -l') do not need
# to be loaded here.
#
# Example:
# LoadModule foo_module modules/mod_foo.so
#
Include conf.modules.d/*.conf
例2:在配置文件example.conf第十行的行首,插入#。步骤如下:
-
运行
vim example.conf命令打开文件,进入普通模式。 -
按
:10将光标定位到第10行。 -
按
I进入插入模式。 -
输入
#。 -
按
Esc键退出插入模式。 -
按
:wq保存文件并退出。插入操作完成后,example.conf文件如下所示:
# To be able to use the functionality of a module which was built as a DSO you
# have to place corresponding `LoadModule' lines at this location so the
# directives contained in it are actually available _before_ they are used.
# Statically compiled modules (those listed by `httpd -l') do not need
# to be loaded here.
#
# Example:
# LoadModule foo_module modules/mod_foo.so
#
#Include conf.modules.d/*.conf
例3:在配置文件example.conf中,在Include conf.modules.d/*.conf行的下一行插入LoadModule rewrite_module modules/mod_rewrite.so。步骤如下:
-
运行
vim example.conf命令打开文件,进入普通模式。 -
运行
/Include conf.modules.d/*.conf找到目标行。 -
按
o进入插入模式。 -
输入
LoadModule rewrite_module modules/mod_rewrite.so。 -
按
Esc键退出插入模式。 -
按
:wq保存文件并退出。插入完成后,example.conf文件如下所示:
# To be able to use the functionality of a module which was built as a DSO you
# have to place corresponding `LoadModule' lines at this location so the
# directives contained in it are actually available _before_ they are used.
# Statically compiled modules (those listed by `httpd -l') do not need
# to be loaded here.
#
# Example:
# LoadModule foo_module modules/mod_foo.so
#
Include conf.modules.d/*.conf
LoadModule rewrite_module modules/mod_rewrite.so
替换
基本命令
R:替换光标高亮的字符,直至按下Esc键退出替换模式。
示例
本示例使用的example.conf文件,如下所示:
# AllowOverride controls what directives may be placed in .htaccess files.
# It can be "All", "None", or any combination of the keywords:
#   Options FileInfo AuthConfig Limit
#
AllowOverride None
例:将配置文件example.conf中的AllowOverride None更改为AllowOverride All。
-
运行
vim example.conf命令打开文件,进入普通模式。 -
运行
/AllowOverride None找到目标。 -
移动光标至
None的首字母。 -
按
R进入替换模式。 -
输入
All和一个空格。说明:
None中共包含4个字符,而All只包含3个字符,因此输入All之后,需再输入一个空格。 -
按
Esc键退出替换模式。 -
按
:wq保存文件并退出。更改后的example.conf文件,如下所示:
# AllowOverride controls what directives may be placed in .htaccess files.
# It can be "All", "None", or any combination of the keywords:
#   Options FileInfo AuthConfig Limit
#
AllowOverride All
删除
基本命令
- x:删除光标高亮的那一个字符。
- nx(n为数字): 删除光标高亮的字符及其后面的n-1个字符。
- dd:删除光标所在的那一行。
- ndd(n为数字):删除光标所在行及其下面的n-1行。
示例
本示例中使用的example.conf文件如下所示:
# Listen: Allows you to bind Apache to specific IP addresses and/or
# ports, instead of the default. See also the <VirtualHost>
# directive.
#
# Change this to Listen on specific IP addresses as shown below to
# prevent Apache from glomming onto all bound IP addresses.
#
#Listen 12.34.56.78:80
Listen 80
例1:在配置文件example.conf中,将#Listen 12.34.56.78:80行首的#删除。步骤如下:
-
运行
vim example.conf命令打开文件,进入普通模式。 -
运行
/#Listen 12.34.56.78:80找到目标,光标此时定位在#字符上。 -
按
x删除#。 -
按
:wq保存文件并退出。删除完成后,example.conf文件如下所示:
# Listen: Allows you to bind Apache to specific IP addresses and/or
# ports, instead of the default. See also the <VirtualHost>
# directive.
#
# Change this to Listen on specific IP addresses as shown below to
# prevent Apache from glomming onto all bound IP addresses.
#
Listen 12.34.56.78:80
Listen 80
例2:在配置文件example.conf中,将#Listen 12.34.56.78:80行和下一行的内容删掉。步骤如下:
-
运行
vim example.conf命令打开文件,进入普通模式。 -
运行
/#Listen 12.34.56.78:80找到目标。 -
按
2dd删除以下内容。#Listen 12.34.56.78:80 Listen 80 -
按
:wq保存文件并退出。删除完成后,example.conf文件如下所示:
# Listen: Allows you to bind Apache to specific IP addresses and/or
# ports, instead of the default. See also the <VirtualHost>
# directive.
#
# Change this to Listen on specific IP addresses as shown below to
# prevent Apache from glomming onto all bound IP addresses.
#