SSH模块化
SSH的模块化开发其实就是将Service和Dao层通过Module的方式进行依赖:

聚合和继承
通常情况下聚合和继承是同时使用的,他们的描述如下:
什么是继承?
继承是为了消除重复,如果dao、service、web分开创建独立的工程,则每个工程的pom.xml文件中的内容存在重复,
可以将这些重复的配置单独提取在父工程的pom.xml中定义。
什么是聚合?
项目开发通常是分组分模块开发,每个模块开发完成要运行整个工程则需要将每个模块聚合在一起运行,比如dao、
service、web三个工程最终会打成独立的war运行。
构建数据库
在数据库ssh_db中创建Student和Teacher关系表,其中一个Teacher跟Student是一对多的关系,如下数据库表:
-- 创建数据库文件
CREATE DATABASE ssm_db DEFAULT CHARACTER SET utf8mb4 COLLATE utf8mb4_unicode_ci;

-- 创建数据库表
use ssm_db;
DROP TABLE IF EXISTS `student`;
CREATE TABLE `student`  (
    `id` int(11) NOT NULL AUTO_INCREMENT,
    `name` varchar(255) CHARACTER SET utf8 COLLATE utf8_general_ci NOT NULL,
    `fraction` varchar(255) CHARACTER SET utf8 COLLATE utf8_general_ci NOT NULL,
    PRIMARY KEY (`id`) USING BTREE
) ENGINE = InnoDB  AUTO_INCREMENT=1 CHARACTER SET = utf8 COLLATE = utf8_unicode_ci ROW_FORMAT = Dynamic;

INSERT INTO `student` VALUES (1, 'A', '60');
INSERT INTO `student` VALUES (2, 'B', '80');
INSERT INTO `student` VALUES (3, 'C', '70');
INSERT INTO `student` VALUES (4, 'D', '85');
INSERT INTO `student` VALUES (5, 'E', '90');
INSERT INTO `student` VALUES (6, 'F', '50');
模块拆分
1、右键工程 -> New -> Module
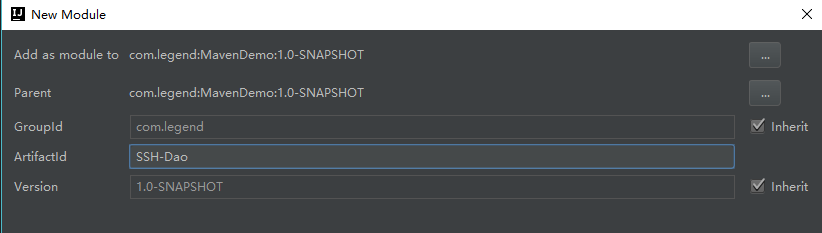
2、点击Next进入如下界面,然后finish完成

需要注意的是Parent工程不需要src目录,可直接删除。其中packaging方式如下所示:
Parent工程:
<packaging>pom</packaging>

Maven_web:
<packaging>war</packaging>

Maven_service:
<packaging>jar</packaging>

Maven_dao:
<packaging>jar</packaging>
父工程包含子模块打包方式必须是pom,而Service和Dao是做一些功能性的,所以是jar包的方式,而Web需要显示,所以是war包的方式。
项目构建
1、构建项目之前,需要引入相应的依赖文件:pom.xml
<?xml version="1.0" encoding="UTF-8"?>
<project xmlns="http://maven.apache.org/POM/4.0.0"
         xmlns:xsi="http://www.w3.org/2001/XMLSchema-instance"
         xsi:schemaLocation="http://maven.apache.org/POM/4.0.0 http://maven.apache.org/xsd/maven-4.0.0.xsd">
    <modelVersion>4.0.0</modelVersion>

    <groupId>com.legend</groupId>
    <artifactId>Maven_parent</artifactId>
    <packaging>pom</packaging>
    <version>1.0-SNAPSHOT</version>
    <modules>
        <module>Maven_dao</module>
        <module>Maven_service</module>
        <module>Maven_web</module>
    </modules>

    <properties>
        <spring.version>4.2.4.RELEASE</spring.version>
        <hibernate.version>5.0.7.Final</hibernate.version>
        <struts.version>2.3.24</struts.version>
        <maven.compiler.source>1.8</maven.compiler.source>
        <maven.compiler.target>1.8</maven.compiler.target>
    </properties>

    <!-- 锁定版本,struts2-2.3.24、spring4.2.4、hibernate5.0.7 -->
    <dependencyManagement>
        <dependencies>
            <dependency>
                <groupId>org.springframework</groupId>
                <artifactId>spring-context</artifactId>
                <version>${spring.version}</version>
            </dependency>
            <dependency>
                <groupId>org.springframework</groupId>
                <artifactId>spring-aspects</artifactId>
                <version>${spring.version}</version>
            </dependency>
            <dependency>
                <groupId>org.springframework</groupId>
                <artifactId>spring-orm</artifactId>
                <version>${spring.version}</version>
            </dependency>
            <dependency>
                <groupId>org.springframework</groupId>
                <artifactId>spring-test</artifactId>
                <version>${spring.version}</version>
            </dependency>
            <dependency>
                <groupId>org.springframework</groupId>
                <artifactId>spring-web</artifactId>
                <version>${spring.version}</version>
            </dependency>
            <dependency>
                <groupId>org.hibernate</groupId>
                <artifactId>hibernate-core</artifactId>
                <version>${hibernate.version}</version>
            </dependency>
            <dependency>
                <groupId>org.apache.struts</groupId>
                <artifactId>struts2-core</artifactId>
                <version>${struts.version}</version>
            </dependency>
            <dependency>
                <groupId>org.apache.struts</groupId>
                <artifactId>struts2-spring-plugin</artifactId>
                <version>${struts.version}</version>
            </dependency>
        </dependencies>
    </dependencyManagement>

    <!-- 依赖管理 -->
    <dependencies>
        <!-- spring -->
        <dependency>
            <groupId>org.springframework</groupId>
            <artifactId>spring-context</artifactId>
        </dependency>
        <dependency>
            <groupId>org.springframework</groupId>
            <artifactId>spring-aspects</artifactId>
        </dependency>
        <dependency>
            <groupId>org.springframework</groupId>
            <artifactId>spring-orm</artifactId>
        </dependency>
        <dependency>
            <groupId>org.springframework</groupId>
            <artifactId>spring-test</artifactId>
        </dependency>
        <dependency>
            <groupId>org.springframework</groupId>
            <artifactId>spring-web</artifactId>
        </dependency>
        <!-- hibernate -->
        <dependency>
            <groupId>org.hibernate</groupId>
            <artifactId>hibernate-core</artifactId>
        </dependency>
        <!-- 数据库驱动 -->
        <dependency>
            <groupId>mysql</groupId>
            <artifactId>mysql-connector-java</artifactId>
            <version>5.1.6</version>
            <scope>runtime</scope>
        </dependency>
        <!-- c3p0 -->
        <dependency>
            <groupId>c3p0</groupId>
            <artifactId>c3p0</artifactId>
            <version>0.9.1.2</version>
        </dependency>
        <!-- 导入 struts2 -->
        <dependency>
            <groupId>org.apache.struts</groupId>
            <artifactId>struts2-core</artifactId>
        </dependency>
        <dependency>
            <groupId>org.apache.struts</groupId>
            <artifactId>struts2-spring-plugin</artifactId>
        </dependency>
        <!-- servlet jsp -->
        <dependency>
            <groupId>javax.servlet</groupId>
            <artifactId>servlet-api</artifactId>
            <version>2.5</version>
            <scope>provided</scope>
        </dependency>
        <dependency>
            <groupId>javax.servlet</groupId>
            <artifactId>jsp-api</artifactId>
            <version>2.0</version>
            <scope>provided</scope>
        </dependency>
        <!-- 日志 -->
        <dependency>
            <groupId>org.slf4j</groupId>
            <artifactId>slf4j-log4j12</artifactId>
            <version>1.7.2</version>
        </dependency>
        <!-- jstl -->
        <dependency>
            <groupId>javax.servlet</groupId>
            <artifactId>jstl</artifactId>
            <version>1.2</version>
        </dependency>
    </dependencies>

    <build>
        <plugins>
            <!-- 设置编译版本为1.7 -->
            <plugin>
                <groupId>org.apache.maven.plugins</groupId>
                <artifactId>maven-compiler-plugin</artifactId>
                <version>3.8.1</version>
                <configuration>
                    <encoding>UTF-8</encoding>
                </configuration>
            </plugin>

            <!-- Maven内置的tomcat6插件 -->
            <plugin>
                <groupId>org.codehaus.mojo</groupId>
                <artifactId>tomcat-maven-plugin</artifactId>
                <version>1.1</version>
                <configuration>
                    <!-- 配置工程路径 -->
                    <path>/</path>
                    <!-- 配置端口号 -->
                    <port>8080</port>
                    <!--配置用户信息-->
                    <server>Tomcat-9.0.50</server>
                    <username>admin</username>
                    <password>admin</password>
                </configuration>
            </plugin>
        </plugins>
    </build>
</project>
2、在相应Module的resources目录下分别创建spring的配置文件:
applicationContext-dao.xml
applicationContext-service.xml
applicationContext-dao代码如下所示:
<beans xmlns="http://www.springframework.org/schema/beans"
       xmlns:xsi="http://www.w3.org/2001/XMLSchema-instance"
       xsi:schemaLocation="http://www.springframework.org/schema/beans
	http://www.springframework.org/schema/beans/spring-beans.xsd">

    <!-- 数据库连接池 -->
    <bean id="dataSource" class="com.mchange.v2.c3p0.ComboPooledDataSource">
        <property name="driverClass" value="com.mysql.jdbc.Driver" />
        <property name="jdbcUrl" value="jdbc:mysql://localhost:3306/maven" />
        <property name="user" value="root" />
        <property name="password" value="123456" />
    </bean>

    <!-- 配置sessionFactory -->
    <bean id="sessionFactory" class="org.springframework.orm.hibernate5.LocalSessionFactoryBean">
        <!-- 依赖dataSource -->
        <property name="dataSource" ref="dataSource"/>
        <!-- 创建工厂需要加载hibernate映射文件 -->
        <property name="configLocations" value="classpath:hibernate.cfg.xml"/>
    </bean>
</beans>
其中配置的hibernate.cfg.xml映射文件代码如下,它也配置在resources目录下:
<?xml version='1.0' encoding='utf-8'?>
<!DOCTYPE hibernate-configuration PUBLIC
        "-//Hibernate/Hibernate Configuration DTD 3.0//EN"
        "http://www.hibernate.org/dtd/hibernate-configuration-3.0.dtd">

<hibernate-configuration>
    <!-- 会话工厂 -->
    <session-factory>
        <!-- 数据库方言,根据数据库选择 -->
        <property name="hibernate.dialect">org.hibernate.dialect.MySQL5Dialect</property>

        <!--为了方便调试是否在运行hibernate时在日志中输出sql语句 -->
        <property name="hibernate.show_sql">true</property>
        <!-- 是否对日志中输出的sql语句进行格式化 -->
        <property name="hibernate.format_sql">true</property>

        <property name="hibernate.hbm2ddl.auto">update</property>

        <!-- 加载映射文件 -->
        <!--<mapping resource="com.legend.dao/entity/xxx.hbm.xml"/>-->
    </session-factory>
</hibernate-configuration>
applicationContext-service.xml代码如下所示:
<beans xmlns="http://www.springframework.org/schema/beans"
       xmlns:xsi="http://www.w3.org/2001/XMLSchema-instance"
       xsi:schemaLocation="http://www.springframework.org/schema/beans
	http://www.springframework.org/schema/beans/spring-beans.xsd">
</beans>
3、在Maven_web下创建main/webapp/WEB-INF/web.xml来构建web相关的配置,
<?xml version="1.0" encoding="UTF-8"?>
<web-app xmlns="http://xmlns.jcp.org/xml/ns/javaee"
         xmlns:xsi="http://www.w3.org/2001/XMLSchema-instance"
         xsi:schemaLocation="http://xmlns.jcp.org/xml/ns/javaee http://xmlns.jcp.org/xml/ns/javaee/web-app_3_1.xsd"
         version="3.1">
    <!--让Spring随项目启动而启动的监听器-->
    <listener>
        <listener-class>org.springframework.web.context.ContextLoaderListener</listener-class>
    </listener>
    <!--配置Spring配置文件参数-->
    <context-param>
        <param-name>contextConfigLocation</param-name>
        <param-value>classpath*:applicationContext-*.xml</param-value>
    </context-param>

    <!--扩大Session作用范围-->
    <filter>
        <filter-name>openSessionInView</filter-name>
        <filter-class>org.springframework.orm.hibernate5.support.OpenSessionInViewFilter</filter-class>
    </filter>
    <filter-mapping>
        <filter-name>openSessionInView</filter-name>
        <url-pattern>/*</url-pattern>
    </filter-mapping>

    <!--Struct2核心监听器注册-->
    <filter>
        <filter-name>struts2</filter-name>
        <filter-class>org.apache.struts2.dispatcher.ng.filter.StrutsPrepareAndExecuteFilter
        </filter-class>
    </filter>
    <filter-mapping>
        <filter-name>struts2</filter-name>
        <url-pattern>/*</url-pattern>
    </filter-mapping>
</web-app>
至此,基本的项目结构构建已经完成。
依赖配置
Maven_parent
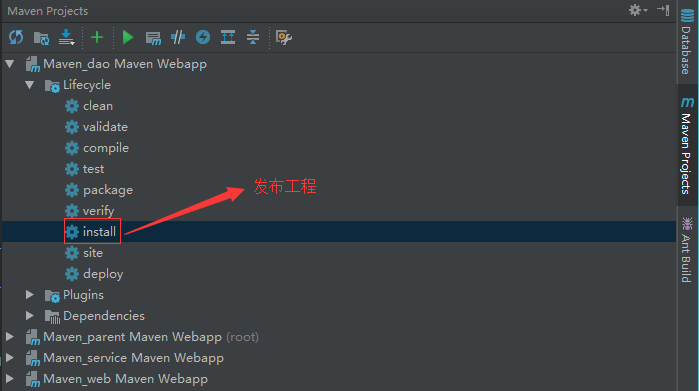
父工程中需要抽取重复性的内容,定义在pom.xml中,然后通过Maven Projects将父工程发包,方便子工程module继承,发布父工程的同时也会自动将所有子工程一起发布:
除此之外,在分模块开发的时候,由于要加载不同的Spring配置文件,那么需要在File -> Project Structure中配置Facets:

Maven_dao
1、Maven_dao主要用于操作数据库来持久化,它不需要依赖。
<project xmlns="http://maven.apache.org/POM/4.0.0"
         xmlns:xsi="http://www.w3.org/2001/XMLSchema-instance"
         xsi:schemaLocation="http://maven.apache.org/POM/4.0.0
         http://maven.apache.org/maven-v4_0_0.xsd">
    <parent>
        <artifactId>Maven_parent</artifactId>
        <groupId>com.legend</groupId>
        <version>1.0-SNAPSHOT</version>
    </parent>
    <modelVersion>4.0.0</modelVersion>
    <artifactId>Maven_dao</artifactId>
    <packaging>jar</packaging>
    <name>Maven_dao Maven Webapp</name>
    <url>http://maven.apache.org</url>
</project>
2、在entity包下创建数据库相应的实体类,Student.java:
public class Student {
    private Integer id;
    private String name;
    private String fraction;
    private Integer teacherId;

    public Integer getId() {
        return id;
    }

    public void setId(Integer id) {
        this.id = id;
    }

    public String getName() {
        return name;
    }

    public void setName(String name) {
        this.name = name;
    }

    public String getFraction() {
        return fraction;
    }

    public void setFraction(String fraction) {
        this.fraction = fraction;
    }

    public Integer getTeacherId() {
        return teacherId;
    }

    public void setTeacherId(Integer teacherId) {
        this.teacherId = teacherId;
    }
}
3、在resources下创建mapper文件夹,然后在mapper下创建映射文件:Student.hbm.xml:
<?xml version="1.0"?>
<!DOCTYPE hibernate-mapping PUBLIC "-//Hibernate/Hibernate Mapping DTD 3.0//EN"
        "http://www.hibernate.org/dtd/hibernate-mapping-3.0.dtd">
<hibernate-mapping>
    <class name="com.legend.maven.entity.Student" table="student"  optimistic-lock="version">
        <id name="id" type="java.lang.Integer">
            <column name="id" />
            <generator class="identity" />
        </id>
        <property name="name" type="string">
            <column name="name" length="32" not-null="true"></column>
        </property>
    </class>
</hibernate-mapping>
4、在hibernate的配置文件hibernate.cfg.xml中配置映射文件的路径:
<!-- 加载映射文件 -->
<mapping resource="mapper/Student.hbm.xml"/>
5、创建StudentDao.java接口和StudentDaoImp.java实现类:
// StudentDao
public interface StudentDao {
    // 根据id获取学生信息
    Student findStudentById(Integer id);
}

// StudentDaoImp
public class StudentDaoImp extends HibernateDaoSupport implements StudentDao {
    @Override
    public Student findStudentById(Integer id) {
        return this.getHibernateTemplate().get(Student.class, id);
    }
}
6、在Maven_dao的resources下的applicationContext-dao.xml配置文件中配置实体:
<!--配置实体-->
<bean id="studentDao" class="com.legend.maven.dao.imp.StudentDaoImp">
    <property name="sessionFactory" ref="sessionFactory"/>
</bean>
7、编写测试类TestDemo,测试Dao模块:
public class TestDao {
    @Test
    public void func() {
        ApplicationContext context = new ClassPathXmlApplicationContext(
                "classpath:applicationContext-dao.xml");
        StudentDao studentDao = (StudentDao) context.getBean("studentDao");
        Student student = studentDao.findStudentById(1);
        System.out.println(student.getName());
    }
}
至此,Dao层基本配置完成。
Maven_Service
1、Maven_service主要用于功能性的,所以打包方式为jar包,并且需要依赖Maven_dao。
<?xml version="1.0" encoding="UTF-8"?>
<project xmlns="http://maven.apache.org/POM/4.0.0"
         xmlns:xsi="http://www.w3.org/2001/XMLSchema-instance"
         xsi:schemaLocation="http://maven.apache.org/POM/4.0.0 http://maven.apache.org/xsd/maven-4.0.0.xsd">
    <parent>
        <artifactId>Maven_parent</artifactId>
        <groupId>com.legend</groupId>
        <version>1.0-SNAPSHOT</version>
    </parent>
    <modelVersion>4.0.0</modelVersion>
    <artifactId>Maven_service</artifactId>
    <packaging>jar</packaging>
    <!--依赖Maven_dao-->
    <dependencies>
        <dependency>
            <groupId>com.legend</groupId>
            <artifactId>Maven_dao</artifactId>
            <version>1.0-SNAPSHOT</version>
        </dependency>
    </dependencies>
</project>
2、创建StudentService.java接口和StudentServiceImp.java实现类:
// StudentService
public interface StudentService {
    Student findStudentById(Integer id);
}

// StudentServiceImp
public class StudentServiceImp implements StudentService {
    private StudentDao studentDao;
    @Override
    public Student findStudentById(Integer id) {
        return studentDao.findStudentById(id);
    }
    public void setStudentDao(StudentDao studentDao) {
        this.studentDao = studentDao;
    }
}
3、在Maven_service的resources下的applicationContext-service.xml配置文件中加入如下代码:
<beans xmlns="http://www.springframework.org/schema/beans"
       xmlns:xsi="http://www.w3.org/2001/XMLSchema-instance"
       xsi:schemaLocation="http://www.springframework.org/schema/beans
	http://www.springframework.org/schema/beans/spring-beans.xsd">
    <!--配置StudentService-->
    <bean id="studentService" class="com.legend.maven.service.imp.StudentServiceImp">
        <property name="studentDao" ref="studentDao"/>
    </bean>
</beans>
4、编写Service的测试代码,由于service依赖dao,所以需要在加载applicationContext-service的同时,还需要加载applicationContext-dao.xml:
public class TestService {
    @Test
    public void func() {
        ApplicationContext context = new ClassPathXmlApplicationContext("classpath*:applicationContext-*.xml");
        StudentService studentService = (StudentService) context.getBean("studentService");
        Student student = studentService.findStudentById(1);
        System.out.println(student.getName());
    }
}
除此之外,还可以在ClassPathXmlApplicationContext中传入String数组来实现:
String[] strArray = {"applicationContext-dao.xml", "applicationContext-service.xml"};
ApplicationContext context = new ClassPathXmlApplicationContext(strArray);
Maven_web
1、Mavev_web主要用于显示,所以打包方式为war包,并且需要依赖Maven_service。
<?xml version="1.0" encoding="UTF-8"?>
<project xmlns="http://maven.apache.org/POM/4.0.0"
         xmlns:xsi="http://www.w3.org/2001/XMLSchema-instance"
         xsi:schemaLocation="http://maven.apache.org/POM/4.0.0 http://maven.apache.org/xsd/maven-4.0.0.xsd">
    <parent>
        <artifactId>Maven_parent</artifactId>
        <groupId>com.legend</groupId>
        <version>1.0-SNAPSHOT</version>
    </parent>
    <modelVersion>4.0.0</modelVersion>
    <artifactId>Maven_web</artifactId>
    <packaging>war</packaging>
    <dependencies>
        <!--需要依赖Maven_service-->
        <dependency>
            <groupId>com.legend</groupId>
            <artifactId>Maven_service</artifactId>
            <version>1.0-SNAPSHOT</version>
        </dependency>
    </dependencies>
</project>
2、在action包下创建StudentAction.java类
public class StudentAction extends ActionSupport {
    private Integer id;
    private Student student;
    private StudentService studentService;
    public String findStudent() throws Exception {
        student = studentService.findStudentById(id);
        System.out.println("传过来的ID是:" + id);
        System.out.println("查找到的值是:" + student.getName());
        ActionContext.getContext().put("student", student);
        return SUCCESS;
    }

    public void setStudentService(StudentService studentService) {
        this.studentService = studentService;
    }

    public Integer getId() {
        return id;
    }

    public void setId(Integer id) {
        this.id = id;
    }
}
3、在resources下创建struts.xml配置文件,然后添加如下信息:
<?xml version="1.0" encoding="UTF-8"?>
<!DOCTYPE struts PUBLIC
        "-//Apache Software Foundation//DTD Struts Configuration 2.3//EN"
        "http://struts.apache.org/dtds/struts-2.3.dtd">

<struts>
    <!-- 配置常量 -->
    <constant name="struts.objectFactory" value="spring"/>
    <constant name="struts.objectFactory.spring.autoWire" value="name"/>
    <!-- 字符集 -->
    <constant name="struts.i18n.encoding" value="UTF-8"/>
    <!-- 开发模式 -->
    <constant name="struts.devMode" value="true"/>
    <!-- 主题 -->
    <constant name="struts.ui.theme" value="simple"/>
    <!-- 扩展名 -->
    <constant name="struts.action.extension" value="action"/>

    <!-- 通用package -->
    <package name="student" namespace="/" extends="struts-default">
        <action name="studentAction" class="com.legend.maven.action.StudentAction" method="findStudent">
            <result name="success">/index.jsp</result>
        </action>
    </package>
</struts>
4、在Maven_web的resources下创建Spring的配置文件:applicationContext-action.xml
<beans xmlns="http://www.springframework.org/schema/beans"
       xmlns:xsi="http://www.w3.org/2001/XMLSchema-instance"
       xsi:schemaLocation="http://www.springframework.org/schema/beans
	http://www.springframework.org/schema/beans/spring-beans.xsd">

    <bean id="studentAction" class="com.legend.maven.action.StudentAction" scope="prototype">
        <property name="studentService" ref="studentService"></property>
    </bean>
</beans>
5、将index.jsp文件到Maven_web的webapp下:
<%@ page language="java" contentType="text/html; charset=UTF-8"
         pageEncoding="UTF-8"%>
<!DOCTYPE html PUBLIC "-//W3C//DTD HTML 4.01 Transitional//EN" "http://www.w3.org/TR/html4/loose.dtd">
<html>
    <head>
        <meta http-equiv="Content-Type" content="text/html; charset=UTF-8">
        <title>第一个maven项目</title>
    </head>
    <body>
        <h1>取出的值是:${student.name}</h1>
    </body>
</html>
部署运行
前面的准备工作都是为了我们能够顺利的运行项目,接下来就是部署到tomcat。部署到tomcat我们可以有两种方式:
1、利用tomcat插件来进行部署,
2、本地tomcat服务器来进行配置。
本地Tomcat部署
打开idea运行配置,添加一个本地的Tomcat服务器

运行配置,然后输入http://localhost:8080/studentAction.action?id=1访问即可。